Where to rest the jack on the new Lada Vesta so as not to damage the body? Everything is not as obvious as it might seem...
| This is what the body of the new Lada Vesta looks like |
Dear visitor, you have probably had to change a wheel more than once after a tire puncture or when switching from summer tires to winter ones or vice versa. Every time everyone asks the same question: “How to jack up a car correctly?”
As you know, the body of modern cars is not rigid and durable, but is necessary only to give the correct aerodynamics and aesthetics to your pet. Therefore, you should install the jack correctly, or rather rest it in a specially designated place on the body. Most often, this is a metal-reinforced rib of the body near the wheel or a special metal platform (for frame cars - a supporting frame).
The new Lada Vesta also has a special place to rest the jack, marked with an embossed triangle shape (indicating arrows).
| The jack should be placed here when replacing a wheel on a Lada Vesta |
A rolling jack for Lada Vesta can be useful if you rest it on the side members located on the bottom of the body.
| What are spars and where are they located? |
If you lift Vesta by resting a jack (no matter what) against the line of connection of steel sheets resembling a stiffener, they will begin to deform (most often bend outward) under the weight of the car. At a tire shop, even at an official dealer, this is a favorite pastime (bending the body by placing the jack in the wrong place).
The result of improper jacking of the Lada Vesta may be: a bent body, damage to the paintwork, rusting of the body and endless disappointment of the owner.
You can share your experience or use the comment form at the bottom of the page.
Standard jack Lada X-ray
1. Engage 1st gear in a manual transmission or move the variator control selector lever to position “P” (parking), brake the car with the parking brake.
Ask passengers to exit the vehicle. If you towed a trailer, disconnect it from the vehicle. To prevent accidental starting of the engine, remove the key from the ignition switch. 2. Place wheel chocks on the opposite side.
4. Grasp the luggage compartment floor cover.
5. . lift the cover and remove it or lock it in the open position.
6. Take the jack from the luggage compartment glove compartment.
9. Install the jack foot in specially provided places located on the body sills near each wheel.
The location of the jack under the body sill is indicated by notches. The edge of the threshold should be above the groove of the jack foot.
There is a sign on the jack with instructions for installing it under the car.
When using the jack on soft ground, place a timber or board under the base of the jack.
10. Insert the shank of the wrench into the rectangular hole of the wheel nut wrench.
eleven. . and its curved end into the eye of the power screw of the jack.
This is what a jack looks like when it is ready for use.
12. Rotating the jack knob clockwise, spread the jack so that the edge of the threshold fits into the groove of the jack foot, installed perpendicular to the supporting surface.
13. If you are lifting the car to change a wheel, loosen the wheel nuts by half a turn before lifting. Remove the spare tire from the trunk. Once the vehicle has been lifted, it will not be safe to remove it.
14. Rotate the jack knob clockwise to lift the body.
15. Before finally raising the car with a jack to the required height, check again to see if the jack is tilted in any direction.
If possible, do not work under a jacked vehicle, but if this is unavoidable, install additional supports under the body.
Additional supports should only be installed under areas specifically designed for lifting the vehicle.
Place a rubber or wooden spacer between the support and the car body. Install the tripod support so that two of its legs are on the side of the car body, and one is on the outside.
16. After use, stow the jack, tools and luggage compartment floor cover.
Source
Replacing the air filter x ray
This procedure can also confuse inexperienced car owners, but in the current times AvtoVAZ has done everything possible to simplify this procedure.
Since the car likes to breathe dust-free air, it is recommended to change the engine filter twice a year - in spring and autumn. The procedure itself takes no more than 15 minutes and does not require any tools. The filter is accessible through the open hood. There is no need to unscrew or unscrew anything. It is located immediately behind the battery, and can be removed by applying a little force after snapping the left and right latch. Replacement is also easy - the old filter is taken out without much effort, a new one is installed in its place, and the housing with the filter is installed back.
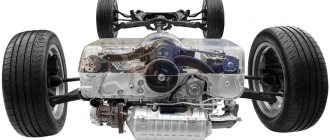
Vesta and XRAY: block and jack cases
Every day, before leaving on the roads of the test site, we make sure to check the tire pressure and levels of working fluids: brake, coolant, and engine oil on Lada Vesta and XRAY vehicles undergoing accelerated life tests.
And they immediately began to notice that Vesta’s level of brake fluid decreases with every thousand kilometers traveled.
Without waiting for 9 thousand kilometers, the fluid in Vesta’s reservoir approached the minimum mark - the TRW pads installed on the conveyor were worn down to almost “zero”! Only the Chinese Geely Emgrand EC7 has previously demonstrated a similar speed of eating pads (only the rear ones).
As a replacement, we prepared the same TRW purchased from an official dealer, and at the same time we decided to test the standard jacks of both cars.
In Vesta, the jack lives underground, in the spare wheel niche, and in XRAY, a heavy and bulky, but solid classic diamond jack (manufactured by the Chinese company AVS) is located on the right in the recess of the fender - when the trunk is full of luggage, it will be easier to get it.
The Vestovsky screw jack with a ratchet produced by the Russian company Avtomash was disappointing at first glance with its design. Both of its screws are made of plastic, and when the car was lifted, the upper, thinner screw bent! It's a bit flimsy, though.
Source
Lada XRay will receive a lot of technical innovations in its design
Serial production of the Lada X Ray will start on December 15, and this coming winter the car will appear at dealers in major cities. Quite a lot is known about the main technical characteristics of the Lada XRay. But what is hidden behind the dry technical data? What features of the X Ray technical device await fans of the Lada brand? This is what this article will be devoted to.
Standard jack Lada X-ray
1. Engage 1st gear in a manual transmission or move the variator control selector lever to position “P” (parking), brake the car with the parking brake. Ask passengers to exit the vehicle. If you towed a trailer, disconnect it from the vehicle. To prevent accidental starting of the engine, remove the key from the ignition switch.
2. Place wheel chocks on the opposite side.
4. Grasp the luggage compartment floor cover.
5. . lift the cover and remove it or lock it in the open position.
6. Take the jack from the luggage compartment glove compartment.
9. Install the jack foot in specially provided places located on the body sills near each wheel.
The location of the jack under the body sill is indicated by notches. The edge of the threshold should be above the groove of the jack foot.
There is a sign on the jack with instructions for installing it under the car.
When using the jack on soft ground, place a timber or board under the base of the jack.
10. Insert the shank of the wrench into the rectangular hole of the wheel nut wrench.
eleven. . and its curved end into the eye of the power screw of the jack.
This is what a jack looks like when it is ready for use.
12. Rotating the jack knob clockwise, spread the jack so that the edge of the threshold fits into the groove of the jack foot, installed perpendicular to the supporting surface.
13. If you are lifting the car to change a wheel, loosen the wheel nuts by half a turn before lifting. Remove the spare tire from the trunk. Once the vehicle has been lifted, it will not be safe to remove it.
14. Rotate the jack knob clockwise to lift the body.
15. Before finally raising the car with a jack to the required height, check again to see if the jack is tilted in any direction.
If possible, do not work under a jacked vehicle, but if this is unavoidable, install additional supports under the body.
Additional supports should only be installed under areas specifically designed for lifting the vehicle.
Place a rubber or wooden spacer between the support and the car body. Install the tripod support so that two of its legs are on the side of the car body, and one is on the outside.
16. After use, stow the jack, tools and luggage compartment floor cover.
Source
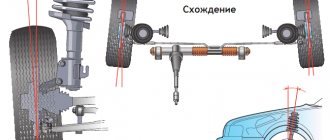
Xray front suspension: device, diagram
The B0 platform is not only a dimensional component of the vehicle's chassis, but also design features of the suspension. Its developer was the French company RENAULT, when in the late 90s the need arose to create a “people’s” car. In simple words, the chassis of the Lada X Rey is based on the suspension of the Renault Sandero, which won the hearts of car enthusiasts with its reliability and maintainability.
The MacPherson type, which has already become a classic for front-wheel drive cars, provided the X Ray with an independent, functional suspension.
After an unsuccessful attempt to get rid of the anti-roll bar (2) in the restyled version of Renault Logan, it was decided to return this part in the new version. It also migrated to X Ray. The stabilizer links (1) secure it to the lower arm using rubber bushings.
The lever itself (3) has two support points, but, unlike the “tenth” family of VAZs, these points are moved from the spar to the subframe (4). Despite the fact that the subframe is not a suspension part, I would like to pay special attention to it. Firstly, being a connecting link between the suspension elements and the body, it made it possible to reduce vibrations. Secondly, the steering rack on the subframe allows for more precise adjustment, and the engine mount has reduced the load on the body.
The suspension extension (5) provides additional stability to the vehicle. This is a design feature of the Lada X Rey suspension, because increased ground clearance would negatively affect the car’s behavior during high-speed maneuvers. The shock absorber strut (6) consists of two supports, a support bearing, a spring and the shock absorber itself. The X Ray has Tenecco shock absorbers. It is they who give the rigidity that distinguishes our car from its French counterpart.
The steering knuckle (7) is attached to the lever using a ball joint (8). At the top point it is connected by two bolts to a telescopic stand.
Despite the similarity with the suspension of Renault Logan and Renault Sandero, manufacturers note the presence of their own development. The modern automobile industry is no longer developing suspension for a specific model, but uses the most suitable base, so the similarity of some components is considered quite normal.
TIME OF RISK
Let us remind you that ten cars are participating in the test: Hyundai Accent, Ford Focus, Toyota Corolla, Mitsubishi Lancer, Renault Logan, Daewoo Nexia, Chevrolet Lacetti, "Mazda-3", "Lada-Priora" and "Kalina". They all have one thing in common: the spare tire is located in the trunk niche, under the flooring. Therefore, first we have to unload the luggage. This is, of course, an important point, but it is not directly related to this test, so the trunks of the experimental cars are empty. We also do not take into account the size of the spare wheel: we are interested in the replacement process itself, and we will leave the discussion of which is better - a re-roller or a full-fledged wheel for later.
We will change the left rear wheel; the time spent (the average result of three attempts) and, of course, the ease of use of the standard tool are taken into account. The latter will be subjectively assessed by ZR technical center mechanic Evgeniy Mikhalkevich. Stopwatch on!
Zhenya changed the shoes of Logan and Kalina the fastest - in 7 minutes 26 seconds each. However, first place was given to Logan: it has a more convenient and less sloppy jack. And the cartridge is 35 mm longer, therefore, the force is less. In addition, there was a sticker on the driver's door with wheel sizes and recommended pressure. It’s bad that the tightening torque is not indicated - such information, in our opinion, should be in front of your eyes, and not in the Operation Manual. (However, the recommended torque is not on the stickers of other cars either.) Tighten the four nuts crosswise.
Third place goes to the Lacetti. Let's note the excellent jack and the carefully provided hook - it holds the raised flooring (no need to prop it up with your head). The cutouts in the sill flanges, marking the place for the jack, are quite obvious - you can’t miss it. We tighten five nuts, as if drawing a star - one after another.
Disadvantages of the Lada X Ray suspension and first reviews
Owners complain about the “wobbly” steering wheel and the “fuzzy zero” when returning the steering wheel. After the technical successes of Vesta, these facts seem to be a significant flaw. But the increased ground clearance should be taken into account. Stabilizer struts, in which there are no hinges and mobility is due to rubber inserts, last about 35,000 km.
The first owners of cars noted the squeaks of rubber products. Now the plant has eliminated some significant deficiencies. Other failures, in the form of failure of a ball joint, support bearing or silent blocks, are considered regulated.
As a result, I would like to note that you should not look for similarities between the X Ray pendant and the Vesta pendant. How can you compare two different designs? Yes, there are common features and they are due to the same type of suspension. But each car has its own components, so we have two completely different models.
How to use a jack
There are a few must-have items in the trunk of your car, one of which is a jack. The most obvious purpose of a jack is to change wheels, but there are other cases when a jack is indispensable.
ATTENTION! The jack should only be used to lift the machine. A jack should never be used to support a machine!
Precautions when working with a jack:
Precautions when working with a jack:
- Before lifting the machine on a jack, it is necessary to place the machine on a horizontal surface. If this cannot be done, then you need to park the car at some securely fixed object (for example, a curb), turn the wheels towards it and block the wheels well to prevent the car from moving.
- Do not lift the vehicle without blocking the wheels. Even if the car is located on a horizontal surface, bricks, wedges, or blocks should be used to block the wheels on the side opposite to the side being lifted. These steps will prevent the vehicle from moving while it is jacked up.
- Before lifting the car on a jack, you must engage first or reverse gear and hold the handbrake (if you have to work with the rear wheels, then you do not need to hold the handbrake). If you are working with the front wheels, then you need to block the rear wheels with blocks. And vice versa.
- Install the jack only in the designated location. If the upcoming work requires installing the jack in a non-standard place, then it must be strong enough to support the weight of the machine. Never place the jack with the weight of the vehicle resting on anything that could break or bend. If you find it difficult to choose a place, then install the jack so that it rests against the body or beam that supports the front suspension or near the axle of the rear wheels.
- Raise the car using a jack smoothly, without jerking.
- If you have safety stands, place them under the car where the jack rests on the car. Raise them to the desired height and lock them. Lower the jack so that the car is supported (the jack can then be removed). The use of stones, bricks or any other objects as supports is unacceptable, because they can slip out while you are under the car.
- Before starting work, rock the vehicle to make sure it is firmly supported by a jack or stands. If you remove a wheel and start working without checking that the machine is securely secured, it may fall and cause a lot of damage.
- After finishing the work, carefully lower the car to the ground (of course, all four wheels should be in place).
X Ray rear suspension: device, diagram
Since the X Ray did not have rear-wheel drive, there was no point in complicating the suspension, otherwise the new product would have been out of its price segment. The rear beam was structurally borrowed from the Renault Sandero, but since the new hatchback had to conquer highways, AvtoVAZ designers decided to increase the track, making the beam 37 mm longer. Due to the springs and shock absorbers, the Lada Xray suspension has become somewhat stiffer, which made it possible to hold the car more comfortably on the track.
The lack of independent suspension at the rear, naturally, did not give the desired results in the car’s behavior on the track, but the classic H-type beam turned out to be a good budget option. It can be represented as a combination of two longitudinal (5) and one transverse (4) levers.
In the front part, the trailing arms are attached to the body on silent blocks. In addition to this, the H-shaped design is able to provide a little freedom to the trailing arms. This creates a “steering” effect, which makes the car more controllable.
The spring (3) and shock absorber (2) are separated. The lack of alignment results in a more stable ride, since the beam now has four points of support. The stiffness of the rear suspension directly depends on the shock absorbers. Over time, analogue replacements for the main components will appear, but at the moment the plant is pursuing a policy that seeks to improve controllability at the expense of rigidity.
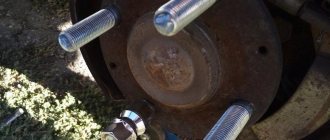
Wheel replacement
The spare wheel is located at the bottom of the car, in a special bracket (holder). To get the spare tire you need to bend the closing flap in the trunk floor lining and unscrew the screw “17”
As you unscrew the screw, the holder hook together with the bracket will lower. After sufficient loosening, unhook the hook from the holder and take out the spare tire.
Note: many car enthusiasts note that due to the fact that the spare wheel bolt is rarely unscrewed, it tends to “stick” very strongly, and if it is necessary to replace a wheel on the road, it causes great difficulty in unscrewing it. This leads to damage to the bolt and the need to buy a new one. Therefore, it is recommended to lubricate this bolt so that it does not cause problems if the wheel needs to be replaced.
There are certain safety rules that must be followed when lifting a car on a jack. They are: • Always raise the vehicle on a level surface. • Apply the handbrake and block the rear wheels. This will keep the car from rolling backwards off the jack. • If the rear wheels lift, block the front wheels to prevent the vehicle from rolling forward. • Block the wheel diagonally opposite to the one that will be lifted. • If the vehicle is being raised for work underneath, support it on stands. Do not place stands under metal panels (sheets) at the bottom of the car so that they (the panels) do not deteriorate (press through).
Do not work under a vehicle that is supported only by a tire jack.
1. The vehicle must be placed on a hard and flat surface and the front wheels must be turned straight ahead.
2. Turn off the ignition key; The automatic transmission must be set to the “P” position.
3. Ask all passengers to get out and apply the parking brake.
4. If necessary, use a wedge bar to secure the wheels and prevent the vehicle from rolling or sliding.
5. Use special standard tools to unscrew the decorative cap and wheel bolts, as shown in the figure.
6. Position the jack so that its entire base rests on a solid surface.
1 - jack, 2 wheel wrench
7. The jack must be installed vertically in the position specified for it.
8. Raise the vehicle until the wheels are off the ground.
9. Unscrew the wheel bolts to remove the wheel.
1. Insert the wheel into the hub so that the bolt holes are located in the appropriate places. Tighten the wheel bolts clockwise.
Please note that if the car was equipped with alloy wheels, the spare wheel is secured with the same bolts that are supplied with the spare wheel. The sticker on the spare wheel reminds you of this.
2. Tighten the wheel nuts securely in a diagonal sequence until fully tightened (tightening torque is 105 Nm).
3. Lower the vehicle and remove the jack.
4. Remove the jack along with the faulty wheel and secure them.
5. Since the spare tire can be stored for a long time, it must be inflated to a level slightly above normal pressure to ensure the spare tire's standard pressure level.
Lada Largus 2015, 105 l. With. — tuning
Lada Largus, 2020
Lada Largus, 2020
Lada Largus, 2020
Comments 19
I once bought a rugged diamond made of thick steel, and I don’t regret it, I’m already in my fifth car, living with everything I see on sale now, just foil.
I found a photo on the Internet, one to one, even in color, like mine))))
The base is the least significant problem of this jack, which can be solved as a last resort.
After modifying my jack, this is the only one I use. Too lazy to take the rolling or bottle bottle out of the garage.
On the 5th or 6th time of changing wheels, the kirdyk spoke loudly when lifting it and I moved it to the side.
Until then, luck is with you, change the jack. Make her happy!
And what kind of awl should I replace this soap with? The standard one is also convenient - it doesn’t get in the way, it’s secured, and it’s compact.
But in Largus there are no little boxes, no drawers, nothing.
Agree. I found a cyber identical to the Volga. Works great. And it stands in its normal place. You can choose a stronger jack. Mine's threaded frame flew off, and some had the handle of their ass and the car on the ground.
Wow, this is already specific. I'll look for a jack from Sibur.
Agree. I found a cyber identical to the Volga. Works great. And it stands in its normal place. You can choose a stronger jack. Mine's threaded frame flew off, and some had the handle of their ass and the car on the ground.
Cybers are writing off in droves. Some rent out fully equipped. Find out where in Kazan. There are geldings and others there too, and there may be jacks.
And what kind of awl should I replace this soap with? The standard one is also convenient - it doesn’t get in the way, it’s secured, and it’s compact.
But in Largus there are no little boxes, no drawers, nothing.
Oh, same problem. There is a hydraulic one, but it’s hard to carry it when you have a regular one... Lately, I’ve even done seasonal tire changes on a standard one - I’m too lazy to look for a bottle one. Served for 5 years.
source
Rules for using inflatable jacks
This is a rather rare type of jack, but such devices are in demand. The design provides a rigid base and a pushing upper platform, as well as a dense airtight bag for filling with gas-air mixtures. For example, many domestically produced models of such jacks operate only from the exhaust pipe, filling with exhaust gases. How to use this type of jack? It is enough to connect the container pipe to the exhaust pipe and open the valve. As it fills, the device will separate the two rigid support segments, lifting the target object as well. By the way, the load capacity of such jacks is small (2-3 tons), so they are more often used for passenger cars. For this reason, many designs are designed to be connected to the exhaust pipe of a car. However, inflation from a compressor unit may also be allowed.
What kind of oil to pour into the radiator?
Each of the engines that are offered to choose from, by their nature, imposes the same requirements during operation. However, there is one difficulty. Depending on the operating conditions, the machine will require a certain oil. Speaking of a universal choice, it is advisable to give preference to synthetics, but the engine accepts other options. The choice should be made as follows: high load - synthetics, medium load - semi-synthetics, rare trips - even mineral will do. By the way, if we are talking about the northern regions, preference should still be given to semi-synthetics - they perform better at low temperatures.
DO YOU REMEMBER HOW IT ALL BEGAN?
A flat tire is always bad. The very first thing to do is to get off the roadway as quickly as possible. And don’t think twice: if the tire has already been chewed, it won’t get any worse, and if it’s still intact, an extra ten meters of “walking” won’t kill it. So, move the car as far as possible to the side, put up a sign and turn on the emergency lights. We strongly recommend wearing a reflective vest.
Sometimes a puncture can be repaired without removing the wheel - if only you had the tools and skills (ZR, 2011, No. 1). If there is neither one nor the other, we install a spare tire. It happens that the wheel is tightened so that without a pipe it is impossible to overcome it, even if you dance on a wrench, but you have neither a pipe nor an impact wrench with which a tire mechanic once “attached” the wheels. Tap the fasteners with any weighty object, striking strictly along the axis of the bolts. If the fastening is on nuts, hit it through a spacer - for example, a socket head of a suitable size. But don't overdo it: the harder the impact, the greater the chance of damaging the wheel bearing.
Before you reach for the jack, be sure to put the car in gear and the parking brake! The site must be level, without slope. Under the wheel located diagonally to the broken one, place stops - at least cobblestones from the side of the road. As you lift the body, make sure that the jack does not collapse. You may have to repeat the lift, moving the heel of the jack a little. Be careful!
If the wheels are alloy and the spare tire is on a steel rim, check that the fasteners fit both wheels. It happens that even the turnkey size is different. The moral is simple: think through the situation in advance.
Advantages of rolling jacks
Large working stroke limits - the design of rolling jacks combines a low level of pick-up with a high lifting height. With a mechanical jack it is impossible to achieve such parameters. Rolling hydraulic jacks allow you to service vehicles with a ground clearance of 65 mm (sports cars) and raise the body to a height of up to 500 mm, which is absolutely optimal for servicing.
Mobility of movement - with a jack weighing up to several tens of kilograms (some models weigh more than 100 kg), it is easy to move it around the work area by grasping the long lever.
High productivity - lifting a load with a jack with a hydraulic drive or a pneumatic-hydraulic drive requires less effort than with a mechanical jack of the same lifting capacity. The ascent itself takes much less time. The lowering of the load occurs with the opening of the exhaust valve: the car smoothly lowers as the oil pressure in the hydraulic cylinder drops. Reducing time losses is the main advantage of rolling jacks. When working in auto repair shops, this is an important indicator of work performance, increasing the number of cars serviced.
What to look for when choosing a jack
To choose a car lift, evaluate its operation and determine the parameters that apply to the device:
- load capacity;
- minimum pick-up height;
- greatest.
Consider the purpose of use:
- lift a car in the garage;
- only to lift the load resting on it during road breakdowns;
- lift loads.
When performing work related to construction, lifting and moving loads, it is important to know their weight and dimensions to determine the load capacity, level and lifting height. Consistently consider the features of various types, their characteristics in order to buy a good load-lifting mechanism for Priora
Consistently consider the features of various types, their characteristics in order to buy a good load-lifting mechanism for Priora.
How to use a jack: general operating rules
Like any other technical device, the jack requires compliance with safety precautions during operation. Its use is not difficult, the main thing is to know where to put the jack and what to do with it next. This is far from a new device; most samples have been tested by time and personal experience.
Classic rack and pinion jack Important! Before sale, all devices undergo certification, during which the manufacturer tests car jacks in various conditions and modes.
Driver's courses do not teach how to properly use and install this device. You need to study everything yourself. In addition, most people, not knowing clear rules, believe that with its help you can not only lift and lower a load, but also hold it for a long time. To avoid possible health risks, you need to learn how to install a jack correctly.
A specially developed list of rules can help with this:
The vehicle must only be placed on a level surface. There should not be any slopes or other irregularities. The machine must be parked in such a way that there is no likelihood that it will move. All wheels must be locked very securely
Bricks, wooden wedges, stones or any other objects are suitable for this. The car should rise and fall very smoothly, without sudden movements or jerks. It is important to clearly know where to place the jack correctly. To lift the car on the bottom there are special mounts for the jack hook
Under no circumstances should you attach it to the front or rear bumper, or to any other parts of the car that are not intended for this purpose. It is necessary to engage reverse or forward gear, put the car on the handbrake and block the wheels on the opposite side from the side being lifted. It is necessary to use a support because the jack can only lift loads, but not hold them. A do-it-yourself jack stand is suitable, but it is important that it is made of wood, iron or any other material other than brick or other unreliable material. Before lowering yourself under the car, it is important to check the security of the machine and the device several times. To do this, you can simply rock the car in different directions. After completing the work, you need to know how to lower the jack along with the car. The same rules apply here - no sudden movements, smoothness.
Note! If you do not check that the vehicle is securely raised, there is a high risk of injury.
Jacks exist in three types: mechanical, hydraulic and pneumatic (inflatable). Each of these types has its own specific operating rules.
Weaknesses x ray
Today, when enough time has passed since the “birth” of the car, we can draw conclusions regarding expectations and reality. The first wave of test drives was picked up by automotive journalists, who subsequently began to echo statements from owners who became happy owners of production cars. So, the main disadvantages that were identified experimentally include:
- Absence of any plastic trim on the fenders and sills. This, at first glance, insignificant detail can immediately disqualify the car from claiming the title of crossover, since all potentially dangerous off-road areas are simply painted. This suggests that meeting this car with poor road conditions will threaten the rapid loss of its original appearance, from which nothing protects the car.
- The car is not maneuverable. Its lateral stability capabilities seem to hint that the car is simply not designed for this. When trying to turn into a corner at high speed, be prepared to feel the resistance of the car, in the form of a large roll.
- There is no reach adjustment for the steering wheel. On the one hand, we are talking about a budget car, for which this omission is excusable, but this can be safely written down as a disadvantage, since this fact affects the convenience of driving.
- Drum brakes are installed at the rear. Their installation is easily explained by the budget concept of the car, but car enthusiasts claim that they would be willing to pay extra in order to correct this misunderstanding. In fact, the drums are able to provide the necessary braking, which has been proven by various tests, but the opinion of car enthusiasts is adamant.
- Controversial ABS. According to the manufacturers, its configuration exactly corresponds to the off-road conditions of Russian open spaces, but this concept does not always work. It is noted that its operating mode is more suitable for driving on hills (in this case, it is surprising that they did not add a diesel option).
- There is no gas strut in the hood. A trifle, but unpleasant, especially considering the fact that 14 Lada models have it.
- The body is a tinsmith's nightmare. Yes, beautiful, noble. In some places, it even smells like Cayenne, but that’s all before the first accident. When receiving dents that in any way touch the branded X, the owner can expect only one outcome - purchasing a new body part. There can be no talk of straightening, since even eminent craftsmen assure that complete restoration of the geometry of the tin is beyond their control.
How to use an inflatable jack
This type of lift is a pneumatic device. In this case, a special pillow is installed under the bottom of the machine, which is subsequently inflated with a special device. To work with such a device you need:
- Place the cushion under the car and spread it evenly.
- Place special mats on top and bottom that are included in the kit. They are designed to avoid pillow punctures.
- Close the lock connecting the valve and hose tightly. This is necessary to avoid air leakage from the pillow.
- Connect the end of the hose to a source of air or gas supply. Special compressors are used.
- The pillow is inflated with air or vehicle exhaust gases.
It is important to monitor the process of inflating the pillow. It should pass evenly in all directions
If any side lags, then it is necessary to check and correct the position of the pillow or lower it and start the process again.
How not to spoil the body of a Lada Vesta: 1 comment
Uniform coverage is obtained using the first two methods. Lada Vesta is galvanized using the third technology, but whether or not the VAZ has a galvanized bath is another question.
Every day, before leaving on the roads of the test site, we make sure to check the tire pressure and levels of working fluids: brake, coolant, and engine oil on Lada Vesta and XRAY vehicles undergoing accelerated life tests.
And they immediately began to notice that Vesta’s level of brake fluid decreases with every thousand kilometers traveled.
Without waiting for 9 thousand kilometers, the fluid in Vesta’s reservoir approached the minimum mark - the TRW pads installed on the conveyor were worn down to almost “zero”! Only the Chinese Geely Emgrand EC7 has previously demonstrated a similar speed of eating pads (only the rear ones).
As a replacement, we prepared the same TRW purchased from an official dealer, and at the same time we decided to test the standard jacks of both cars.
Soundproofing floor x ray
The biggest problem is the fender liners, thanks to which every small pebble bounces off with a noise that even the songs of Stas Mikhailov cannot drown out. To solve the problem, the owners perform sound insulation. It is worth noting that the problem can be partially eliminated by replacing the fender liners. It’s worth starting with this step, since soundproofing the floor is an action that requires a complete disassembly of the interior, and as a result, large financial and time costs. There is no point in describing all types of sound insulation - everyone is free to choose to their own taste, but this event, even without replacing the fender liners, can give relative silence in the cabin.
How to replace a wheel on a VAZ 2108-VAZ 2115?
By the way, it is also recommended to replace a wheel using a torque wrench, since bolts that are tightened differently (with different forces) can even break the part of the disk in which they are located, for example, try to tighten three bolts with a small amount of force, and one of all four with very strong force and after hitting a bump, most likely in the place where one of the bolts is tightened the disk will be very damaged, since all the force during a collision will go specifically to this part of the car’s wheel
1) At the very beginning of the operation, it is recommended to loosen, but not completely unscrew, all the wheel bolts on the car.
In all cases, take note that it is necessary to loosen the wheel bolts when the car is standing with all its weight on the ground, because if you decide not to loosen the bolts while the car is standing on the ground, but decide to immediately unscrew them when you lift the car into the air, then it may Even if you jerk the part with your hands, the car will most likely fall off the jack and you will have to lift it again!
Where is the right place on a VAZ to remove a wheel?
What tires are on x ray
Initially, AvtoVAZ decided to equip the car with 15-inch wheels (manufactured by Pirelli, Continental). From the point of view of implementing functionality, the manufacturers explained their choice by saying that it allows for maximum wheel travel. The owners of the first versions were slightly dissatisfied with the fact that externally this radius looked extremely ridiculous, creating a desire to fill the empty space. The manufacturer listened and equipped the car with a 16 radius - so to speak, it was a certain compromise.
For tuning enthusiasts, the capabilities of this car represent a wide range of choice of rim radius, which, in combination with properly selected tires, can make up a profitable batch of cars, without reducing its practicality, on Russian roads