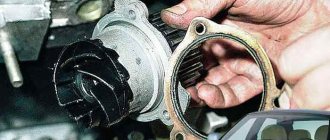
The pump (coolant pump) is one of the main elements of the cooling system of an internal combustion engine.
It serves to pump coolant into the system, thereby ensuring its circulation and cooling of the entire engine. The pump structure consists of a housing, an impeller, a bearing and a drive gear.
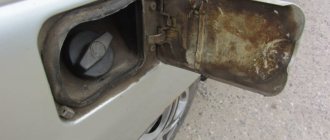
In VAZ 2110 cars (8 valves), the pump is located on the right side of the engine cylinder block (in the direction of travel) under the timing belt cover.
It is driven directly by the timing belt, which, while moving, rotates the drive gear.
Purpose and functions of the water pump
The pump is a centrifugal type pump that provides forced circulation of antifreeze through the engine cooling circuit. Due to this, excess heat is removed from the engine. Structurally, the pump is quite simple. An impeller is located in a cast iron or aluminum casing, which is driven through a shaft. The tightness of the structure is ensured by the oil seal and gasket between the pump housing and the cylinder block.
Coolant is supplied through the central channel. When it hits the impeller, due to the centrifugal force, the coolant is thrown towards the walls of the housing. Through the distribution channel, the liquid flows to the pipes and then into the engine cooling jacket. When the temperature reaches a certain value, the thermostat opens, which leads to cooling of the liquid in the radiator. The coolant then returns to the centrifugal pump. This ensures the circulation of antifreeze.
The pump is the main element of the engine cooling system
Design Features
Despite its simple design, the pump of any car, including the VAZ 2110, is a fairly loaded element, all due to the same drive, so it can easily fail. The culprit is usually the pump bearing. Replacing a VAZ 2110 pump is not the easiest process, but you can do it yourself, all you need is the necessary tools and our instructions.
Essentially, the pump consists of:
- shaft;
- housings;
- bearing;
- oil seals;
- gear and impeller.
Everything is simple - a gear is mounted on the shaft on one side, and an impeller on the other. Between them on the shaft there are a bearing and seals, which are located inside the housing.
This housing attaches the pump to the cylinder block. In this case, the impeller is located inside the cooling jacket, and the gear is outside it. The timing drive causes the gear to rotate, and along with it the impeller, since they are mounted on the same shaft.
In this case, the gear does not contact the drive with its entire working surface, but only half.
And since the timing belt must be constantly tensioned, the pump bearing constantly experiences a one-sided load, which ultimately leads to its failure.
This, in general, is the main reason for the breakdown of the water pump in the VAZ-2110 and not only.
Checking the functionality of the water pump
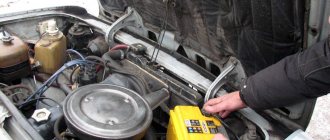
Self-diagnosis of the pump is quite simple and will take no more than 10 minutes. The verification procedure is as follows:
- The engine warms up to operating temperature (91˚C for VAZ 2110).
- For safety reasons, a thick glove is worn on the right hand.
- The coolant supply from the radiator is cut off. To do this, squeeze the pipe by hand. If the pump is working properly, you will feel the antifreeze pressure inside the hose. If the pipe compresses easily, then the pump is faulty.
All actions should be carried out with extreme caution, since the coolant gets very hot, and you can get burns from the surface of the motor or pipes.
To identify problems with the pump, it is enough to pinch the coolant supply pipe
Diagnosis of pump faults on VAZ 2110/11/12
A pump malfunction can be identified by the following signs:
- While driving, extraneous noise appears from the timing belt.
- The pump loses its seal and begins to leak.
- The timing belt breaks.
The most capricious element of the VAZ 2110/11/12 pump is the bearing. If it is severely worn or if the timing belt tension is incorrect, the pump cannot be repaired.
One of the symptoms of a pump malfunction is the appearance of a leak.
Consequences of using a faulty pump
Operating a car with a faulty pump can lead to the following serious consequences:
- damage or breakage of the timing belt, often leading to a major engine overhaul;
- When the engine overheats, the rubber elements of the cooling system, valve covers and cylinder head gaskets are destroyed.
The pump is changed along with the tension roller and timing belt every 50 thousand kilometers. If signs of wear appear, these components are replaced before the time specified by the manufacturer.
Resource
The pump does not seem to be a consumable, but still it is also subject to periodic replacement. But unlike consumables, it does not have a specific resource.
One pump can run 100 thousand km, but the other won’t reach 20 thousand km. It all depends on the quality of manufacture of the part itself, as well as on the correctness and frequency of maintenance, namely, checking and adjusting the tension of the timing belt.
An overtightened belt can shorten the life of the pump, significantly.
Repair of pump VAZ 2110/11/12
If the failed water pump is relatively new and its service life has not yet expired, you can try to repair it. This will require special tools, new parts, seals, etc.
To repair a faulty pump, you will need to purchase the necessary parts.
Disassembling the pump
The pump is disassembled in the following sequence:
- The removed pump is wiped with a dry cloth.
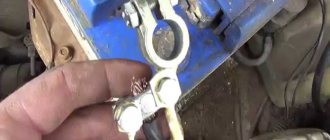
- Using a special puller, the pulley is removed.
- The bearings are knocked off the shaft with a hammer.
- The shaft is removed from the pump housing.
- The impeller is removed.
- The oil seal or what is left of it is removed.
- The insides are thoroughly washed and cleaned.
If the pump is leaking, the seal must be replaced. The cause of a whistle at high speeds is usually a strong shaft wear.
Video: disassembling the pump
Replacing the oil seal
The oil seal is a rubber seal consisting of a metal rim, a spring and rubber. In any case, when disassembling the pump, the oil seal should be replaced, since the rubber wears out quickly. The procedure for replacing the oil seal is as follows:
- The old seal is removed from the shaft.
- The seat is cleaned of dirt.
- A new seal is installed.
Pump leaks are usually caused by worn out seal.
Replacement of shaft and bearings
Often, due to high production, bearings have to be replaced. They can only be knocked out using special tools (a puller or a hydraulic vice). Therefore, a new shaft with bearings already mounted on it is usually installed in the pump.
The pump shaft is replaced along with the bearings
Replacing the pump pipe
Changes in pressure in the cooling system often lead to deformation of the coolant inlet and outlet hoses. These hoses are replaced as follows:
- Use a screwdriver to loosen the clamp on the pump side.
- The fastener is removed along with the hose.
- The clamp is loosened and removed from the other side.
- The pipe is removed and pulled out from under the hood.
Pump lubrication
Periodically replacing the water pump lubricant will significantly increase its service life. Some pump designs have special holes for lubrication. If there is no such hole, the water pump will need to be disassembled.
Some water pumps have special holes for lubrication.
Replacement
Having purchased a new coolant pump, you can begin the replacement procedure.
The VAZ 2110 works in conjunction with 8 valve and 16 valve power units. Despite there being a certain difference between them, the pump replacement procedure is identical.
Dismantling works
The instructions below are relevant for dozens with two types of motors.
- Place the car on a level area above a hole or on an overpass.
- Lift the hood, remove the negative terminal from the battery, which will turn off the power to the car.
- Unscrew the cap of the coolant expansion tank. This will relieve excess pressure in the system.
- Now get down under the car.
- Place a clean container with a volume of at least 5 liters under the cylinder block.
- Unscrew the coolant drain plug using a 13mm wrench, which will allow you to drain the coolant. Be careful, unlike oil, you need to drain the coolant when the engine is cool.
- When all the coolant is out, screw the plug back into place.
- Using a 10mm wrench, unscrew the three mounting bolts that hold the timing case in place.
- Remove the casing.
- Place the crankshaft at TDC of the first cylinder - top dead center. To do this, you need to turn off the gear and turn the special bolt that holds the generator pulley to 19 with a key. Turn until the marks on the camshaft gear align with the mark on the rear timing case.
- Make sure that the marks on the flywheel and clutch housing match. To do this, you will have to remove the plug on the crankcase. It is made of rubber and is located to the right of the cylinder block.
- Lock the crankshaft in this position. You can use a simple slotted screwdriver that fits into the teeth of the flywheel.
- Slightly loosen the tension roller locking nut using a 17mm wrench.
- Turn the roller using a special wrench in a counterclockwise direction. This way you can loosen the tension level of the timing belt.
- Now you can quite easily dismantle the tension roller and belt.
- The next step is to remove the five mounting bolts that hold the lower timing case in place. These include 3 bolts that hold the pump. You will need a socket wrench or a 10mm socket.
- The casing can then be removed.
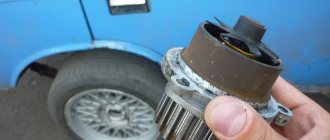
- The VAZ 2110 provides for installation of a pump using three hexagon bolts. Once you unscrew them, you can simply carefully remove the pump by tapping on the body.
- If that doesn't work, then use a flathead screwdriver to pry up the coolant pump housing, which will allow you to remove the pump.
- Remove traces of the old gasket that should remain on the surfaces of the seats.
Changing the gasket
- The gasket is lubricated on both sides using a special automotive sealant. The prepared and processed new gasket is placed on the body of the new pump.
- The new pump is installed in its rightful place, taking the baton from the old coolant supercharger.
Before installing a new coolant pump, make sure that it rotates normally and does not jam anywhere.
Reassembly nuances
- Reinstall the new coolant pump;
- Replace the casing;
- Fix the camshaft pulleys;
- Return the timing belt to its rightful place;
- The belt must be put on, focusing on the marks on the camshaft and crankshaft;
- Pull the belt using the tension roller and eccentric to the desired level;
- Turn the engine over several times to check that the marks match;
- Adjust the position and tension of the belt in accordance with the standards;
- Install the outer casing of the device;
- Replace the terminal from the adsorber;
- Add coolant to the required level.
Replacing the pump is an excellent reason to change the coolant at the same time. If you plan to do this in advance, you don’t have to pay special attention to the cleanliness of the container for draining the coolant.
If the pump fails some time after the coolant was changed, it is better to fill it back after the repair is completed. Still, buying a new coolant is not the cheapest thing. Learn to save wisely on repairs.
By properly organizing the replacement of the pump on your VAZ 2110, you can save a decent amount of money, plus improve your skills. On average, the work takes about 3 hours. If you follow the instructions, no pitfalls should arise during the repair process.
Installation of an additional pump on a VAZ 2110/11/12
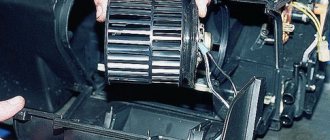
The interior heating system in VAZ 2110/11/12 cars often fails to cope with its responsibilities in the cold season. This problem can be solved by installing an additional pump in the cooling system.
To heat the interior of the VAZ 2110/11/12, an additional electric pump from GAZelle is installed
The VAZ 2110/11/12 stove functions normally only at speeds of at least 2 thousand rpm. At idle, slightly warm air enters the cabin. The fact is that to increase the air temperature, the coolant must circulate faster. The problem is solved by installing an additional pump and accelerating the circulation of antifreeze through the stove. As a result, the temperature in the cabin ceases to depend on engine speed. For these purposes, an electric pump from a GAZelle is installed.
Installation of an additional pump
To install an additional pump, you need to do the following:
- Coolant is drained from the cooling system.
- A part of the outlet pipe of the stove is cut out, equal to the length of the pump without taking into account the fittings.
- The fittings are coated with sealant, the hoses are put on and secured with clamps.
- To attach the pump to the body, use a special bracket that wraps around the pump and is attached to the body with two self-tapping screws. You can make such fasteners yourself or purchase them in a store. The bracket can also be attached to suitable studs on vehicle components.
- To control the pump, a button is installed in the cabin that supplies power from the positive terminal of the battery. In this case, it is advisable to supply voltage through a relay.
The additional pump fits into the return pipe of the stove and is secured using a special bracket
After installing the additional pump, antifreeze is poured into the system. After starting the engine, check the pump and pipes for leaks and test the operation of the new device.
Also check out
- Self-replacement of the VAZ 2110 CV joint
- Self-adjustment of VAZ 2110 headlights at home
- How to independently modify the VAZ 2107 stove by installing a VAZ 2108 “snail”
- Remove the wheel to gain access to the bottom bolt that secures the plastic casing.
- In the case we are considering, the timing belt is in good condition and does not need to be replaced. Therefore, the pump was replaced without removing the generator drive belt.
- It was necessary to dismantle the plastic casing and also remove the pulleys with the camshaft rollers. This can be done if the tension rollers are loosened and the timing belt is removed from them.
DIY diagnostics and replacement of the pump on a BAZ 2110
- Lock the camshaft gears using something flat. Unscrew them carefully so as not to damage their soft teeth.
- After dismantling the pulleys, you can remove the plastic casing. One fastening bolt will have to be unscrewed from below through the space near the wheel. After this, access to the pump is free.
DIY diagnostics and replacement of the pump on a BAZ 2110
- The VAZ 2110 water pump is attached using three hexagon mounting bolts. Unscrew them. After this, lightly knock on the pump body and try to pull it out.
DIY diagnostics and replacement of the pump on a BAZ 2110
- Place a container to drain the coolant.
- The new VAZ 2110 pump must be well lubricated. In addition, it is better to apply a thin layer of sealant to the paper gasket and let it dry.
After this, all the parts are assembled in reverse order:
- Reinstall the water pump.
- Place the plastic casing.
- Secure the camshaft pulleys in place.
- Using the previously made marks on the camshaft, put on the timing belt.
- Use the wheel to turn the engine, adjust the correct tension and position of the belt. Upon completion of installation, add coolant.
- Check the work.
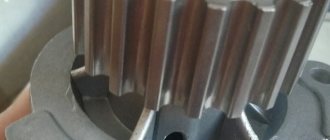
Shaft defects
Make sure the pump bolts are tightened correctly. They definitely need to fix this element of the system. However, they should not be over-tightened. Otherwise, you can damage the threads and jam the sealant.
When draining antifreeze from the system after finishing work, remove any air pockets. The liquid must be added to the level. After replacing the pump, the engine should be running and the system should be warm. Then it is checked for leaks.
If the car has a 16-valve system, replacing the pump will be a little more difficult. However, doing this procedure yourself is not difficult.
Electricity
Before connecting an additional pump to the Gazelle stove, the connection diagram should be reviewed for reference. There are several options. One of the simplest ways is to place the button in two positions in the car interior. It's simple here: on/off. For example, if it’s cold you can turn it on, if it’s warm you can turn it off.
This is a simple method, and it has a disadvantage. If you forget to turn off the additional pump, then the next time you start the car to warm up from the alarm key fob, the pump will start and take heat from the cold engine. This will increase the engine warm-up time.
Professionals recommend using a complex but more effective method. There will be a dual control system. This button is intended only to be turned on in winter and turned off with the arrival of spring. This is done to prevent the pump from working unnecessarily.
When the button is turned on, the additional heater pump for the Gazelle stove will turn on/off completely automatically when the engine starts and the car is driving. For this circuit you will need a two-position relay. The pump has a certain power, so the relay needs a current of 3 A.
Video on how to buy a good pump
Home→Catalogue→Engine→Cooling system→Water pump (pump)→VAZ-2110-12 16kl→Water pump (pump) VAZ-2110-12 (16kl.) “Original” series (company packaging LADA) Water pump (pump) VAZ-2110-12 (16 cells) series “Original” (company packaging LADA)Characteristics
| Supplier code: | 092433 |
| Vendor code: | 21120-1307010-82 |
| Requisites: | Product, Product, 00-00006125, Water pump (pump) VAZ-2110-12 (16 cells) series “Original” (company packaging LADA), 0.85 |
| Basic unit: | PC |
| Tax rates: | Tax free |
| Manufacturer: | DAAZ OJSC |
Water pump (pump) VAZ-2110-12 (16 cells) series “Original” (company packaging LADA) Out of stock RUB 1,320 + 39.6 to bonus account Water pump (pump) VAZ-2110-12 doors. 21124 (1.6L 16 cells) assembled (with gasket) (TZA)Water pump (pump) VAZ-2110-12 dv.21124 (1.6L 16 cells) assembled (with gasket) (TZA)Characteristics
| Supplier code: | 037034 |
| Vendor code: | 21124-1307010-20 |
| Requisites: | Product, Product, 00-00019617, Water pump (pump) VAZ-2110-12 dv.21124 (1.6l 16 cl.) assembled (with gasket) (TZA), 0.89 |
| Basic unit: | PC |
| Tax rates: | 18 |
| Manufacturer: | TZA CJSC |
Water pump (pump) VAZ-2110-12 dv.21124 (1.6l 16 kl) assembled (with connector) (TZA) In stock ( 7 ) RUB 1,835 + 55.05 to the bonus accountWater pump (pump) VAZ- 2110-12 (16 cells) series “Standard” (company packaging LADA) Water pump (pump) VAZ-2110-12 (16 cells) series “Standard” (company packaging LADA) Characteristics
| Supplier code: | 195979 |
| Vendor code: | 21120-1307010-81 |
| Requisites: | Product, Product, 00-00001773, Water pump (pump) VAZ-2110-12 (16 cells) “Standard” series (company packaging LADA), 0.84 |
| Basic unit: | PC |
| Tax rates: | Tax free |
| Manufacturer: | Lada-Image CJSC |
Water pump (pump) VAZ-2110-12 (16 cells) series “Standard” (company packaging LADA) Out of stock RUB 1,080 + 32.4 to bonus account Water pump (pump) VAZ-2110-12 (16 - class) TZA water pump (pump) VAZ-2110-12 (16 class) TZA Characteristics
| Supplier code: | 024791 |
| Vendor code: | 21120-1307010-75 |
| Requisites: | Product, Product, 00-00019616, Water pump (pump) VAZ-2110-12 (16 cells) TZA, 0.89 |
| Basic unit: | PC |
| Tax rates: | 18 |
| Manufacturer: | TZA CJSC |
Water pump (pump) VAZ-2110-12 (16 cells) TZA In stock ( 4 ) RUR 1,460 + 43.8 to bonus account Water pump (pump) VAZ-2110-12 (16 cells) ( BelMag) Water pump (pump) VAZ-2110-12 (16 cells) (BelMag) Characteristics
| Supplier code: | 266248 |
| Vendor code: | BM.7512 |
| Requisites: | Product, Product, 00-00041350, Water pump (pump) VAZ-2110-12 (16 cells) (BelMag), 0.91 |
| Basic unit: | PC |
| Tax rates: | 18 |
| Manufacturer: | BelMag JSC |
Water pump (pump) VAZ-2110-12 (16 grade) (BelMag) In stock ( 10 )855 RUR + 25.65 to bonus accountWater pump (pump) VAZ-2110-12 (16 grade) “Riginal”Water pump (pump) VAZ-2110-12 (16 cells) “Riginal”Characteristics
| Supplier code: | 045865 |
| Vendor code: | RG2112-1307010 |
| Requisites: | Product, Product, 00-00028287, Water pump (pump) VAZ-2110-12 (16 cells) “Riginal”, 0.88 |
| Basic unit: | PC |
| Tax rates: | 18 |
| Manufacturer: | PKF Niagara LLC |
Water pump (pump) VAZ-2110-12 (16 grade) “Riginal” In stock ( 10 )815 RUR + 24.45 to bonus accountWater pump (pump) VAZ-2110-12 (16 grade) (HB 1003 L1) FenoxCharacteristics
| Supplier code: | 139889 |
| Vendor code: | 2112-1307010 |
Water pump (pump) VAZ-2110-12 (16 cells) (HB 1003 L1) Fenox Out of stock 740 RUR + 22.2 to bonus accountWater pump (pump) VAZ-2110-12 (16 cells) KRAFTPump water (pump) VAZ-2110-12 (16 cells) KRAFTCharacteristics
| Supplier code: | 180590 |
| Vendor code: | KT 059347 |
| Basic unit: | PC |
| Manufacturer: | OberKraft |
Water pump (pump) VAZ-2110-12 (16 cells) KRAFT Out of stock RUR 1,115+ 33.45 to bonus accountLUZAR LWP 01124 Water pump LADA 2110-2112/KALINA/PRIORACharacteristics
| Supplier code: | 319873 |
| Vendor code: | LWP01124 |
| Manufacturer: | OberKraft |
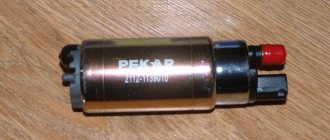
LUZAR LWP 01124 Water pump LADA 2110-2112/KALINA/PRIORA In stock ( 10 ) RUB 1,715 + 51.45 to bonus account Water pump (pump) VAZ-2110, 2111, 2112 and their modifications. Pekar Characteristics
| Supplier code: | 574236 |
| Vendor code: | 2112-1307010-02 |
Water pump (pump) VAZ-2110, 2111, 2112 and their modification. Pekar In stock ( 1 ) RUB 1,075 + 32.25 to bonus account GRAF PA833 Water pump VAZ 2110/KALINA Characteristics
| Supplier code: | 098381 |
| Vendor code: | PA833 |
GRAF PA833 Water pump VAZ 2110/KALINA In stock ( 4 )RUB 1,570+ 47.1 to bonus accountLPR WP0683 Water pump VAZ 2110/KALINACharacteristics
| Supplier code: | 566435 |
| Vendor code: | WP0683 |
LPR WP0683 Water pump VAZ 2110/KALINA In stock ( 2 )RUB 1,650+ 49.5 to bonus accountMILES AN21042 Water pump VAZ 2110/KALINACharacteristics
| Supplier code: | 579310 |
| Vendor code: | AN21042 |
MILES AN21042 Water pump VAZ 2110/KALINA In stock ( 10 )915 rub.+ 27.45 to bonus account Withdraw by:2020406080100
The pump, or technically speaking, the water pump, is an integral part of the car’s cooling system. This is the second part after the thermostat that most often fails. On a 16-valve VAZ-2112, replacing this element is quite simple, and almost every motorist can handle it. The water pump itself is responsible for circulating coolant through the system. If the water pump malfunctions, coolant may leak and air may enter the system. And in the worst case scenario, the pump gets jammed and the valves bend. This does not threaten the 124th engine, but the 21120 will require a major overhaul.
Video about replacing the timing belt and pump on a 16-valve VAZ-2112:
The video material shows the process of replacing the pump, and also contains some recommendations and nuances. Before performing operations, it is recommended to watch the presented video.
What do you need to know during installation?
That's it, the old pump was successfully removed from our car. The VAZ-2110 is then equipped with a new part. This can be done without any special tools. In principle, installation of the pump (VAZ-2110, 2112) is carried out in the reverse order, similar to removal, however, several important points should be noted here.
Firstly, the new part must contain lubricant. Often it is already there. But if it is not there, be sure to lubricate the element. Secondly, if the VAZ 2110 model pump has a paper gasket, apply sealant to it and wait 10-15 minutes for it to dry. Afterwards you can install the part in place.
Replace or repair?
External noises. A partially faulty cooling system water pump makes an “unhealthy” noise or “howl” during operation. This may be due to significant wear on the bearings and/or the pump impeller contacting the pump body as it rotates. This is also due to partial damage to the bearing.
Pump pulley play. This is due to damage or natural wear to the rotating bearing. In this case, diagnostics can be carried out quite simply, just move the pump shaft from side to side with your fingers. If there is play, it will be felt well to the touch. Please note that the appearance of play causes leakage of the pump seal and leakage of coolant.
The occurrence of leaks. Thus, antifreeze can leak from the gasket, as well as from other places such as the housing and impeller. Including: In this case, antifreeze may be visible on the pump housing, pump mount, some elements of the space under the pump (depending on the design of a particular car), or simply on the ground under the car.
Antifreeze smell appears. In particular, this can be felt not only in the space under the hood (when the hood is opened), but also in the cabin, since its fumes will enter the cabin through the ventilation system. Antifreeze has a sweetish smell, sometimes with a taste of alcohol.
Step by step operating procedure
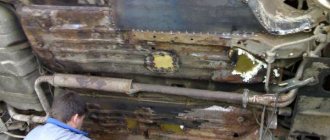
The water pump is replaced in an inspection pit or overpass. A regular jack will do, but you should make sure in advance that the body is lifted from the front right side and securely secured with additional stops.
Replacing the pump involves removing the timing belt and tension pulley
After the initial preparation, you can begin the main work:
- Open the hood and remove the wire from the negative terminal on the battery.
- Unscrew the cap from the expansion tank.
- Get down under the car and place a container under the cylinder block.
- Unscrew the antifreeze drain plug and pour it into a container.
- After draining, install the plug back.
- Next, remove the front right wheel from the VAZ.
- The timing block will open under it - use a 10mm wrench to unscrew the three casing bolts.
- Remove the casing from the machine.
- After this, fix the crankshaft at the highest point of the first cylinder: engage the gear and turn the bolt that secures the pulley with a 19mm wrench. You need to turn it until the mark on the shaft gear matches the mark on the rear casing of the gas distribution mechanism.
- It is better to insert a large screwdriver or a long bolt between the crankshaft teeth to ensure it is static.
- Next, use a 17 key to loosen the tensioner roller, which will entail loosening the timing belt.
- First remove the belt, then the roller itself.
- Remove the five bolts that secure the bottom of the pump to the timing belt.
- Then unscrew the three bolts securing the top of the pump.
- It is easy to pry the pump housing with a screwdriver and pull it out of the socket.
- It is recommended to immediately clean the planting site from dust and old antifreeze. The remains of the old gasket must be removed.
- It is recommended to lubricate the new pump gasket with sealant on both sides and carefully place it in the landing zone.
- Install a new pump onto the gasket.
- Assembly work is carried out in reverse order.
Is it necessary to drain all the antifreeze from the system?
Drivers, when independently changing the pump on a VAZ, often wonder about draining antifreeze from the system. How much is it necessary to drain the coolant at all and if drained, how many liters?
There are specific answers to these questions:
- It is necessary to drain the antifreeze when performing any work on the elements of the cooling system. Draining the antifreeze ensures that pressure in the system is relieved and reduces the risk of injury. In addition, when dismantling and installing the pump, antifreeze will constantly leak from the landing zone, which will create a lot of inconvenience and ultimately lead to incorrect replacement.
- Regarding the question of how much antifreeze needs to be drained, there are two solutions. The first is based on caring for the car. As a rule, it is customary to change the coolant along with the pump, so it is better to drain the antifreeze from the system completely. The second option is suitable for those drivers who have only recently replaced antifreeze. In this case, you can drain only part of the liquid from the system (about 2-3 liters) in order to relieve the residual pressure in the pipes.
Features of replacement on a 16-valve engine
The difference in replacing a pump on a 16-valve engine comes down only to the fact that this engine has two camshafts, and therefore two drive gears.
Therefore, when disassembling, it is necessary to align the marks on both gears.
And then, during the disassembly process, make sure that the camshafts do not move and their position is not disturbed.
After installing a new pump and belt and then tensioning it, be sure to check that the marks match. That is, the crankshaft is rotated several times, then the marks are set on the camshafts and their alignment on the flywheel is checked.
This is the whole difference between the replacement process on 8- and 16-valve VAZ-2110 engines.
In general, the described process for replacing the water pump is suitable for almost all cars whose engine is equipped with a timing belt drive.
Of course, there will be a difference at some points in the disassembly, but it is not significant.
Therefore, the described sequence of action is almost universal, especially for VAZ cars, starting with model 2108.
Installation technology
Installing a circulation unit is a process that requires compliance with a certain sequence of work.
Preparation
Experts recommend purchasing a pump with split-type threads. If they are not available, then you need to buy these parts additionally. You will also need a deep cleaning filter.
Before installation, prepare a check valve: this normalizes the operation of the heating system.
You will also need special keys, fittings, a small pipe with a diameter equal to the diameter of the riser.
Place
Modern circulation pumps can be installed both on the water supply pipe and on the return pipe.
Installation carried out on the bypass (a jumper or a piece of pipe installed between the direct and return wiring of the heating radiator) requires preliminary testing of the device’s ability to withstand strong pressure of hot water.
If there is a membrane tank, the bypass with the pump is placed on the return pipeline, closer to the expansion tank.
Installation
The heating system can be made of metal or ecoplastic. There is no difference for the installation of pumping equipment. It is inserted by going around it. If the pipeline is made of metal, then you can purchase a ready-made structure to bypass the main line.
First you need to drain the water and clean the heating structure, rinsing it several times.
Then, according to the diagram, a U-shaped piece of pipe is mounted on the side of the main pipe, in the middle of which a pump is built. Ball valves must be installed on both sides of this unit. What is it for?
Firstly, the natural circulation of the coolant will be restored if one of them is closed. Secondly, you can repair or replace the circulating equipment if you turn off both taps, without needing to drain the water from the system.
During installation, you need to pay attention to the direction of water movement (marked by an arrow on the body of the pump unit). https://www.youtube.com/embed/GB4ifjhXr9Y
After this, the system is filled with coolant and checked for functionality. Any errors should be corrected at this stage.
Then, unnecessary air is removed from the pipeline using a central screw. If everything is done correctly, liquid will begin to leak out of the special hole.
Pumping equipment with manual control requires air to be removed before starting work: it is turned on for a few minutes and the valve is opened, this is repeated several times.
After the pipes are filled with water, the pumping device will turn on. The presence of air in the pipeline is excluded.
conclusions
Replacing a water pump is a fairly simple process that any motorist can do. Particular attention must be paid to choosing a product and checking its authenticity. There have been numerous cases when the installed pump on a VAZ 2112 had a service life of 1-2 thousand km, and then failed, which not only upset the owner, but also led to a repeat purchase.
Sources used:
- https://mylada.net/remont/zamena-pompy-na-8-klapannoj-vaz-2110-2.html
- https://vaz-2110.ru/dvigatel/zamena-pompy-vaz-2110-8-klapanov.html
- https://carfrance.ru/zamena-pompi-vaz-2110-artikuly/
- https://original-detal.ru/catalog/dvigatel/sistema_okhlazhdeniya/nasos_vodyanoy_pompa/vaz_2110_12_16kl_2/
- https://carfrance.ru/zamena-pompy-na-vaz-2112-svoimi-rukami-na-16-klapannom-dvigatele-vybor-ceny-process-video/
Order of Operations
A complete replacement of the coolant is not required for this type of repair if its service life has not expired. It is better to install the machine on an overpass or inspection hole. Further work is performed in the following sequence:
- Disconnect the battery by removing the negative terminal.
- First, the cover of the expansion barrel is opened, and a container with a volume of at least 5 liters is placed under the cylinders. The coolant is drained into it; after draining, the cover must be replaced.
- Then you need to remove the casing; to do this, unscrew the mounting bolts.
- Now you need to fix the crankshaft at the dead top point of the 1st cylinder. To do this, the gear is engaged and the pulley mounting bolt is turned. The correct position is determined in this way: the mark on the timing case coincides with the mark on the shaft gear.
- To statically fix the crankshaft, you need to insert a screwdriver between its teeth.
- Now you need to loosen the tension on the timing belt; to do this, slightly unscrew the nut holding the roller. This is done with a special key, the direction of movement is counterclockwise.
- After this operation, the roller and belt can be removed.
- Now you can completely remove the casing. To do this, unscrew the five mounting bolts.
- The water pump is now available. You need to pry it off with a screwdriver and remove it. The seat should be cleaned.
- Now the VAZ 2110 8-valve injector pump is being directly replaced. But first you need to take a new gasket, coat it on both sides with autosealant, and install it on the pump.
- The pump is installed in place.
- Subsequent work is performed in the reverse order to that described above. It is advisable, along with replacing the VAZ 2110 8 pump, to change the roller and timing belt. This way you can accurately calculate the service life of these elements.
- After installing the belt in place, you need to check its tension. To do this, take one of its fields with your fingers and unfold it in a horizontal plane. If you cannot turn the belt more than 90 degrees, the tension is normal.
- After completing the work, add old or new coolant to the required level.
Only after positive test results of the pump can you hit the road by car. For the procedure for replacing the VAZ 2110 8 valve pump, see this video.
Difficulties in installing an additional pump in the heating system
Correct pump installation
Having found out whether it is possible to install an additional heating pump, you need to choose its location correctly
The difficulty lies not in calculating the optimal power, which is also important, but in the consistency of the device’s operation with the main pump
There are several options that will require the installation of additional elements. A special place among them is occupied by the installation of additional heating at home. In practice, this can be implemented in two ways:
- Constructing a separate line with radiators and all the necessary piping. For this you will need an additional boiler;
- Modernization of the existing system - arrangement of a new heating circuit connected to the main one. Then you will definitely need to install an additional heating radiator or several.
The second option is the most practical, since there is no need to purchase additional equipment and components. But then an additional problem arises - asynchronous operation of the pump impellers. Even with the same number of revolutions, this will lead to uneven movement of water in the pipes, which is the first cause of water hammer.
Installation of hydraulic arrow
Hydraulic gun with pumps
The way out of this situation is a fundamentally new scheme for installing an additional pump in the heating system. Its innovation lies in the installation of a hydraulic arrow.
This device compensates for pressure drops in a certain area of the system, thereby normalizing the heating operation.
This device normalizes the pressure in the main and return pipes. In additional heating of an apartment, its installation is not necessary, since the increase in the circuit may be insignificant. But if the volume of water in the system increases by more than 20%, means should be provided to normalize circulation and pressure. To install an additional circulation pump in a heating system together with a hydraulic compensator, the following rules should be followed:
- Location - as close as possible to the entrance of the return pipe to the boiler;
- Installation of shut-off valves for each pump circuit;
- Installation of mesh filters.
If it is impossible to install the hydraulic arrow correctly, you can make its simplest analogue. To do this, a through jumper is made after the connection point of the additional pump to the heating system. Its optimal length should be 300-400 mm. This circulation ring will be able to partially balance possible hydraulic shocks.
Double circulation pump
Twin pumps
Is it possible to install an additional heating pump if changing the pipe configuration is physically impossible? There is a more expensive but effective way to improve circulation - installing double pumps.
This is the best option if you have a gas boiler with a built-in circulation system. The total power of the new pumps should compensate for the forced shutdown of the main one. This way you can avoid malfunctions in the heating system.
The advantages of this modification are as follows:
- There is no need to change the standard installation scheme for an additional pump in the heating system;
- A common connection pipe ensures that there is no uneven movement of water in the pipes;
- Possibility of connecting to a heating control unit - programmer.