The purpose of thresholds, popularly boxes, as a composite load-bearing element of the body is to prevent torsional deformation in the middle part. Severe destruction of the boxes is fraught with irreversible loss of geometry - the body begins to “walk”. The nine has a lightweight and simplified body. Therefore, even a spar that miraculously did not have time to rot will not save the situation. The car's steering becomes unpredictable. The structure of the structure is quite simple. The main load during movement is taken by amplifiers (two on each side - large and small), welded to the outer part of the box structure. The amplifiers are welded to the A-pillar, B-pillar and floor. Additional structural rigidity is provided by connectors that are welded to the bottom.
Dimensions
Factory thresholds on the VAZ 2109 are supplied with a 1 mm thick reinforcement. Only 0.8 mm samples are available for sale. Despite its flimsy appearance compared to the factory model, such an amplifier is quite acceptable for providing the required rigidity. Especially taking into account the remaining service life of the VAZ 2109.
Also, on all new VAZ body parts, the size may differ from the factory one, so in most cases the part needs to be adjusted at the installation site.
Are there any differences between the thresholds of VAZ 2109, 21099 and 2108
Thresholds, amplifiers and connectors from VAZ 2109/2109/21099 to 2115 are completely identical. Since the 2108 body is a two-door version of the nine, the dimensions of the component boxes are slightly different. In turn, all elements of the VAZ 2108 threshold are compatible with the coupe of later years of production - 2113. In terms of workmanship, front-wheel drive Samaras of later years of production are more susceptible to corrosion. According to reviews from owners, a systematic deterioration in the quality of bodies began in the 1990s.
What does the device consist of?
The purpose of thresholds, popularly boxes, as a composite load-bearing element of the body is to prevent torsional deformation in the middle part. Severe destruction of the boxes is fraught with irreversible loss of geometry - the body begins to “walk”. The nine has a lightweight and simplified body. Therefore, even a spar that miraculously did not have time to rot will not save the situation. The car's steering becomes unpredictable. The structure of the structure is quite simple. The main load during movement is taken by amplifiers (two on each side - large and small), welded to the outer part of the box structure. The amplifiers are welded to the A-pillar, B-pillar and floor. Additional structural rigidity is provided by connectors that are welded to the bottom.
Dimensions
Factory thresholds on the VAZ 2109 are supplied with a 1 mm thick reinforcement. Only 0.8 mm samples are available for sale. Despite its flimsy appearance compared to the factory model, such an amplifier is quite acceptable for providing the required rigidity. Especially taking into account the remaining service life of the VAZ 2109.
Also, on all new VAZ body parts, the size may differ from the factory one, so in most cases the part needs to be adjusted at the installation site.
Are there any differences between the thresholds of VAZ 2109, 21099 and 2108
Thresholds, amplifiers and connectors from VAZ 2109/2109/21099 to 2115 are completely identical. Since the 2108 body is a two-door version of the nine, the dimensions of the component boxes are slightly different. In turn, all elements of the VAZ 2108 threshold are compatible with the coupe of later years of production - 2113. In terms of workmanship, front-wheel drive Samaras of later years of production are more susceptible to corrosion. According to reviews from owners, a systematic deterioration in the quality of bodies began in the 1990s.
Body repair is a harsh thing, or use a chisel to “CHISEL”
For everything about garage welding of rotten cars, see the new book on car repair from Khoma
In August 2009, a nice young lady approached me with a small request - to weld a hole in the side member of a VAZ-21093 car, in common parlance - “chisels”, they say, the husband is a diagnostician, “fumbles” with engines at 10c plus, but there is no one to do auto body work.
Well, helping your neighbor is a sacred thing, I thought and invited them to the show. The initial examination raised a lot of questions, ranging from year of birth to:
WHERE IS THE CAR'S FLOOR? Brief questioning of the owner revealed the following: the car was produced in 1996, stupidly stood in a pit for three years, after which it was bought outbid, hastily patched up, coated with various mastics and successfully sold off to the current owners, and since the diagnostician husband figured out that the engine was in good condition, he didn’t bother with the condition of the body…..But in vain!
The young lady was offered the following options:
— replace the floor, sills, rear side members
— completely change the body (the engine is excellent)
- cover it up again and sell it off to other less fortunate buyers at an even lower price (there was no recycling program at that time).
Ultimately, the decision was made - COOK!
Disassembling the interior took two hours, they opened the Shumka and “rejoiced”:
the floor of the car was practically destroyed by corrosion (see photos 1, 2, 3) The place of the “happy” driver, who almost ran along the “path with his own legs” (photo 4) looked especially impressive
Since the floor tunnel miraculously survived, only the “trough” was replaced
After cutting off the rags, cleaning off mastics and other offal, drilling out resistance welds on the side members, and carefully marking them, welding of the floor began.
By the way, everything was cooked using a domestic carbon dioxide semi-automatic PDG-165.
Next in line were the rapids.
After opening the outer panels, a view appeared no less gloomy than the appearance of the floor (photo 9, 10)
In order not to take risks, stretchers were installed in the body for rigidity (see photo 26, where the car looks quite naked) and this measure, I think, was not unnecessary - it’s better to be overdressed than underdressed.
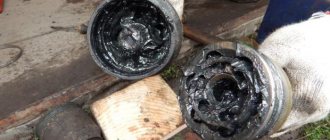
The remains of the side members and jacks brought tears to my eyes... (photo 11, 12)
Having mercilessly chopped off pieces of old metal with a grinder and a chisel, we got to the living metal of the body. We welded in the amplifiers, connectors and front jacks. Buy a new book on auto repair from Khoma. We decided to wait a while before installing the doors to install the external sill panels in order to prevent the appearance of unnecessarily large gaps.
Finally, the turn came to the spars. This “hole” was what the sweet girl wanted to seal (photo 14)
The same photo shows that the edges of the wheel arches still have the same deplorable appearance. Removing the rear bumper and examining the trunk for integrity forced me to take up the camera again:
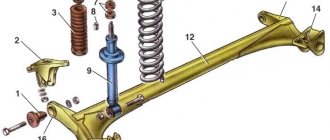
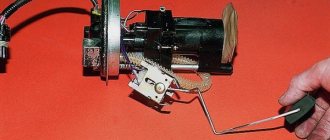
The left trunk well (see photo 21) and the rear panel (see photos 15, 32) also suffered from terrible rot. For further repairs, we had to remove the gas tank and the rear beam (photo 28). While they were filming, the soured brake pipes were told to live to death for a long time (see photo 23). There was no time to mourn for them, so the chisel, grinder and drill were used again. The edges of the arches were trimmed, the side members were drilled out, and the rear panel was cleaned down to bare metal. First, new spars were installed, and then new edges freshly cut from millimeter sheet metal were welded to them by spot welding, as well as parts of the rear panel (see photos 24, 25, 27, 16). At this point, the welding work was completed, but the owner expressed a desire , taking the opportunity to “make noise” of the interior, and treat it with anticorrosive... No sooner said than done, especially since the customer supplied the materials himself, with the exception of body iron.
So, the hidden cavities were treated with Movil, the interior was glued, the bottom was treated with bitumen mastic (the rear panel, of course, also got it) see photos 18, 19, 20.
I won’t describe the procedure for assembling the interior, it’s boring and not quick, because you have to return everything down to the screw to its appropriate place)))
Two weeks after the car was delivered, the owner received her car in a rather cheerful mood of body and spirit, she was incredibly pleased with the price and quality and drove for another year until she bought something foreign.....
I haven’t come with any breakdowns yet. Buy a new book on car repair from Khoma. Written by Roman aka Jagger, May 2010
We send all questions to
- All such work, of course, is carried out only in enclosed spaces - garages, construction boxes, repair shops, or at least under a good canopy.
- Before you start replacing the threshold on the “nine”, you need to remove both doors on the side on which the replacement is being carried out and remove the aluminum trim from the old one.
- Remove the old thresholds in sections, starting from the middle, from the front door. This will make it more convenient for you. Cut out the worn-out thresholds with a grinder, and then be sure to remove traces of corrosion by cleaning all problem areas.
- Take a new threshold, we will install it. First cut off part of the amplifier, align it well and weld it to the bottom of the joint. You need to make a small cutout in the area of the B pillar.
The top panel should be attached very tightly, without cracks or gaps. For greater reliability and rigidity, screw the screws in there.- Then you need to make holes through which welding will be carried out. The bottom of the panel and the connector are firmly welded to the amplifier.
- Weld a brand new aluminum plate on top. But it is better to weld metal plates (patches) on the bottom side.
- The threshold assembled in this manner must be brought into ideal condition by sealing all seams. Take putty, primer and paint, and apply first, then second and third to the weld seams.
- Install all removed parts (we are talking about doors) in exactly the reverse order. Actually, the replacement of the thresholds on your “nine” has been successfully completed.
What affects wear
The active destruction of the external and internal parts of car boxes is caused by a combination of poor-quality anti-corrosion treatment coupled with urban operating conditions in winter:
- reagents;
- constant exposure to water;
- temperature changes;
- high humidity.
Most believe that the thresholds on the 2109 were made very poorly. Let us list the main causes and consequences of rapid corrosion of VAZ cars:
- Poor quality factory painting of VAZ body elements. Moisture gets under the paint, quickly starting the corrosion process. In practice, box repairs are needed after 10 years of operation.
- Lack of modern anti-corrosion treatment technologies. A striking example of proper processing is the galvanized body of the Audi 80 from the late 80s and early 90s. Such cars are still in service today. Whereas VAZ 00-x is already rare.
- Poor waterproofing. Water quickly enters the internal threshold (connector) and remains there all year round. Salt from the city road “finishes off” the metal.
- Poor design of drainage holes for removing water from the body.
- Disadvantages of the interior heating system.
general information
To begin with, it must be said that, like most cars of the Volzhsky Automobile Plant, the entire Sputnik family was made of the most ordinary (black) steel. This material, of course, has certain positive characteristics (including it being very cheap), but it also has plenty of negative qualities.
In addition, during assembly on the factory assembly line, the cars were subjected to a rather weak anti-corrosion treatment, which consisted of three steps, namely: applying putty, priming and painting the upper body elements. While the lower part of the hull and the bottom remained untreated, which means they were subject to strong influence of external factors, especially moisture.
Therefore, many owners of such cars, immediately after purchase, independently carried out work on treating the bottom with special anti-corrosion compounds (primer, mastic). Thanks to this, it was possible to improve the anti-corrosion performance of the housing to some extent.
This attitude of manufacturers had a very negative impact on the process of preserving the car body. So usually after 1 to 3 years, the car began to have problems associated with rotting of such elements as wheel arches and sills. Subsequently, rust began to cover the edges of the window openings, affecting the lower half of the doors, wings and bottom.
The corrosion effect also spread rapidly due to the climatic conditions of our country with a long autumn-winter period. Also because of this factor, owners have to carry out a procedure to replace the most affected body elements at least once every 5-7 years.
If we talk specifically about thresholds, then they are usually replaced at the moment when they rot through.
Preparatory work before replacement
It is more convenient to carry out a preliminary inspection of the car and replacement of the box in a garage with a pit.
You will need a powerful inverter-type welding machine and a grinder with a metal disc. If you really want to do the body work, you can do it yourself by renting it or buying it and resale it.
Then you can begin the preliminary stage of work on replacing body sills:
- It is necessary to pre-treat new body parts, since the main problem is corrosion. Practice has shown that the first priority is protection from water. Epoxy primer does not allow moisture and air to pass through. Soil in the form of an aerosol is best suited for processing.
- The doors need to be removed. The VAZ 2109 will need a pair of keys and the help of a partner.
- Pieces of steel profile should be welded diagonally to the doorways. The resulting design will prevent a situation where, when removing the remains of rotten boxes, the car body “collapses” under its own weight due to loss of rigidity.
- The new box is being measured. You should also mark the approximate boundaries along which the obsolete threshold is removed.
Removing rotten parts
We begin repairs by removing rotten, rusty and deformed parts. I will describe the process using the example of a car, a VAZ 2109, which I was tasked with repairing. First, I’ll give you my problem areas in the car. The front floor of the car is completely rotten with all the jacks and reinforcements. And the jack could only be used with a sub-engine beam. The rear floor was also rotted. Corrosion also affected the car doors. In general, the bottom was almost absent. The wings were not in the best condition.
The front hood was noticeably rusty, all the floor connectors and the floor of the gas tank and spare tire were missing. The same fate befell the reflectors of almost all headlights. The front spar burst in the gearbox area. And above the muffler, in the floor of the trunk, there was a huge hole. The corners of the door were “eaten” by corrosion.
I describe in detail the condition of my car so that car enthusiasts can identify similar faults in theirs and draw the right conclusions. Once the necessary tools for car body repair are at hand, we begin installation.
Algorithm of actions for complete replacement
Despite the rotten body, the car can serve its owner faithfully for years, since black steel has a serious margin of safety.
Let's consider the algorithm of actions step by step:
- The outer part of the rotted threshold is cut out along the upper edge with a grinder.
- At the bottom, the remaining metal is removed with a chisel.
- The amplifier is stripped down to the first layer at the contact welding points.
- Using a grinder, carefully go over the welding points across the amplifier. If everything is done correctly, the amplifier is quite easily separated from the welding points with a chisel.
- The threshold connector is removed. To do this, use a chisel or grinder.
Article: 2109-5401060-11*, additional articles: 2109-5401064
Order code: 008549
- Buy with this product
- show more
- Passenger cars / VAZ / VAZ-21092 drawings
- » href=»/catalog/vaz-3/legkovye_avtomobili-30/vaz_2109-9/lementy_narujnye-34/#part31121″>Right side panel Body side / External elements
- » href=»/catalog/vaz-3/legkovye_avtomobili-30/vaz_2109-9/lementy_narujnye-69/#part31877″>Right side panelBody / External elements
- Passenger cars / VAZ / VAZ-210992 drawings
- » href=»/catalog/vaz-3/legkovye_avtomobili-30/vaz_21099-79/lementy_narujnye-34/#part35060″>Right side panel Body side / External elements
- » href=»/catalog/vaz-3/legkovye_avtomobili-30/vaz_21099-79/lementy_narujnye-69/#part35816″>Right side panelBody / External elements
There are no reviews for this product yet.
Correct welding sequence
Safety on the road depends on how well the car is repaired. Remember that the modern rhythm of movement implies serious dynamic loads on the body. Therefore, carrying out work on the body requires compliance with a given technological process.
The process of welding thresholds, close to factory conditions, step by step:
- Holes for welding with a diameter of 7 mm are drilled on the connectors.
- The amplifier is being adjusted and overcooked.
- The seams and welding points under the platform for installing the outer part of the box are cleaned.
- The doors are temporarily installed, the threshold is additionally adjusted to the front and rear fenders. The recess should match the embossing on the wing, and the doors should open freely.
- The element is fixed (some bodybuilders use homemade clamps) and welded with an overlap of about 20 mm over the old parts hammered in with a hammer.
- The surface is treated with a grinding wheel, putty with fiberglass is applied and painted. Replacement is complete.
How to replace the thresholds of a VAZ 2109 with your own hands
If a significant part of the thresholds is damaged by corrosion, then there are no options other than completely replacing these body elements. To carry out repair work you will need the following list of tools and materials:
- semi-automatic welding machine;
- new thresholds;
- Bulgarian;
- drill;
- sandpaper;
- putty and primer;
- anti-corrosion compound (mastic).
Features of replacement and preparation for it
When planning body repairs, you need to understand that the design of the VAZ 2109 thresholds consists of the following elements:
- outer box;
- inner box;
- amplifier
The outer and inner boxes are the outer walls of the threshold. The outer element goes outside and is located under the door, and the inner one is located in the cabin. The amplifier is an element located between two boxes inside. Most often, the outer frame is subject to corrosion, and when replacing thresholds, this particular body part is in mind.
Even though new parts are used when replacing thresholds, they still require preparation. From the factory they are covered with shipping primer, which must be cleaned before installation, i.e. the metal must shine. This is done using sandpaper or grinder attachments. After cleaning, the elements are degreased and coated with epoxy primer.
How to choose a part: average prices
Since the latest front-wheel drive VAZ has not been produced since 2012, there are almost no original body parts on the market. What remains is the cooperative body iron. The main advantage of the option is that the price of the door sills is nowhere lower at 2109. The main disadvantage is the inaccurate fit of dimensions, which requires adjustment of parts. As a result, a more highly qualified technician is required to carry out repair work.
Iron elements for thresholds
Depending on the supplier, the price of thresholds and repair kits for the VAZ 2109 may vary. Body parts for VAZ from (Naberezhnye Chelny) are considered the most inexpensive branded ones. Also, the production of some spare parts is still ongoing in Togliatti, traditionally the retail price is a little more expensive, with a premium for the original. The manufacturer from Rostov is quoted at prices on par with Nachalo. The cost of a set for both sides of the nine varies between 2000 - 2500 rubles.
Plastic covers
The price of a set of plastic trims for the VAZ 2108 is from 700 rubles for the standard version. Sellers estimate a plastic set of tuned overlays in a sporty style at 2000 - 3000 rubles. Of course, plastic is available to match any car color. If a car with severe corrosion is planned for sale, the sill trim is sealed with polyurethane sealant to give it a marketable appearance. The achieved decorative effect allows you to profitably sell the car.
Other options for repairing dents in car sills without welding
In some cases, when pulling out dents on thresholds without painting, instead of rings and pins, you can use a vacuum suction cup. The required vacuum is created in it by a vacuum pump. But its use is not always possible, since the shape of the dent may be such that the device will not hold securely.
The bracket with suction cups and guide rod is also used for pulling out dents on thresholds without painting. The rod in the center of the dent is fixed at its base using special glue. It serves as the base on which the bracket is installed, and is connected to the edge of the bend with suction cups. Leveling out dents in the car threshold occurs by twisting the rod. Dismantling after straightening is completed is carried out using a special adhesive solvent that does not damage the paintwork of the threshold. Next, the rod is installed at another point, and the work is performed using the same technology.
Engine sump protection
When driving on bad roads, the pallet is at risk of being exposed to external influences. These include various stones on the road and other solid bodies, the strength of which allows them to pierce the thin metal of the pallet. If there is even one hole in it, the oil will begin to leak and ultimately the engine will require very expensive repairs.
All this forced car manufacturers to produce a special protective device for the pan. It is made of thin sheet metal and installed under the pallet. Fastening is carried out to the car body using bolts. The principle of operation is to absorb the impact energy of any obstacle and prevent damage to the pallet.
During the long-term operation of vehicles and after acquiring the necessary experience, the following requirements began to be imposed on engine protection:
1. Rigidity. Deformation of the metal sheet should only occur in the place where the pallet is located. In addition, the protection must have a mandatory slope, which in the event of a car collision will lead the engine not into the passenger compartment, but under the car.
2. Durability. The metal sheet of protection should have as few holes as possible, otherwise such a structure will poorly withstand the energy of an impact on an obstacle.
3. Weight and dimensions. The weight of the protection should not exceed 15 kilograms, otherwise it will create additional load on the front of the car. The dimensions, in turn, should allow maintaining the vehicle's ground clearance. Protection that is too large and low will “catch” almost all the unevenness of the road surface.
Treatment with anti-corrosion agents
All work related to the repair of thresholds must be completed by treating all surfaces with special compounds to prevent the formation of corrosion. Anticorrosives made on a bitumen basis are best suited for this. In addition to rust, such protection will help against the effects of other unfavorable factors - the effects of gravel and small stones.
Some vehicle manufacturers protect the internal parts of the sills from rust with simple foam for installation work. This can be done efficiently at the factory, but for self-repair it is better not to use this method. The fact is that the foam will fill all the insides of the threshold, blocking the access of air there. Moisture will begin to accumulate in these areas, promoting the development of corrosion.
Possible consequences
The correct geometric parameters of the car are the safety of the driver and passengers. Relative to the position of the power elements of the body, the angle of each of the wheels of the car is set. If the geometry is violated, the wheel alignment measuring system will never meet the standard. If the body moves relatively little, the technician will adjust the position of the wheels, but not for long.
Changes in geometry lead to the fact that the bottom is gradually deformed, folds appear in long body elements in the intervals between welding points, and the safety characteristics of the structure are noticeably reduced.
In a head-on collision, the engine should collapse underneath. If the dimensions of the body are violated, the engine will fly into the cabin, the risk of death for the driver and passenger increases by 50%.
Front Arc Efficiency
If the car is driven on rough terrain at low speeds, then it needs special protection. It protects it well from collisions and running into various objects. The front arch will cope with this task perfectly.
The manufacturer has provided different options. One of the most common is thresholds. They look beautiful, are comfortable and practical. Thanks to their presence, getting into transport is simple and easy, despite its height. Therefore, thresholds are quite often installed on cars.
It is also worth noting that thresholds also perform a protective function. They protect the side of the vehicle from various types of damage. If a minor collision occurs, the impact will not even reach the door itself; it will be delayed by the thresholds.
Geometry and control points
Owners of the “Nine” cannot do without knowledge of control points and body geometry if they intend to repair or tune the body themselves in the future. In addition, it is very important to know this when you buy a car, and you need to properly check the body.
Most often, the following geometric dimensions of the VAZ 2109 body are checked:
- The diagonal of the windshield frame, marked in the photo as A. It should be equal to 1270 mm (plus/minus 4 mm);
- The distance between the middle of the upper beam of the windshield frame and the middle of the lower beam, marked in photo B, should be equal to 550 mm (plus/minus 2 mm);
- The diagonal of the hood, marked in the photo as B, should be equal to 1400 mm (plus/minus 5 mm);
- The long diagonal of the rear side window, marked in the photo as D, should be equal to 555 mm (plus/minus 2 mm);
- The short diagonal of the rear side window, marked D in the photo, should be equal to 380 mm (plus/minus 2 mm).
Knowing the car body diagram, the owner will be able to check for distortions and defects with his own hands and carry out repairs. The diagrams and photos presented in the article will help you understand the information more easily. You can find step-by-step instructions for body repair on the pages of our website.
Source