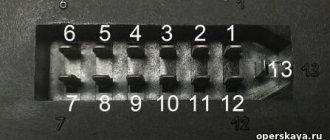
There are a lot of videos of the same type on YouTube on how to make footwell lights with your own hands, where the wires lead from the door limit switches or the ceiling lamp, but my laziness found a new and quick way to make footwell lights on a VAZ-2114. I may not be the discoverer of this method, but I have never seen anything like it anywhere. So, let's look at the contacts of BI BSK.
Contacts BI BSK VAZ 2114
In my car, the footwell lighting is implemented through an open door indicator, the signal of which comes to the BI BSK, so this method can be considered the fastest and simplest. Operating principle: when the driver's door is opened, the signal comes to pin 6, and when the other doors are opened, the signal comes to pin 7. If you look at the signal table (below), pins 6 and 7 are ground. To make the backlight quickly, you will have to “work around” the car electrician a little. We power the positive wire of our backlight from wherever it is convenient, even from the cigarette lighter, and connect the ground wire to pins 6 and 7 of the BI BSK chip. Everything is ready, all that remains is to power the LED strip to the connected wires. In the end, we spent about half a meter of wiring and saved a lot of time.
It is worth noting that in order for the footlights to work correctly, you will have to connect pins 6 and 7 to each other, this did not affect the operation of my car in any way, at least I personally did not notice any changes. You can also theoretically consider other conditions under which the foot lighting will work; if interested, read after the signal table.
Signal table BI BSK VAZ 2114
In theory
1. Turn on the footwell lights when the key is inserted into the ignition.
According to the signal table, when the key is inserted into the ignition switch, a voltage of 12V appears on the wire of pin 9. Accordingly, we toss the wire to pin 9 of the chip and get a positive wire for illumination, and we toss the ground wire where it is convenient. Done, now when we insert the key into the ignition, our foot lights come on. They pulled out the key and the light went out.
2. When the lamp is turned on, the foot lighting turns on.
According to the signal table, when the lamp is on, ground appears on pin 8 of the chip.
Accordingly, we connect the ground wire to pin 8, and the positive one is convenient. Ready! When the interior light is turned on, the footwell lights come on. Let's give a round of applause to those people who dismantled the plastic and the ceiling to make the lighting for the feet directly from the lampshade.
3. Foot lighting when the ignition is on.
According to the signal table, 12V appears on pin 13 when the ignition is on. Accordingly, we connect the positive wire for illuminating the legs to pin 13, and the ground is convenient. Everything is working.
Why there is no light in the VAZ 2114 interior: the secrets of an electrician
The electrical equipment system of the VAZ 2114 car includes a whole range of different lighting devices.
It's good when it's light in the cabin
Conventionally, they can be divided into the following groups:
- Headlight;
- Tail lights;
- Lighting in the cabin.
To make it easier for the driver to navigate the road at night, halogen low and high beam lamps are installed in front of the car in the headlight unit. Turn signal lamps are also installed in one unit with them, so that when repairing the car the entire unit can be removed. At the rear there is one block on each side, which includes brake lights, turn lamps and reverse lamps.
VAZ 2107 fuses and relays, electrical diagrams
Often when operating a VAZ 2107 we encounter electrical problems. At one point, one of the electrical appliances, such as a stove or low beam headlights, refuses to work. Dimensions, cigarette lighter, turn signals and other components of the vehicle's electrical circuit may also stop working without warning.
To find the cause of the malfunction, you first need to understand whether voltage is supplied to a particular device and check the fuses and relays of the VAZ 2107. The most important thing in the circuit is the fuse. It protects the device from overloads and failure. If there is any short circuit or if the current in the circuit increases significantly, the fuse will blow. Therefore, first of all, let's open the hood of the car and check the fuses.
Interior of the car
The interior lighting is worth a separate discussion. The interior of the VAZ 2114 is illuminated using the following devices:
- Interior lighting;
- Individual light lamps;
- Instrument lighting on the control panel;
- Light in the glove compartment, cigarette lighter and separate bulbs for some buttons and switches.
The general light in the VAZ 2114 is located in the car interior and illuminates it. The engineers decided that it would be optimal to place it above the heads of the driver and front passenger, so it is simply built into the headliner and bolted there. Usually this lamp lights up when one of the doors is open, and goes out when it is closed. This is familiar to us from the classics, where a similar system was organized with light bulbs on the door pillars.
Interior lighting
Here the lamp lights up when the VAZ 2114 door limit switch, which stands on the racks and is pressed by the door itself, is triggered. There are also separate buttons for the passenger and driver to turn on this lamp if desired.
Replacing the standard clock of a VAZ 2107 with digital ones
The standard clock is not informative enough, and it looks too standard. Therefore, many owners of the “Seven” change them to more advanced models. Usually this is an electronic watch with a voltmeter function. Such a device not only looks more modern and attractive, but also allows you to control the voltage of the on-board network. Installing an electronic clock on a VAZ 2107 is easy. On the market you can find a wide range of electronic watches for the “seven” with different display colors and functionality. A good option is a watch with alarm, calendar, voltmeter and thermometer functions. The most advanced model has two temperature sensors - internal and external, which allows you to control two temperature parameters at once.
Such clocks fit perfectly into the place of the standard ones, and connecting them does not require the installation of additional power circuits. The only thing you should take care of is to install an external temperature sensor and run a wire from it to the location where the clock is installed.
If the electronic clock does not have a function for measuring external temperature, its installation is completely similar to the installation of a standard clock and does not require additional actions.
Backlight doesn't work
In cases where the light in the interior of a VAZ 2114 does not turn on, drivers who do not understand the electrical equipment of the car and its repair immediately begin to go to the Internet and try to find some advice or a solution to the problem there. But, no matter how strange it may be, you can fix the interior lighting of a VAZ 2114 yourself, you only need a minimum of tools for this and a detailed action plan, which we will analyze today.
Initial check
It is better to start repairs by checking the functionality of a specific lamp - perhaps the light bulb has simply burned out and will simply need to be replaced. If the light in the interior of the VAZ 2114 does not go out or, on the contrary, does not turn on when the doors are opened, then you need to check the door switches for functionality, you need to see if the contacts are in order, if they have oxidized, then it is better to clean them and wipe them with alcohol.
There are also certain nuances if there are LEDs. Typically, drivers prefer to replace conventional lamps with LEDs as quickly as possible, this is due to the following factors:
- Cost-effective;
- Longer service life;
- Light brightness is much higher at low cost.
But when operating such lamps, it is necessary that the electrical circuit be fully taken into account, since for LED lamps it is important that the polarity be observed.
So you need to check the plus and minus, and if so, turn the light bulb the other way and see if it lights up after that. In any case, it is better to convert the lampshade of the individual lighting of the VAZ 2114 to LED lamps so that it produces more brightness.
Also, on all light bulbs you need to check the voltage at the contacts and find out whether current is flowing there. If it is not there, then you will have to look for a broken wire somewhere in the wiring. This will require disassembling certain parts of the car, but there is no getting around it - if the interior lighting of the VAZ 2114 no longer works, then it needs to be repaired. The greatest attention still needs to be paid to the limit switches; often the problem with breaking the circuit lies precisely in them; a wire can easily break there, and you won’t even notice it.
We make a unique design with our own hands
Everything is much more complicated here, but you can save money. In this case, no sets are purchased. Everything is created independently and exclusively to your taste. True, you can first look at photographs of ready-made solutions. They will help you move in the right direction.
This option is preferable not only because of saving money. You can create something truly individual and unique. First, you should replace the arrows and stickers. Here you can again go to the store or create something of your own. You can also order arrows and stickers from a studio specializing in tuning. It will cost you a little more, but the effect will be much stronger.
Refinement of light in the cabin
The interior lighting of the VAZ 2114 can be customized with your own hands to suit your purposes and needs. The most interesting option is considered to be the complete removal of the standard lampshade, and the installation of a programmable analogue along with integrated LEDs instead. It is better to do such an upgrade as soon as it was noticed that the light in the VAZ 2114’s interior does not work - why repair an already broken old lamp if you can replace it with a new and much better one.
In addition, the new lamp will have the following functions that the standard version does not have:
- The ability to select brightness from three possible options, adjusted by pressing a button;
- Automatic shutdown after a certain time if the door is not completely closed or just open. This will prevent the battery from draining overnight;
- Smooth extinguishing of the lamp, switching off occurs within 10 seconds.
Popular faults
If we talk about the dashboard of VAZ 2109 cars, then they are characterized by certain problems. We will tell you about them, and also tell you how to act correctly in a given situation.
| Fault type | Your actions |
| Gasoline level and temperature indicator does not work | In most percent of cases, this situation occurs due to breakdown of devices, sensors of these devices, or an open circuit of the power supply. Therefore, first check the circuit for continuity, make sure that the fuses have not blown. If this is not the case, check whether the gas level and temperature sensors are working. Only if none of the actions allowed you to get rid of the breakdown, you can begin to replace the devices themselves. No options, the problem lies in them |
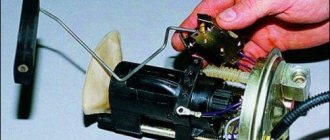
| When the fuel tank is full, the arrow points to zero | If you have worked on the fuel level sensor, the fault most likely lies with you. When manipulating this device, the float limiter is often knocked down. Either the limiter is installed incorrectly or adjusted, causing the resistor winding to end. To resolve the problem, remove the sensor and then adjust the limiter again |
| The fuel gauge needle regularly jumps and ends up at zero | Here, most likely, the resistor has weak contact with the current collector. Another possible option is that there is a break in the resistor. To resolve this situation, we recommend replacing the hot level sensor with a new measuring device |
| The fuel level lamp is constantly on | If this lamp is constantly on, there is probably a short circuit in the fuel level sensor supply wiring to ground. Another option is that the sensor’s flexible bus is shorted to the fuel intake pipe. You will have to disassemble the device to align the bus and get rid of the resulting short circuit |
| Indicator lamps do not work on the dashboard | There is a high probability that the light bulbs have simply burned out, or they are poorly held in their seats due to loose contact. Replace the bulbs, but first try tightening the contacts. Traces of oxidation may be detected. When cleaned, the light bulbs can work normally again. Also, do not exclude the possibility of wiring breakage or oxidation of the tips of the supply wiring. Try going over the wires with a tester, cleaning the contacts if necessary. |
| The speedometer does not work, the flexible shaft is noisy | In such a situation, you will have to change the speedometer drive cable or replace the entire speedometer assembly. But before you bother so much, check that the fastening nuts of the tips are tightened correctly and properly. The flexible shaft may make noise during operation due to deformation or violation of the permissible bending of the shell of less than 10 centimeters during installation |
The instrument panel of the VAZ 2109 is not so complicated that you cannot figure it out on your own. But in the absence of experience, it is better to entrust the repair to specialists, or to enlist the support of a partner who understands this matter.
If you find an error, please select a piece of text and press Ctrl+Enter.
Installation of new equipment
Now let’s figure out how to install an LED lamp on a car; for this we will definitely need a VAZ 2114 interior lighting circuit.
This is done in the following sequence:
- Remove the lampshade;
- Unscrew the base of the case;
- We connect the new lampshade;
- Screw the LED lamp into place.
First we need to remove the original lampshade and disconnect the wires from it, all the contacts, we also need to remove the diffuser. The housing is screwed to the roof sheathing with four self-tapping screws; they are simply unscrewed and the housing is removed. Next, you need to take a new case and connect all the plugs in accordance with the diagram to the contacts that go to the battery. The new housing is screwed in exactly the same way onto the same four self-tapping screws, and the lens is snapped into place.
In this simple way you can update your car interior and make the interior lighting of the VAZ 2114 more comfortable and convenient.
Replacing the standard clock of a VAZ 2107 with digital ones
The standard clock is not informative enough, and it looks too standard. Therefore, many owners of the “Seven” change them to more advanced models. Usually this is an electronic watch with a voltmeter function. Such a device not only looks more modern and attractive, but also allows you to control the voltage of the on-board network. Installing an electronic clock on a VAZ 2107 is easy. On the market you can find a wide range of electronic watches for the “seven” with different display colors and functionality.
A good option is a watch with alarm, calendar, voltmeter and thermometer functions. The most advanced model has two temperature sensors - internal and external, which allows you to control two temperature parameters at once.
Such clocks fit perfectly into the place of the standard ones, and connecting them does not require the installation of additional power circuits. The only thing you should take care of is to install an external temperature sensor and run a wire from it to the location where the clock is installed.
If the electronic clock does not have a function for measuring external temperature, its installation is completely similar to the installation of a standard clock and does not require additional actions.
