The Niva Chevrolet timing chain is an important element in the gas distribution mechanism of the internal combustion engine. The main purpose is to ensure synchronized operation of the crankshaft and camshaft.
This element is a closed circuit located in an oil environment inside the engine. On the one hand, the timing chain is a simple and reliable element with a long service life. However, over time, during operation, the chain wears out, stretches, etc.
Replacing a Chevrolet Niva chain itself is a serious procedure, since it will require partial disassembly of the internal combustion engine. Next, we will look at when a Chevrolet Niva chain needs to be replaced, how to set the Chevrolet Niva timing marks, and also what nuances you should pay attention to when replacing the timing chain yourself.
Design and symptoms of timing chain malfunction on Niva
Structurally, the VAZ 21214 engine installed on the Chevrolet Niva is similar to any engine of a classic Lada. The differences lie in the use of a hydraulic tensioner in the timing mechanism, hydraulic valve compensators and a single-row chain instead of a double-row. In addition, the engine of a modern car is equipped with fuel injection, air conditioning, and hydraulic booster, which somewhat complicates repairs.
The timing chain is considered more reliable than a timing belt. It does not tear and has an additional margin of safety. The factory instructions require replacement at 100 thousand km, or at the first sign of malfunction. In this case, not only the chain is subject to wear, but also the camshaft and crankshaft sprockets. The development and natural stretching of the chain leads to a shift in valve timing and deterioration of engine performance.
Symptoms of Chevrolet Niva timing faults:
- an engine error appears periodically on the dashboard;
- uncertain cold start;
- extraneous metallic sounds in the area of the front engine cover;
- drop in engine power and response;
- engine overheating, deterioration of exhaust gases;
- increase in fuel consumption.
Important! The simplest and most reliable way to determine a malfunction is to evaluate its operation by ear. A thin metallic ringing from under the cover indicates a weakening of the chain tension. With severe wear, the sound becomes similar to the rattling of a diesel engine.
The main reasons for accelerated wear of the chain and sprockets in the timing mechanism are low-quality oil and its irregular replacement, engine operation in extreme conditions, and defective replacement parts.
How is the replacement made?
If chain stretching is detected and the decision is made to replace only the hydraulic tensioner, then this is an incorrect assumption. It is necessary to replace all parts: chain, hydraulic tensioner, seals, gaskets. Replacement is done in the following sequence, using all the necessary tools:
Use a spanner wrench to unscrew the tube fitting, which has a “10” head. The tube is designed to supply oil to the hydraulic tensioner.
Having loosened the fitting, the tube is removed and moved upward so that it does not interfere with further work. The two nuts securing the device itself are also unscrewed using a “10” wrench.
The device is ready to be removed from its mounting location. We grab the protruding part with our hands and pull out the device. There is a gasket on it, which also needs to be removed to replace it with a new one.
A used device cannot be repaired and requires the installation of a new one. Before installation, it is necessary to coat the gasket with a layer of sealant to prevent oil leakage.
Replacing an old device does not require serious mental and especially physical effort. Installation of a new one is carried out in the following steps:
- The device is inserted into the new seat, having first checked that the structure is identical to the old tensioner.
- Screwed in with two fastening nuts.
- The tube is inserted and secured.
It is simply impossible to make a wrong replacement. After installation, the operation of the motor and the tension of the new chain are checked. An important point is to replace the timing chain in order to 100% protect the car and your health from unexpected breakdowns on the road. This article will tell you how to replace the chain.
Now the owners of the Chevrolet Niva can, without doubt and without errors, correct the existing problem with weakening the chain tension. Remember that if your car has traveled more than 100 thousand km, and there are no characteristic sounds from under the hood, then do not neglect the situation, but disassemble and check the looseness of the chain and the functionality of the tensioner. Happy renovation work!
Selecting tools and spare parts for replacement
Replacing the timing chain on a Chevy Niva is impossible without an inspection hole or a lift . Therefore, before you decide to carry out such repairs yourself, you need to find a suitable place. Convenient access from below is necessary to remove the engine protection and conveniently unscrew the auxiliary pulleys. You will have to remove the radiator with fans and drain the coolant. On average, the entire replacement operation will take from 3 to 5 hours.
Necessary tools for repair:
- set of keys and heads from 8 to 21;
- spark plug key;
- flat screwdriver;
- pliers;
- torque wrench (preferably, but not required);
- brake pipe wrench (for unscrewing the oil line);
- a special 38mm wrench for the crankshaft pulley nut or a suitable socket;
- hammer, mounting tool, rags.
With spare parts for repairs everything is also simple . Buy them only from trusted stores and well-known brands. The abundance of spare parts for VAZ engines in stores does not always mean a quality product. Timing units from factory manufacturers and official conveyor suppliers have proven themselves to be the best.
Important! Parts for different VAZ engines may differ in design. The Chevrolet Niva has the VAZ 21214 engine model, while the classic Niva may have the VAZ 2106, 21213, 21214, 21218 engine and their modifications.
We will need:
- valve train chain;
- crankshaft, camshaft, oil pump gears;
- plastic shoes for chain tensioner and guide;
- tensioner mechanism (mechanical or hydraulic);
- a set of gaskets for the front and valve covers;
- front cover crankshaft oil seal.
Advice. It is convenient to combine such a labor-intensive operation of replacing the chain with other work on the engine. For example, replacing the pump, radiator, leaking oil seal, drive belts of mounted units and other minor repairs.
note
If you are replacing the timing chain on a Chevrolet Niva with a two-row one, it is important to check that the ignition is installed correctly. It is set along the crown on the flywheel of the internal combustion engine. There is a section on the crown that is missing one tooth.
If the piston of the first cylinder is at TDC, this section should be located at the bottom. In this case, the 20th tooth, when counting counterclockwise, is opposite the DPKV.
Step-by-step instructions for replacing the timing belt yourself
Repairs begin by preparing the car for partial engine disassembly . To do this, the machine is placed on a pit or a lift. Remove the engine protection, drain the antifreeze from the radiator, dismantle the main radiator with cooling fans. Loosen the fastening of the power steering pump and generator, remove the drive belts.
With an air conditioner, there are 2 options : drain the refrigerant and dismantle the radiator, or carefully move it to the side and hang it so as not to break the hoses. We disconnect all the cooling system hoses that interfere with the repair area. Remove the air filter, throttle cable, air pipe. In this semi-disassembled form, you can proceed directly to replacing the timing chain.
When to change?
The factory instructions for the Niva chain drive with the VAZ-2123 injector engine do not indicate the frequency of replacement. A sign of an impending change is the increased noise of the drive and the impossibility of further tensioning the chain. Typically, this picture begins to appear closer to 100 thousand mileage. The majority of Chevy Niva owners try to overhaul the valve drive of their cars at exactly this mileage.
For the belt drive of the Opel Ecotec Z18XE injection engine, the plant has set a replacement period of once every six years. Or every 120 thousand km.
Consequences of untimely replacement
Often the cause of repairs is an imperfect design of the hydraulic tensioner. To avoid this, many people replace the Chevrolet Niva chain tensioner from hydraulic to mechanical. Otherwise, operating the timing chain longer than expected can lead to disruption of the normal operation of the engine, and in advanced cases, to its overhaul.
The increased functional life of the components and simple replacement allow you to regularly replace the timing mechanism yourself. In combination with high-quality oil, this will significantly extend the life of the engine, and will save the car owner money and nerves.
Fund indicators
To evaluate the performance of a Sberbank fund, you need to analyze profitability, commission percentage, portfolio composition, the possibility of early withdrawal and other indicators.
For convenience, I have reflected the characteristics in the table.
| Name | Prospective bonds |
| Ticker ISIN | RU000A0EQ3T9 |
| Registration number | 0327-76077399 |
| Registration date | 02.03.2005 |
| Type | Open |
| Strategy | Investing in bonds of Russian issuers denominated in rubles |
| Risk | Short |
| Commission | 2,8–5,8 % |
| Profitability for 3 years | 30,62 % |
| Minimum initial deposit | 1000 rub. |
| Subsequent contributions | 1000 rub. |
| Number of shareholders | 13 598 |
| Buy online | Yes |
| Minimum investment period | 1 year |
| Early withdrawal | Yes |
How to replace a Chevrolet Niva timing chain: subtleties and nuances
The Niva Chevrolet timing chain is an important element in the gas distribution mechanism of the internal combustion engine. The main purpose is to ensure synchronized operation of the crankshaft and camshaft.
This element is a closed circuit located in an oil environment inside the engine. On the one hand, the timing chain is a simple and reliable element with a long service life. However, over time, during operation, the chain wears out, stretches, etc.
Replacing a Chevrolet Niva chain itself is a serious procedure, since it will require partial disassembly of the internal combustion engine. Next, we will look at when a Chevrolet Niva chain needs to be replaced, how to set the Chevrolet Niva timing marks, and also what nuances you should pay attention to when replacing the timing chain yourself.
What's the result?
As you can see, replacing the timing chain is not the simplest and rather labor-intensive operation. It is necessary to remove many elements; in addition to the chain, a number of parts will also need to be replaced.
It is important to adjust and put on the chain (from the crankshaft through the oil pump to the camshaft), set the marks correctly, and also strictly follow the order of disassembly/assembly and removal, as well as the subsequent installation of parts and assemblies.
However, if you have the necessary tools and spare parts, if necessary, such a replacement can be done with your own hands in a garage. The main thing is to study the manual, and also separately take into account certain nuances discussed above.
Engine with chain drive gas distribution mechanism. Design features, average timing chain life, when it is necessary to change the chain in the engine.
The car does not start after replacing the timing belt, timing chain or performing other work on the timing mechanism drive. Main reasons, recommendations.
Why does the valve bend when the drive belt or chain breaks: reasons for the break. How to find out whether the valves are bent on a particular gasoline or diesel engine.
Comparison of chain and belt type gas distribution mechanism drives. Advantages and disadvantages of timing chain, pros and cons of timing belt. Recommendations.
Features and nuances of correct selection of timing belt. When a belt needs to be replaced, the best belt manufacturers know how to avoid buying a fake. Recommendations.
When to change the timing belt. Replacing the timing belt, marking it and how to do it correctly. Tips and tricks.
Main signs of timing chain malfunctions
Let's start with the fact that the timing chain on many cars needs to be replaced every 80-100 thousand kilometers, but in practice, replacement may be necessary earlier. Replacing the Niva Chevron timing belt is no exception. It is important to pay attention to certain signs that indicate possible problems with the chain.
During operation, the metal links of the timing chain are stretched due to constant loads. As a result, the timing system malfunctions, which leads to the following:
- the appearance of jerks when the car moves;
- antifreeze overheating;
- instability in the operation of the internal combustion engine;
- engine starting is difficult;
- the check light came on, etc.
Incorrect gas distribution greatly affects the operation of the vehicle’s internal combustion engine. If the problem is not corrected in time, the engine may completely fail, and this is a complex and expensive overhaul. You can determine how worn the chain is visually by disassembling the engine.
You can also determine that there is something wrong with the chain by listening to the motor's performance. If a ringing rustling sound appears from under the hood of the car, reminiscent of the sound of a diesel engine, and fuel consumption increases and power decreases, you need to check the timing chain.
Also, after disassembly, you can visually identify the displacement of the valve timing marks relative to each other (in one case, with a sufficiently large displacement and stretching, the chain is changed. This is necessary if the Niva chain tensioner does not cope with its task.
FakeHeader
Comments 30
Ha, mine is empty too (((((I’ll put it in tomorrow, and at the same time I’ll wash the wetsuits.
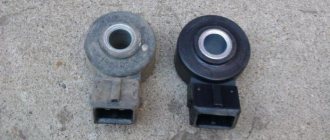
how to understand empty? I have it below there. turns out the top broke off? I've been traveling for so long. And I knew how it should be
Yes, the top, it bears all the shock load.
Tell me, I have turned the bushing in the damper, how can I now unscrew the bolt that secures it? Break it into pieces and hold the notches on the bushing with a wrench?
I held it with a medical clamp and it unscrewed easily.
This misfortune has befallen many) On my old field, I changed three dampers)) On the current one, after losing the first damper, I installed a Pilot automatic tensioner. I'm happy)
does it break and fall down?
When I started, the chain rattled so loudly that people turned around, for 5-7 seconds. The damper was intact. I’d rather change the chain at 50,000 km than have the cylinder head repaired sooner or later.
Today I opened the valve cover, the damper is intact, but somehow it moves a little. That's how it should be. (Niva 214m)
Check the tightness of the bolts on the outside of the block. It should move a little, about 3-5 mm. There is a nut in the damper housing, the top one, it has a small stroke. I believe this is a design calculation by the designers; a small stroke seems to reduce the shock load on the damper.
And the damper has threads or bushings. Somehow it works like a diesel when cold. It rattles or grinds, I don’t understand.
Threaded bushings are inserted into the damper body. Hydraulic compensators can make noise. If the chain tension is poor, a sharp, rattling sound is heard when starting the engine, which usually goes away after a few seconds. Look at the valve cover for signs of scuffing in the area of the chain; it often hits the body. Also look at the block from the back side of the damper. If there are scuffs, then the chain is not tensioned when starting, this can lead to unpleasant consequences. If the mileage is more than 80k. It’s better to change the chain and check the tensioner at the same time, maybe it’s no longer working.
Mileage 50. How to check the tensioner. Why is everyone putting on a pilot? Before this, I had the same Niva, sold 130 miles, never climbed into the engine.
I don’t know how to check, mine looked like it was working. Changed due to chain noise when starting the engine. Try starting the engine when cold, ask someone to listen to the noise, have them put their hand on the valve cover, if the chain is moving, it will be immediately clear. On the other hand, if you went into the engine to find out the cause of the noise, then why not change the tensioner to Pilot or Asai. Access there is better than on Shnivy. And with a sinking heart, no one wants to start the engine every day. If the noise disappears and a uniform tapping remains, then these are hydraulics. If they make a lot of noise, then replacement is necessary.
Hi all! We all remember that during the last repair of the car, Repair, I fished out some pieces from the engine sump, which later turned out to be plastic. And so, immediately after that repair, I went to the store and bought a chain guide. On Saturday, a decision was made change it urgently! at the store they scared me that if you bother with this matter, you might end up with a big repair. On Saturday, I’m happy with a book in my hands, I remove the valve cover, crawl under the car to turn the pulley, and I understand that the key It doesn’t fit because our pulley is deep. I immediately ran to cut and make a new key:
Replacing the timing chain and timing mark of a Chevrolet Niva
Replacing the Niva Chevrolet timing chain is carried out in several stages, and the process of setting marks is important. The Niva Chevrolet timing marks are holes and special types of notches located on the timing belt pulleys.
It is according to these marks on the pulleys that the timing chain is set. This helps not only to fix the chain, but also guarantees that the gas distribution mechanism will work correctly, no phase failure will occur, etc.
General procedure for installing timing belt phases:
- preparing the necessary tools (screwdriver, tool for turning the crankshaft, wrenches “8”, “10” and “13”;
- install the Niva Chevrolet car on the inspection hole;
- put the car on the handbrake, placing chocks under the wheels;
- open the hood and dismantle the fan, move the radiator to the side (or drain the antifreeze and remove the radiator), unscrew the fastening bolts, remove the air duct pipe;
- unscrew the valve cover fastenings and remove the cover;
- setting the phases according to the marks by rotating the crankshaft pulley until the mark on the camshaft gear aligns with the mark on the bearing structure;
- if the chain is positioned correctly, the marks on the crankshaft gear will coincide with the notch on the camshaft drive chain cover;
- if the marks do not match, continue installing and adjusting the phases.
Phase adjustment:
- straighten the special wings of the support washer and, using a “13” key, unscrew the fastening bolt securing the camshaft sprocket;
- engage first gear to prevent the crankshaft gear mounting bolt from turning while it is being removed;
- straighten the wings of the lock washer by unscrewing the sprocket mounting bolt and remove it together with the lock washer;
- remove the chain tensioner;
It is necessary to remove the crankshaft sprockets along with the chain, manually pulling it towards you 5-10 cm, while the location of the chain on the teeth changes (optimally - moving in increments of one tooth). - install the sprocket together with the chain on the crankshaft flange;
- turn the crankshaft in the desired direction until the hole and notch (pin) coincide;
- install and tighten the mounting bolt with lock washer;
- without tightening the bolt, turn the crankshaft using a special wrench (two turns) and check the location of the marks, as described above;
- after all marks coincide, tighten the fastening bolts of the crankshaft and camshaft sprockets;
- Assembly is carried out in reverse order.
Let us note once again that correctly set Niva timing marks significantly affect the service life of not only the timing belt itself, but also the engine. In this case, malfunctions in the gas distribution mechanism can cause serious problems with the internal combustion engine itself. For this reason, it is extremely important to align belts and chains strictly according to the marks.
conclusions
As you can see, to carry out this work you do not need to have any special knowledge or tools. Therefore, you can handle this kind of work yourself if necessary.
. If you follow these recommendations, it is impossible to carry out such repairs incorrectly.
The part designed to regulate the chain tension in a Niva Chevrolet car is called a timing belt (gas distribution mechanism) hydraulic tensioner. In the Chevrolet Niva timing system, the hydraulic tensioner performs a very important function, so engine operation without such a part is simply impossible. Over time, all parts of a car tend to wear out.
Rotating parts of cars are especially prone to wear, weakening, stretching and breaking. This part includes the timing chain, which stretches over time and wears out. Chain stretching is normal but must be addressed. It is to eliminate chain stretch that a hydraulic tensioner is installed in the timing system. It has a wear property that is detected by loosening the chain to half the sprocket tooth.
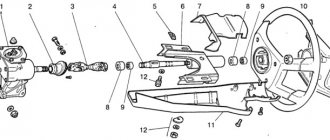
1 – tensioner body; 2 – valve unit; 3 – check valve ball; 4 – limit pin; 5 – tensioner plunger; 6 – volume limiter; 7 – plunger spring; B – working cavity; C – installation groove; D – hole; E – reserve cavity.
Oil from the lubrication system through tube 3 (see Fig. 2-11) enters cavity “E” (Fig. 2-46) of the tensioner, then through hole “D” and valve assembly 2 enters working cavity “B” and presses onto plunger 5. In tensioner body 1 there is a hole with a diameter of 1 mm for bleeding air from cavity “E”.
The diametrical gap between body 1 and plunger 2 should be 0.018–0.024 mm and is measured as the difference between the maximum measured diameter of plunger 2 and the minimum measured diameter of body 1.
During repairs, the tensioner body and plunger form a pair in which replacing one part with another after selecting the gap is not allowed. Plunger 2 must move in body 1 without jamming by a stroke of 16 mm.
When installed on the engine, the tensioner must be free of oil, pin 4 must not protrude from the housing.
As can be seen in the figure, the device has a cylindrical shape; it is screwed on the outside with a lid with a small hole through which oil flows. Inside the device there is a small ball and a spring, which ensures free flow of oil in one direction and does not release it in the opposite direction.
Inside the device body there is a cylinder with rings. On the inside of the housing walls there are spiral notches that have an inclined shape. When the chain is loosened, the piston, under pressure in the housing, moves to a certain notch on the housing wall. When the tension occurs, the body notches do not allow the piston to take its original position. It is carried out by engaging the piston rings with one-sided notches. This is how the tension device works.
Self-replacement of Niva Chevrolet chain
- Before replacing the timing chain of a Chevrolet Niva, it is necessary to carry out a number of preparatory work. First, you need to purchase new replacement parts (timing chain, three gears, front crankshaft oil seal, drive cover and water pump gasket, timing chain tensioner and damper);
- You also need to prepare tools (a spark plug wrench, pliers, rags, a flat-head screwdriver, a wrench for brake pipes, heads sizes from “8” to “22”, a special wrench for the crankshaft pulley nut);
- Even before starting work, the car itself is prepared (the car is placed on the handbrake, it is also necessary to secure the wheels with supports, remove the protection of the internal combustion engine and gearbox, prepare containers for draining antifreeze, etc.);
Having completed all preparations, you must do the following:
- loosen the generator fastenings, remove the auxiliary drive belt, remove the idler and tension roller;
- Having taken out the upper camshaft cover, use a minus screwdriver to bend the lock washer and remove the bolt with a key set to “17”;
- unscrew the water pump mount and remove it, unscrew the generator bracket bolt;
- put the car in fifth gear and remove the nut on the crankshaft pulley with a key set to “38”;
- unscrew the spark plugs and set the marks (the procedure is described above);
- then the pulleys and damper are dismantled using the head at “17”;
- dismantle the hydraulic chain tensioner (remove the oil line, change the oil pressure sensor, unscrew the chain tensioner, remove the tensioner and shoe).
- dismantling the gears and chain (after removing the old crankshaft oil seal, thoroughly clean the seat from dirt);
- Next, damaged or worn parts are replaced (new tensioner shoe, oil seal, new Chevrolet Niva timing chain, pre-treated with engine oil, etc.);
- then it is necessary to check the degree of chain tension and check that the marks match;
- When finished, you will need to tighten the mounting bolts of the pump and camshaft gears, bend the stoppers, and install the front cover. Now you can install the generator bracket and other elements, check the tension rollers and auxiliary drive belts for defects.
- We also recommend reading the article about why the engine does not start after replacing the timing chain. From this article you will learn about the main reasons why the engine may not start after replacing the timing gear drive, as well as what nuances you should pay attention to.
- The installation of the pump completes the work of replacing the circuit, the belt is also put on and the connectors are connected, the radiator is put in place, antifreeze is poured in, and all remaining parts are installed.
- After finishing the work, check for leaks or the occurrence of noise that is not characteristic of engine operation. If everything is in order, replacing the timing chain with your own hands can be considered complete.
- What's the result?
- As you can see, replacing the timing chain is not the simplest and rather labor-intensive operation. It is necessary to remove many elements; in addition to the chain, a number of parts will also need to be replaced.
- It is important to adjust and put on the chain (from the crankshaft through the oil pump to the camshaft), set the marks correctly, and also strictly follow the order of disassembly/assembly and removal, as well as the subsequent installation of parts and assemblies.
- We also recommend reading an article about the advantages and disadvantages of a timing chain drive compared to a timing belt drive. From this article you will learn about the pros and cons of the timing chain, as well as what to look for when operating engines with this type of drive.
- Of course, if you do not have the proper experience and skills to perform such work, it is better to give up trying to change the chain yourself and seek help from specialists at a service station.
- However, if you have the necessary tools and spare parts, if necessary, such a replacement can be done with your own hands in a garage. The main thing is to study the manual, and also separately take into account certain nuances discussed above.
Video
The entire process of replacing and setting phases is shown quite well in the video (this is the author’s channel).
Recently, an old friend of mine came to see me in his old Chevrolet Niva with the characteristic sound of an extended chain.
In addition to the timing kit, I had the foresight to purchase even a front cover gasket, a crankshaft oil seal and a kilo of marinated meat. I could not refuse such an offer. So, Niva Chevrolet replaced the timing chain and front crankshaft oil seal.
First, let the engine cool to an acceptable temperature. Remove the pipe by unscrewing the bolt by 10 and loosening the clamps.
Next, we unscrew the eight nuts by 10 and move aside the throttle cable and all the pipes that will interfere with us, remove the valve cover.
Remove the air conditioner belt by unscrewing the bolt 13 of the tension roller.
Then loosen three 13mm nuts and one bolt of the generator belt tension roller and remove it.
Now comes the fun part. To unscrew the pulley nut, we need a 38mm socket. Since the elongated head does not fit under a regular wrench (the radiator is in the way, but we don’t want to remove it), we use a pry bar, carefully sawed off from the hub key of some large car.
Everything fits perfectly. Unscrew the nut and remove the crankshaft pulley.
Unscrew the deflection roller.
We dismantle the reinforcing plate.
We unscrew the six nuts securing the front timing chain cover to the block and the three bolts securing it to the pan and remove it.
Set the top dead center. The key on the crankshaft should align against the mark on the block.
The mark for the camshaft sprockets is against the ebb of the camshaft housing.
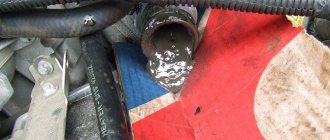
Next, unscrew the oil supply pipe and two nuts 10 of the chain tensioner.
Next, unscrew the tensioner shoe, damper and remove the timing chain.
Compare the new and old timing chain. It could be worse.
New timing kit.
Reinstall the chain, guide and tensioner shoe. We tighten the chain by hand and check that the marks match.
To make it convenient for us to check the marks after installing the front timing cover, we find the factory mark on the crankshaft pulley and mark it with a white marker. This mark at TDC should be opposite the center of the crankshaft sensor.
We install the front cover, crankshaft pulley and tensioner. Let's check the marks again. We install all the removed parts in the reverse order of removal. Fill with fluids, start the engine and enjoy.
The timing chain on a Chevrolet Niva should be replaced every 100 thousand kilometers. In car services, this procedure costs a decent amount of money, but the whole process can be done independently. Fortunately, this is not difficult to do on a Chevrolet Niva, and today we will look at the whole process with examples in photos and videos.
When the time comes to replace the timing chain, the vehicle's fuel consumption may increase and the engine will become noisier. If these signs are present, it is necessary to replace it as quickly as possible to avoid serious damage.
Symptoms of a problem
It is almost impossible to say exactly when replacement is required, and to understand that it has stretched, you can only disassemble the engine, but this is not an easy task. Therefore, you can understand that the chain is stretched by the operation of the engine; during operation, if stretched, a ringing sound will be heard, it may resemble the operation of a diesel unit. As a rule, it needs to be replaced at a mileage of about 100-150 thousand kilometers. In case of wear, not only the chain changes, but also:
- Pad
- Stuffing box
- Gears
And if they are not changed, this can lead to it breaking during movement. Only replacing all elements of the system will guarantee its high-quality and long-term operation, and it is somehow impractical to disassemble the engine floor to replace one part.
Tranquilizer
Another important element in this system is the Niva Chevrolet chain damper, which prevents the resonance effect from occurring. This system consists of the following elements:
The damper is located inside the cylinder head on the front side and is attached to it with two bolts. If it is damaged or worn out, vibrations appear, which can lead to the chain jumping and thereby damaging the motor.
Replacement
To replace, you will need a ten-size socket wrench and a screwdriver. When the tool is ready, we go through the following steps:
- Remove the cover from the cylinder head
- Remove the camshaft drive chain tensioner
- Without disconnecting from the chain, remove the sprocket from the camshaft flange
- Starting from the bottom bolt, unscrew the two fastening bolts
- We fix the chain together with the sprocket and remove the damper. During removal, it is advisable to hold it so that it does not fall into the oil pan.
- We inspect it and if there is damage, we replace it with a new damper.
- We take a new part and install it in reverse order.
It is necessary to purchase a new element exactly the same as the one that was installed previously, since models that were produced earlier may have a damper of a different shape.
Summarizing everything written above, we can conclude that to carry out this work you do not need to have special knowledge or have a special tool, therefore, if necessary, following all the above instructions, you can do all the work yourself.
Removal
Changing a chain on a Chevrolet Niva is much more difficult than replacing a belt. To do this, you should do the following:
- We drive the car into a pit or overpass
- For ease of work, remove the engine protection with boot, this will also help remove the timing belt mounts
- We fix the car with the handbrake, put supports under the wheels
- Drain the antifreeze and remove the radiator with fan
- From the air duct pipes and from the valve covers, disconnect the accelerator cable that goes to the air filter.
- We remove the crankshaft sensor, and then loosen the bolt that secures the generator
- We move the generator and loosen the belt tension.
- We remove the belt, unscrew the bolts that secure the water pump to remove it.
- Unscrew and remove the belt bypass and tension roller.
- We remove all pipes that interfere.
- To prevent debris from getting into the cylinder head, it is advisable to cover it with something.
- We unscrew the bolts that secure the gear and camshaft, and after removing the cover, remove it.
- We remove the hydraulic tensioner with the shoe, having first removed the oil pipe.
- Together with the chain, we remove all the gears, oil pump, camshaft and crankshaft.
- We install a new oil seal on the timing cover
How to choose a spare part
To work, you will need to buy a new damper, which for the Chevrolet Niva is available from different materials:
Car enthusiasts choose traditional metal parts for their resistance to stress and wear. The best option among components made of durable metals is one in which the working surface is made of polymers
When choosing, please note that the layer of vulcanized rubber must fit tightly to the metal so that it cannot be removed with a sharp object. The disadvantage of this option is that if it breaks, the heavy metal parts of the damper can fly apart and damage the engine. Plastic components have only one drawback - they need to be changed more often than metal ones.
It is less resistant to wear. This option has clear advantages: when broken, the plastic crumbles into small pieces and does not damage the engine due to their low weight; this damper is slightly larger in size than metal, which increases the area of its contact with the chain. The design features of the plastic component make it possible to reduce chain vibrations and reduce shock loads, so it will serve no less than a classic one.
As for the manufacturer, it is worth paying attention to RUSMASH products. This company supplies spare parts to the Gorky and Volzhsky automobile plants
Please note that you only need to buy the part for the Chevrolet Niva. The components from other VAZ models will not fit - they are different in shape and area of contact with the chain.
Installation
After removing all elements of the system, you need to carry out proper installation and configuration, for this you need to do the following:
- Install the mounting bolt on the shoe.
- We check that the shoe does not move on the axis, tighten the bolt
- We install new gears, they must clearly coincide with the existing marks
- We install the clamp, if it does not sit in its place, you can file it a little
Before installing the chain, take engine oil and lubricate it, then put it on the new elements as follows:
- We put it on the crankshaft gear
- Then to the oil pump
- Then to the camshaft
After replacement, the tensioner is installed in place, the marks of which must coincide with the chain tension; after checking, we tighten all the bolts. Lubricate the gasket with sealant located on the timing cover and install it in place. We install the pulley and two belt rollers in place and tighten the bolts that secure them. Engage 4th gear and tighten the pulley nut. We install all existing pipes, hoses, radiator, fan in their place, and fill in antifreeze. We start the engine for a couple of minutes and check how it works; if everything works properly, we install the protection with the boot in place.
Replacing the chain drive
- Place the car on a level surface. Open the hood. Disconnect the battery. Remove the air filter.
- The choke cable should be disconnected and moved away. It is also necessary to disconnect all electrical drives and pipes.
- Remove the fan, generator belt and pump roller. The belt should be thoroughly examined. If deep cracks or other damage is found on it, it must be replaced with a new one. Remove the tray protection and thoroughly clean its cover.
- Remove the valve plug. Unscrew the camshaft sprocket screw.
- Take a wrench and unscrew the ratchet nut.
- Now we begin to rotate the crankshaft until the marks on it and on the engine casing completely coincide. Make sure that the marks also match on the bearing housing and camshaft sprockets.
7. Then remove the casing covering the motor. To do this you will have to remove several bolts. We remove the sedative. Unscrew the screw securing the oil supply pump. There is no need to remove the screw. It should only be loosened and left in place.
8. We begin to remove the tension element mechanism. We remove the MM line, remove the pressure sensor, after which you can remove the tensioner itself. 9. Remove the screw on the camshaft gear. We remove the gear. After this, remove the timing chain. At this point, the parsing process can be considered complete. Now let's assemble the mechanism. 10. We take the purchased oil seals and begin to install them in place of the old ones. First of all, we change the crankshaft oil seal. After removing the old component, clean the installation location and install a new oil seal. First, it is recommended to lubricate the new oil seal with engine fluid, for example. 11. Now we take the chain in our hands and also begin to lubricate it. After this, we put the drive on the crankshaft gear, the oil pump and then the camshaft. This sequence must be followed. When tensioning the chain, you need to ensure that the alignment of the marks is not disrupted.
12. Install the tensioner and carefully tighten the nuts securing it. We tighten the screws on the sprockets and check the alignment of the marks again. To do this, turn the crankshaft to the right again. 13. Replace the alternator belt. If the old belt is in good condition, then it is quite possible not to change it. 14. Lubricate the gasket that we will install on the cylinder head and install it. Don't forget to clean the seat from traces of the old gasket. We put the head in place and carefully tighten all the fasteners. We install all other parts in reverse.
Now let's check the operation of the mechanism. To do this, start the engine and listen to how the engine operates. By hearing it is quite possible to determine whether everything was done correctly or something went wrong. If the sound is familiar, rustling, then everything is done correctly. If there is a characteristic grinding sound, the procedure must be repeated.
Replacing the timing chain on a Niva Chevrolet
Over time, parts on cars wear out and become unusable. The timing chain in the Chevrolet Niva is no exception. Although the chain has a longer service life compared to the belt, there comes a time when it needs to be replaced. If the belt simply breaks when it serves its purpose, then the situation with the chain is more complicated.
Over time, chains have the ability to stretch; of course, it is not noticeable at low mileage of the car, but after winding up more than one hundred thousand kilometers on the meter, you can compare and feel a significant difference in stretching. Therefore, every part has its own service life, which depends not only on time, but also on the quality of driving the car.
Stretched and new timing chain
When is it time to change?
As you know, the timing chain is a more reliable element of the gas distribution mechanism than the belt. Unlike a belt, it does not wear out so quickly and the likelihood of it breaking is quite low. However, sooner or later, every owner of a Niva Chevrolet faces the question of the need to replace the chain and set the marks according to the standard.
Niva Chevrolet car
As for the timing, the manufacturer does not regulate the frequency of replacing the mechanism chain on a given car model. As a rule, this happens no earlier than after 100 thousand km. But if, during operation of the internal combustion engine, a sound appears that was not there before, this may cause the chain to stretch. If the chain cannot be tensioned using the usual method, this may indicate the need to replace it.
Phase diagnostics may also indicate the need to change the chain. If the mark on the camshaft sprocket does not match the one on the bearing housing, the element should be replaced. Likewise, if chips have formed on the bushings.
In addition, if you find cracks directly on the chain itself, then this, of course, also indicates the need to replace the component.
How to understand what is wrong
There is no exact recommendation for determining the timing chain stretch in a car. To find out how much it has stretched and whether it is time to change it, you need to disassemble the engine. And disassembling the engine to check stretching is quite difficult and difficult. Therefore, stretching can be determined by hearing, when the sound of a ringing rustle is heard from under the hood. This sound is reminiscent of a diesel engine, so it is easy to hear. In addition, it is necessary to monitor the mileage; if the meter shows mileage of about 100 thousand, then this definitely indicates chain wear.
It's not just the timing chain that needs to be replaced. Since the timing mechanism on a Chevrolet Niva often takes on heavy loads, which cannot be said about cars with a belt, gears, seals and gaskets are also subject to wear.
After all, if you replace only the chain, then the use of old gears will lead to its eating away, which can contribute to its breaking while the car is moving.
Therefore, it is necessary to change all the parts of the timing mechanism in Niva with new ones, only this will help guarantee quality and long-term operation. Plus, disassembling half the engine to replace one part is an irrational use of time and money.
Consequences of incorrect installation and adjustment
The gas distribution mechanism greatly influences the operation of the engine, so when replacing parts and setting marks, you must be careful and avoid mistakes. But if this does happen, the engine will immediately let you know about it.
If there is a serious error, the engine will not start. If the phase shift is small, the electronic engine management system compensates for this by adjusting the ignition. If the phases are shifted by half a tooth or a gear tooth, the system is not able to compensate for such a shift.
This leads to the following consequences:
- sudden loss of traction - the car responds poorly to pressing the accelerator pedal;
- deterioration in fuel efficiency;
- the engine runs intermittently, even at high speeds;
- the coolant temperature rises, causing engine overheating with all the ensuing consequences;
- premature wear of the camshaft, burnout of valves, broken chain followed by major engine overhaul.
Replacement of worn out timing mechanism parts
Replacing a belt in cars with a belt drive is much easier than doing it in a Chevrolet Niva engine with a chain drive. First you need to install the car on an overpass or inspection hole. In the pit, the car is fixed with a hand brake, and supports are placed under all the wheels. The fan and cooling radiator are removed, after draining the antifreeze. The accelerator cable is disconnected from the valve cover and the air duct pipe going to the air filter.
Now you need to loosen the alternator belt. To do this, you need to remove the crankshaft sensor and loosen the bolt that secures the generator. After loosening the bolt, you need to move the generator and release the belt tension. We unscrew the bolts securing the water pump and remove it, after first removing the belt from it. Having released the tension and bypass rollers of the belt, you can unscrew and remove them. The next step is to remove the valve covers. It is necessary to first remove all pipes that may interfere with its removal. It is better to cover the cylinder head with a cloth to prevent small particles or dirt from getting inside.
To ensure ease of repair work, you need to remove the boot and engine protection of the Chevrolet Niva. This convenience will allow you to loosen the timing cover bolts and unscrew them. The mechanism cover is removed and the camshaft gear is removed, after unscrewing its mounting bolt. The hydraulic tensioner can be dismantled in the following way: remove the oil pipe and unscrew the two fastening bolts, followed by removing the tensioner along with the shoe. Now you can remove all the gears (crankshaft, camshaft and oil pump) along with the chain. It is necessary to install a new oil seal, which is located on the timing cover.
Replacing the Chevrolet Niva fuel filter
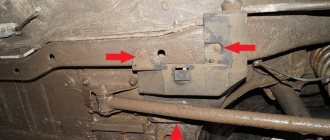
Every 30 thousand kilometers it is necessary to change the fuel filter on a Chevrolet Niva. It is located under the rear right wheel, behind a special plug.
- Relieve the system pressure. To do this, you need to remove the rear seat cushion. Unscrew the two self-tapping screws securing the hatch cover and unclip the lock of the fuel pump power wire block.
- We crawl under the car and find the fuel filter plug.
- Using a 10mm socket, unscrew the fastening nuts.
- Remove the plastic protective cover.
- We snap off the clamps of the tip of the outlet and inlet fuel pipes.
- Using a 10mm socket, unscrew the fastenings of the fuel filter clamp to the body.
We replace the fuel filter with a new one and reassemble it.
Choosing a Chevrolet Niva fuel filter
The original catalog number of the Chevrolet Niva fuel filter is 2123-1117010-02. The cost of the part is 500 rubles.