The “tens” stove is a very special device with its own character and disposition. And her mood and desires do not always coincide with the driver’s requirements. We didn’t come up with this, it’s enough to drive a 10 for a few cold months to form your own opinion. But those who have their hands in the right place will not put up with her character, but will begin to adapt her to normal work. We will also try to find out the main flaws in the design and figure out how to get the heater into working condition.
Reasons for weak airflow of the legs by the VAZ-2110 stove
It happens that during the cold season, the flow of warm air from the VAZ-2110 heater to the foot area is weak or practically absent. And this, especially in severe frosts, causes discomfort when driving. Below we will tell you why the VAZ-2110 stove does not blow at your feet, and also list the possible causes of this problem and ways to solve it.
Causes of poor foot airflow
Heater malfunction
Air through the cabin filter is taken from the street by the rotating blades of the electric heater motor. Through a damper system, air is distributed through air ducts and supplied into the cabin through deflectors and non-adjustable grilles.
Air, like any gaseous medium, tends to follow the path of least resistance. Therefore, it is logical that the air flows first come out of the central and side deflectors. The feet of the driver and passengers are blown last. Structurally, the air ducts to the central deflector and the upper side airflow points have a larger cross-section, and it is much easier for air to pass through them.
Initially, you need to make sure that nothing interferes with the intake of air from the atmosphere. After all, if the air is supplied in insufficient volume, then it will not be enough to supply all airflow points with the intensity that was calculated at the design stage of the car.
Check the condition of the cabin filter. To do this, remove the wipers and frill. The cabin filter is located on the right side of the vehicle under the windshield. It is covered with a plastic casing, which is secured with four self-tapping screws. Unscrew the screws and remove the cabin filter. We start the engine, warm it up to operating temperature and check the operation of the stove. If the situation has improved, change the cabin filter and close the issue.
The second common cause is a clogged heater core. In this case, the heating of the interior will be weak, because warm air does not come out of all the deflectors well, and not just into the legs. But the fact is that when driving for a long time, your feet begin to freeze first, so it seems that the problem is in this part of the airflow.
Video: Why the stove does not blow at the feet of VAZ 2111,2110
This malfunction is easily diagnosed. We find two pipes for supplying antifreeze to the heater radiator (rubber hoses on the left side in the direction of travel of the car). With the engine warm, carefully touch the two pipes one at a time with the heater running at full power. The difference in temperature between the pipes should be minimal. If one pipe is hot and the second is cold or barely warm, we wash or replace the heater radiator.
Checking the operation of the dampers
There are nine exit points for air flows from the heater on the VAZ-2110:
- central deflector;
- two side deflectors and two windshield air vents;
- heated feet of the driver and front passenger;
- two outputs for heating the feet of rear passengers.
In an ideally operating system, the pressure generated by the heater motor is sufficient to create an effective flow to warm the feet. However, over time, gaps form in the joints of the air ducts, and the dampers of the VAZ-2110 heater begin to fit loosely to the body. This leads to atomization of the air flow. As a result, a minimum amount of air reaches the distant exit points.
First, dismantle the panel with the central deflector. It is held in place by four plastic clips. To remove it, simply pry it off one of the sides with a suitable object, such as a flat-head screwdriver. Be careful: the clips are fragile.
Evaluate the operation of the damper. In older cars with a manual damper drive, pay attention to the play in the linkage of the rods. A broken rod system will not allow the damper to fit tightly to the body in the extreme position, which will cause air to leak from the cold circuit. The problem is corrected by adjusting the damper. In a mechanical drive, it is possible to shorten the rod due to a movable lock on a gear rod or a threaded tip. During the adjustment process, check that the position of the switch on the panel corresponds to the actual position of the damper.
Another reason why the VAZ-2110 stove does not blow into your feet is a malfunction in the operation of the automatic heater control system (AHC) unit or the gear motor of the VAZ-2110 stove. In this case, there is usually insufficiently warm or even cold air from the stove operating in maximum heating mode. This is due to the incorrect position of the damper in which the gearmotor sets it.
Evaluate the operation of the gear motor of the VAZ-2110 stove. To do this, visually check how it closes the damper when switching modes. The easiest way to do this is to remove the panel with the central deflector. Move the temperature knob to the extreme position (for example, set the minimum temperature), then sharply switch to the opposite mode. The damper should completely block the channel visible from the driver's position. If this does not happen, the problem lies in the gear motor or the automatic control system unit. Check the serviceability of the gearmotor and unit.
Video: Airing the legs of VAZ 2112, 2110
Improvement of the VAZ-2110 foot airflow
If all of the above procedures did not help, then most likely you are simply not comfortable enough with the operation of the standard heater. Many motorists note: in severe frosts, even with a fully functional heater, the airflow of the feet is not enough to feel comfortable behind the wheel. While scalding streams of air emerge from the central and side deflectors. This is a design feature of the car.
There are several ways to increase the efficiency of foot airflow on a VAZ-2110 car.
- Disabling the rear footwell air circuit. It is advisable to carry out this procedure if you rarely carry passengers in the rear seats. To turn off the rear foot airflow on the VAZ-2110, you will need to remove the gear shift lever cover. The rear heater circuit air duct window is located in the front part of the rocker housing. A piece of foam rubber tightly placed in this area will close the passage channel and cut off the rear contour. Now, when the foot blower mode is turned on, air will flow only from the front of the cabin.
- Increasing the area of the outlet openings. The grilles on the plastic foot airflow panel are small. You can increase them yourself. This will slightly increase the flow of air coming out of them. Removing the panel on the driver's side is simple: it is held on with self-tapping screws. Unscrew the screws and remove the panel. We are looking for a suitable material that will serve as a lattice. We cut holes in the plastic and secure the prepared grid with glue or self-tapping screws. As practice has shown, this method increases the flow of warm air into the leg area.
- We eliminate the loose fit of the dampers. To do this, we prepare foam rubber strips 3-5 mm thick and glue them to the surfaces of the dampers adjacent to the body. This will allow the dampers to completely block the cold air supply channel in the interior heating mode, which will increase the efficiency of the heater.
An integrated approach to modifying the heater will significantly increase the efficiency of heating the feet.
Repair
Problems with instability of car heating are most often noted in the event of failure of the automatic temperature control system. The system is checked sequentially, starting with the temperature sensor. It should change the resistance depending on the temperature in the cabin within the following limits - at a temperature of +22°C the sensor should show a resistance of 20 Ohms, at +16°C - 25 Ohms. If the measurement results do not coincide with the nominal values, the sensor must be replaced.
In automatic mode, heating may not work due to the fault of the controller. Its data is also measured using a multimeter. If, when the ignition is turned on and when the temperature adjustment knob is rotated, the voltage on the long terminal changes 10-12 seconds after the mode change, the controller is in working condition. If it does not respond to rotating the knob, the controller must be replaced.
We are modifying the stove on the VAZ 2110
Materials and tools for work: - bitoplast 10; — plastic corrugation (tube); — grille (the author took it from old speakers); - Super glue; - a piece of sewer pipe; - cutting tools, screwdrivers, pliers, wrenches, etc.
The process of refining the stove:
Step one. Solving the problem of side airflow
If the stove does not blow well on the sides, then this problem can be solved in two ways. The easiest way is to simply seal all the cracks, which will increase the efficiency of the airflow. You can also lay a corrugation, but according to the author, the corrugation will allow the legs of the front and rear passengers to be well aired, but it will not have any effect for airflow of the sides. Therefore, sealing will be most effective in this case.
To seal the cracks in the panel, anti-creak (modelin) is used. It should also be used to seal the bolt holes.
Step two. Upgrading the stove damper
Thanks to the damper, air is directed to the windshield, legs and face. Initially, this damper does not fit tightly and some of the air goes through the cracks where it is not needed. Using modelin and double-sided tape, you need to seal the valve and all the cracks. The body can be covered with bitoplast 10 instead of a standard sponge. In some places the author glued as many as two layers.
After this, you will need a coffee can, plates are made from it and screwed as shown in the photo. The plates will need to be painted black, so they will not be visible through the grille. As a result, when you turn on the blower in your face, the air goes to the side windows and only into your face. When you turn on the flow to the windshield, the air goes only to the windshield and nowhere else. When the footwell flap is turned on, 50% of the air will go to the side windows, 25% to the feet and 25% to the windshield.
Video “Guide to replacing the damper gear motor”
The channel In Sandro's Garage presented instructions for changing the damper gearmotor in a garage environment.
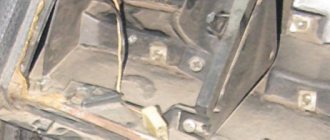
All owners of Ten and Prior know the problem of the heater, namely, it blows very badly into the feet. After last winter I decided to fix this problem. I searched through many forums and websites. Everyone solved this problem differently, but it all came down to completely removing the torpedo. I decided not to remove the torpedo. I bought everything I needed - three aluminum corrugations, a sewer pipe with a diameter of 50 mm and a length of 1 meter and 3 sewer corners. And he began to disassemble from below. The first thing I did was unscrew the front seat mounts and tilt the seats back to give me more work space.
Then I removed the upper part of the tunnel and the lower part
Then, in order to remove the Christmas tree from the bottom, we had to saw it off on the spot. I sawed with a hacksaw for metal. I sawed off part of the Christmas tree and took it out. On the driver's side, the Christmas tree is bolted to the dashboard.
Modification of the VAZ 2112 stove
- Registration
- Entrance
- To the beginning of the forum
- Forum Rules
- Old design
- FAQ
- Search
- Users
- List of forums AUTOLADA.RU
- “Tenth” family (VAZ-2110, VAZ-2111, VAZ-2112) and LADA PRIORA
- 1
- 2
- 3
- >
photos and comments for them here:
In short: I started the modernization when it was -38 outside, because... It was in this weather that I realized that the stove didn’t warm my feet at all
I didn’t bother too much (I read a PDF where air ducts were made from corrugated hoses) - I wanted to get a relatively simple solution that could be repeated “in field conditions”, without disassembling the torpedo. It turned out - what happened (see the last photo “results”).
Comments, other ideas, questions, etc. are welcome.
and if you try to cross the option where corrugated hoses are used (to reduce the heat loss itself) + changing the kinematics of the dampers
Teapot099, please send me a PDF modernization of the stove No. 2 for soap. I wanted to consider the possibility of laying corrugated air ducts without removing the dashboard. At least as much as it fits. Do you think it's real?
rear right passenger air deflector
2 Teapot099
Well done! Did some serious work! And he described it well!
And the article about corrugations is sensible, but it’s not clear whether the author removed the entire panel to pull out the Christmas tree (that is, the central air duct). When I remember this operation I will tremble so much
You can't pull out the Christmas tree without removing the torpedo. You can, of course, try to unscrew the fastening and lift the torpedo, but if you’re going to mess with all this, then it’s worth making SHI torpedoes. The joy will be even greater. And the result is more effective.
then it’s worth making SHI torpedoes.
Chet did not come across descriptions with photos. Do you have a link?
regarding the blowing in the face. The purpose of this extra thrust is that the upper damper gradually closes, and at the same time the lower damper gradually opens the way to the legs (and blocks the way to the face). Those. we simply redistribute the air that is available - it blows better into the legs/sides, and correspondingly worse into the face (but there’s enough there as it is).
In addition, here are photos of the previous express modernization: the addition of a cardboard “plug” (it is visible there in the photos) - its meaning is that without it, the air that should go into the right window deflector follows the path of least resistance ( i.e. through this hole again into the face). As a result, the factory kinematics resulted in a strong flow into the face in any situation (either directly through the closed lower damper, or bypassing it through the hole on the right). Accordingly, all other areas were allocated on a residual basis. And with this plug, more air blows to the right (the right glass definitely began to freeze less - otherwise it’s very inconvenient to drive through intersections. Visibility to the right suffered)
I posted a PDF with corrugated hoses here (special thanks to Volk) - 2.2mb
There is something to think about: something was initially done wrong in the Christmas tree - it has almost no air blowing towards the driver, but it blows well in the central part of the Christmas tree. Now, if you somehow (with corrugations, or cutting extra holes in the tunnel, or something else) redistribute the air that went past the gearshift knob - and force it to blow into the front legs, then IMHO it will be even better to warm the legs.
I don’t know, guys, why are you so afraid of dismantling the torpedo? As they say, the eyes are afraid, but the hands do. As the author of this PDF file, I can tell you: the work is worth it. I rode all winter with the heater at 26 degrees and the fan speed no higher than 2. The result justified its costs, the rear passengers are warm, the front passengers are generally safari, the windows do not sweat. In the cabin, after just 20 minutes of driving, you can undress. And most importantly, the mats are now dry. And if I add a cooler in the back of the tunnel and a grill to my article, then it’s a total song. Sorry, I didn’t take any photos of this alteration, because... it was in the fall and I spontaneously decided to do this alteration (I did it in 2 hours), but now, if I want, I press a button and an additional cooler for the rear passengers turns on (so to speak, separate climate control
). Good luck with all the changes.
P.S. the main thing is cheap and reliable, unlike VAZ design solutions
regarding the blowing in the face. The purpose of this extra thrust is that the upper damper gradually closes, and at the same time the lower damper gradually opens the way to the legs (and blocks the way to the face). Those. we simply redistribute the air that is available - it blows better into the legs/sides, and correspondingly worse into the face (but there’s enough there as it is).
In addition, here are photos of the previous express modernization: the addition of a cardboard “plug” (it is visible there in the photos) - its meaning is that without it, the air that should go into the right window deflector follows the path of least resistance ( i.e. through this hole again into the face). As a result, the factory kinematics resulted in a strong flow into the face in any situation (either directly through the closed lower damper, or bypassing it through the hole on the right). Accordingly, all other areas were allocated on a residual basis. And with this plug, more air blows to the right (the right glass definitely began to freeze less - otherwise it’s very inconvenient to drive through intersections. Visibility to the right suffered)
I posted a PDF with corrugated hoses here (special thanks to Volk) - 2.2mb
There is something to think about: something was initially done wrong in the Christmas tree - it has almost no air blowing towards the driver, but it blows well in the central part of the Christmas tree. Now, if you somehow (with corrugations, or cutting extra holes in the tunnel, or something else) redistribute the air that went past the gearshift knob - and force it to blow into the front legs, then IMHO it will be even better to warm the legs.
photos and comments for them here: https://www.e1.ru/fun/photo/view_album.php?id=29975 In short: I started the modernization when it was -38 outside, because... It was in this weather that I realized that the stove didn’t warm my feet at all
I didn’t bother too much (I read a PDF where air ducts were made from corrugated hoses) - I wanted to get a relatively simple solution that could be repeated “in field conditions”, without disassembling the torpedo. It turned out - what happened (see the last photo “results”). Comments, other ideas, questions, etc. are welcome.
How to improve the performance of the VAZ 2110 stove
The original VAZ 2110 stove has a number of disadvantages, for example, it does not dry foggy windows well, especially on rainy days, and does not warm the legs of the driver and front seat passenger well. All this can be corrected if desired. We offer a guide on how to modify your oven.
To work you will need the following:
— sound insulation; — polyurethane foam; - plastic corrugation; - a tin container, for example a coffee can; — modelin; - material for making the grille, such as speaker mesh; — sewer pipe, plastic; - a set of tools, among them should be a screwdriver, keys, pliers, files.
Modernization of the VAZ-2110 furnace device
It includes several areas:
1. Correction of deficiencies in airflow of side deflectors
This problem can be solved in two ways:
— sealing of all openings through which the air flow dissipates. This allows you to increase the flow of glass several times. — Laying corrugation in place of air ducts. This method increases the air flow to the passenger seats, front and rear, but is ineffective for the side air vents.
Therefore, to eliminate problems with airflow on the side deflectors, we make complete sealing, including the holes for the bolts. To do this, we take a material such as modelin or otherwise antiskripin.
2. Modification of the furnace damper
Modifying the damper allows for increased air flow, which is directed to the windshield, legs and central deflector.
The efficiency of the damper is reduced because it does not fit tightly to the surface of the housing. Because of this, some of the air simply dissipates. Therefore, we need to correct this manufacturer's defect:
— take the model and seal the valve and cracks. — We remove the standard sponge from the body and glue sound insulation instead. You can even do several layers.
— There is a large gap near the central deflector on the dashboard. We seal it with polyurethane foam.
— We cut out fragments from the edge of the damper. They are marked in the photo in red and green. By the way, the element circled in green further increases the flow of air onto the driver's side window.
— We take a tin and cut out the plates, paint them black so that they are not visible through the deflectors. We screw them in as shown in the photo.
The result of these manipulations will be the following:
— when the windshield blower is turned on, the air flow is directed only to the glass; — if you set the foot blowing mode, then half of the air will go to the side windows, and the remaining half will be divided between the windshield and the feet.
3. How to improve foot airflow
To work, you need to prepare a pipe, take a piece of plastic. To install the pipe, we make a hole in the plastic wall. We cover the pipe with a mesh taken from old speakers.
To modernize the airflow of the legs in the rear passenger row, we lay corrugation in the central tunnel. The ashtray is replaced by a blower deflector.
4. Improve the thermostat
The stove will work more efficiently if you use a six-channel thermostat instead of a five-channel thermostat. In this case, during the cold season of the year, the temperature of the antifreeze will not drop beyond 90 °C when the engine is running.
5. Correction of deficiencies in the steam pipe
The steam pipe is located between the expansion tank and the stove. It is through this that some of the heat is lost. On older models, the antifreeze coming out of the radiator does not have time to heat up. New brands provide for installation of a tube at the end of the radiator. Due to this, the coefficient of transferred heat increases.
6. Installation of an additional pump
If the methods described above did not help, and the stove still does not heat well, then there is only one option left - installing an additional pump from Gazelle.
This will ensure intensive circulation of antifreeze and better heating of the interior even at idle speed.
Typical faults
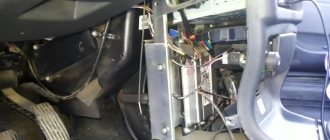
The heater may not respond to changes in the position of the regulator. In this case, you need to check the contacts in the relay block. The block itself is located on the right under the hood, and the heater relay is indicated by the corresponding pictogram. If the load on the controller is too high, the control wires may burn out. To do this, simply remove the controller and conduct a visual assessment of the contacts. The resistor through which the heater motor is connected may also fail. You can only get to it from under the hood.
Occasionally, low levels of antifreeze in the reservoir can negatively impact performance. If the coolant level is too low, air may enter the radiator. There it creates an air lock, preventing the heater radiator from warming up completely. If the radiator is not warming up well, you can pay attention to the thermostat. It may not open completely, thereby limiting the entry of antifreeze into the heater radiator.
How can you upgrade your VAZ-2110 stove yourself?
Owners of the “ten” often encounter various kinds of problems in the design of this car.
They can touch, in principle, any unit, including the stove. At the same time, when it’s winter outside, of course, no one wants to freeze while traveling. So we have to finish what the designers started, modernizing the stove in order to make it work more efficiently. Considering the harsh Russian climate, such improvements can safely be called a necessity, and not a whim of car enthusiasts. Generally speaking, the design solution of the VAZ-2110 stove can be described as quite successful. But in order for this unit to work normally, it also requires high-quality assembly and the absence of effects in the components. At the same time, both the first and second are long-standing problems of the domestic automobile industry. So motorists have to fix factory defects on their own.
How can you improve the VAZ-2110 stove
So, let's look at the situation when the interior of the "tens" is not heated efficiently enough. Accordingly, this problem should be eliminated. By and large, upgrading the stove of a VAZ-2110 car with your own hands is not a very difficult job, but it still cannot be done without a certain amount of time. Of course, you still need to have some skills, but almost anyone can do it. The main thing is to be patient and have the appropriate desire. In addition, to modernize the stove you will also need:
- sealant or silicone;
- polyurethane foam;
- simple locksmith tool.
You can, in particular, follow the simplest path with minimal effort. This option is the most optimal solution when the result needs to be obtained in the shortest possible time, but there is no time or desire to engage in a complete rework of the entire system.
In particular, the easiest way would be to simply block the stove ducts through which warm air is supplied to the rear passengers. Naturally, you sacrifice the comfort of those sitting behind you. But this option is fully justified if the driver almost always drives alone. This simple manipulation will increase the flow of warm air, heating the foot area in the front of the car.
The same result can be achieved using another simple method. In particular, the air channels of the central deflector of the stove should be blocked. To do this, you need to cut, for example, from an aluminum sheet, a plug of suitable size. By blocking the central deflector, you will thereby increase the flow of warm air directed to other furnace ducts of the car.
Another option for upgrading the VAZ “tenth series” stove is to replace the standard 5-hole thermostat with a more modern one, with 6 holes. In this case, you should not have any complications or problems. These thermostats are interchangeable. At the same time, the 6-hole version is more advanced from a technical point of view. For example, it helps to increase the heating efficiency of a stove radiator. And such a replacement will not be that expensive.
Now let's look at more labor-intensive upgrades to the "tens" stove. We are talking about improving the air ducts, and this will require removing the standard installation. Naturally, more time and effort will need to be spent on such work, however, the positive effect here is much more noticeable. In order to do everything thoroughly, you need to seal the cracks in the torpedo air ducts located on the front panel.
In addition, certain changes should be made to the design of the car's stove damper. It will also be necessary to upgrade the systems responsible for heating the rear passengers and the driver’s foot area. In particular, you will need to lay new heating ducts - this can be done using corrugation. As you can see, there really is something to work on. However, all the time and effort spent will more than pay off in the cold winter season when there is biting frost outside the window, and the car interior is warm and cozy.
So, let's get to work. First of all, you should remove the dashboard, dashboard and air ducts. Do not forget that before removing the instrument panel, you should unscrew the negative terminal from the battery. Next, we dismantle the cover of the floor tunnel lining, the air ducts of the heating system, and then the housing itself. The latter is easy to do - you just need to unscrew the screws. Before removing the dashboard, the glove box must be removed. There is also nothing complicated here, but everything needs to be done carefully so as not to break anything. Next, unscrew the bolts that secure the instrument panel, as well as all the mounting screws.
Device
First of all, you should know the very structure of the heating system in order to clearly understand what and how to repair, because for the VAZ 2110, interruptions in the operation of the heater are a typical phenomenon, and from time to time requiring the intervention of reliable hands - be it a driver or a service station worker.
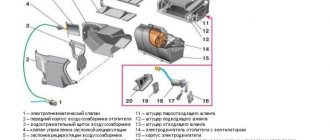
So, the heating system consists of: 1. The actual heater unit, which provides heating for the interior
It is represented (by importance of details):
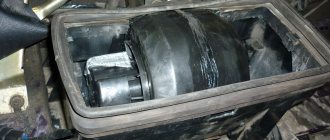
- An electric motor on which a fan is also attached to pump hot air;
- A radiator, without which the entire system does not work. Moreover, unlike the old heater, the radiator of the VAZ 2110 stove of the new model does not have a tap that shuts off the flow of antifreeze (antifreeze) through the radiator. Thus, it is always (whether in winter or in summer) heated. This was done supposedly in order to eliminate leaks that were often observed through this tap, and also to heat the interior as quickly as possible when necessary. In the summer, the supply ventilation goes past the radiator, but still some VAZ 2110 owners, when repairing the stove, add this tap to the system;
- There are three dampers. One is responsible for air intake recirculation, the second opens/closes the heater duct, the third, the most important for the interior, controls the heater;
- A resistor that regulates the blowing speed.
Heater parts VAZ 2110
All parts are packaged in a block with additional valves, shields, and fittings. This entire device is housed in a housing and is located under the hood closer to the instrument panel.
2. The next block represents the air ducts of the VAZ 2110. They extend directly from the stove and provide:
- Interior ventilation through central nozzles;
- The air distributor works to supply heat (or regular air for ventilation);
- Two air ducts are directed to the rear of the cabin;
- There is a whole system of five nozzles for heating the feet;
- Two side air ducts provide heating for the side windows and part of the interior, providing better heating;
- Two nozzles for ventilation.
Operating principle of the heater
This, in a nutshell, is the principle of distribution of hot or cold air inside the VAZ 2110.
3. The electronic control unit for the stove operates from the passenger compartment. It includes:
- Controller handle. This device allows you to set the temperature in the cabin that the stove unit should produce. It turns on by turning the knob and sets the temperature from the air, the temperature of which will correspond to that outside, up to 30°C. Most often, this part is called the ACS controller (automatic heater control system);
- The temperature sensor is responsible for turning on the heater when the temperature in the cabin drops by 2 degrees against the set one. The sensor has a microfan, and if the control knob is in position A, then the micromotor in the stove block turns on and the damper begins to operate, ensuring proper heating. Therefore, before starting repairs of the heating system, the operation of this sensor is usually checked. It is located next to the heating lamp on the ceiling of the VAZ 2110. Since it is not repairable, in the event of a breakdown this device should be replaced immediately.
Ceiling interior air temperature sensor
DIY modification of the VAZ 2110 stove
The standard stove on the VAZ 2110 car has minor drawbacks, such as it does not dry foggy windows well in rainy weather, and poor heating of the driver’s and passenger’s feet. But these shortcomings can be corrected with great desire and free time.
To do this you will need a small set of tools and inexpensive materials:
- A little soundproofing
- Polyurethane foam
- Plastic corrugation
- Coffee jar
- Modelin (anti-squeak material)
- Mesh from columns or something else for making a lattice
- Sewage pipe
- Tool set, screwdrivers, pliers, wrenches, metal (plastic) file
Problem solving
Now let's talk about how to solve emerging issues, troubleshoot problems and return the heater to normal operation.
Each breakdown requires separate consideration.
Broken motor
Temperature not regulated
If the temperature of the air flows cannot be adjusted, the problem is hidden in the control unit or damper, or the temperature sensor on the ceiling inside the cabin does not work.
Be sure to check that the damper is not stuck. It can be accessed through the engine compartment. If replacement is necessary, replace the standard plastic damper with an aluminum product. It is more durable.
Blowing cold
If the heater on your VAZ 2110 starts blowing cold air, you need to look for the reasons. The cause of the failure lies in the gear motor. A similar situation occurs in 9 out of 10 cases, so it is unlikely that you will have to look for alternative culprits.