How to tighten the steering rack on a Lada Granta
So, there are two ways you can go:
- The easiest and fastest way is to tighten the rack using a special key, inserting it into the hole where the steering rod passes on the left side of the Granta body.
- The second method is longer - it is suitable if the hand does not fit into the hole in the body from the wheel side. In this case, you will have to remove the battery and its platform to get to the adjusting nut.
So, with the first method everything is clear; as for the second, let’s consider it in more detail. First of all, unscrew and remove the terminals from the car battery.
Then we remove the battery and proceed to dismantling its platform.
Now that the platform has been removed, you need to get to the adjusting nut from the inside of the steering rack housing.
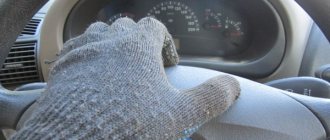
The rack is tightened clockwise, take into account the fact that it is in an inverted state, so the movement will be counterclockwise.
Please note that to adjust the rack on a Grant, you need to buy a special key, which is designed for the VAZ 2110 rack. Its price is no more than 150 rubles, and sometimes they are sold combined: on one side for the rack, on the other for the timing rollers
Lada Granta was originally created as an inexpensive car. Actually, that’s why it became one of the most popular cars on the roads. The manufacturer tried to introduce both proven and new elements into the design. But they have their drawbacks. The Lada Granta steering rack can present various surprises during operation. It is useful for the owner of a domestic car to understand the structure of many components.
Tools for work
To make it easier to carry out all repair work, you need to ensure that you have the following tools:
- The key is "10".
- 13" socket and wrench.
- Special key for tightening the rack. (Marking for VAZ 2110 – approx.).
The cost of such a key in stores is about 100-150 rubles
Step-by-step order of preparatory work
If you are not the lucky owner of a garage with a pit or a lift, work on tightening the steering rack can be done on the ground, but before doing this you need to prepare the work area.
- First of all, remove the battery, unscrew the terminals and fasteners of the batteries one by one (if available - approx.).
Remove the battery clamps carefully
By unscrewing these 4 bolts around the perimeter, the pillow can be easily removed
Steering rack tightening
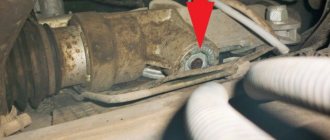
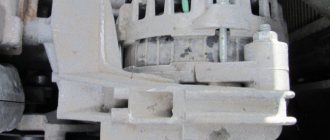
- In the very center of the steering rack, strictly on the opposite side, by touch we look for a rubber cap, which we remove from its place with our hands or with a screwdriver.
Any car enthusiast will enjoy this view from above.
It is on this seat (indicated by the yellow arrow) that the key should be fixed.
The main reason for knocking is that the cardan located at the bottom of the engine shield is weakened.
The second driveshaft is not visible; it is located behind the cover of the electric power steering control unit. To make it easier to tighten and see the mechanism, you need to remove the steering wheel cover. The photo shows the electric amplifier and its electronics unit.
I removed the metal box that is held in place with screws. They were tightened very tightly; I had to use a special power screwdriver with a ratchet. Behind it you can see the second cardan, on which you need to check the tightness, which I did.
Surprisingly, nothing was loosened after 45 thousand miles. On other cars with lower mileage, the driveshafts usually weaken earlier.
Within a few minutes you can get rid of the knocking sound of the steering gearbox. Of course, this will not help in all cases. But before tightening the rack, try checking the cardans.
Write how you eliminated extraneous noise, squeaks and knocks. What was their reason and what happened. I wish you good luck and goodness!
Do-it-yourself power steering and power steering installation
Lada Priora hatchback Logbook Steering rack repair
Electric power steering first appeared on Kalina, then on Grant and on the new Priora. You can drive a car without an ESD. But if a car owner previously owned a car equipped with a hydraulic or electric booster, then, at a minimum, he will experience great inconvenience. On the Lada Granta in the minimum configuration, the manufacturer does not install electric power steering, so many owners of such cars decide to install the power steering themselves. This procedure is not the easiest, and the unit is not cheap. But its presence means a comfortable ride, maneuverability and safety.
Installation does not require any special knowledge or skills; minimal experience and a set of tools are sufficient.
If the question arises about installing electric power steering on the Lada Granta, then when purchasing an electric power steering unit you should pay attention to its number
The set of numbers contains a definition of the place of production, these are the last two digits:
- 00 – made in Makhachkala (not the highest quality, has many negative reviews);
- 04 – Korean amplifier, you can buy it in a store, a rare copy at auto wrecking yards;
- 02 – made in Kaluga, a good medium option.
To install the amplifier you will need a set of wrenches, screwdrivers and an angle grinder (grinder). Before proceeding with installation, the steering wheel, all steering column switches, the ignition switch, and the steering column with cardan must be removed. The further algorithm of actions is as follows.
- Knock out the bolts from the removed bracket in the form of a plate and cut off about 3 cm from the top with a grinder.
- Drill holes in the plate to mount the electric amplifier.
- Fix the cardan to the EUR.
- Place washers under the bracket (where the electric booster is mounted), and you can use them to adjust the steering wheel.
- Attach the electric booster, and then install the cardan into the rack.
After this, all that remains is to connect the EUR to the wiring according to the electrical diagram supplied with the amplifier. Using washers you need to adjust the steering wheel deflection in different positions. No further maintenance of the electric amplifier is required. Those who decided to replace the electric power steering with a hydraulic booster should understand that this idea is pointless. Firstly, the power steering is much more technologically advanced and modern, and secondly, installing the power steering on the Grant is a labor-intensive and expensive process that has no practical advantage.
Steering of Lada Granta
DIY steering rack repair
It is designed to control the car while driving. Structurally, it consists of the following main elements:
- wheels;
- steering rack;
- drive unit;
- mechanism.
The work of the mechanical part is that the driver acts on the steering wheel, the impulse through the steering mechanism and rack transmits force to the front wheels through the levers, and the car turns in the desired direction. A characteristic feature of a passenger car steering wheel is its smaller diameter (compared to a truck). The design of the mechanism also differs. The steering of the Lada Granta is complemented by an electric booster. The steering wheel can be adjusted in height. Unfortunately, there are no settings for departure.
The steering mechanism of the Lada Granta is rack-and-pinion type, the simplest and most inexpensive option.
The drive is mechanical, structurally consisting of levers, rods and hinges. For more efficient and convenient control, the Lada Granta is equipped with an electric amplifier. This is a complex mechanism that provides force through the use of electricity. An electric power steering, or simply EPS, is used to improve dynamic characteristics and controllability. And, according to some data, it allows you to save fuel by increasing the vehicle’s maneuverability.
Lyrical digression
Suzuki Grand Vitara 2.4 manual, color ZMA Logbook Replacing the steering rack oil seal, without removing the rack. And not only Part-1
In Lada Kalina, the steering rack never makes a knock when we are talking about a new car. This is also true for the break-in period. Let's say in your case this is not done. Then, do not try to repair anything, but go straight to the dealer. According to reviews, the defect in question is covered under warranty, and most car dealers do this: the steering rack assembly is replaced with a new one.
This is what the replacement unit looks like, the rack assembly
There is a logic here. At the factory, adjustments are made correctly (this is true in 99.9% of cases). If a defect appears, the dealer replaces the assembly without expecting that adjustment will solve the problem. The owner does not need to hope for this either. The choice is yours.
Preparatory actions, dismantling unnecessary parts
To remove the crankcase protection, you need to unscrew 4 screws located in one row near the bumper. Also, unscrew two screws having a standard size of M6x16. In some configurations, the protection consists of two parts, but in this case they are attached only with self-tapping screws. These words are illustrated by the following photo:
First, unscrew the “10” screws, and then the two “18” screws. In the second case, there will be more screws (eight).
Now let's look at how to remove the battery. First of all, disconnect its terminals. Then, you need to move the additional fuse box to the side. In general, actions are performed according to the photo:
You also need to remove the mounting platform itself, for which you unscrew 4 screws. You will need a 13mm wrench, as well as a 10mm spanner. We will repeat the entire sequence again:
- Unscrew the nuts holding the battery terminals using a 10 mm wrench;
- Remove both terminals;
- Move the fuse box to the side by unscrewing 2 fastening screws;
- Unscrew the nuts with a 10mm wrench and remove the battery;
- Unscrew the screws with a 13mm wrench and remove the metal plate.
Just in case, here is a look at the fuse box mountings:
Mounting screws are located under the casing
Rack adjustment
Before installing the rack and rods back, it is necessary to set the gaps of the gear connection. How to remove the front and rear bumpers on a Lada Vesta. Please note that it is better to immediately replace the thrust nut with a new one. Setting up the staff
to the middle position, as if the wheels were straight. For adjustment, a special clock-type indicator mechanism is used. We start rotating the gear shaft and measure the indicator readings.
If the value is 0.05 mm, then the adjusting nut should be tightened to the same amount. After the steering rack adjustment is completed, check the ease and uniformity of movement along the entire length of the rack stroke. How to remove the front bumper on a Lada Granta Instructions for disassembling the front bumper on a Lada Granta. Provided that everything is done accurately, you should fix the position of the adjusting nut by performing special core punching with a punch. When all the work has been completed, you can begin to reinstall the steering mechanism on the Lada Granta.
After the mechanism has been installed back on the car, you should, even before starting to drive with the car stationary, turn the steering wheel, checking the uniformity of rotation. Steering rack VAZ-2114. How to remove, tighten or adjust the steering rack on a VAZ-2114. A check that will reveal that there is no knocking can only be done while driving on a rough road.
Steering malfunctions usually occur due to insufficiently frequent preventive inspections. If the owner has missed the appearance of minor leaks in the steering mechanism, loss of integrity of the protective covers, then the likelihood that a knock will soon appear in it is quite high
Therefore, it is important to carry out annual diagnostics
Useful tips for motorists
In conclusion, I would like to give a few tips that will help the steering rack and other elements of the control system serve you for a long time and reliably:
- visit a service station once every three months or check the condition of the steering yourself;
- constantly monitor the condition of the protective casing installed on the steering rack;
- try to drive on road irregularities to a minimum, especially when driving at high speed;
- do not wear out the steering rack by sudden starts with the wheels turned all the way;
- If play appears, make adjustments immediately;
- If you notice signs of malfunction, carry out repairs immediately, without waiting for the condition of the steering system to deteriorate.
Steering wheel tuning on Lada Granta
There are few options for upgrading the steering wheel on the Lada Granta. The most popular of them is installing a sports version. Such a steering wheel will not only make the interior more attractive, but will also increase the comfort of control, especially if it is selected correctly. You can install a multi-steering wheel, but only if the configuration is maximum, in other cases there will be nothing to control with its help.
The sports version must be injury-proof, that is, in the event of an accident it must be deformed without causing damage to the driver. Among the shortcomings, it can be noted that although there is an airbag in the standard steering wheel, the sports one does not have it. You can also modify the steering wheel by installing braid. More advanced ones install a heating thread under it.
To install the sports steering wheel, you will need to carry out the following operations.
- Align the front wheels straight (you can drive a little forward and back so that the trajectory is straight).
- Disconnect the battery terminals by de-energizing the vehicle's on-board network.
- The airbag control module must be disabled (if the Granta equipment is equipped with it). If you do not turn it off when removing the factory steering wheel, it may shoot out.
- Remove the steering wheel and install a horn on the adapter. The wiring must be stored in the adapter; to do this, carefully inspect all contacts.
- Connect the adapter to the shaft, but do not secure it with a nut.
- A sports steering wheel is installed on the adapter and secured with special screws.
You cannot throw away or sell the factory product; the sports version will raise questions when passing inspection.
Wheel bolts are loose
Also an infrequent, but possible reason. It is logical that to eliminate it you just need to tighten the fastening bolts. But if the car has already been driven enough with loose bolts, then the wheel rims may become deformed and your Lada Granta will continue to make a knock when turning the steering wheel until you replace the wheel itself.
Although the Granta is our car, the wheels now cost a lot of money, so if the Lada Granta just starts making a knock when turning the steering wheel, fix the problem immediately so as not to incur unexpected expenses.
Diagnostics, repair and reassembly
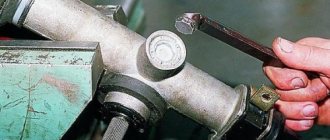
Before determining why there is a knock in the steering, you should completely disassemble the rack and carry out diagnostics for wear, destruction of components and connections. Disassembly is carried out in this order. Secure the steering rack in a vice, having previously installed spacers made of soft metal or other material. How to tighten the steering rack on a Grant? The question is quite relevant if a distinct sound is heard from the engine compartment. Unscrew the nut securing the mechanism crankcase pipe. The story of the owner of a Lada Grant with a request to tighten the rack, in place, how. The crankcase tube is removed. Remove the clamps securing the pipe bushings and remove them.
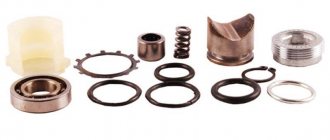
Unscrew the adjusting nut. Here you need to use a special 24mm wrench, which has external edges for unscrewing. Sequentially remove the rack stop spring, the sealing ring and the rack stop. Remove the crankcase cover. After removing the bearing cage and sealing ring, remove the rack. Dismantle the second element of the steering mechanism
- gear shaft.
Now you can diagnose the condition of the bearings and sealing rings. After thorough cleaning, the wear of the gear sectors and the condition of the surface of the rack and shaft are assessed. After all, this is where the reason lies that causes the knocking that appears. If necessary, select the necessary parts and replace them.
Before reassembly, all critical connections are lubricated with a special compound. Very often, it is the insufficient amount of lubricant that leads to rapid wear of loaded parts, which violates the previously established clearance. Therefore, even a recently installed rack knocks again.
Assembling the steering mechanism is carried out in the reverse order. For correct and easy installation of dismantled bearings, you should select the required diameter of pipe cutting, which will help to correctly install the bearings in place. How to tighten the steering rack on a Lada Kalina: photo. The assembled steering mechanism must be adjusted, since the size of the gap can also determine whether a knock will appear after reinstallation.
A little theory: front suspension design
Before attempting to fix any problem, there is a tendency to look at the blueprints or repair manual. It is known that the VAZ-2192 parts catalog contains the following object:
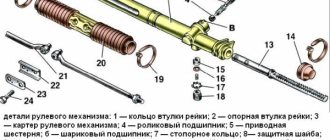
This is what the steering rack looks like in the drawing
Whether the knock will remain in the steering rack of Kalina-2 depends on the following: how accurately element “14” is adjusted. The adjusting nut, marked “14”, looks almost invisible here. But first impressions are deceiving. In the catalog, by the way, the element is called “Stop Nut”.
It is important to know that the thrust nut has external threads. And it spins clockwise. And the words “tighten the rack” mean screwing in the specified nut, and nothing more.
Now let's move on to practice and see what the node in question looks like in reality:
Steering mechanism malfunctions and their elimination
The steering mechanism of the Lada Granta is quite reliable and rarely causes problems for the owner. However, this does not mean that problems do not occur at all. There are problems. And you need to know how to eliminate them.
| Cause of problems |
Elimination
Large steering wheel play
The fastening nuts on the ball rods have become loose. The cotter pin may be missing. Tighten the fastening and install a cotter pin if necessary.
The clearance in the ball joint rods is too large. Replacement of steering tips for Lada Granta.
The silent blocks of the hinges are worn out. Replace the rods.
There is too much clearance between the rack and nut. Worn elements must be replaced, and after replacement the mechanism must be adjusted.
There is a knocking sound when turning the steering wheel
The tie rod nuts are loose. Tighten the fastening nuts.
There is a large gap between the rack and the nut. Replace worn elements; after replacement, the mechanism should be adjusted.
The steering mount is loose. Tighten the fastening nuts holding the mechanism.
Steering wheel turns too hard
The support bearing of the shock absorber strut is faulty. Replace the support bearing.
The support sleeve is worn, the rack stop is worn. Worn elements need to be replaced.
Tire pressure is too low. Inflate tires to optimal pressure.
Ball joint parts are worn or damaged. Replace elements.
The shock absorber struts or their elements have expired. Repairing the shock absorber strut or replacing it.
The shaft bearings are worn out. The shaft bearings need to be replaced.
The electric power steering is faulty. Replacement of the EUR together with the shaft.
Like the braking system, engine operation and other important components and assemblies, the steering system must be periodically inspected for malfunctions. If there are no signs, protective boots and other smaller structural parts must be inspected. The steering rack of the Lada Granta is a key control mechanism. It is thanks to this that the car is controlled by turning the wheel.
Basic steering rack faults
The main sign of a breakdown is a knocking sound when turning. At first it is almost invisible and appears when hitting potholes. If you ignore the first symptoms, the noise will not go away and will constantly get worse. Then the knock will be transmitted to the steering wheel. If you ignore this symptom, the rack will simply jam, and this risks getting into an accident due to loss of control. The rack knocks due to wear of the hinges, teeth or rubber-metal bushings (damper).
The following symptoms can also be attributed to steering rack malfunctions.
- The steering wheel turns hard (accompanied by a slight whistle).
- The tight rotation stops as the speed increases.
- With straight steering, there is no gain.
- When turning, the steering wheel does not turn the front wheels properly (the car begins to roll left/right while driving).
- Vibration, beating, grinding; the steering wheel begins to rattle.
- The steering wheel does not return to its original position.
- The steering wheel rotates spontaneously.
There are many reasons for steering rack malfunctions. But these are the most common. If at least one of them occurs, the Lada Granta should go for repairs as soon as possible.
DIY steering rack replacement
For novice motorists, this may seem like an overly complicated procedure. But in reality everything is simpler. The algorithm of actions is as follows.
- Disconnect the battery, loosen the bolts of the front wheels, hang the front on jacks and remove the wheels.
- Inside the car, you need to unscrew the bolt that connects the steering gear terminal to the intermediate shaft. In this case, the steering wheel must be in a straight position (the wheels are strictly straight).
- Disconnect the rods from the swing arms.
- Unscrew the steering mechanism mounting nuts through the gaps in the wheel arches.
- Dismantle the clamp and remove the steering mechanism assembly.
- Next, all anthers and their fastenings are removed.
Now you can install a new steering rack (if you did not use a repair kit). The assembly is assembled in the reverse order. The position of the rack should be adjusted so that the marks on the crankcase coincide with the marks on the protective boot. The last operation when replacing a unit is to adjust the front wheel alignment.
In most cases, the cause of rack failure is motorists ignoring to inspect the car for faults. A thorough diagnosis of all components and assemblies is carried out at least once a year.
Summarize
The occurrence of malfunctions in the steering unit, if the steering rack is faulty, usually occurs due to untimely preventive checks. When the owner neglects this action, leaks may occur in the future due to loss of tightness of the seals in the rail. Such a scenario will inevitably cause knocking, and, as a result, the need for repair of the rack and pinion assembly. Carry out timely diagnostics of the mechanism and, if repairs are required, do not put it off until later.
Installing a minespring
I noticed that when driving on gravel or crushed stone at 60-70 km/h, the steering rack began to tap (barely audible, but still). This knocking is not particularly annoying yet, but I started looking for a solution to the problem in advance. As usual, I turned to the great and mighty...Internet. The main cause of knocking is the so-called “disc spring”. The original one is of not entirely satisfactory quality and over time, under the influence of loads, it flattens. It is recommended to install a disc spring SS-20. I asked the consultant for a spring for the steering rack of the VAZ 2110 of the new model (it is the same as the Grantovskaya and Kalinovskaya ones), he hands me a box and it says “SS-20 Belleville Spring”. I look up at him in surprise, and he says: the best, they say.
Photo of the minesweeper spring:
It is placed on the interior side. There are 2 hex bolts.
The knocking began to gradually increase and it was already starting to irritate. In addition, a barely noticeable rattling of something metal appeared in front of the car (the rattling was heard only on bumps and then barely, I was just used to listening to any knocks or clatters of the car and easily caught it). Over time, the rattling began to increase, but I could not understand what exactly was rattling: I shook the entire suspension, checked all the engine mounts, the gearbox trapezoid, the gearshift lever, looked through all the pipes, engine protection, etc. — nothing rattles and cannot make similar sounds (the sound is very specific).
But after traveling 10,000 km, my gearbox began to howl, the differential began to bite, I had to urgently change the gearbox to a completely new one. Having decided that this rattling noise was coming from the gearbox, I thought that replacing it would solve the problem. But Alas, the rattling noise remained with the new gearbox. What can make such sounds? With this question, I went around a bunch of forums, each offering their own ways to solve it, even to the point of insanity. Everything turned out to be in vain. I decided to just ignore this ringing.
But then I was finally finished off by a rattling sound in the steering rack when overcoming bumps. I was already in the mood to replace the steering rack and was mentally saying goodbye to 4500 rubles when I remembered the SS 2 disc spring I bought six months ago. I decided to try my luck, so to speak, and install it (it certainly couldn’t be worse).
I bought 2 hex keys to loosen the bolts.
These 2 bolts are hexagon
I crawled under the panel, deciding to first rip off these bolts and only then, if they come loose, unscrew the steering cardan. But the bolts categorically did not want to turn away - the keys were just plasticine! They crumple, bend, lick off. Is there no normal metal left in our country at all? Then I remembered a set of star keys that I recently purchased:
Rack and pinion steering
If we talk in general about the steering mechanism of the Lada Grant, then the following are its main characteristics and features.
- The steering column provides the ability to adjust the tilt of the steering wheel. And the steering wheel itself can be locked by installing an anti-rotation device connected to the ignition switch.
- The steering mechanism is of a rack and pinion type, where it is possible to change the gear ratio in different operating modes.
- The mechanism is mainly equipped with electric power steering.
- The electric amplifier is equipped with a unit that allows you to independently diagnose the technical condition of the device, and, if necessary, exclude the amplifier from operation.
The schematic diagram of the Lada Granta steering device is quite simple. The rack-and-pinion type mechanism is fixed in the engine compartment on a special shield through rubber supports. Reliability of fastening is ensured by bolts welded to the body. Steering drive is provided through two separate tie rods, which interact with the steering arms of the front wheel struts.
Reliability of engagement of the gear pair on one side is ensured by a special gap set at the factory. On the other hand, the precision of engagement is maintained by a spring stop, which presses the rack itself against the gear teeth.
The above gap under normal conditions is 0.1 mm, but during operation it may be violated due to wear of individual parts. Thus, one of the main reasons why an extraneous knock appeared in the steering mechanism is a violation of the set gear clearance. It should be noted that there are other malfunctions that can lead to an unpleasant knocking sound in the car:
- loosening of the steering rack itself on the mounting bolts;
- loosening of the tie rod ball joint;
- wear or destruction of mechanical transmission teeth.
VESKO-TRANS.RU
AutoNews / Reviews / Tests
How to tighten the steering rack on a Grant
How to remove the knocking sound of the control rack on a Lada Granta car
The steering is that important mechanism, no matter what malfunction of which will not allow the driver to continue using the car. Any malfunction must be removed as quickly as possible.
The more popular model of the Russian company AvtoVAZ received rack and pinion steering. Structurally, the mechanism is quite reliable. But at the same time, one of the most common defects is the knocking steering rack .
Removing the steering gear
If a knock does occur, the car owner will have to dismantle the mechanism. It is more convenient and faster to carry out this work when the vehicle is on a lift. To carry out the work you will need the necessary tools, which in this case include:
- socket wrench or socket wrench 13;
- flat screwdriver;
- durable knife;
- special 24mm wrench for the steering rack;
- hexagon 6 with wrench.
Before starting work, the battery is disconnected, thereby taking the necessary safety measures. At the initial stage, you need to first loosen the bolts securing the front wheels. The wheels themselves should be left in the “straight” position before lifting the car onto the lift. Next, the steering wheel driveshaft is disconnected from the rack and pinion drive shaft.
This work is carried out from the salon. Therefore, the car is not raised high. The swing rods can now be released by unscrewing them from the swing arms. And as soon as this work is completed, you can begin to dismantle the steering mechanism. Using a 13mm wrench, unscrew the nuts securing it and remove the mounting clamps.
The steering mechanism is removed along with the disconnected steering rods. The next step is to disassemble the removed device. Here you should free the steering rack from all protective covers that are put on the mechanism. For this purpose, cut off all the fixing clamps, which will subsequently need to be replaced with new ones.