Nowadays it is difficult to imagine a modern car without a working receiver or listening to a high-quality soundtrack. Many trim levels of new cars do not have speakers installed in the Lada Vesta. Starting with the Comfort package, the Lada Vesta comes with factory speakers.
And also, not all car configurations are equipped with a multimedia system, but there is audio preparation in the car. The simplest configuration of the machine has noise-insulated holes for the speakers.
Multimedia system
Component Selection
Let's consider, in order of importance, the choice of individual elements of the music system and other important points. The correct installation of music in the car depends on understanding the issue.
Installation location
When selecting a speaker system, you need to decide on its installation location and dimensions. Most often, speakers are built into doors. The depth of the speakers plays an important role, since the internal parts of the door do not always allow them to be installed. When choosing an acoustic system, it is recommended to buy two-component speakers from popular manufacturers.
In addition to the doors, speakers can be installed in the rear trunk parcel shelf. To do this, you will have to cut it if there are no holes in it. You can buy ready-made acoustic shelves in car stores, but they cost a lot. Therefore, you can do everything yourself from a standard shelf.
Amplifier
You can listen to music in the car without an amplifier. But with the correct composition of a musical system, this component is mandatory. It is also better to buy it from a well-known brand, for example, Alpine, Hertz, Pioneer, Kenwood, Sony. High-quality amplifiers have protection against overheating and overload, and create decent sound.
When choosing, you need to take into account the power of the speakers, the presence of a subwoofer and other parameters. The amplifier specifications must match the speakers. If their resistance and power do not match the parameters of the amplifier, then the sound quality will be worse, and the electronic components may fail. The speaker impedance must exceed that of the amplification board.
A sound amplifier for a car will not be cheap, so you need to be prepared for the expense.
Based on the number of output channels, these devices are divided into single-channel, two-channel, three-channel and four-channel. The first ones are used to connect a subwoofer. They do not require a high-pass filter, but they do require a low-pass filter. There should also be a bass control.
A universal option is two-channel amplifiers. They can connect two speakers or one subwoofer using a bridge circuit. They initially have built-in high and low pass filters.
Three-channel devices are used to connect two speakers and a subwoofer. Recently, four-channel amplifiers have become the most common. They consist of two two-channel amplifying circuits in a single package. Even five-channel amplifiers for cars are rare. You can connect 4 speakers and a subwoofer to them.
Wires
These equally important elements of the system are divided into three types:
- Power.
- Acoustic.
- Interblock.
The first type supplies power to the radio and amplifier. Their cross-section should not be less than 21 square meters. mm. Acoustic wires are usually used with a cross-section of more than 8 square meters. mm. These values must correspond to the power of the entire system. The interblock type of wires has different lengths and can be equipped with a control wire.
High-quality interconnect wires can provide clear sound. Such brands include the brands “Chernov”, “Stinger”, “Daxx”.
How does sound depend on the wire? A conductor is a current transmission line with a certain resistance. It has its own inductance and capacitance, on which the output and input circuits of devices depend. Music lovers always use only high-quality copper wires in their cars.
Capacitor
Music fans in their cars install a special high-capacity capacitor in the music system circuit. When choosing it, you need to know that for every 500 watts of power, a capacity of 0.5 farads is required. It is better to buy a capacitor with an automatic system, then you will not have problems when including it in the circuit.
The capacitor in the car's speaker system serves to maintain the sound of low frequencies at high peak loads. At these moments, the generator and battery do not have enough energy, and the capacitor helps with the accumulated charge.
Basic car equipment and tips for choosing car speakers
Everything that is included in the Lada Vesta audio preparation is presented below:
- For the basic version there is a plug instead of a radio. The Classic does not have front or rear speakers, but does have wires in the doors to connect the speakers.
- “Comfort” has optimal standard acoustics with a display 4.3/USB/AUX/FM/AM, etc. The standard speakers on special spacers are also located here.
- The top version of Lada Vesta is fully equipped. The designers placed here a multimedia system with a color display, six speakers and standard audio speakers, as well as tweeters in mirrored triangles.
Speakers for Lada Vesta The choice of speakers for the Lada Vesta car has a colossal assortment.
On the shelves of specialized stores you can find a system for every taste. In addition, the kit includes everything you need for independent installation of media devices. Acoustics vary in structure, dimensions and installation method
When purchasing, you must pay attention to the compliance of the technical characteristics of the product. If you purchase complex and expensive equipment for a simple radio, the sound quality will not improve in any way.
- When choosing the diameter of the speakers, you should know the dimensions of the audio preparation of the Lada Vesta.
- The louder the acoustics, the better, since when driving on uneven roads, all elements of the media system can reduce their performance over time. It is preferable to choose a radio that is suitable for adverse conditions.
- You should choose amplifiers, subwoofers and acoustic systems from the same manufacturer in order to avoid inconsistencies.
- The smaller the radius of the speaker cone, the more clearly the high frequencies are reproduced. The size of the speakers in the doors is 16 centimeters.
- The electrical power of the devices must prevail over the voltage of the radio. Otherwise, you will experience a decrease in sound quality
- All car stereo components must be purchased only from authorized suppliers. To maintain the validity of the warranty card, it is better to install the elements in special workshops. If you install the audio system yourself, the right to compensation disappears.
All frequencies of coaxial speakers are collected in one place, and their sound is rich in good quality. Component acoustics are distinguished by a separate arrangement of elements that produce frequency vibrations. It separates the melodies of instruments from each other, but is much more expensive than the first. Lada Vesta comes with factory speakers of the first type.
Car audio connection diagrams
Before purchasing all components, you need to choose their connection diagram. Below you will learn about the most popular schemes.
- Radio - front speakers - subwoofer - four-channel amplifier . The last component connects to the front speakers and subwoofer. This is a classic connection that most car enthusiasts use. The circuit is easy to connect and configure, and saves space in the cabin, since all components do not take up much space. The sound power is low and the sound quality decreases imperceptibly. If you are not a music lover or a fan of car sound, you will not notice the difference compared to expensive devices.
- Radio - front - rear - sub - amplifier . The sound-amplifying electronic board has 5 channels: 2 for the front, 2 for the rear and 1 for the subwoofer. The first scheme with its advantages and disadvantages is taken as a basis. The design improves sound in the rear of the car, as rear passengers often complain about poor sound. This type of system is more difficult to configure compared to the first one. The desired result cannot always be achieved.
- “Head” – front – “sub” – two amplifiers . The term “head” is used by many to refer to the radio tape recorder from which the sound signal comes out. “Sub” is short for subwoofer; music lovers and music fans are accustomed to abbreviating many names. The last devices in the circuit are equipped with two output channels: to the front speakers and to the subwoofer. This scheme is usually chosen by lovers of low frequencies. If the amplifier is connected using a bridge circuit, the resulting power exceeds the first two types of connection.
- Radio - front speakers - subwoofer - two amplifiers . One of the amplification devices has 4 channels for front sound, and the second has 2 channels for the subwoofer. The circuit turns out to be the most expensive, but the sound quality exceeds all other types of connections. It allows you not to install sound filters for the front speakers, but to use the frequency filters of an external amplifier. In this case, each channel will be amplified separately. This enhances the sound power and quality.
MMS modes
The multimedia complex involves the use of the following modes:
- "Radio". Allows you to receive and play radio signals, search for radio stations with an automatic memorization function for up to 8 positions. Displays the current radio station on the screen.
- "Audio". Intuitive audio player that plays audio files through 6 speakers. There is an equalizer with the ability to select presets or customize it yourself. Audio files can be played via Bluetooth from an external device, but in this case information about the file being played is not displayed on the screen. Supported formats: MP3 up to 320 kbps, WMA up to 320 kbps, WAV up to 24 bits and FLAC.
- "Video". To view videos, you will need a converter. Video files must meet the following requirements:
- AVI with a frame rate of up to 30 frames per second and a resolution of no more than 720x536;
- MP4 with a resolution of no more than 1920x1080, frame rate up to 30;
- MOV with support for standard codecs;
- MKV with support for standard codecs, frame rate up to 30 and resolution 1920x1080.
- "Photo". For viewing photos, the radio screen in the car is not the best option. But if necessary, you can view images in most formats.
- "Telephone". Used for hands-free phone calls via speakerphone. You first need to synchronize your smartphone with the system and download the phone book.
- "Navigation". Movement according to maps and according to the guidance of the navigation program "CityGID 7". Allows you to install third-party cards. Disadvantages include the lack of image rotation, the inability to download maps online, the lack of construction of alternative routes, it does not show traffic jams over long distances, and there is no satellite view.
Installation procedure
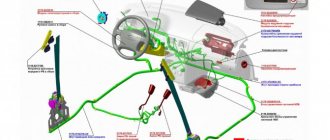
First of all, you need to lay the power cables from the battery into the interior. Once you have selected and purchased your conductors, run the negative and positive wires. For this purpose, many cars have a special hole in the shield that separates the engine from the passenger compartment.
When laying wires through a metal hole, you need to protect them from chafing with a piece of rubber or plastic tube. Otherwise, a short circuit may occur.
The positive conductor must be connected through a fuse, the current strength of which must be the same as that on the amplifier's fuse. This fuse link should be located close to the battery (about 30 cm).
Installing tweeters
Before installing “tweeters” in the car (as they are popularly called), remove the lining of the windshield pillars. High-frequency speakers are the basis of sound. They need to be positioned at eye level of the passenger and driver, facing the middle of the windshield. In this position, they will emit sound onto the glass, from which it will be reflected into the cabin.
The left beeper will reflect the sound to the right passenger, and the right one will reflect the sound to the driver.
Laying and connecting wires
The next step is to carefully lay out the rest of the wiring, which includes the wires between the blocks, power wires and acoustic wires. It is not recommended to lay different types of wiring next to each other, or together with the car’s wires.
The intersection of wires of different groups is allowed only at 90 degrees.
Before connecting the speakers in the car, strip the ends of the wires from insulation. Next, connect the wires to the subwoofer and power amplifier. If the sub is purchased in a body, then for a sedan body it is recommended to turn it towards the back of the rear seats. For station wagons and hatchbacks - towards the trunk door. You can make the subwoofer housing yourself, but this will be discussed in a separate article.
Correct adjustment and configuration of equipment
An instrument called an oscilloscope is best suited for this purpose. However, it is practically inaccessible to the average car owner. In this case, you can use a simple method:
- Turn off the input pulses coming from the amplifier.
- Set the regulators to the minimum level.
- After turning on the music, select a volume of about 90% and a medium tone.
- Give a signal to one channel, and then distort the signal and slightly reduce it in the opposite direction.
- Turn off the signal. Repeat this with other sources.
Sound settings
After connecting all the wires, you need to know how to set up music in the car. This procedure means setting the sound frequency on the amplifier separately for the speakers and subwoofer. In addition, sound sensitivity requires adjustment.
Conventionally, we will assume that the amplifier has sound filters of better quality compared to the radio. Therefore, we will carry out the setup procedure with the radio settings at “0”.
To properly install music in the car and configure it, you must follow the instructions:
- Install a sound filter for the subwoofer on the amplifier - LPF. Set the frequency response for the crossover in the range of 50-70 hertz. A “crossover” should be understood as an electronic board that includes several sound filters at different frequencies.
- Install the front sound filter - HPF. Crossover frequency is from 70 to 90 hertz.
- Set the sensitivity on the amplifier to o. Set the volume on the head unit to full volume. Next, gradually increase the sensitivity adjustment on the amplifier until sound distortion occurs. After this, reduce the sensitivity a little.
This completes the basic music setup in the car.
Firmware MMS Lada Vesta
If you have experience flashing smartphones, then you won’t have any difficulties reinstalling multimedia software. If there is a warranty, this should be done by the dealer. You can do the firmware yourself:
- A firmware image is downloaded to a FAT 32 SD card, which must contain the files chain.bin, NK.bin, chain.lst, TINYNK.bin.
- Exit to desktop.
- Open the file Windows/OEM_Settig.exe.
- Click the Upgrade OS button and start the firmware process.
After completing the procedure, you need to reboot the system while holding down the volume key - this is a radical measure. Updating to a more stable version will help eliminate malfunctions. Even a beginner can cope with this if he follows step-by-step instructions:
- Turn on the device.
- Insert removable media into the slot with the pre-loaded image for updating.
- Press “i” (information) on the display.
- On the pop-up window, you need to successively click on 4 dots in the corners of the screen.
- In the new window, click on “Software”.
- Click on “SW Upgrade”.
- In the pop-up menu, click “Upgrade”.
- The update application will open, where you need to select one of three modes. Update Radio will update the shell, Update Navi will update the navigation system, and Update OS will update the operating system.
- Having selected the desired mode, press “OK”.
All that remains is to wait for the process to complete, during which the system will reboot several times.
Firmware from third-party developers or violation of software installation rules can lead to freezes and inability to boot. The described method will help you deal with this problem by de-energizing the on-board network and starting the desktop using a removable card and an empty explorer.txt file. The situation can also be corrected by reformatting the drive or flashing the device using software from the manufacturer.
Comments and reviews from car audio fans
Alexander, Moscow . When a car has a subwoofer and an amplifier, and they operate at full power, the voltage in the network can drop significantly. They consume a lot of energy; the battery drain when the car engine is running sometimes reaches 12.5 volts. But the reason for this is not that there is no capacitor, but the quality of the power wires and the correctness of their connection.
Evgeny, Orenburg . If you install Chinese wires on the car, the voltage drops significantly. When installing Russian copper wires and making good contact, the voltage almost does not drop. The capacitor will not provide any protection in the voltage drop. It stores energy and releases it at peak moments to provide power to the amplifiers. If your car has a high-quality battery and good wires, then there is no need for a capacitor.
Gregory, Barnaul . If the voltage drops during peak load, the capacitor quickly gives up its charge. It helps with instant loads. And if there are a lot of low frequencies with appropriate music in the car, then the capacitor does not have time to charge. In fact, it will serve as a beautiful unnecessary accessory in the car, from which there is no benefit.
Yuri, Simferopol . I have two amplifiers in my car and a powerful subwoofer that rattles the windows. And this whole system does not have a capacitor. This is an ordinary advertisement, or a toy that is not at all needed in a car with a normal sound system.
It is used only by professional fans who understand this and distinguish the subtleties of sound in a car. For most drivers, a capacitor is not needed.
Connecting the amplifier to the radio via the mini-ISO connector
To implement this amplifier connection scheme, you will need to find a mini-ISO connector, which should be connected to an empty slot on the back of the standard radio of Lada cars.
It is further recommended to use high quality shielded wires.
The main advantage of this connection scheme is high sound quality.
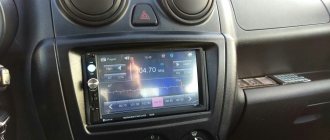
Review of TEYES CC2 radio for LADA Vesta
The TEYES CC2 radio is installed in the Lada Vesta car instead of the standard MMC with buttons. The device differs from previous series with an increased screen diagonal of 9 inches. In addition, the model has a large number of options.
Appearance of the radio. Photo source: https://www.drive2.ru/l/537959154707333729/
The Android 8 operating system is installed on the radio. Technical characteristics of TEYES CC2:
- The amount of RAM is 4Gb, internal memory is 64Gb;
- 8-core processor frequency – 1.8 Hz;
- screen resolution – 1024x600;
- built-in modem connects to Wi-Fi and 4G, supports SIM cards from any provider;
- GPS and Glonass are supported.
The operating system allows you to install different applications. It is possible to use the Yandex navigator, Navitel or CityGID systems.
Adapters for connection and a center console are included with the radio.
For long trips with children, you can connect an external flash drive to watch movies or cartoons.
Adviсe
Technically, installing music yourself in Lada Vesta is not difficult. By adhering to a few simple rules, any motorist can handle the work. Consider these rules:
- All work must be done very carefully to avoid damage to the plastic upholstery;
- The car already has audio preparation; you only need to install harnesses to connect the front speakers;
- You cannot cut off standard connectors, but you need to buy and use adapters;
- Before installing audio, it is recommended to soundproof the Lada Vesta doors to obtain improved sound characteristics;
- Install the speakers on the spacers.
Audio preparation is measures carried out by the manufacturer (laying audio cables, installing speakers, etc.) that simplify the process of installing music for the car owner. Depending on the configuration of Vesta, audio preparation may be different.
Installing a radio
You can install TEYES CC2 on a Lada Vesta (sedan) car yourself. The process takes place in several stages:
- the old radio tape recorder is dismantled;
- the main standard TEYES system is installed;
- rear view cameras are connected;
- audio devices and radio are configured;
- The navigation system is connected.
Installation of the radio. Photo source: https://www.drive2.ru/l/544485305973997681/?m=544528736683296814
The device is sold already Russified. If the owner wants to choose a different language, just go to the settings. There is no need to change the firmware.
How to remove an old radio from a Lada Vesta
Before installing a new multimedia system on a Lada Vesta car, you need to dismantle the existing one. Before starting work, be sure to disconnect the wires from the battery. Sequence of dismantling actions:
- Remove the central frame (overlay). It gives in even if you just pull it with your hand. If you can't do it by hand, you can use a flat-head screwdriver or a plastic card. You need to act carefully so as not to scratch the frame.
- Remove the frame that holds the air ducts. It is attached to 4 torexes. Unscrew the screws with a TORX T40 screwdriver and carefully remove the frame with air ducts.
- Unscrew the 4 mounting screws that hold the radio itself.
- Carefully remove the radio from the dashboard socket.
The old radio was removed. Photo source: https://www.drive2.ru/l/539776372550140380/?m=548090879479382046
To do this, just slightly pull the device towards you. On the back of the unit, it is necessary to disconnect all wires leading to other vehicle systems. Difficulties may arise with the radio antenna. To disconnect, remove the back cover in the dashboard socket and snap off the plug.
Installing TEYES CC2
The multimedia system has several adapters, the connectors of which exactly match those in the socket on the dashboard. When installing the device, it is necessary to connect all matching wires in series.
MMCs with 1 or 2 USB connectors are available. You need to connect the first TEYES connector and the standard USB on Vesta. The other can be displayed under the panel and used to listen to music from flash drives.
After the radio is installed in the socket, it is fixed with 4 screws. A central frame is placed on top. If it sits correctly, a characteristic light click is heard. Before installation, the springs are removed from the original frame and transferred to the new one.
Connecting a camera, audio devices, navigation, radio settings
Adapters for the car's standard devices are included with the radio.
To connect the rear view camera to the MMC, use the green mini-ISO connector. Installation of the TEYES camera on Vesta is carried out in the following order:
- Connect the red reverse wire to the brown VASK.
- The yellow connector is fixed to the contact of the car's reversing light.
- Connect the grounding.
The navigator is configured. Photo source: https://www.drive2.ru/l/537809346248050454/
To configure the navigator, use the corresponding icon at the bottom of the screen. You can select the “Set default navigator” menu item. The system works with Yandex maps and Navitel. A SIM card from any provider is suitable for connecting to the Internet. You can set up a Wi-Fi hotspot and join via your smartphone.
Vesta's standard MMS
Installing PTF on Lada Vesta with your own hands
All versions of Vesta, with the exception of the basic one, have MMS installed. The minimum configuration of the car is equipped only with an audio system. The main functions of the MMC are playing audio files from removable media, receiving radio signals, navigation, parking assistance with video playback from the rear view camera. The MMC on the Lada Vesta is located in the central upper part of the console and complements the updated modern design. The system is equipped with a good filling with the following characteristics:
- processor CSR S3681 B036BK K609B CPU SiRFatlas VI 800mhz Cortex A9;
- RAM Micron D9PSK 2X 256MB DDR3-1600 Clock Rate 800 MHz MT41K128M16JT-125 IT:K;
- internal memory 2 GB Micron NQ283 NAND FLASH 2gb MT29F2G08ABAEAH4-IT;
- internal memory 8 GB SDMMC 8GB SAMSUNG KLM8G1WEMB-B031;
- bluetooth CSR 8311 Bluetooth v4.1 BlueCore CSR8311 QFN Automotive;
- WI FI CSR 6030 Wi-Fi IEEE 802.11b/g and n;
- digital video decoder AKM8859 DIGITAL VIDEO DECODER PAL/SECAM/NTNC AK8859VN;
- audio AK7757VQ Audio DSP with 24bit 3ch ADC + 4ch DAC + MIC Amp;
- power controller MPS MP4570 Automotive Power Systems;
- TPS65150 Low Input Voltage, Compact LCD Bias IC With VCOM Buffer;
- TJA1042 high-speed CAN transceiver;
- CAN and K-Line controller Freescale S9S12G96F0CLF;
- controller Fujitsu 32-bit ARMTM CortexTM-M3 based Microcontroller.
The following elements are used to manage and play files:
- seven-inch touch screen;
- “Mode” key – select modes;
- “MUTE” – mutes all sounds;
- Volume control – pressing once turns the device on or off;
- microphone for the ability to talk on the phone without hands - Handsfree;
- “Reset” – button to reboot the device;
- slot for reading a removable SD card;
- connector for reading information from removable USB media and connecting various gadgets;
- AUX connector for connecting headphones or external audio devices.
Additional control
In addition to the buttons near the touch screen, MMS functions on the Lada Vesta are controlled using duplicate buttons located on the steering wheel:
- volume control;
- selection of file and radio playback modes;
- turning off all sounds;
- button for navigating through folders and tracks on removable media; in another mode, the buttons are responsible for accepting/ending an incoming call.
Photo 2 (Additional controls on the steering wheel)
Such equipment first appeared on AvtoVAZ cars. Previously, a standard audio system and MMC without duplication on the steering wheel were offered. Thanks to this, Vesta can compete with budget foreign cars of the same class in approximately the same price segment.
Key Features
The system combines several different devices that should be in every modern car. The main one is the audio system, consisting of a 7-inch touch screen. Its peculiarity is its resistive base and the need to press with a stylus or other similar object. The input method is not the most progressive, but in weather conditions with sudden temperature changes, the resistive screen works without failure. The sound is reproduced through six speakers to create surround sound.
The system recognizes most SD and USB drives, but with a limitation - the media should not contain more than 1024 files and 256 folders. The flash drive must be formatted to FAT 16 or 32 with a maximum number of partitions - 4. Cards supported by MMC Lada Vesta:
- SDHC no more than 32 gigabytes;
- SD no more than 4 gigabytes;
- USB 2.0 and 3.0 no more than 64 GB.
The user is warned by the instructions that the download speed depends on the number of files on the drive. The optimal solution would be a medium that contains only audio and video files.
Files supported by MMC:
- WMA audio codec, bitrate no more than 128 kbps, sampling 44100 Hz;
- video codec WMV3 with a frame rate of 25, bitrate 750 kbps.
Before use, it is recommended to convert all files to the required parameters. For these purposes, the manufacturer recommends the free Freemake Video Converter program. When playing back, keep in mind that the files will be played in the order they were recorded.
Comparison TEYES CC2 / CC2L / SPRO
The 9-inch TEYES radio for Vesta is available in several modifications. Versions CC2, CC2L and SPRO run on the Android 8.1 operating system. All of them have a high monitor resolution - 1024x600 pixels. A split-screen function is available with the ability to use 2 applications at once.
The main differences between TEYES SPRO Vesta, CC2 and CC2L are shown in the table:
| Radio version | CC2 | CC2L | SPRO |
| Processor Specifications | 4-core, 32-bit | 8-core, 64-bit | 8 core, 64-bit |
| What type of internet does it support? | Wi-Fi only | 4G and Wi-Fi | 4G and Wi-Fi |
| Equalizer | 16-way | 32-way | 32-way |
| Number of USB outputs | 1 exit | 3 outputs | 3 outputs |
| Supports additional options | CarPlay | DVR and CarPlay | DVR and CarPlay |
Models TEYES CC2, CC2L and SPRO for Lada Vesta 2015-2019 model years allow you to scroll through the menu in the radio and external applications using the buttons on the steering wheel.
Reviews of the TEYES CC2 radio for Vesta
Alexander, Moscow: “I recently bought and independently installed a Teyes car radio on a Lada Vesta with a 9-inch screen. The sound of the new multimedia system is better than the previous one. I connect to the Internet via my phone’s Wi-Fi and it responds instantly. I found a built-in player in the menu with online broadcasting of several TV channels. Now I’m thinking about installing unlimited Internet.”
Mikhail, Tula: “I read positive reviews about the TEYES SPRO MMC for Lada Vesta (I have a 2022 Cross). Although there were no instructions in the box, I installed it myself, since all the connectors fit.”
Andrey, Novosibirsk: “I purchased TEYES CC2 for Vesta last year. I hesitated between this version and SPRO. Then I realized that CC2 was quite enough for my purposes. Convenient to use. The only bad thing is that there are no installation instructions from the manufacturer.”
Vesta's standard MMS
All versions of Vesta, with the exception of the basic one, have MMS installed. The minimum configuration of the car is equipped only with an audio system. The main functions of the MMC are playing audio files from removable media, receiving radio signals, navigation, parking assistance with video playback from the rear view camera.
- processor CSR S3681 B036BK K609B CPU SiRFatlas VI 800mhz Cortex A9;
- RAM Micron D9PSK 2X 256MB DDR3-1600 Clock Rate 800 MHz MT41K128M16JT-125 IT:K;
- internal memory 2 GB Micron NQ283 NAND FLASH 2gb MT29F2G08ABAEAH4-IT;
- internal memory 8 GB SDMMC 8GB SAMSUNG KLM8G1WEMB-B031;
- bluetooth CSR 8311 Bluetooth v4.1 BlueCore CSR8311 QFN Automotive;
- WI FI CSR 6030 Wi-Fi IEEE 802.11b/g and n;
- digital video decoder AKM8859 DIGITAL VIDEO DECODER PAL/SECAM/NTNC AK8859VN;
- audio AK7757VQ Audio DSP with 24bit 3ch ADC + 4ch DAC + MIC Amp;
- power controller MPS MP4570 Automotive Power Systems;
- TPS65150 Low Input Voltage, Compact LCD Bias IC With VCOM Buffer;
- TJA1042 high-speed CAN transceiver;
- CAN and K-Line controller Freescale S9S12G96F0CLF;
- controller Fujitsu 32-bit ARMTM CortexTM-M3 based Microcontroller.
The following elements are used to manage and play files:
- seven-inch touch screen;
- “Mode” key – select modes;
- “MUTE” – mutes all sounds;
- Volume control – pressing once turns the device on or off;
- microphone for the ability to talk on the phone without hands - Handsfree;
- “Reset” – button to reboot the device;
- slot for reading a removable SD card;
- connector for reading information from removable USB media and connecting various gadgets;
- AUX connector for connecting headphones or external audio devices.
Additional control
In addition to the buttons near the touch screen, MMS functions on the Lada Vesta are controlled using duplicate buttons located on the steering wheel:
- volume control;
- selection of file and radio playback modes;
- turning off all sounds;
- button for navigating through folders and tracks on removable media; in another mode, the buttons are responsible for accepting/ending an incoming call.
Photo 2 (Additional controls on the steering wheel)
Such equipment first appeared on AvtoVAZ cars. Previously, a standard audio system and MMC without duplication on the steering wheel were offered. Thanks to this, Vesta can compete with budget foreign cars of the same class in approximately the same price segment.
Key Features
The system combines several different devices that should be in every modern car. The main one is the audio system, consisting of a 7-inch touch screen. Its peculiarity is its resistive base and the need to press with a stylus or other similar object. The input method is not the most progressive, but in weather conditions with sudden temperature changes, the resistive screen works without failure. The sound is reproduced through six speakers to create surround sound.
The system recognizes most SD and USB drives, but with a limitation - the media should not contain more than 1024 files and 256 folders. The flash drive must be formatted to FAT 16 or 32 with a maximum number of partitions - 4. Cards supported by MMC Lada Vesta:
- SDHC no more than 32 gigabytes;
- SD no more than 4 gigabytes;
- USB 2.0 and 3.0 no more than 64 GB.
The user is warned by the instructions that the download speed depends on the number of files on the drive. The optimal solution would be a medium that contains only audio and video files.
Files supported by MMC:
- WMA audio codec, bitrate no more than 128 kbps, sampling 44100 Hz;
- video codec WMV3 with a frame rate of 25, bitrate 750 kbps.
Before use, it is recommended to convert all files to the required parameters. For these purposes, the manufacturer recommends the free Freemake Video Converter program. When playing back, keep in mind that the files will be played in the order they were recorded.
Speaker selection
There are 3 types of speaker systems:
- Coaxial. In this option, all available speakers are located in one housing. The most acceptable option in terms of price and quality.
- Component . This audio system has 3 speakers, each of which is responsible for reproducing its own frequency level. The speakers are located in different housings on the same platform. It is the best in quality, but also the most expensive.
- Broadband . There is one speaker that reproduces all frequencies.
To reinstall the audio system, you need to purchase spacers for the speakers. They will help avoid vibration, rattling and other unnecessary sounds, and ensure purity of sound.
In order for the sound to be of high quality, you need to purchase speakers with a little more power than what comes from the radio. Fitting dimensions for speakers on Lada Vesta doors:
- front – 160 mm;
- rear – 130 mm.
Be sure to consider how thick the stand is.
Recommendations for installing acoustics on Lada Vesta
Sound devices for domestic products are not very sensitive, but have a number of positive advantages: high-quality frequency indicators, a wide directional range and good sound balance.
It is recommended to mount car speakers for mid- and low-frequency frequencies at the rear, and for high-frequency speakers at the front, since a different position will affect the loss of playback perspective. The subwoofer can be installed in the trunk or under the seats.
Replacement and installation of radio in Lada Vesta
Radio for Lada Vesta It is necessary to understand that installing 16 cm speakers in the front doors is a simple matter, but for knowledgeable people. If you pry the case of the media player from the bottom, and then pull out the fixing rivets from the plugs, you can easily remove the radio cover. A picture with four connectors will open before us:
- universal bus for acoustics ISO consists of a pair of plugs and reduces dependence;
- The FAKRA port is designed to transmit information at high frequencies; in a car it provides a signal for the antenna;
- USB – a connector designed for connecting external media (flash drive);
- The AUX port is used to transmit external impulses and control the player without a standard panel (smartphone).
There is not enough space on the dashboard to install a 2DIN player for additional upgrades. A single-block media system fits into the interior of the Lada Vesta without much effort, you just need the right approach to connection.
We mount speakers in the Lada Vesta door frame
The first step is to prepare the space for acoustics. The sound insulation should be removed by removing the trim. Here the design is similar to that of Renault Logan. The installation area is equipped with only three mounts, rather than the usual four. For the audio element to work properly, you need to make or buy special stands and place them in this area. The dimensions must match; it is necessary to check the connections of the mounted part.
Installing speakers on a car Installing speakers in a Lada Vesta involves the use of holders. Spacers for speakers in Lada Vesta cost about 800 rubles. Their installation takes no more than five minutes. You just need to unscrew the two screws at the bottom of the trim, bend the trim towards the door and push the spacer into the space. They fit tightly between the skin and do not require additional fastenings.
The wires are already installed at the factory, but there is a slight problem with non-standard connectors. If you install speakers in the front doors yourself by mechanically replacing the plugs, there is a possibility of losing warranty service. A rational solution in such a situation is to use an adapter.
Rear fill – meaning and usage
The sound coming from behind gives the melody volume. The designed audio system eliminates high frequencies in the rear speakers. Two-channel or stereo designs will be adjusted if you can clearly distinguish between the “lows” and “highs” in the front seats.
Removing the trim
The speakers can only be installed by removing the trim from the car doors. This process must be done with care to avoid scratching the plastic. The casing is attached with self-tapping screws and 4 “hedgehogs”. They often break when dismantling the casing, so it is better to get spare ones.
To pry off the plug and window lifter buttons, you must use a card, not a screwdriver.
General principles
The nuances of installing speakers in the rear and front doors may differ, but the general principles are as follows:
- It is better to carry out all work carefully;
- audio preparation is available in all models, even in the absence of standard speakers;
- it is better to select speakers 16 cm for the front doors, 13 cm for the rear;
- It is better not to cut standard connectors, but to purchase adapters;
- to improve sound quality, it is necessary to install sound insulation;
- The speakers are installed on spacers.
Installing acoustics on a Lada Vesta involves purchasing not only speakers, but also a spacer, if one is not available. Some craftsmen cut out a transition frame from plywood. The purchase kit includes:
- spacer,
- rivets for its installation,
- adapter for connecting acoustics.
General provisions
Before you begin installing a standard multimedia system, you need to know what is included in the audio preparation of the Lada Vesta. Starting from the Classic version, there is a minimum required for connecting a car radio, i.e. All the necessary harnesses and wires have already been installed in the Lada Vesta in order for the standard acoustics to be connected.
There are no wires for tweeters in the triangle of mirrors. When installing a multimedia system in a Lada Vesta, just pull out the plug. To do this, carefully remove the bar; behind it there are ISO and FAKRA connectors for connecting an antenna, as well as USB and AUX connectors. You can install a standard multimedia system or a 1DIN radio in the resulting hole.
Installing a radio in a Lada Vesta is not very difficult; just connect the appropriate harnesses.
It should be taken into account that without significant modifications it is impossible to mount a 2DIN car radio.
Installing speakers in Lada Vesta has its own subtleties.
Important!
To connect standard speakers, non-standard connectors from Nissan or Renault are used. In order to connect other speakers, you will need to purchase adapters ZRS-AG-22 or CT55-17. It is not recommended to cut off the factory pads, because... The car will be automatically removed from warranty.
Installation of speakers in front doors
First of all, it is necessary to remove the insulation where the speaker is attached. If the standard speakers are being replaced, then the old speaker system must be dismantled. There may be a piece of pull rod left inside the rivet. It needs to be carefully knocked out and the caps drilled out.
Speakers with a diameter of 16 cm are attached to 3 self-tapping screws. Be sure to use a spacer. Separate adjustment is not required, but the gap between the acoustics and the body should be about a centimeter.
Mounting speakers
There is no need for special training when installing speakers. It will be enough to remove the insulating material located in the places where the speakers will be mounted. We will need special gaskets that can be cut from felt material.
If 16-centimeter loudspeakers are mounted in the front door cards, then this procedure has a number of features. The standard set of fasteners involves fixing the speaker with three screws. In our case, we will need to install special spacers, whose dimensions depend on the size of the dynamic heads.
Using this technology, speakers are installed in the rear door panels of LADA Vesta.