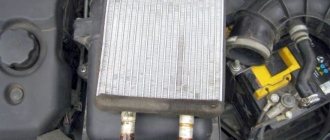
Sometimes situations occur when a malfunction appears in the electronic control unit (or brains) of the Lada Kalina model. This can often be caused by spilled antifreeze, since the control module is located in a very unfortunate place, namely under the radiator of the heating system. Even the most careful owner of a domestic small car cannot prevent such a problem. Many people are interested in whether it is possible to transfer the ECU?
Removing the ECU and installing it in a place safe from flooding
- The first step is to remove the plastic cover, which is located at the feet of the front passenger; for this you need a Phillips screwdriver.
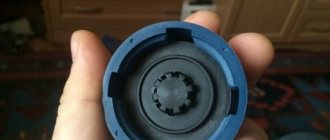
- After this, you will have to suffer a little to get the controller. First, use a Phillips screwdriver to unscrew the self-tapping screw on which it is attached. and turning it from side to side, pull it towards you. If this doesn’t work, you can first press on it from the driver’s side, having first removed the cover there. When you take it out, it will all look like this:
- After I took it out, I immediately removed the sled on which it sat in its original place. They unscrew it with a screwdriver from both sides.
- Then I started thinking and looking for a new protected place for it, I didn’t put it under the rug, since I think this place is not entirely safe, so I decided to attach it under the bottom shelf of the glove compartment. True, I had to “farm” a little, but no floods are scary for the ECU in that place.
- Using a screwdriver, I made three holes in the shelf for 5mm bolts strictly in accordance with the holes on the control unit. And I screwed it on one side to this shelf, the bolt heads were at the top, as shown in the photo below:
Basic moments
To disable the immobilizer, you do not need to physically disable it
Let's look at what the contents of the controller's memory look like in two cases: before activating the immobilizer, and also after activating it. We should be interested in bytes with the following numbers: 02-07. So here's what's in memory:
- 0FD1 0FD1 0FD1 – in the case when the immobilizer is connected but not activated;
- 0FD3 0FD3 0FD3 – lack of physical connection without activation;
- 0051 0051 0051 – activation has been completed.
We also note that if the specified memory cells are filled with “FF” values, then after reconnecting the ECU unit their contents will become equal to “0FD1 0FD1 0FD1”. Actually, it is precisely this property that should be considered useful. To perform programming, you will need an adapter that allows you to connect the computer and the digital lines of the ECU. The circuit diagram of such a device looks simple, and in general you can assemble it yourself:
Why the ECU on the Lada Kalina does not work - the main reasons
One of the most common problems that Lada Kalina owners encounter is ECU failure. Let's look at the main reasons for controller failure:
- Failure due to a short circuit in the on-board network. Here, you can get by with little effort and solder the main resistors, or it will lead to complete combustion of the element.
- If liquid gets on the unit panel, which will lead to complete failure. Usually the ECU is filled with antifreeze.
- Illegal actions of third parties that will lead to ECU failure.
- Other reasons not previously stated.
All these reasons will serve as a reason for diagnosing and dismantling the car control unit.
Dismantling and disassembling the electric amplifier
Before removing the amplifier, you need to remove all the steering column switches. Remove the steering rack cover and dismantle the devices, remembering to disconnect the connectors from the power supply.
How to remove the EUR with your own hands:
- After removing the switches, you will need to dismantle the lower cross member of the dashboard. To do this, you need to press the fasteners that secure the connector with wires, and then disconnect the wiring from the control module. Once these steps are completed, you can disconnect the connector from the switches.
- The system bracket is secured with nuts; you will need to unscrew them with a wrench.
- After this, the steering rack will need to be carefully lowered down. To do this, you will need to find the bolt that secures the driveshaft to the booster shaft. This bolt must be unscrewed, but when unscrewing, you will need to fix the nut, this will prevent it from turning. When the bolt is removed, the fastening will need to be loosened, after which the intermediate shaft will be carefully removed. At this stage, we recommend marking the position of the shaft and gears; you can use a marker for this. This step is very important because doing it will prevent possible installation problems in the future. If the marks on the shafts do not match, this may cause problems with the amplifier. When dismantling, be careful not to damage the wiring, as this will also lead to the inoperability of the ESD.
- When the unit is dismantled, it will need to be disassembled and the failed elements replaced. Further editing is done in reverse order (the author of the video is Murzik Bely).
How to remove the ECU on a Lada Kalina - step-by-step instructions
In order to remove the ECU unit on a Lada Kalina, you must perform the following procedure:
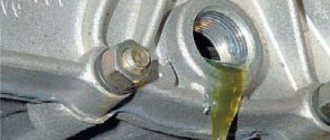
- First you need to unscrew 2 screws, the location of the first is shown by the arrow. The second is at the same level on the engine side. Before doing this, you must remember to remove the terminal from the battery. After unscrewing the screws, do you need to pull the block towards the passenger door? and he must leave from there along the guides. Sometimes it happens that the wires rest against the carpet. Then they need to be corrected.
In order to remove the connector and disconnect the unit from the wires, you first need to: pull the connector lock to the side. The latch is a bracket. I think you can easily find it on the connector.
Primary localization of the problem
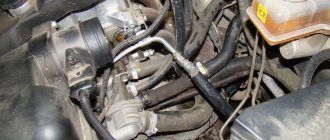
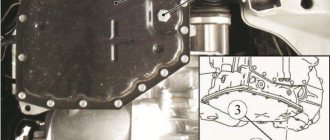
If any malfunctions occur in the radiator, then antifreeze dripping directly onto the body of the Lada Kalina ECU becomes the cause of lengthy repairs. It can take a long time from the start of a leak to the first signs of a malfunction. Depending on the intensity of the leak, the Lada Kalina will react differently.
In most cases, the driver sees a constant light on indicating an engine error. After a few weeks, the failure of the brains on Kalina will cause the vehicle to stop. If antifreeze leaks quickly, smoke may come out from under the car's dashboard. Regardless of the reason, the car owner needs to react quickly.
If the ECU is flooded, it is necessary to immediately carry out a visual inspection. It is located at the bottom of the instrument console. If you can’t find it the first time, then you can use the area between the floor and the heating radiator as a guide.
After unscrewing, it must be moved in the direction of travel of the vehicle. If everything is done correctly, then it completely disengages. To carry out further work, the unit itself must be dismantled. The procedure here is as follows:
- be sure to remove the terminal from the battery;
- Carefully unscrew 2 screws (one of them is located on the Kalina 2 engine side);
- slowly pull the block towards the passenger door;
- if this does not work, you need to temporarily remove the carpet from the car;
- Removal of the wires is carried out using a slight pulling movement of the connector latches to the side.
The ECU on Kalina is filled with antifreeze - what to do?
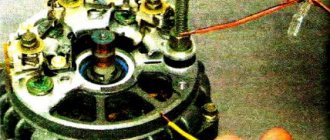
After the block filled with antifreeze has been removed, its initial inspection should be carried out. For these purposes, it is necessary to remove 4 screws using a star screwdriver. Then you should slowly remove the control board for a visual inspection. The most common failure is the burnout of the ignition coil output switch. In this case, repair will not help.
As a result of such a malfunction, the Lada Kalina starts working on only 2 cylinders, and sometimes refuses to start at all. You can cope with a similar problem in a stationary workshop. There they will remove the damaged element, wash and dry it. The second most common problem is board burnout. It is not difficult to detect such a defect: the characteristic blackening of the board will leave no doubt.
Is it possible to repair the ECU in this case? The answer to this question can only be given by a service center, but experience shows that repairs will not help here. A complete replacement is required. It happens that sometimes the brain circuitry is slightly damaged. If this happens, then the car owner can get off easy. To restore the car to working order, you will need some minor repairs:
- wipe the block with a dry cloth;
- rinse with WD-40 several times and blow it out with a compressor;
- rinse several times in alcohol and blow again with a compressor;
- dry well, otherwise the Lada Kalina will not move;
- drying takes at least 1-2 hours.
Diagnostics using equipment
Error number “4” that appears during self-diagnosis of Lada Kalina
If you check your car for errors using special equipment, then, as stated above, the combinations will be four-digit, and the code will be preceded by a letter.
First, let's look at what the letters and numbers mean.
- B - indicates a malfunction of the body, that is, we are talking about airbags, central locking, electric windows. Of course, this is true for Lada Kalina cars equipped with these devices;
- C - means an error in the operation of the chassis;
- P - indicates a malfunction in the functioning of the engine or automatic transmission.
What does the second number mean:
- 0 – common code for OBD-II;
- 1 – number of the car manufacturer;
- 2 – number of the car manufacturer;
- 3 – reserve code.
The third symbol directly indicates the type of malfunction:
- 1 – malfunction of the fuel system or air supply;
- 2 – malfunctions in the fuel system or air supply are also reported;
- 3 – malfunctions in the ignition system were detected;
- 4 – auxiliary control;
- 5 – malfunctions in idle speed;
- 6 – malfunction of the ECU or its circuit;
- 7 and 8 – errors in the operation of the transmission system.
Check Engine Light - starts flashing on the dashboard when any problems occur
| Code | Decoding |
| P0036 | Errors reported. It is recommended to check the device for operability, and also check the circuit for opens and short circuits. |
| P0102 | This error code tells the driver about a malfunction in the mass air flow sensor. It's also worth checking the chain. |
| P0441 | Incorrect air flow through the canister purge valve was detected. You should check the valve itself, as well as the entire gasoline vapor recovery system. |
| P0444 | The control unit registered a break in the wiring of the canister purge valve. The circuit should be checked. |
| P0445 | The on-board computer reports a short circuit in the control wiring to ground or the on-board circuit. |
| P0480 | A broken fan relay wiring has been detected. This code can also directly indicate a relay failure. |
| P0504 | A problem has been reported with the brake pedal sensor. |
| P0830 | Malfunctions have been reported in the operation of the clutch switch. It is necessary to diagnose the clutch and identify the breakdown. |
| P2187 | Literally means: the fuel supply system is too lean at idle. Here, first you need to adjust the idle speed. If this does not help, then look for the problem in the fuel supply system itself. |
| P1115 | Incorrect data was recorded in the operation of the oxygen level control sensor. The circuit should be checked. |
| P1123 | In idle mode, the on-board computer registered a too high combustible mixture index. |
| P1124 | At idle, the on-board computer reported that the fuel mixture was too low. |
| P1127, P1128 | The control unit reports too high or too low a fuel mixture indicator in partial engine load mode. |
| P1135 | The Lada Kalina control unit has detected a short circuit or an open circuit in the heater circuit of the oxygen level control sensor. |
| P1136, P1137 | The fuel mixture level is too high or low in low load mode. The internal combustion engine should be checked. |
| P1141 | The on-board computer detected malfunctions in the functioning of the heating device of the oxygen level control sensor. |
How to clear/reset the Check Engine error on Lada Kalina cars - this question often worries owners of VAZ cars. The fact is that most Lada owners have encountered such a problem when, for no apparent reason, the “chek” error lights up.
New Lada: Kalina drives jerkily, jerks when moving slowly (solved) - 2 answers
Here many people immediately panic. Don't worry, there's nothing wrong with it. Firstly, this error appears when any sensor fails.
Secondly, this error appears when the wrong mixture enters the combustion chamber. This can happen in two cases: some sensor is not working correctly, or low-quality gasoline. Try using higher quality fuel the next time you fill up.
Diagnosing the block
After dismantling the liquid-filled module, we inspect it. To do this, take a screwdriver with a star tip and unscrew the 4 small screws. Next, we slowly remove the control board, with which we also perform a thorough visual inspection.
The most common reason for device failure in such a situation is a burnt-out output key of the Lada Kalina ignition coil control circuit. Repair won't help here. After such a malfunction occurs, the engine begins to function on only two cylinders, and in some situations it is not able to start at all. This is where qualified service will come to the rescue. Specialists will dismantle the damaged component, wash and dry it.
The second common cause is burnout of the board itself. This fact is revealed quite simply. There will be a characteristic darkening of the surface of the board, which will eliminate all doubts.
Will repairing the ECU help in this case? The answer can only be heard in a specialized workshop. From experience, we note that the probability of help from repairs tends to zero. Will need replacement.
Let's sum it up
If symptoms appear, the owner of LADA Kalina should contact service as soon as possible, because the cost of repairs can be significantly reduced. It is advisable to independently carry out the procedures we have indicated if the owner of LADA Kalina has a sufficient level of experience in dealing with automotive electronic devices. To do this, at a minimum, you need to know where the ECU is located, as well as how to remove the ECU. However, a 100% positive outcome of the event should not be expected. In case of failure, we recommend contacting the service specialists.
ECU interchangeability on Lada Kalina
I will give a table of interchangeability of Kalina ECU
. This data was not verified by me personally, but by one authoritative master. The interchangeability of these blocks applies only to blocks with factory firmware (that is, after installation there is no need to reflash the block for your engine and sensors). So, in each line there is a block marking, firmware version and toxicity class.
- Bosch 21114-1411020-40 with software B104CR01(02) Euro3 (in my cases it was this one) can be replaced with:
- Bosch 21114-1411020-40 with software B102СQ05(CR06) Euro3;
- Bosch 11183-1411020-02 with software B101CR01(02) Euro2.
There is one peculiarity here. If your car has an air conditioner, then the firmware version must be B104CR02 and no other, otherwise the engine will not compensate for the load from the air conditioner. But since in this article we are talking about a car without it, you can ignore the last 2 digits of the firmware.
All of the above Bosch blocks can be replaced with domestic Janvr7.2 and 7.2+ blocks.
Domestic blocks are all Euro 2, with the exception of M73 blocks - they are Euro3. January 7.2 and 7.2+ blocks manufactured by Avtel or Itelma (Euro2) for Kalina 1.6l 8V: 7.2 11183-1411020-21(22) with software A(I) 201CO56(57)(58); 7.2+ 11183-1411020-21(22) with software A(I)201CP57. These blocks do not support air conditioning, as I understand it. And, in fact, the M73 blocks, which are suitable for Kalina. These units are all Euro 3: M73 21114-1411020-41 with software A303CE05(CF06) Euro3 (support air conditioning); M73 21114-1411020-42 with software I303CE05(CF06) Euro3 (support air conditioning).
Thus, all of the listed ECUs with Euro3 toxicity class can be changed and can be changed among themselves without hesitation (only if they have factory firmware). It is also possible to replace a block with Euro 3 class with a block with Euro 2 class, but vice versa is not possible. All markings are located on a white plate glued to the ECU cover. Next, I consider it necessary to consider the option of replacing the unit with a used one that was installed on a car with an activated immobilizer, since in this case there is one unpleasant feature.
Source
Common faults
An electrical wiring system includes many different devices and components. Therefore, there can be quite a lot of malfunctions in its operation. In Lada Kalina cars, electrical circuit elements are repaired if any malfunctions in the operation of the equipment are detected. All these breakdowns can be determined using a multimeter.
What groups can faults be divided into:
- Device failure. If the lighting stops working, the light bulbs may have burned out. If the audio system does not function, then the problem may lie in the performance of the car radio itself.
- The fuse or relay has failed. Again, if the near and does not work, then the reason may lie not in the burnout of the light bulb, but in the failure of the corresponding fuse or relay. In this case, the failed element can be found in the block, guided by the diagram. Typically, fuses blow out as a result of power surges, so before replacing burned-out parts, it is necessary to find and eliminate the cause.
- There is a break in the wiring or a wire has come loose from the device. Wire breaks and chafing usually occur where there are rubbing or moving parts. Therefore, after replacement, the wire must be laid in such a way that it does not come into contact with moving elements.
- Lack of contact. If there is no contact, but the wire is intact, then the problem lies either in the fact that the contact has come loose, or that it has oxidized. If it comes loose, then you just need to connect it back; if it has oxidized, then you need to clean it (the author of the video is Vladimir Semyashkin).
As practice shows, one of the most common malfunctions is battery discharge or breakdown.
For what reasons may a battery be inoperative:
- the terminals of the device are oxidized;
- there are signs of damage or cracks on the battery case, because of this electrolyte may leak out of the battery;
- inside the battery there are special plates that can be destroyed due to improper operation and maintenance of the battery, or constant vibrations;
- short circuit between electrodes.
In any case, if problems arise in the operation of electrical equipment, and you have never encountered circuit diagnostics before, we would recommend contacting an electrician. You may have to pay for this service, but you will be sure that everything was done correctly (the author of the video is the randomnameres channel).
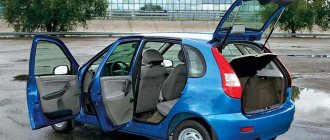
Location
The ECU on the Lada Kalina is located under the center console of the car. You can see it by removing the side cover of the front passenger's footwell air duct. The block is attached to a bolted connection and securely fixed in its place. The connectors of the unit are also tightly inserted into their place and secured with a special lock, which prevents the connector from spontaneously disconnecting from the ECU.
It is quite difficult to call this location of the engine control unit successful, since it is located exactly under the heater radiator and if there are leaks in the heater radiator, the coolant gets directly onto the engine block, which causes irreversible consequences and, of course, a breakdown or short circuit.
In some cases, there is a coolant leak at the ECU, it can be repaired, but most often it is necessary to replace the unit.
How the firmware is installed
The firmware process (software update) is as follows:
- First, a complete diagnosis of the engine is carried out; if the engine is faulty, the firmware will do more harm than good.
- The original firmware is saved and a modified one is selected based on it.
- Using an adapter, new software is written to the ECU through the OBD II diagnostic connector (observing the pinout) using a special computer program.
- The controller is rebooted and the functionality of all systems is checked.
At first glance it looks quite simple, but flashing the control unit on the Lada Kalina without special knowledge and skills is highly not recommended. In addition, you need equipment and the ability to choose the firmware so as not to cause harm. By contacting specialized organizations, you can not only get diagnostics and firmware, but also a guarantee of performance.
What kind of ECUs are there on Kalina?
Below is a table with engine controllers that were installed on the Lada Kalina.
| Manufacturer | Model | vendor code | Engine | Throttle |
| BOSCH | 7.9.7 | 21114-1411020-40 | 1.6l, 8 cl. | Mechanical |
| BOSCH | 7.9.7 | 1183-1411020-20 | 1.6l, 8 cl. | Mechanical |
| ITELMA | January 7.2 | 11183-1411020-22 | 1.6l, 8 cl. | Mechanical |
| BOSCH | 7.9.7 | 11194-1411020-10 | 1.6l, 16 cl. | Electric |
| Avtel | January 7.2 | 11183-1411020-21 | 1.6l, 8 cl. | Electric |
| Elvar | January | 11183-1411020-52 | 1.6l, 8 cl. | Electric |
| Avtel | January M73 | 21114-1411020-41 | 1.6l, 8 cl. | Mechanical |
| ITELMA | ITELMA | 21126-1411020-08 | 1.6l, 16 cl. | Electric |
Installing the controller
1) For the LADA PRIORA family , attach the bracket to the controller and secure it with screws. Screw tightening torque 1.2…1.6 Nm (Phillips screwdriver, Phillips head, torque screwdriver). Install the controller on the car and secure it with nuts. The tightening torque of the nuts is 1.9…4.5 Nm (spanner 8, interchangeable head “8”, torque wrench).
For the LADA KALINA family , attach the bracket to the controller and secure it with screws. Screw tightening torque 1.2…1.6 Nm (Phillips screwdriver, Phillips head, torque screwdriver). Install the controller on the car and secure it with a screw. The tightening torque of the screw is 1.7…3.5 Nm (Phillips screwdriver, Phillips head, torque screwdriver).
For the LADA 4x4 family , install the controller on the car and secure it with nuts. The tightening torque of the nuts is 1.9…4.5 Nm (spanner “8”, interchangeable head “8”, torque wrench).
2) Connect the wiring harness connectors to the controller.
3) Install the instrument panel console screen into place (using a Phillips screwdriver). For the LADA 4x4 family, install the left front upholstery.
4) Connect the wire to the negative terminal of the battery (spanner “10”).
Why doesn't the ECU work?
Quite often problems occur that the engine control unit stops working; to find out the reason for the failure of the ECU, you need to inspect it:
- Check to see if the connector has come loose from the unit; this happens quite often after installing a radio, or replacing a heater radiator, etc.
- Check for ground on the block. Sometimes it happens that after some work, a person forgets to fasten the mass necessary for the operation of the unit.
- Check for signs of coolant leakage on the engine block.
If such problems are not found, it is necessary to dismantle the engine block and troubleshoot, repair or replace it.
Prevention measures
What preventative measures should be taken to prevent problems in the operation of the electrical circuit:
- Use only original instruments and devices - the use of cheap Chinese analogues can lead to voltage surges or short circuits. For example, a splitter in a cigarette lighter. As you know, it is designed for a certain power. By connecting two or more devices instead of one (using a splitter), the load on the node increases significantly. This can cause a short circuit and even a fire.
- Solve problems that arise in the operation of electrical appliances as quickly as possible. If the faults continue to accumulate, it can lead to more serious problems later.
- At least twice a year, it is necessary to carry out scheduled maintenance for the battery. It is recommended to do this before the onset of cold weather and with the arrival of spring. Check the electrolyte level in the banks, charge the battery to replenish the lost charge, and also regularly conduct visual diagnostics of the device body.
- Use only original fuses; using homemade fuses can lead to serious problems.
Loading …
Replacing the ECU
Replacing the engine controller on Kalina is quite simple according to the instructions presented below.
- Remove the negative terminal from the battery;
- Unscrew the cover of the side air duct of the front passenger's feet;
- Disconnect the connectors from the controller;
- Unscrew the screw securing the ECU on the left;
- We take out the controller by pulling it towards ourselves, as if on a sled;
- Unscrew the controller from the pad;
- Installation is carried out in the reverse order;
Source