In order to successfully replace the trunk lock in a domestic car Lada Kalina in a sedan, station wagon and even a hatchback, you will need to stock up on some tools and accessories. The algorithm of actions is simple, so such work is available to owners subject to responsible preparation.
Next, we will consider in detail the nuances of the replacement process.
Lada Kalina door lock repair
Lada Kalina Station wagon PORT WINE NOT LIKE EVERYONE Logbook Rear door lock
We disassemble Kalina locks
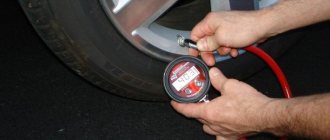
Tools and materials: (for torture and attempts to restore the castle) - grinder
- set of screwdrivers - soldering iron - welding
1) One of the experimental samples on the operating stool. Let's start disassembling. You will need a set of “stars”.
Unscrew
2) We gradually disassemble it into details. And we remember what and where it was installed. This is an important point. Otherwise, you'll get tired later.
And here is the first bummer. Rivet installed. Many people stop at this point and do not dare to further dismantle the non-removable lock. What a tautology
3) The lock is already faulty, there is nothing to lose. We grind the rivet with a grinder.
The rivet was removed with a grinder. We continue to disassemble
4) We get to the insides. The plastic parts (gray and black) are sealed together in several places around the perimeter, approximately 10 points. Either pick them out with a knife, or, as I did later, use a soldering iron.
5) remove the power contacts and limit switches, simply pull them up.
6) Between the covers there is a rubber gasket for sealing.
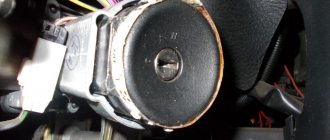
7) A copper (and most likely brass) ribbed tip is rigidly fixed to the motor shaft. From the factory it has a plastic tip sealed on top. Due to frequent use, the connection was destroyed and the motor did not open or close the lock.
 Using a soldering iron, I carefully soldered the plastic tip as best I could. The motor power contacts are simply inserted into the motor from above. There are two limit switches inside
9) I disassembled the front and rear locks and compared the internal actuating part. Inside the plastic box, the only difference is the limiter. When opening the front door, it does not allow closing the door “latch” (door lock lock)
10) I also disassembled the mechanical part of the lock. We carefully remember what and where it came from. I didn't do this and had to lose a lot of time during assembly. I had to select parts using intuition and direct poke. I noted the location of the spring, which you can’t just install, it still gets in the way of slipping out.
Lock assembly
11) The locking tab is pushed back by this tension spring. When disassembled, it flies out and can be installed back through a special hole that the designers have provided.
the spring is simply inserted into the hole and fixed at the end in the seat.
12) We clamp the metal clips to fix the structure on the plastic case. There are only four of them, one from each corner
13) Put the plastic white lever in place.
14) We try on the actuator levers, the clamps of which were previously ground off with a grinder. There is nothing left to rivet there, so nothing else came to mind other than welding it. perform
15) There is no semi-automatic machine, so we cook with an electric arc. There was a syringe with water for cooling.
16) I’m not much of a welder, it turned out what happened. The plastic got a little hot, but not scary.
17) I made another “rivet”. The spring is marked - the one that is installed from inside the mechanical part. If you forget her
installing and welding rivets will turn out very funny...
18) Lock assembly. Can be installed in place.
The design of the rear lock is different from the front one. This also made me look for the missing parts that were right under my nose.
And now some conclusions:
1) One new lock costs about 1500-1660 rubles. The savings are obvious. 2) It is quite possible to disassemble something that is not collapsible, if it is really necessary. 3) Assembling what has been disassembled and making it work is also possible, you just need to be very careful.
next article:
Electric drive: easy installation option
The technique is simple, the only thing needed is to make a rotating plate and a rod for it yourself.
The wiring should be routed to the electric lock and connected to a special control unit. When disarming the car, the electric trunk lock will be activated after the fifth door opening button is unlocked. The entire installation task is based on connecting the electric lock to two wires. You can purchase the part at any auto store. The trunk end must be additionally hidden to prevent water from getting into it. Otherwise, it will periodically short out during rain.
An important attribute is the trunk hinges. Wires are often broken in this place, so their condition must be carefully monitored.
Before installing the electric drive, the trunk lid trim is removed. The main thing is not to damage it during this process. It is recommended to choose a lock that will not need to be modified during operation.
An important step in the installation process is wiring; you can use those wires that are standardly suitable for the fifth door of the car.
Power is taken from the cigarette lighter. An important point is the installation of a protective fuse. The wire is laid along the threshold; it will take approximately 3.5 meters. Then the installation takes place.
It is advisable to choose an option that does not require drilling additional holes. The procedure consists of connecting the wires according to the diagram. Important: you can use the wire that goes to the trunk light.
Installing an electric drive is not difficult, but for the first time it is a labor-intensive process. If difficulties arise, you can seek help from a service station.
tweet
back The most common error codes for Lada Kalina
Next How can you remove the front bumper on a Lada Kalina?
Tags: trunk, replacement, lock, installation, electric drive
Lada Kalina rear door repair
Removing the rear door trim
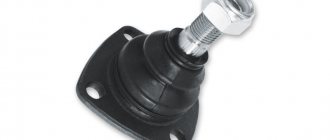
| Lada Kalina Universal Logbook Replacement of ball joints 1. Unscrew the lock button by hand | 2. Having turned the inner handle so that the screw securing it to the lever is accessible, use a Phillips screwdriver to unscrew the screw and remove the handle. For the current full text about illegal actions in Ukraine, see here |
| 3. Using a screwdriver with a thin blade, pry up two decorative plugs and remove them from the holes in the armrest handle. | 4. Using a Phillips screwdriver, unscrew the two screws securing the armrest handle |
| 5. Remove the handle | 6. Use a screwdriver to press out the power window handle socket. |
| 7. Pull out the latch and remove it. | 8. Remove the handle and socket from the shaft. |
| 9. Using a screwdriver, placing soft material under it, press the lower edge of the upholstery away from the inner door panel, overcoming the resistance of the pistons. It’s better to start from the bottom, gradually moving the screwdriver around the entire perimeter of the upholstery. | 10. Remove the rear door trim |
| 11. Location of ten pistons on the inside of the upholstery | Install the rear door trim in the reverse order. |
Replacing rear door glass
Remove the rear door trim. We lower the glass so that we can unscrew the screw securing the decorative glass trim.
| 1. Use a flat-head screwdriver to pry up the edge of the inner glass seal. | 2. Lift the seal up, applying the necessary force, and remove the inner glass seal from the inner door panel. |
| 3. Bend over the edge of the seal and use a Phillips screwdriver to remove the self-tapping screw securing the decorative glass trim. | 4. Using a slotted screwdriver, press out the upper corner of the decorative trim and remove it. |
| 5. Remove the lower part of the seal from the door. Raise the glass. | 6. Using a 8mm socket, unscrew the bolt securing the glass guide at the end of the door |
| 7. Take out the guide. Roll down the window | 8. From the outside of the door, use a slotted screwdriver to pry up the decorative retainer of the glass seal. To avoid damaging the paint, place a soft material under the screwdriver, for example, a piece of fabric folded several times. |
| 9. Pull out the retainer from the outer seal and remove it. | 10. Remove the outer glass seal by pulling it off the front decorative clamp and lifting it up. |
| 11. Using a 8mm head, unscrew the two bolts securing the glass holder to the window lifter slider. | 12. Remove the glass from the door. Install the rear door glass in the reverse order. |
How is the activator installed?
The only way to get inside the trunk of a Lada Kalina is this manipulation - turn the key and press the button. This action is not always associated with convenience. For example, in bad weather or when your hands are full, this is not easy to do. This circumstance prompts owners to consider purchasing and installing an activator. Installing this useful element is quite simple. Here you will need a self-tapping screw, which will secure the device we are considering. To check the functionality of the activator, you should connect it with the standard connector from the on-board network.
After the current supply to the activator is stopped, the door is locked with the first latch, but remains not completely closed. To get back inside the luggage compartment you will need to use the key.
Installing a push-button lock is not a very difficult task. To implement it, you will need to assemble a circuit, which requires wiring. Here you will need to “attract” the programmable channel present in the alarm.
You can connect the device using two options.
- We connect the button with the positive output of the activator (12 V), bypassing the relay. The advantage of this scheme is the absence of unnecessary components and simple connection. As a negative aspect, it should be noted the need to lay additional wire lines.
- The second method is more labor-intensive. Here you will need to use additional components (diodes). You also need to find the ground connection point. The main advantage is the need for a minimum number of wire lines.
Experts prefer the first method because it is simpler. For switching, you can use copper wire type PV-3, the cross-section of which is 1 mm2. Laying should be done on the left side along the thresholds. You can connect by means of a clamp and subsequent wrapping with electrical tape.
The control wire of the activator may be a standard red-pink cable. It is subject to commutation with the relay, followed by winding the contact and placing it under the BUS fixation frame. The entire list of manipulations is performed with the battery disconnected.
Car doors do not open well
The most common manufacturer defect is that the rear and front doors on Kalina are difficult to open. The flaw occurs in used cars and those that have just come off the assembly line. The reason is incorrect or insufficient adjustment of the door handle or the door itself.
The problem can be solved with the help of a service center or fixed by yourself. The second option is more acceptable for experienced drivers, experienced auto mechanics and those who like to experiment with their car.
First of all, it is important to find out the reason why the back door on a Viburnum does not open well. An external inspection of the defect is carried out and a comparison with the original position of the part is carried out. Based on the results of the check, you can adjust the elements yourself.
In a similar way, malfunctions of the front and rear doors are eliminated, including the trunk door, if the car has a hatchback or station wagon body, but in this case there are nuances.
Recommendations
Comments 20
I also want to do this for myself, maybe one of these days I’ll do it
great post. A question from a teapot, so to speak. I don't know much about electrics. But still not enough to pull out the right one from the pile of wires. The question is exactly this. I have a viburnum with an alarm. Moreover, when the electrician installed it, he said that the trunk would be opened with the alarm key fob and with the standard key fob, and said to buy an additional regular four-pin relay. I installed the activator - but it’s not convenient to open it from the key fob - I want to embed a button into the interior. Maybe someone can tell me where and where to get what.
Here you can do everything elementary. The button is placed in the gap of the positive wire. It takes a long time to draw a picture, I’ll try to explain it with my fingers. Take a two-contact button that works to close. Connect one contact to 12V, the other to the plus of the activator. It is advisable to place a diode in the gap in the power wire that goes from the signaling to the activator. Everything will work.
Well, thank you. Almost understandable. I can most likely figure this out.
Here you can do everything elementary. The button is placed in the gap of the positive wire. It takes a long time to draw a picture, I’ll try to explain it with my fingers. Take a two-contact button that works to close. Connect one contact to 12V, the other to the plus of the activator. It is advisable to place a diode in the gap in the power wire that goes from the signaling to the activator. Everything will work.
Hello! Please tell me if it's not difficult. I installed the activator, now the trunk can be opened with the factory key fob. When the car is started, the key fob won't open it. But it opens if you press the unlock button on all doors. Everything would be fine, but I close the doors with a button in the cabin when I drive or stand in remote places. Then I open it in the city, and naturally, the trunk opens with them, I have to get out and slam it. How to prevent the trunk from opening with this button. And also, I want to make a separate button to open the trunk from inside, where should I connect it?
Hello. Read the article carefully, it describes exactly your problem with the door opener button. You'll have to solder the circuit.
Thank you, I have already done the standard wiring. I set the activator to unlock, not to open. Now you only need to press the button on the trunk. In the blog there is
Here’s a question: I did it approximately according to the same scheme), but even after cutting down the second tooth I can’t open the door, I have to press the button on the doors, and maybe I need to change the stops or what?
I don’t quite understand, the button in the doors opens the tailgate, but not the remote control?
thank you, I figured it out) just not a big electrical glitch))
it turned out great) I also spent a long time doing everything, all I have to do is put the button on, but it doesn’t open with my key and for some reason the doors open along with the trunk, I don’t know why
Thank you! I don't quite understand about the doors. When you press the 3rd trunk release button, do the doors open?
Yes, such garbage, because of this I won’t use the remote control, I’ll have to make a button in the door, that’s enough
Hmmm...interesting garbage...I haven’t come across anything like this yet. It’s a pity that you don’t live in Donetsk, it would be possible to figure out what and how
He approached the matter seriously and prepared - for which I shake your hand! Pass! =)
Thank you for the kind words
I did this for myself a long time ago... I’m very pleased! It was a very spicy situation... They stopped me at the post and said: “Open the trunk.” I said: “No question.” And the fastener that connects the activator and the rod that opens the lock has come off (unreliable thing). And fucked up... I pressed the button - it doesn’t open, I pressed the button on the key fob - no effect... I think it’s all an ass))) I already wanted the rear seats fold it back, and I’m wondering what they’ll see there...))) I started to roll it back and then it dawned on me - I can open it with the key. I opened it. Showed it. He exhaled. Let's move on... So immediately either weld the eyelet onto the rod and secure it clearly (the rod can be easily removed), or something like that, BUT this fastener with three bolts is still crap...
By the way, does the solenoid relay work in two directions? If so, is it clearly fixed in the lower or upper position and what is the stroke length? Otherwise, I’m looking for a device that works in two directions with a clear fixation.
The retractor only seems to work in one direction. That's why it's engaging)) But regarding such incidents, I left the option to open with the key
The fact of the matter is that I’m so used to opening it remotely that I forgot about opening it with the key... ))))
Where does the water in the trunk come from?
Almost a whole body of water
It is known that the appearance of water in the interior or trunk of a car can lead to corrosion there.
It is recommended that owners pay attention to this factor as often as possible and check the accumulation of water under the floor mats in the cabin and in the trunk, especially in rainy weather. You should also periodically check the underbody of the car for damage. Over time, seals deteriorate, and this can also cause condensation in a car that is poorly ventilated.
In this case, moisture can get into the car’s wiring, which will lead to a short circuit and fire, or failure of certain systems
Over time, seals deteriorate, and this can also cause condensation in a car that is poorly ventilated. In this case, moisture can get into the car’s wiring, which will lead to a short circuit and fire, or failure of certain systems.
Water in the trunk of a VAZ-2112 - hatchback features
If it appears in rainy weather, you should check:
- Condition of the seal in the luggage compartment.
- Tightness of dimensions.
- Condition of the valves for compartment ventilation.
Water in the trunk is not only in the niche, but also on the metal - corrosion will not take long to occur
Water can appear most often in niches near the arch.
If moisture is observed in the trunk only during heavy rain, and in dry weather it is dry, then most likely the compartment ventilation valves are faulty or leaky.
You should try to fill such places with sealant. To do this, the valve must be treated not only from the outside under the bumper, but also from the inside of the cabin. Fortunately, the trunk of the VAZ-2112 will allow it to fit there.
Sealing of rear position lights and their seat
You can use this sealant Applying sealant to the rear marker body Applying sealant to the body and installing the rear marker
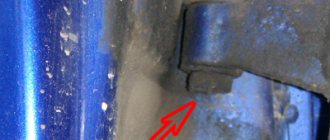
During operation, water can penetrate into the trunk through the rear tailgate, or rather in its seat. This happens due to the fact that the alignment of the seat and the housing of the side lights is disrupted. In this case, it is necessary to remove the “dimensions” and place them on the sealant.
Rear window seal
Diagnostics for water leaks on the rear window
You can also check the tightness of the rear window. Its joints with the body should also be treated with sealant. You can check the result of the work by watering the rear window of your car with a hose.
Checked the rear window, filled the rubber mat
Ventilation
Cleaning the ventilation holes in the rear bumper
If water appears in the spare tire area, the cause will be clogged ventilation valves and, as a result, condensation that will be under the compartment upholstery. When the valve has come off, you will need to remove the rear bumper to carry out work to seal it.
Clogged vent valve Diagnosis of the vent hole on the other side of the rear bumper
To check the ventilation in the car, you need to remove the carpet and look in the area of the spare tire. It should be dry there. If this is not the case, then it is worth treating the ventilation valves with sealant.
Adviсe
Some experts say that condensation in the trunk may appear due to the fact that there is a rubber mat on the floor, which does not allow air to circulate normally. This becomes especially noticeable when the car sits for a long time. In this case, even the carpets in the cabin may be wet.
conclusions
Knowing these points, you will be able to independently identify where the water comes from in the luggage compartment of the VAZ-2112 and eliminate these causes without resorting to the help of specialists. If this is difficult for you, you can always call a specialist for help.
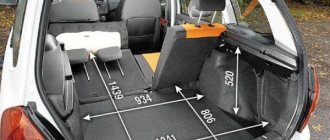
Types of car trunks, tips for choosing
Trunk
It is a rather ordinary structure, which consists of support posts and crossbars. In its own configuration it has special fastenings and boxes, due to which the transported cargo is fixed. Car trunk
can be installed not only from above, but also from behind. How to remove the rear door trim on a Lada Priora. But the 1st option can be found much more often than the 2nd.
Regarding the roof rack for the Lada Kalina
, then, despite its spaciousness, it occupies quite a huge area of the car. In addition, driving at high speeds will be accompanied by strong noise, and if the car is moving through the forest, then the structure in question will inevitably pass along all the lower branches. Compact models, naturally, do not have such shortcomings, although they contribute to lengthening the overhang, which can lead to overloading the rear of the car.
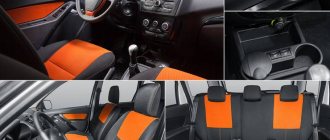
If the Lada Kalina car is equipped with a top model, then it would be useful to mount a luggage box, which looks like a streamlined plastic box. A detailed article on how to choose seat covers for a Renault Duster and how to install them yourself. If desired, this design can be installed on the rear doors. The introduction of luggage boxes for the Lada Kalina has a number of advantages.
- A similar design has a shape that promotes good aerodynamics. And this, in turn, contributes to silent driving at high speeds.
- If the car is driving through the forest, the smooth surface does not allow branches to cling to the trunk.
- The volume of such a device allows you to replace a suitcase by putting all your hand luggage there.
- Plastic is a material that is not afraid of moisture, which means that carrying luggage in rainy weather does not pose any threat to your belongings.
- The box is protected in the form of a lock, which means that the cargo will always be safe and sound.
- The appearance of the structure is quite presentable.
But the design in question also has its disadvantages. Firstly, it is large in size. If the driver does not have a garage, then it will take up a lot of space in the apartment. Secondly, if the box is not removed from the car, but is transported empty, then fuel consumption will increase significantly.
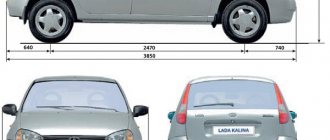
It should not be forgotten that the Lada Kalina
Can also carry larger luggage. For example, the same bicycles. True, they require special fastenings. Be sure to read this article before you start replacing the timing belt on a Lada Kalina car. Such transportation by transport is possible in the case when the additional trunk
installed on the door or tow bar of a
Lada Kalina
.
To transport relatively small loads, you can install
structure on top of the luggage compartment lid. If you install a rear type of trunk on a Lada sedan, then it is worth remembering that the standard lights should be clearly visible. Otherwise, you need to take care of additional ones.
Removing the lock, drive and latch of the trunk lid
To remove the lock, remove the four pistons by prying them off with a screwdriver.
. and remove the lock drive trim.
. disconnect the rod from the lock drive.
Squeezing the clamps, disconnect the lock wire block from the rear wiring harness block. We use a marker to mark the position of the lock relative to the trunk lid.
Using a socket or a 10mm wrench, unscrew the three nuts securing the lock.
Remove the trunk lock with rod and wires. We install the trunk lock in the reverse order according to the previously marked marks. To remove the lock drive, disconnect the lock rod from the drive (see above).
We use a marker to mark the position of the lock drive relative to the trunk lid.
Using a 8-mm socket, unscrew the two nuts securing the lock drive to the trunk lid.
Remove the lock drive.
Using a screwdriver, remove the retaining ring.
Remove the pressure lever.
. and remove the lock.
Remove the pusher with the washer and spring.
We take out the cylinder lock mechanism. We assemble and install the lock drive in the reverse order according to the previously applied marks. To remove the lock retainer.
Installation of the locking device drive
Removing the fifth door opening button is the easiest thing. It is more difficult to seal the remaining hole. This can be done using a special putty. One of the tricks is to process the hole cavity so that the surface becomes as rough as possible. This will create optimal adhesion to the putty. Next comes sanding, priming and painting. The work can be done independently without special training and practical skills. After that, you don't have to worry about aesthetics.