Main components of the Lada Granta starter
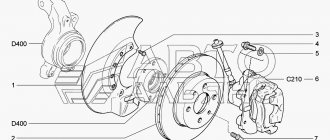
The figure below shows the constituent elements and their names in the starter of the Lada Granta car
Fig. 2. Parts of the Lada Granta starter: 1 – screw securing the traction relay; 2 – front cover; 3 – support ring; 4 – restrictive ring; 5 – lever support; 6 – freewheel; 7 – relay anchor; 8 – lock washer; 9 – return spring; 10 – spacer washer; 11 – traction relay; 12 – drive shaft support; 13 – drive shaft; 14 – planetary gear (satellite); 15 – planetary gear cover; 16 – back cover; 17 – brush holder fastening screw; 18 – coupling bolt; 19 – connecting busbar with insulated brushes; 20 – brush holder with “negative” brushes; 21 – pressure spring; 22 – anchor; 23 – drive lever; 24 – body
Article and price
Below is a table with the article number and cost of the original starter and its analogues.
| Factory models | |||
| Manufacturer | Power, kWt) | vendor code | Price (Rubles) |
| AvtoVAZ | 1,4 | 21100370801002 | Up to 4000 |
| AvtoVAZ | 1,8 | 5702370815 | Up to 4100 |
| Good analogues of factory models | |||
| Lauber | 1,4 | 221182 | Up to 6200 |
| Bosch | 1,4 | 986023780 | Up to 7300 |
| Bosch | 1,8 | 1108203 | Up to 11000 |
| Motorherz | 1,8 | STB1182WA | Up to 4800 |
Operating principle of the part
Essentially, the starter device helps start the car and all its systems. As for the principle of operation of the starter, everything happens according to the following algorithm:
- After the driver turns the key in the ignition, current is transferred. The signal goes to the machine's motor winding.
- Next, a part of the starter called the bendix transmits the impulse to the flywheel.
- As soon as all the car systems are started, the Bendix returns to its original order. Here the starter completely finishes its work and stops.
Thus, it is clear that the work of the starter consists only of the ignition process, in the form of assistance to the motor. There are a variety of starter options.
In addition to this difference, they can be varied depending on the friction composition. There are specialized models for more powerful diesel engines that have advantages over standard ones
So when repairing a VAZ or any other starter with your own hands, pay attention to its type.
Method two - towing
No less efficient and even more reliable, but you need another machine more powerful than your car. It will be enough to tow the vehicle for a short distance, and then start the engine in the same manner as described above. In this case, I would like to give a couple of practical tips:
- Do not turn off the car after it has started and then go straight to the service center;
- Do not forget that after starting the car, it will pick up speed if it is in second gear and you press the accelerator pedal;
- Don’t forget that after starting, the car towing you will stop. Therefore, you will need to have time to slow down.
Repair and replacement of starter for Ford Fusion
Replacing the starter with a Ford Fusion is carried out if it is not possible to repair the Ford Fusion starter - the costs for it are not comparable to the price of a new part. If the damage is minor, it is recommended to limit yourself to repairing the car starter.
When to repair and replace the Ford Fusion starter:
- car won't start and starter doesn't work
- a noise is heard when trying to start the car, the engine does not start
- After starting the engine, the starter does not turn off automatically
How to determine whether the starter is repaired or replaced?
In specialized car services, before carrying out procedures to repair or replace the starter, they will definitely conduct a preliminary diagnosis of the Ford Fusion starter. In this case, there is no need to remove the spare part - a preliminary inspection of the part will allow you to find out for sure whether there is a problem with the starter.
And only after, if a malfunction is detected, the procedure for removing the starter and installing it on a specialized stand for deeper diagnostics will follow. The necessary information can be obtained by disassembling and troubleshooting the part.
And after that it will be possible to say exactly what should be done - repair or replace the Ford Fusion starter with a new one.
The cost of repairing and replacing the starter
- Diagnostics of the spare part will cost 800 rubles.
- Testing at a stand costs from 300 rubles.
- They can clean the starter at a service center for 200 rubles.
- Repairing a Bendix starter on a Ford Fusion costs about 400 rubles. (plus 250 rubles per part)
- Repairing a starter on a Ford Fusion costs from 500 rubles. (plus 400 rubles for components)
- Replacing a starter on a Ford Fusion costs from 1,200 rubles. (plus about 3,500 rubles for components)
- Replacing starter brushes will cost 200 rubles. (the part costs 300 rub.)
- Replacing the solenoid relay will cost 200 rubles. (cost 300 rub.)
- Replacing the gearbox on a Ford Fusion will cost from 450 rubles. (plus 500 rubles for components)
Replacing the starter for Ford Fusion 1 4 and 1 6:
- To carry out the work you will need 10 and 13 socket wrenches
- The car must be placed on a lift or inspection pit
- Disconnect the negative battery terminal wire
- Unscrew the nut of the positive terminal of the starter power supply
- Remove the terminal from the stud
- Unscrew the nut of the power wire terminal at the traction relay
- Move the wires to the side
- Remove the Ford Fusion starter by removing the 3 bolts securing it to the clutch housing
- Install a new starter and reassemble the device in reverse order
Starter repair for Ford Fusion 1 4 and 1 6
Before you begin repairing the Ford Fusion starter, you will need to remove the part - the removal process is described above. During the procedure, the starter bendix will be replaced, so it is necessary to prepare a new spare part in advance
It is also important to remember that when carrying out work, be sure to disconnect the battery to avoid a short circuit.
Repair of a removed starter is carried out as follows:
- Clamp the start relay in a vise
- Unscrew (pull off) the screws with a TORX25 key
- Remove the starter relay
- Clamp the starter and unscrew the 2 long bolts at the back
- Remove the starter cover
- Remove the old bendix and fork, take out the shaft
- Remove the planetary gearbox, disassemble it and wash it with kerosene.
- Wash all other starter parts
- Lubricate the entire mechanism except the bendix and shaft (you can use lithol)
- Install a new bendix on the shaft, replace the fork and cover
- Clamp the starter in a vice and switch the key to tightening
- Reassemble the mechanism in reverse order
- Disassemble the solenoid relay
- Wash the part
- There is no need to lubricate the relay (as well as the shaft and bendix)
- Install each starter part in its place
- Place the starter on the Ford Fusion and connect it (the battery must be turned off when installing!)
For those who decide to make repairs or change the starter on their Ford Fusion on their own, we recommend that you first watch the corresponding video. Next, you will need to read the full description of the work and prepare all the necessary tools.
Starter part numbers for Ford Fusion:
- Bendix Bosch – 1 006 209 804
- Solenoid relay Bosch – 2 339 304 015 / Cargo 138763 / Unipoint SNLS221A
- Electromagnet coil Magneti marelli – AME 0539
- Starter Ford – 3122001
- Starter relay KRAUF – STB1050
Repairing and replacing the starter are relatively simple procedures, and they can be carried out by an ordinary car enthusiast if he has the necessary parts, tools, a garage and free time.
Required Tools
In order to remove or install the starter on a Priora, you will need the tools from the table below.
Table - Tools required to replace the front strut
| Name | Note |
| Spanner | "at 13", "at 15" |
| open-end wrench | "at 13", "at 15" |
| Pliers | Can be replaced with pliers |
| Screwdriver | With a thin flat blade |
| Silicone Grease | If you plan to remove the air filter |
| Head | "at 13" |
| Vorotok | With extension and ratchet |
| Penetrating lubricant | For example, WD-40 |
| Rags and wire brush | To clean dirt |
Replacing the starter on a Lada Priora can be carried out without access from the bottom. If you don’t want to remove the air filter and the wires going to the sensors, then you can dismantle and install the unit from underneath. In this case, you will need an inspection hole, overpass or lift to access the place where the starter is located.
Replacement
Work on removing and installing the starter can be carried out without a higher education as a mechanic. Using the step-by-step instructions below, anyone who has ever held a key in their hands can cope with the task.
Necessary tool
- Phillips and flat head screwdriver
- Ratchet, extension and socket for “13mm” and “15mm”
- Open-end wrench for “10mm” and “13mm”
- Penetrating lubricant (WD-40)
- And the desire to repair your own car with your own hands.
Step-by-step replacement instructions
Work can be carried out both from the inspection hole and from above. We will consider the option of doing the work from above, as it is simpler and more convenient. And not everyone has an inspection hole.
First of all, disconnect the negative terminal of the battery and remove the air filter housing along with the mass air flow sensor.
Then, on the solenoid relay, use a 13mm open-end wrench to unscrew the power wire and remove the “mother” chip from the relay (marked with red arrows in the picture).
Using a ratchet with a 13mm socket and an extension, unscrew the two starter mounting nuts. Below and above.
Next, we remove the starter from the engine compartment and inspect it.
We install it in the reverse order and check its functionality by test running the car.
Replacement from under the bottom of the car is similar to the instructions outlined above, but only to carry out work from an inspection hole or overpass it is necessary to remove the engine crankcase protection.
Starter Lada Priora
The starter on a Lada Priora car is used to start the power plant. It rotates the engine crankshaft until the engine starts.
During operation, the unit gradually wears out. As a result, the starter may fail and starting the power unit will become impossible. Therefore, it is important to pay attention to the first symptoms of a unit malfunction and promptly eliminate any identified breakdowns.
ATTENTION! A completely simple way to reduce fuel consumption has been found! Don't believe me? An auto mechanic with 15 years of experience also didn’t believe it until he tried it. And now he saves 35,000 rubles a year on gasoline! Read more"
Classification of faults
The starter is an electromechanical device, so faults can be classified as electrical or mechanical.
Electrical breakdowns
Such malfunctions often occur due to insufficient power supply. The reasons for inoperability may be:
- Dead battery.
- Damaged wiring.
- Winding short circuit.
- Oxidation and burning of contacts.
Mechanical damage may be caused by electrical problems. The parts of the starting device are subject to heavy loads, especially in severe frost, since the device must generate high power and pass high voltage.
The most vulnerable components are:
- Bushing and armature corrector.
- Brushes.
- Heels.
- Fork.
- Gear.
- Solenoid relay.
- Damper spring.
Extraneous noise, unpleasant odor and untimely activation of the starter can be evidence of mechanical failure.
Common Mechanical Failures
- Untimely switching on. The motor rotates, but during start-up a metallic grinding noise is heard. In this case, most likely the damper spring is faulty, the gear or bushings are unusable. The exact cause is determined visually after disassembly.
- The starting device works, but there is no rotation of the crankshaft and there are extraneous sounds. The cause may be a broken bushing.
- The starter does not work when trying to start. You need to tap the back of the starter with a mallet. If operation resumes upon impact, the brushes may be worn.
- After starting the engine, friction and metal grinding can be heard. The engine must be turned off immediately. Most likely the relay is stuck. The exact cause is determined during disassembly.
- The retractor relay clicks are heard, but the mechanism does not work. The battery may not be sufficiently charged. The voltage supplied to the mechanism is weak; there is enough current to operate the relay, but the terminals are not closed by the contact plate. You need to remove the battery and connect the charging unit. If such symptoms occur when the battery is charged, then the heels may burn or the power cable may malfunction.
- When the battery is charged, the starter rotates slowly. The bushings may be worn out or the electric drive may be dirty.
- When you try to start the engine, a burning smell may come from the device. The winding in the traction relay may have burned out. The anchor can also burn out, but this happens less often. In this case, the wires connected to the starter overheat.
- The retractor on the starter does not work. There is a fault in the electrical circuit. It is necessary to check the integrity of the wires and the operation of all components included in the electrical circuit.
Reasons for failure of the starting system
Most often the following happens:
- For some reason the electric starter does not turn on - the reason is a broken wiring, short circuit or breakdown of the traction relay;
- the starter starts, but an uncharacteristic clicking sound is heard - damage to the coil of the above relay or discharge of the battery;
- the start works, but the starter does not turn or rotates too slowly - the battery is dead.
In addition, the reason here may lie in:
- loss of contact;
- brush wear;
- collector contamination;
- short circuit of the winding wires.
It also happens that the starter works normally, but the flywheel still does not rotate.
Here, first of all, you need to make sure that the attachment to the crater installed on the clutch is not broken. Then you will have to check the integrity of the teeth of the flywheel itself or the drive gear.
It happens that the 16-valve Priora does not turn off the starter after the power plant is factory installed. This happens due to a malfunction of the clutch that ensures the free movement of the unit in question. Sticking of the relay contact group also leads to the same result. If this malfunction occurs, you must immediately turn off the engine.
Problems with the Priora plant often arise due to ignition failure. In this case, you need to make sure that:
- the coils are securely fastened to the power plant;
- there was no break in the ignition wires in its low-voltage circuit;
- whether the spark plugs are working (if there is no spark, you will need to replace the ignition coil).
Dismantling works
After opening access to the starter, you must perform the following steps:
- First, you should disconnect the control connector, for which the locking tab is lightly pressed;
- Then the rubber cap is moved aside and the nut is unscrewed using a 13mm wrench from the terminal;
The power terminal is removed, after which the three mounting screws located at the top and bottom are unscrewed with a 13 key.
Note that you need to start with the two lower screws, and the top one should be unscrewed last, while the starter housing must be held, then the housing is carefully tilted back. Installation work is carried out in the reverse order of dismantling.
How to remove the electric starter
The procedure in this case is as follows:
- remove the terminals from the battery;
- the “plus” connector is removed from the starter;
- removed from the relay block;
- The nuts securing the faulty unit are unscrewed.
Then you can safely remove it.
Next you will need to check the functionality of the relay. To do this, take emergency wires to start from another car. The negative one is installed on the battery and on the starter housing. “Plus” is connected to the relay. The latter in this case (if it works properly) is triggered and moves the gear. The absence of this reaction indicates a breakdown of this element.
When there is no reason to suspect the relay, you need to try to start the starter itself. The “minus” remains in place, and the “plus” is set to the lower output of the relay. The motor should start working. A negative result indicates wear of the graphite brushes.
Description of the Priorov starter
Before we talk about how to repair a starter, let's get acquainted with the basic description of the mechanism. Let's start with the purpose and location.
Purpose and location
An electric starter is a unit used to convert electrical energy into mechanical energy, which is necessary to start the engine. In fact, this mechanism is an electric DC motor equipped with a mechanical drive. The principle of operation of the device is to close the retractor and retainer coils, as well as move the core, which helps push out the bendix. As a result, the Bendix engages with the flywheel of the power unit, and under the influence of the anchor, this flywheel begins to spin. Accordingly, this leads to the engine starting. In Lada Priora cars, the starter unit is located on the gearbox, under the housing of the engine air filter element.
Designation of structural elements of the starter assembly
Which starter is better to install on Priora?
Today you can find many models of starters on sale from various manufacturers, but they are all divided into geared and gearless. Both one and the second type have both their advantages and disadvantages. The main advantage of the gearless version is reliability and the ability to repair in case of breakdown, which is due to its fairly simple design. As for the disadvantages, such mechanisms are characterized by high voltage consumption and heavy weight.
Geared devices began to be used relatively recently; the addition of a gearbox to the design made it possible to improve the technical characteristics of the unit as a whole. The main advantage is considered to be higher reliability of engine starting, in particular at low temperatures. This advantage is achieved as a result of increased torque. The electric motor itself is smaller in size, but the rotation speed of the device is higher, and accordingly, less current is required to start the motor. In the production of geared devices, fewer expensive materials are used; accordingly, their cost is an order of magnitude lower than that of gearless ones.
As for directly choosing a starter, in practice geared devices are more reliable and fail much less frequently than gearless ones. But in this case, you need to remember that under no circumstances should you allow the starter mechanism to operate while the power unit is running. This is because the rotation frequency of the armature will be several times higher; accordingly, its conductors can come out of the grooves and touch the stationary components of the device, thus destroying its structure (video author - CompsMaster).
Which brushes are better – graphite or copper-graphite
Let's say everything is fine with you. The first thing we do on the starter is to do without any disassembly, completely remove and change the brushes. It's quite easy and takes minutes.
When replacing brushes, pay attention to the pressure springs. They must be in good condition - not twisted or damaged. These springs ensure good contact between the brushes and the starter motor armature.
- Graphite brushes. If, when removing the brushes, you discovered that you have graphite brushes, and these were factory supplied, then there is no need to reinvent the wheel. No matter what advice or recommendations you are given, use only graphite brushes. They are softer and put less pressure on the lamellas of the engine armature, so the lamellas are less subject to wear. Imagine, if you change brushes, your slats already have a little wear because they have worked for a certain period of time. If you install copper-graphite brushes, which are stiffer, then this wear will only increase. Thus, in the near future it will come down to disassembling the starter and repairing the armature.
- Copper-graphite brushes. Today you rarely see this, when there are graphite brushes on the starter, copper-graphite ones are still installed there. Copper-graphite brushes differ from graphite brushes in color; they are a little shiny because they contain copper additives. But the main feature is that copper-graphite brushes are not only stronger, which means they last longer, but also have lower resistivity. They have higher electrical conductivity and a lower voltage drop, which allows the starter motor to operate more efficiently. This means that preference is given to copper-graphite brushes.
Lada Priora starter: device and principle of operation
As mentioned earlier, this part can be installed on Priora of two types: geared and gearless
Sometimes it may be necessary to remove the starter, note that it is located under the engine, on the right - closer to the space under the air filter
To ensure that the starter unit does not wear out so quickly, it has a special mechanism that disengages the gear from the crankshaft flywheel - the Priora starter retractor relay. If it were not there, the service life of the unit would be greatly reduced, or repairs would be required.
Geared
This mechanism is small in size. It turns out this way because the gearbox allows you to increase or decrease the torque. The planetary gearbox itself in the car in question is located between the armature and the bendix; it serves as a “buffer” and an intermediate part between them. Thus, it does not take up so much space in the case, under which there are:
- bendix;
- fork;
- anchor;
- stator;
- solenoid relay;
- mask;
- gearbox
Its main difference is that the bendix is fixed on its own shaft, and it interacts with the Priora engine through a gearbox.
Gearless
A gearless starter is much larger than its counterpart, but it does the same job of receiving electrical energy from the battery and sending it to the crankshaft to start the engine. It consists of the following components:
- relay;
- an electric motor containing the traction relay cores and winding;
- brushes and holders, “brush assembly”;
- solenoid relay;
- stator;
- fork;
- contact bolts;
- anchor;
- starter mask;
- retaining ring;
- freewheel;
- front bushing and rear bushing;
- starter bendix Priora;
- gear.
The gearbox operates according to the following algorithm:
- Power is supplied from the battery through the wiring harness.
- The anchor is retracted.
- The Bendix is attached to the gear, “thrown out”, the pin contacts are closed, and voltage is applied to them.
- The armature rotates, the torque is transmitted to the bendix, through it to the gear, and it is already in contact with the engine flywheel.
- As soon as the ignition key is released, the retractor relay disconnects the bendix and the gear.
Starter diagnostics to determine the cause of the malfunction
In order to determine which part of the Priora starter mechanism is failing, you need to check absolutely everything - the problem could even be with a fuse that is located far from the part. Perform diagnostics in the following order:
- Turn off the ignition and secure the car with the handbrake. Remove the negative from the battery.
- Remove the air filter and intake hose.
- Disconnect the current-carrying cable from the part that is connected to the battery positive. In order to remove it, remove the upper stud of the solenoid relay with a 13 mm wrench.
- Place neutral on the gearshift lever.
- You will need a working car battery. If you are completely sure that the battery in your Priora is fully operational, use it. Connect the cable with alligator clips to the negative terminal of the battery, the other end to the bolt on the housing of the starter unit. Before doing this, make sure that the connection area is clean. If there is dust and dirt on it, clean it with a brush.
- Connect the second cable with the crocodile to the positive of the battery, its second end to the positive on the back of the starter. When you connect everything there should be a click. It will mean that you did everything right. If there is no click, you need to check the ground just in case.
- Disconnect the negative wire from the housing and connect it to the bottom screw of the solenoid relay. Connect the positive wire to the back of the relay. If a click is heard, it means the brush assembly has failed. If it doesn't work, you'll have to buy a new starter - the relay is broken.
- The negative wire must be reconnected to the body, the positive wire to the lower screw of the relay. When connected, the starter assembly should begin to rotate and you will hear a characteristic noise. The revolutions can rise to 11 thousand per minute. If the RPM is too low and the armature turns slowly, the problem is with the brush assembly or armature.
- If the armature does not spin at all, the problem is in the winding.
- Finally, you need to connect the plus to the top stud of the pull-out relay and close the contacts. If you hear extraneous sounds, you should check the bendix and gearbox.
Relay test
First, it’s worth studying the location of the Priora starter relay, which is located in the starter unit in a small housing. Checking its serviceability is carried out in two stages.
- First, you need to ask a friend to turn the ignition key and listen to the engine compartment. If there is a click, then everything is fine with the part. If there is no click, or the armature does not spin with a click, you will have to move on to the next step.
- Connect the terminals coming from the battery with the terminal that is connected to the starter assembly with a screwdriver. If the unit works, then the relay is faulty.
Fuse
The Priora fuse box is located above the driver's left knee. Remove the plastic cover by first unscrewing the three fastening screws. The Priora starter fuse is K3, that is, third from the left in the first “line”.
You can check the additional block, which is located under the floor tunnel lining. In this case, the 15 Ampere fuse F1 is checked - the one on the far left; sometimes it is enough to change it, since repair of this mechanism is not always required.
Photo of DIY starter repair
Major breakdowns
Do-it-yourself starter retractor relay repair
Among the main starter failures are the following:
- Excessive brush wear. In this case, the electric motor does not rotate or does so with difficulty. There is a noticeable drop in voltage in the on-board network.
- Damage to the solenoid relay. A sign of this breakdown is that the electric motor does not start at all, and there is no noticeable voltage drop in the on-board network.
- Destruction of the bendix - the electric motor rotates very quickly, but the movement is not transmitted to the flywheel.
- Destruction of the flywheel crown. Such a breakdown is manifested by the fact that when the starter rotates, extraneous sounds and grinding noises are heard. The motor starts once.
You need to know where the starter on the Priora is located. It is located in the engine compartment, next to the clutch block and cooling radiator.
We have listed only the main breakdowns that you can diagnose yourself and fix quickly enough. But if there is a break in one of the windings, you will have to carry out a full diagnosis. The symptoms of this phenomenon are approximately the same as those of faulty brushes or a retractor relay.
How does the starter of the VAZ “Ten” work?
Domestic “tens” are equipped with a starter unit with number 5702.3708, which is essentially a DC electric motor. One of the main components of such a device is a traction relay, as well as a planetary gearbox. The motor is excited by the action of permanent magnets installed inside the unit structure. The body of the mechanism itself is made of steel; it is connected using two pins to the covers of the device.
Designation of the component elements of the device
Also, the design of the starter unit implies the presence of an armature and a stator. The armature is designed to carry out rotation in metal-ceramic liners, as a result of which the rotation is transmitted through a gearbox to the device drive. When the driver turns the key in the ignition, voltage from the car's battery is transferred to the relay windings. As a result of the influence of the magnetic field, the armature is first retracted, causing the gearbox gear to mesh with the flywheel. Accordingly, this leads to the closure of the contact bolts inside the structure.
Then the armature itself remains in the same state, it is fixed in this way with the help of a holding winding. When you turn the key in the ignition switch, this winding is de-energized. Ultimately, this contributes to the fact that the armature returns to its original position (the author of the video is Avtoelectrica HF).
What does it consist of?
The starter is an electrical machine with a fairly large power consumption. When starting, it receives power from the battery and is the main consumer that can quickly discharge it.
The starter has a common design with a brush-type DC motor.
Its main parts are: stator, rotor, brush holder and brushes, bendix, solenoid relay.
All of them are involved in the operation of the starter and the failure of one element will lead to its complete stop.
Signs of a generator malfunction
Generator faults are not always easy to identify. Some of them (the so-called “floating” faults) are determined only on a special stand.
But if you notice that the headlights have become dimmer while the engine is running, and that extraneous noise interferes with the normal sound of the running engine or that the battery is quickly discharged, then it’s time to contact the experts. Because it is better to prevent a malfunction by repairing the generator in a timely manner than to ruin your day one day with an unexpected breakdown.
Recently, it has become very convenient to contact specialized companies whose specialization is the repair, maintenance and sale of starters and generators. Modern equipment, combined with qualified personnel and a large selection of spare parts, will allow you to eliminate any malfunction in just a few hours. And diagnostics with disassembly and analysis of the degree of wear of parts will help to quickly determine the degree of performance and carry out restoration work.
However, you can try to diagnose and eliminate some of the causes of generator malfunctions yourself.
If the battery in the car is not charging, then first of all you need to check the tension of the alternator belt - the belt should be tensioned without sagging. This, of course, can be done by eye, but it is better to use a dynamometer: if you pull the longest branch of the alternator belt with a force of 10 kgf, then it should bend no more than 10-15 mm.
On most machines, the tension of the alternator belt can be adjusted by loosening the nut securing the alternator housing to the adjusting bar and using a pry bar to move it away from the engine. After setting the required belt tension, tighten the generator mounting nut back.
If the tension of the generator belt is normal, then most likely the voltage regulator relay needs to be replaced. On older cars it is a plastic box screwed to the front fender mudguard, but in modern cars the regulator is built directly into the generator itself.
To replace the relay-regulator in the generator, you must first unscrew the two mounting screws, disconnect the contacts, and then remove the regulator along with the brush assembly from the generator housing.
Check the slip rings: burnt ones should be cleaned with fine-grained sandpaper and wiped with a cloth soaked in solvent.
For the first time after installing a new regulator, the voltage may be slightly different from the nominal one. When the new generator brushes get used, everything will return to normal.
Small diagnostics
In order to check the starter, you need to dismantle it, and then connect the plus and minus from your battery at the stand, and you will see the starter working. This can be easily done at home.
- The starter brushes are normal and the armature rotation is slow, while your battery is charged. You will probably have to disassemble the starter and clean the armature; most likely, excess oil has got there and the contacts are clogged. This is one of the defects that allows you not to change the brushes and at the same time make good preventative repairs. The reason for oil penetration may be cracks in the housing. Carefully inspect whether the body is intact.
- brushes can not only wear out, but also have characteristic chips, so that the size of one brush differs from the size of another. Perhaps this is an accident, or perhaps a sign that the bearing in which the armature rotates is wearing out. We are replacing all the brushes in pairs, and if this continues, we will probably have to install a new bearing in the future.
- more points related to the electrical part in the starter. An interturn short circuit of the armature winding on the commutator may occur, then the rotation will be inadequate and the starter will begin to heat up. To do this, you need to check the winding, which also requires disassembling the starter.
- In addition to the winding, there are lamellas on the armature. These are precisely the contacts to which power is supplied through the brushes, a direct current of twelve volts. So, if the lamellas are dirty, worn out by the brushes, or a short circuit occurs between them, this also has a bad effect on the operation of the starter.
Purpose of the starter and its location
The “ten” has a small, but quite powerful 4-band electric motor, which is responsible for the primary rotation of the crankshaft. Without the participation of an electric motor, it is impossible to ensure the required crankshaft rotation speed. We replace this unit, since for a gasoline engine with an average cylinder capacity, 3 kW of energy is enough to start.
The starter supplies energy from the battery; it is a DC motor. Receiving voltage from the battery, the motor power is increased by four brushes. They are the main elements in any car starter. If necessary, the brushes can be replaced. If the starter meters are faulty, they can be purchased separately and replaced. But to do this, in any case, you will first need to remove the starter.
Checking the starter circuit
If the starter does not work when the ignition key is turned to position “II,” there may be a malfunction of both the starter itself and its activation circuit.
To check, turn off the ignition and disconnect the wire block from the terminal of the starter traction relay windings. During the operation, care must be taken, as sparking may occur in the area where the terminals are closed. Do not connect the screwdriver to ground while closing the terminals!
Using a screwdriver, we bridge the terminal of the traction relay and the tip of the wire connected to the “positive” terminal of the battery. If the crankshaft rotates, then the starter is working, and the cause of the malfunction is a violation in its activation circuit. Otherwise, the starter or its traction relay is faulty. If it is not possible to eliminate the malfunction in the activation circuit of a working starter, then, if necessary, in this way (by turning on the ignition and closing the terminals), you can start the engine and drive to the repair site. A malfunction in the starter switching circuit can be caused by damage to: the starter relay, the power circuit or relay control circuit, the ignition switch contact group. To troubleshoot the starter circuit...
...in the car interior we remove the starter relay and fuses from the mounting block. To check the starter relay, install a known-good relay type 902.3747-11 in its place. To do this, you can use the adjacent heated rear window relay. If the starter turns on with the newly installed relay, then the starter relay has failed and must be replaced. If not, check the power circuit and starter relay control circuit. To check the power circuit, remove the starter relay from the mounting block.
We insert a jumper (piece of wire) into the sockets of the power contacts of the relay “30” and “87”. We turn the key in the ignition switch to position “II” - “starter”. If the starter turns on, the power circuit is working, if not, then we check it with a tester...
...is “+12 V” supplied to socket “30” of the starter relay when the ignition key is in position “II”. In this case, the second (“negative”) tester probe can be connected to the head of the instrument panel mounting screw. If voltage is supplied to socket “30”, use a tester to check the integrity of the circuit from socket “87” of the starter relay to the tip of the starter traction relay control wire. If voltage is not supplied to socket “30,” we check the circuit from terminal “50” of the ignition switch to socket “30” of the relay. If the circuit is in good condition, it is necessary to replace the ignition switch contact group. If the starter power circuit is working properly, check the starter relay control circuit. To do this, insert the tester probe into socket “86” of the starter relay, connect the second probe to ground. With the ignition on, check...
...is “+12 V” supplied from the main relay of the engine management system to socket “86” of the starter relay. Then we insert the tester probes into the relay sockets “85” and “86” and check...
...is there ground in socket "85" of the relay... ...connected to terminal "50" of the controller. Otherwise, we check the integrity of the starter relay control circuits: from the main relay of the control system and output “50” of the controller - respectively to sockets “86” and “85” of the starter relay.
Principle of operation
- When you turn the ignition key, voltage appears on the coil of the solenoid relay, which attracts the core.
- The core pulls the bendix out of the starter housing and engages it with the flywheel.
- As soon as the bendix engages the flywheel, a short circuit occurs, voltage is applied to the brush holder and causes the starter rotor to rotate.
- The rotor begins to rotate the bendix through the gearbox, thereby rotating the engine crankshaft and starting it.
- As soon as the engine starts, you release the ignition key, the voltage disappears on all elements of the starter and the retractor, under the influence of the return spring, disengages the bendix from the flywheel.
Answers to frequently asked questions
How can you tell if the starter relay is not working?
To determine whether the starter relay is working, apply power from the positive terminal of the battery directly to the control contact of the relay. After this, a click should sound; if it is faulty, there will be no sounds.
How to check whether the starter is working or not?
To check the serviceability of the starter itself, you need to apply current to it directly by connecting the power wires of the retractor relay (thick wire from the battery) and the electric motor (stud with a thick wire from the retractor to the starter). A working starter should start moving.
What to do if the starter does not work after turning the ignition key?
First, make sure there is voltage at the battery terminals. If you don’t have a tester, this can be done using a 12 V lamp. Then try to apply voltage directly to the starter: use a screwdriver to close the pin to which the wire from the battery goes and the control contact located nearby. If there is no reaction, check the quality of the contacts of the terminals on the battery, the ground contacts (with the body and the engine) and the contacts of the starter itself by cleaning and tightening the terminals. If the battery is discharged or the starter is faulty, you need to start the car with a pusher (manual transmission) or tow it to the repair site.
Why does the starter not work with the ignition key?
The main reasons why the car does not respond to the ignition key:
- control relay failure;
- breakdown of the ignition switch/contact group;
- wire break or short circuit;
- problems with the anti-theft system (alarm, immobilizer);
- breakage of the solenoid relay;
- starter motor failure.
If the starter turns directly, but not from the key, then the last two problems can be eliminated.
Source
Designation and location of fuses in the mounting block of Priora VAZ 2170
| Fuse no. | Current strength, A | "Standard" and "Norm" | “Norma” with air conditioning and “luxury” |
| F1 | 25 | Engine cooling radiator fan | Reserve |
| F2 | 25 | Heated rear window | Mounting block, rear window heating relay (contacts). Electrical package controller, contact “10” of XP2 block. Rear window heating element. |
| F3 | 10 | Right headlight, high beam | Right headlight, high beam lamp. Instrument cluster, headlight high beam indicator. |
| F4 | 10 | Left headlight, high beam | |
| F5 | 10 | Sound signal | Mounting block, horn relay. Sound signal. |
| F6 | 7.5 | Left headlight, low beam | |
| F7 | 7.5 | Right headlight, low beam | |
| F8 | 10 | Alarm signal | Mounting block, alarm relay. Alarm sound. |
| F9 | 25 | Priora heater fuse | Reserve |
| F10 | 7.5/10* | Interior lighting, instrument panels, brake light | Instrument cluster, pin “20”. Brake light switch. Brake light bulbs. Interior lighting unit. Interior lighting. The door sill light on the right front door. Additional brake signal. |
| F11 | 10/20* | Wiper | Mounting block, high speed windshield wiper relay. Switch for cleaners and washers, contact “53a”. Wiper and washer switch, contact “53ah”. Heated rear window switch. Mounting block, rear window heating relay (winding). Windshield wiper motor. Rear window wiper motor (2171,2172). Windshield washer motor. Rear window washer motor (2171,2172). Airbag control unit, pin “25”. |
| F12 | 20/10* | Terminal 15 devices | Instrument cluster, pin “21”. Electrical package controller, contact “9” of block X2. Electromechanical power steering control unit, contact “1” of block X2. Reversing light switch. Reversing lamps. Parking system control unit, contacts “11” and “14”. |
| F13 | 15 | Cigarette lighter fuse Priora | |
| F14 | 5 | Left headlight, parking light, license plate light, trunk light | Side light lamps (left side) Instrument cluster, main light indicator License plate lights Trunk light Electrical package controller, pin “12” of block X2 |
| F15 | 5 | Left headlight, parking light | Side light lamps (right side) Glove compartment lamp |
| F16 | 10 | Terminal 15 ABS | Hydraulic unit, contact "18" |
| F17 | 10 | Left fog lamp | |
| F18 | 10 | Right fog lamp | |
| F19 | 15 | Seat heating | Seat heating switch, contact "1" Front seat heaters |
| F20 | 5/10* | Immobilizer control unit | Recirculation switch (switch on) Mounting block, relay for low beam headlights and parking lights (automatic lighting control system) Heater electric fan relay Automatic lighting control switch Windshield wiper and external lighting control unit, contacts “3”, “11” Automatic climate control system controller installation, pin “1” Automatic window cleaning system sensor (rain sensor), pin “1” |
| F21 | 7.5/5* | Rear fog lights | Light switch, contact "30" Diagnostic block, contact "16" Clock Automatic climate control system controller, contact "14" |
| F22 | -/20* | Reserve | Windshield wiper motor (automatic) Mounting block, windshield wiper relay and windshield wiper high speed relay, (contacts) |
| F23 | -/7.5* | Reserve | Windshield wipers and external lighting control unit, pin “20” |
| F24-F30 | Reserve | ||
| F31 | 30 | Electrical package control unit | Electrical package controller, terminal “2” of block X1 Electrical package controller, terminal “3” of block X1 Driver’s door module, pin “6” Threshold light of the left front door |
| F32 | Reserve |
Identifying signs of a problem
When the contacts burn out, the driver begins to hear clicks, indicating that the magnet is triggered. At the same time, there is an anchor in the starter, which remains motionless, and even if it moves, it moves extremely slowly. This happens when the contacts, or rather their working surface, are not completely connected, which causes:
- The copper splash is heated;
- The transient voltage begins to rise;
- An air gap immediately begins to appear.
As a result, a dielectric – oxide – appears on the surface. There is only one way you can fix everything. It is necessary to clean the deposits from the deposits that have formed. You can do this work yourself. If the damage is not large, then you can use a diamond file or use a student's eraser. When the device is severely damaged, it is better to replace it completely.
It happens that the coils short out. This happens due to moisture ingress, or if the insulating properties of the emulsion that protects the wires are lost. The latter option is definitely due to large overheating.
Among other things, you can make sure that the device we are considering is working by connecting the starter directly to the battery. For this purpose, you can use wires to start the LADA Priora engine from another car. We connect the wires to the battery and to the starter.
First the negative ones. If the relay is working as expected, then you will need to inspect the connectors, wiring and battery.
Initially, the wiring is checked for integrity. Start your inspection from the starter to the battery. Next, test the entire circuit with a multimeter; if you don’t have one at hand, a light bulb will do. The test is carried out from the battery to the starter.
Don't forget to check the starter fuse, sometimes the problem lies only there.