A common malfunction of the “power supply system” is simple - the generator does not charge or “wakes up” only at high speeds. Domestic generators are famous for this, both due to the general low quality of workmanship and due to a number of design defects. When faced with the problem of undercharging the battery, it is worth understanding the causes of the problem - anyone who has ever been left on the highway with a dead battery and no charge will confirm that there is little good in this.
Theory of the issue
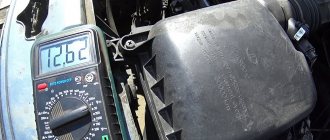
While the car is moving, a dead battery receives a charge voltage of 13.6 to 14.2 V. For the correct and stable operation of all systems in the car, these voltages must be maintained until the engine starts and the crankshaft rotates. Together with the motor, torque is supplied to the generator through the drive belt. At this moment, an amount of energy is generated that will be sufficient for the stable functioning of all systems and to maintain a charge on the battery.
If the generator does not charge, then in most cases the reasons must be sought in the excitation circuits, as well as in the output voltage circuits from the generator to the battery. But this is not always the case. Sometimes problems are related to the generator itself.
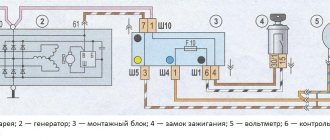
When the driver turns the key in the lock, the relay in the ignition system also starts at the same time. “Plus” flows through the relay and fuse in the mounting block. Next, the voltage passes through the on-board network, reaching the battery charge lamp and charge sensors. It then passes through diodes, relays, elements in the mounting block and finally to the connector in the generator. There, electricity comes to the relay-regulator and, passing through brushes and slip rings, enters the exciting winding.
Troubleshooting VAZ 2107 battery charging problem
First, you should check the serviceability of the alternator belt - it is this that causes the alternator to rotate and generate current. This belt drives the coolant pump, so this malfunction also manifests itself in engine overheating.
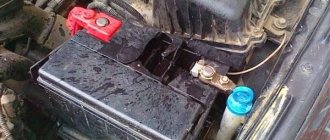
If the charge indicator lamp does not light up, and the voltmeter shows normal voltage of the on-board network, and the battery does not charge, the reason is in the contacts at the terminals.
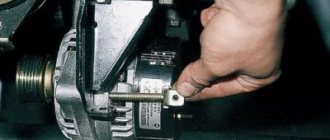
You should remove the wires from the battery and clean the battery terminals and wires with emery cloth. If the charge does not appear, it is necessary to measure the voltage at terminal “30” (generator output) with the engine running. If the voltage at this terminal and the battery is very different, you need to clean the contacts and ring the wire going from the generator to the battery. The faulty wire must be replaced.
Important: if the belt is over-tensioned, excessive load occurs on the bearings of the generator and pump, which can lead to their failure.
Other reasons for the lack of charge may be a broken rectifier diode on the generator, an open or shorted rotor or stator winding.
Diodes can be checked using a multimeter or a test lamp. Using a multimeter, you can check the resistance of the diodes in the direction in which they should be locked. To check with a test lamp, you must remove the “+” terminals from the battery and connect the test lamp. The wire of the test lamp must be touched in succession to the three bolts of the rectifier devices. Then perform the same operation, only disconnecting the “-” terminal. If the lamp lights up, the diode being tested is broken.
If one of the diodes malfunctions, the diode rectifier assembly must be replaced.
A break in the stator winding is determined with a multimeter by measuring the resistance between the rectifier unit mounting bolts. Lack of contact between the winding and the other indicates its breakage. In this case, it is necessary to replace the winding or generator assembly.
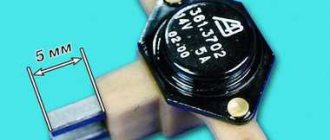
A common cause of generator failure is brush wear. To check them, you need to dismantle the brush assembly. The length of the brushes must be more than 5 mm, otherwise they need to be replaced. Also, the brushes may become warped or “stick” in the wells. Therefore, it is necessary to check the condition of their side surface.
Note: the VAZ 2107 generator (carburetor) is no different from the unit for the injection version of the “Seven”. Therefore, all tips for checking and repairing the generator are relevant for both modifications of the car.
If the warning lamp does not light up and other devices do not work when the engine is running, and the battery is not charging, the reason is a blown fuse or a breakdown of the ignition switch (relay).
The reason for the lack of battery charging may be a breakdown of the relay regulator. To check it, you need to connect “+” from the battery to the top contact, and “-” to the left one and check the voltage on the brushes, which should be 12 V. If the voltage is lower, the relay regulator must be replaced.
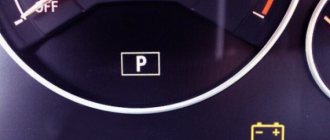
How to determine that the generator is not charging the battery
The easiest way to check that the generator is not charging (VAZ-2110 is no exception) is by looking at the dashboard. There is a control lamp on it. Classic VAZ models also have a voltmeter. The arrow should be in the green zone, and the control lamp should be in normal mode (when everything is working properly, it does not light up). If this is not the case, then charging does not occur. It is worth considering the problem in detail.
Why is there no charger on the VAZ 2107?
For trouble-free operation of the car, you need to ensure that the battery is fully charged. If you notice that your VAZ 2107 is not charging the battery, the problem must be resolved as quickly as possible. Especially if you have to drive a car often at night and in winter. At this time, discharge occurs much faster. Otherwise, you will definitely have to use the help of a tow truck or tug.
Generator overload
If the battery is charging, but the voltage is insufficient, it means the generator is overloaded. This is facilitated by the installation and connection, in addition to standard electrical equipment, of various gadgets that require electricity. The generator is operating at the limit of its capabilities.
Modern drivers love various car tunings. Thus, serious music systems, powerful lighting and other equipment are installed. Someone also increases the battery power. So, with a 70 Ah battery, the standard VAZ generator cannot fully charge it. It just doesn't have enough power. As a result, the generator provides little charge.
Failure of the control relay
If during the check it turns out that the load on the on-board network is normal, and the generator itself is fully operational, then you should pay close attention to the VAZ 2114 generator relay. Failure of this device very often leads to problems with the mains voltage and lack of charging to the battery. In order to check the functionality of the relay (which, by the way, is located on the back of the generator and is painted black) you will need a multimeter.
The check itself is performed as follows:
- Set the tester to voltmeter mode.
- Measure the voltage at the battery outputs with the engine not running - it should be between 12.5 and 13 volts.
- Start the engine and re-measure the voltage on the battery - now it should be around 14 volts, and sometimes even a little more.
- Turn on the consumers (for example, high beam) and measure the voltage at the battery for the third time. It should now be less than 13.2V, and ideally around 13.9V.
Generator relay VAZ 2114
You can also check the functionality of the removed relay.
This is done like this:
- connect the negative of the relay to the negative of the battery;
- We connect outputs B and B of the relay to the battery positive;
- We connect a 3 Watt light bulb to the brushes installed in the relay block using wires. If it lights up, then the relay is working properly.
If during the test it turns out that the relay is faulty, it should be replaced.
The whole procedure is performed as follows:
- Disconnect the terminals from the battery.
- Unscrew terminals 10 with a wrench and remove the positive wires going to the generator.
- Pull off the “chip” with a thin wire.
- Remove the back cover of the generator by unbending the 3 clips.
- Remove the 2 screws holding the relay.
- Unplug the plug from the relay and remove it.
- Install the new relay in the same order, but in reverse order.
This option for removing the relay is the most convenient, although in some cases it can be removed together with the generator. How it will be more convenient to carry out this procedure in each specific situation is up to the driver to decide.
Short circuit to the rotor housing
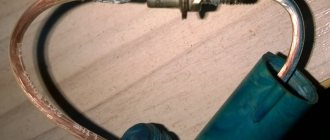
In the event of this malfunction, the entire field winding will be closed and the generator will not be able to operate. Often, short circuits to the frame occur in places where the ends of the winding are connected to the slip rings on the rotor. You can check this using a 5 V lamp. To check, the wire should be connected to one of the slip rings, and the second to the rotor core or its shaft. In the event of a short circuit, the lamp will light up. This generator is faulty. You can insulate the short circuit or replace the winding completely.
Stator problems
Similar problems can arise in stator windings. In particular, if there is an interturn short circuit, the battery will not charge. Of course, the generator can work, but in emergency mode. Firstly, its power will drop significantly. Secondly, the batteries will not be charged. Thirdly, excessive heating of the generator housing occurs. The winding may also short-circuit to the housing. Excessive heating, humming, loss of power - all those signs that are inherent in rotor winding failures. The check is carried out in the same way as in the case of a rotor winding. To carry out repairs, it is necessary to replace all faulty coils. It even happens that in generators the positive terminal is closed to the housing. Consequently, a short circuit also occurs between the terminals of the battery. This poses the risk of a fire. Of course, the generator does not charge in this case.
Algorithm for finding the cause
We looked at typical faults. But it is important to find the main reason. If the car has standard equipment and there are no abnormal energy consumers, then you can begin to diagnose the generator directly. If there are additional consumers, it is better to turn them off. In this case, it must be disconnected physically, from the on-board network.
Next, all consumers are connected and the leakage is measured in the same way with a multimeter. If it is large, then the reason should be sought not in the generator or battery, but in one of the devices in the on-board network. If no leakage currents are detected at rest, then most likely the VAZ generator is not charging. We have already discussed the reasons.
Reasons for lack of charging
When the ignition is turned on, voltage is supplied to the battery charge regulator relay, and the rotating generator generates current. In the vase, the mains voltage is maintained at 13.6-14.1 volts. Regardless of the engine speed, the output voltage remains unchanged; the VAZ 2107 charging relay is responsible for this function. The device controls the excitation of the armature winding, thereby changing the output voltage level.
Based on this, the reasons for the lack of charging may be the following:
- The generator belt has broken;
- Weak belt;
- The generator or excitation circuit is broken or there is poor contact between them;
- The problem is in the relay regulator;
- The generator armature (rotor) is faulty.
Diagnostics and repair of faults
The table lists possible reasons why the generator does not charge the battery or charges poorly, methods for self-diagnosis and corrective measures.
| Possible reason | Where to look, what to check | What to do in case of malfunction |
| The terminal has come off the battery. | Is the terminal in place? | Pin. |
| The terminals have oxidized. | Are there any traces of oxidation at the place where the terminals are connected to the battery? | Carefully clean with sandpaper, removing only the oxidation layer. |
| Generator overloaded. | How much power-consuming equipment is installed compared to the factory assembly? Perhaps the generator is not charging the battery because it can no longer cope with the increased load. More details below. | Optimize the load by discarding some equipment or replacing it with less powerful one. |
Theoretically, it is possible to install a more powerful generator, but finding a suitable one requires in-depth knowledge of electrical engineering. By installing an incompatible unit, you risk facing disproportionately expensive car repairs.
Find out the charging time of your battery
Let's start the renovation
There may be several reasons for the battery not charging. The instructions below are quite universal and are suitable for any case.
Troubleshooting algorithm:
- First of all, we check the serviceability of the belt and its tension. If it is damaged or loose, charging will be less than normal and will ultimately lead to battery failure. The belt is also partly responsible for the operation of the cooling pump, so a damaged belt can cause other problems as well.
The problem can be determined by the sign when, when the engine is running, the voltage in the power circuit is within the normal range, but immediately after connecting the load it disappears. Another sign of a weak belt may be a whistling sound. It may appear immediately after starting the engine or when large current consumers, such as lights, are turned on.
This needs to be corrected, since a poorly tensioned belt slips during operation of the mechanism, which accelerates its wear. It must be tightened to a deflection level of 12 - 17 millimeters with a pressure of 10 kgf, or replaced with a new one;
This is interesting: How to save fuel?
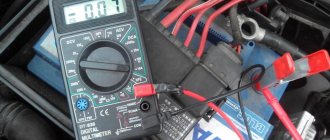
- In order not to waste time and not draw false conclusions, you need to check the voltage on the battery with the engine stopped and running. The normal supply voltage of the machine when the engine is running should be 13.6 - 14.1 volts. A voltage below this will indicate a weak belt (point 1), a faulty regulator relay, or a failed diode bridge.
- If everything is fine with the belt, remove the charging relay and check the wear of the brushes. They should be longer than 5 millimeters, this can be seen visually, but to be sure, check with a ruler. If they malfunction, replace the VAZ 2022 charging relay.
You can check the relay by applying a battery voltage of up to 12 volts to it and connecting a multimeter to the brushes. There should be tension. Next, you need to apply a voltage of 16 - 18 volts to the relay. There should be nothing on the brushes;
- The next reason for low voltage is a break in one or more diodes. Revealed when removing and disassembling the generator.
It’s worse when a diode breakdown occurs, then there is no voltage drop, but this has a detrimental effect on the battery. An alternating voltage enters the machine's power circuit, which leads to boiling of the battery, destruction of the plates and a decrease in its service life.
- If the VAZ 2107 battery charging does not light up, or rather, the indicator light on the instrument panel does not light up, despite the fact that the voltage gauge shows normal voltage and despite all this there is no charging, then the problem lies in the contact at the terminals. To fix this, you need to disconnect the wire and clean it with sandpaper or a file and check the integrity of the wire from the battery to the generator.
- Another reason why the battery charge lamp does not light up at all is a break in the armature winding. It can only be determined after disassembling the generator and measuring the winding for an open circuit using a tester or a multimeter.
Below is a charging diagram for the VAZ 2107 battery:
Generator overload
When tuning a car, it is important to remember that the total electricity consumption of all systems should not exceed the power of the generator. Moreover, a power reserve is required from which the battery will be charged.
How long a generator charges a battery depends largely on their models. But when the demand exceeds the generator's capacity, the systems begin to take it from the battery; the generator does not charge the battery.
Conduct an audit of all energy consumers to see how much power they require. More often than others, problems are caused by :
Battery charging indicator is on
- Acustic systems;
- additional lighting;
- on-board computers and similar electronic systems;
- a battery with a larger capacity than provided by the car manufacturer.
The most rational solution is to abandon energy-consuming equipment in favor of more economical ones. For example, you can:
- buy regular speakers and a radio at a car store;
- install energy-saving light bulbs, for example, LED;
- turn off electronic devices, if not permanently, then limit their operating time and connection to the on-board network.
If the above recommendations are not acceptable, consider installing a more powerful generator. Correct installation can only be done with in-depth knowledge of automotive electrical engineering.
Basic faults
In the event that generator malfunctions begin to appear, you must first pay attention to the entire on-board network. It is quite possible that the wiring that records the excitation winding of the generator in the installation is broken. Please note that the generator provides little charging if its power is much lower than the total of all consumers. This happens when you have installed on your car, for example, a very powerful sound system, lighting, as well as other gadgets that are not provided as standard. This leads to the fact that when the internal combustion engine is running, the entire on-board network is powered not only from the generator, but also from the battery. In this case, the battery actively releases its charge. But it itself does not recharge at this time. Therefore, when tuning domestic cars, be sure to pay attention to the generator set. It is advisable to have a reserve of power. Only in this case will you ensure the most complete charging of the battery, as well as ideal operation of all consumers.
What kind of charging should go to the battery from the generator?
The current required for the normal operation of all electrical equipment and charging the battery is individual for each model and is calculated with a margin so that the car owner has the opportunity to connect additional equipment.
The power spread is quite high - 50-amp generators are installed in compact city cars, and 200-amp generators are installed in respectable cars and SUVs.
In any case, the relay-regulator ensures that the voltage transmitted from the generator to the battery is no more than 14 V - charging in this mode will protect the electrolyte from overheating (and in the summer it is very hot in the engine compartment - in the area around the engine at 100 degrees), at which The liquid boils, decomposing into oxygen and hydrogen.
The main problem is that the generator will charge a heavily discharged battery at a stable voltage with an increased current. For batteries that have lost most of their charge, this is fraught with big troubles, even complete failure. However, recently, expensive configurations of prestigious models have been equipped with functions that allow you to control the amount of battery charging current.
From the above, you need to understand: how many amperes the vehicle generator should supply to the battery depends on the state of charge of the battery. Under normal circumstances, this is approximately 1 A, and as the voltage in the battery increases, this value decreases to 0.5 A. Yes, this is not enough. It can be argued that generator charging of a battery is never complete, this is true. That is why it is recommended to charge once every six months using a charger.
As for the maximum current, its value is usually indicated on the generator label. If it or a component of the generator assembly is faulty, the battery will charge at reduced voltage and will be continually undercharged. Before checking the alternator voltage on the battery with a multimeter, you should make sure that other devices that consume electricity are working normally - this can narrow down further troubleshooting.
The mechanism of operation of the VAZ 2109 - 2114 generator.
In order to understand why on the VAZ 2109 - 2114 the generator does not provide much charging or does not provide charging at all, you need to understand how it works and know the principle of its operation.
The generator consists of 5 main parts shown in the figure below: armature - 5, stator - 6, relay-regulator paired with brushes - 10, diode bridge - 9, housing - 3.7.
The mechanism of operation is as follows:
- a positive wire goes from the battery to the diode bridge (9) and the diode bridge (9) is connected to ground through the housing (3.7) of the generator
- voltage through the diode bridge (9) is supplied to the stator (6) of the generator and a magnetic field appears in the stator
- when the machine starts up, the engine, using a belt drive, turns the generator rotor (5)
- in the rotor (5), rotating in the magnetic field of the generator (6), a current arises
- The current is removed from the rotor by brushes (10) and through a relay-controller (10) is supplied to the car’s battery.
Failure to comply with any of the points leads to a malfunction of the VAZ 2109 - 2114 generator.
The generator does not start when starting only after re-gassing
I recently became the owner of an alarm system with auto start and discovered the following thing: when you start the car with a cold engine, the generator is excited only after re-engineering.
Is this glitch observed only in autorun mode or does it (or did it?) occur?
No, the belt is fine. I checked that it was tight. They say that the tenth family has a disease. If you don’t believe me, let him start it when it’s cold (the main thing is not to press the gas) and look at the voltage on the on-board computer.
1) Put the key in the 1st position. There is no need to start the engine. 2) Set the multimeter to DC voltage measurement mode. You remove the excitation chip from the generator, measure the voltage between the chip and ground. It should be about 6 Volts (if there is a resistor in the device) and about 12 Volts if there is no resistor in the device:
3) Switch the multimeter to DC measurement mode (10 or 20 A “unfused”, depending on the type of multimeter). You stick one end into the chip, and with the other you touch the output of the regulator on the generator (from which you removed the chip):
The multimeter should show about 140 mA if there is a resistor in the device and about 240 mA if there is no resistor:
If everything went well in steps 2 and 3, look at the small bridge diodes, regulator and brushes.
Source
Prerequisites for which the VAZ 2109 - 2114 generator does not charge.
To find the reason why the VAZ 2109 2114 generator does not work or does not charge well, you need to check the serviceability of any of the items above that describe the operation of the generator.
Point 1: the diode bridge does not receive positive voltage from the battery.
The cause of the malfunction in this case may be the wire itself or its connection to the diode bridge or battery. Try to clean the connection terminals, and if that doesn’t help, test the wire.
Poor contact with the negative wire is not considered, because in such cases the engine would not start at all.
Point 2: diode bridge and generator stator.
If voltage comes to the diode bridge, but charging does not occur, then it should be checked for functionality. To find out how this is done, read the article “Checking the diode bridge of VAZ 2109 - 2114”.
After checking the diode bridge, if it is working properly, we ring the stator winding. To do this, select the continuity mode on the multimeter and apply the probes to the first and second contacts of the stator, and later to the first and third.
If there are no cliffs anywhere, we move on.
Point 3: VAZ 2109 - 2114 alternator belt.
The carburetor version of the VAZ had a narrow V-belt, and the injection models have a wide belt with cores, but this does not change the operating mechanism. Charging may not go well due to belt slippage. This malfunction is manifested by a powerful belt whistle. Also, the belt may begin to whistle when you turn on energy users such as headlights, heated glass, stove fan, etc. If you hear a belt whistle, try to change it as soon as possible. This is one of the reasons why the VAZ 2109 -2114 generator does not charge well.
Point 4: generator armature VAZ 2109 -2114.
There should not be breaks in the armature, as well as in the stator. Test it by placing the multimeter probes on the brush tracks.
If the anchor does not ring, it should be changed.
Point 5: brushes with a relay-controller.
The brushes of the VAZ 2109 -2114 generator wear off on the armature tracks over time. If their length is less than 5 mm, then they are not able to press tightly against the anchor, thereby not providing charging for the battery of the vases.
But it happens that the relay-regulator fails before the brushes are worn out. To check it you will need:
- 12 volt light bulb
- car battery
- two 1.5 volt batteries
- several wires
We connect the light bulb and battery to the relay regulator as shown in the figure below. In this case, the lamp must glow.
Now we add two batteries to the circuit, as in the figure below. At the moment, the light bulb does not have to glow.
If the light bulb lights up in both versions - the relay - the regulator must be changed.
Now you know all the main reasons for the malfunction of the VAZ 2109 - 2114 generator. If you have questions, leave them in the comments!
Source: www.vaz-zona.ru
Possible causes of defects
Brush wear
If the generator does not charge the battery, then the first thing that comes to mind on cars with sufficient mileage is wear of the brushes. There are not many purely mechanical components in generators that affect its performance - and the brushes, constantly rubbing against the commutator, are worn out.
As wear occurs, the contact worsens, and the current in the rotor winding decreases accordingly. At first, the generator does not give much charge at low speeds, “waking up” after re-gas, then it completely fails. The brushes themselves can be either a separate unit or interlocked with a relay regulator.
When removing the brush assembly from the generator, you can simply feel how it can be pulled out so that the elasticity of the springs stops being felt - this will be the remaining working length of the longest brush. Please note that brushes often wear out unevenly: on the side of the lid, where dirt and brush wear products accumulate, the brush wears out faster. This is also noticeable by the presence of a groove on one of the rings.
The groove itself is not so scary if it is rubbed smoothly. Here it is wavy, with sharp changes in diameter - a direct indication of the replacement of slip rings or the rotor assembly. On foreign generators there is a monoblock system, when the diode bridge, the relay-regulator, and the brush assembly are one whole. Replacing such a monoblock is not a cheap matter, and it’s stupid to do it when only the brushes are worn out. Therefore, they are resoldered, selecting suitable ones from Russian generators or power tools.
Break
In the rotor, apart from wear of the slip rings, there are few possible causes of malfunction - relatively small currents do not allow the winding to burn out, and even more often the wire breaks at the junction with the collector. The rotor is checked with a tester: first, the resistance between the collector rings is measured, then between the rings and the “ground”. In the first case, the resistance is several ohms, in the 2nd case it is “infinite” (there is no short circuit of the winding to the housing).
Stator and diode bridge
Another reason why the generator does not charge is the more loaded components: the stator and the diode bridge. With constant overloads, they overheat, which for the stator is fraught with destruction of the insulation, a small short circuit to the housing and fire of the winding, and for the diode bridge - failure or breakdown of the diodes. External symptoms (Symptom from Greek - case, coincidence, sign - one separate sign, frequent manifestation of a disease, pathological condition or disorder of any vital process)
are similar - the power of the generator drops (one or two phases do not work), or the generator fails completely.
The stator is assessed first from the outside - darkening of the insulation and a burnt odor should not be visible. Then, using a tester, the resistance of each phase winding and the absence of short circuits to the housing are checked.
It is better to inspect the diode bridge using a battery and a test lamp - in testers, the voltage during testing is low, and a broken diode can be missed in this way. A 12-volt 40-60 W light bulb and battery are more reliable in this regard. The test circuit is ordinary: we connect the “minus” from the battery to the power terminal of the diode bridge, and alternately connect the “plus” through the lamp to any terminal of the bridge to which the stator windings were connected. If the light bulb does not glow on one of the phases, the diodes are burnt out. Next, we change the polarity of the connection - in this case, the light bulb does not light up in any phase, otherwise this will indicate a breakdown of the diodes in the bridge. We repeat the function, connecting the “ground” to the “horseshoe” of the diode bridge - the lamp does not light up. When connected in reverse, it should glow in all phases. Additional diodes are checked from the stator inputs to the terminal going to the relay regulator.
With all this, the malfunctions of the stator and the diode bridge are closely connected: broken power diodes will lead to overheating of the winding in the corresponding phase, because it is short-circuited.
Problem with the relay regulator
The procedure for checking the relay regulator depends on the design. External ones (like on old Zhiguli cars) in the absence of charging can be easily checked by making sure that current flows to the brush assembly after turning on the ignition (by connecting an ammeter to the circuit between terminal 67 of the relay regulator and the brush assembly). There is no current - change the “chocolate”.
If the relay-regulator is combined with a brush assembly, then you can measure the voltage on the brushes after turning on the ignition: it may be less than the on-board one, but it should be. Do not inspect relay-regulators without an overload: in this case, there may be voltage at the output, but if an overload is applied to a faulty relay-regulator, it will drop sharply, and the working unit will have to be considered defective.
The lack of current in the stator winding will not necessarily be a consequence of a malfunction of the relay regulator itself. Remember what we wrote above about relay power circuits. In generators with additional diodes, it comes from the generator itself, but when the engine is not running, only the current goes to the relay-regulator through the control lamp. Such generators are easy to distinguish - they are connected to only one low-current terminal from the control lamp. The relay is considered defective if the additional diodes in the bridge are operational.
In generators with external excitation, at least two low-current inputs are required - one from the control lamp, the second is the ignition “plus”. This is a very common scheme on Asian generators, where the pinout of the low-current connector can be easily deciphered by the markings (L - test lamp, IG - ignition). In generators of this type, after turning on the ignition, the voltage at the IG terminal is certainly present, otherwise the generator will not be excited.
Something else useful for you:
Video: Reason for lack of battery charge on VAZ 2101. How to find
Source: topmekhanik.ru