The bumper lip is a rubber splitter designed to be mounted on the front bumper, rear bumper or on the door sills of a car. In its initial state, the universal lip looks like a U-shaped strip of dense rubber. When installed, one of the edges of the lip is attached to the bottom of the bumper, as a result of which the lower part of the car looks stylish and acquires a certain completeness.
Comes from motorsport
Another name for this part is splitter. In big motorsport, a splitter is a special limiter in the form of a plane, thanks to which a vacuum is created under the bottom of the car by limiting its flow under the front part of the bumper. The thinner air under the car provides a kind of cushion on which the car acquires greater lightness and, accordingly, speed.
This technology is complex; it is hardly possible to achieve a similar aerodynamic result using a rubber lip at a speed of 90 km/h. However, the universal rubber lip has its own advantages; it makes the operation of the car more comfortable and somewhat special for the car enthusiast.
Additional tuning elements
Motorists, trying to give their vehicle a unique design, tune the bumper. Basically, these alterations concern the installation of the following elements:
- Lip. It is a kind of protrusion, which is located at the bottom of the protective structure. It is made of fiberglass and polyurethane foam, as a result of which the lip is primed and painted to match the color of the car.
- Diffuser. Decorative trim for the lower part of the rear bumper. Foamed PVC is used to create it. Markings are created on the material, after which the sheet is heated with a construction hairdryer and the parts are given shape. They prime and paint, and then attach it to the car using sealant.
- Fangs. A decorative element that is installed on both metal and plastic body elements. For mounting on “plastic”, fiberglass is used. To install fangs on iron parts, use metal and a welding machine.
Also, to give the car an individual look, stickers are placed on the bumpers, or parts are covered with carbon fiber.
Unexpected features
It would seem what changes a 2.5 meter long rubber band can make when using a car. And they exist and, indeed, are very worthy of listing them.
Lip with bumper
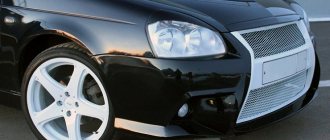
- The universal splitter gives the car a new look - more aggressive and sporty. The front of the car seems more predatory due to the fact that it becomes wider due to the lip, and the visual decrease in ground clearance evokes thoughts of a sports car.
- The splitter looks especially organic when combined with other sports body kits. Alternatively, the lip can be attached around the perimeter of the car: above the wheel arches, on the rear bumper and along the side line of the car.
- When operating a car in bad weather, the space under the hood of the car gets dirty much less. In addition, when falling into deep puddles, a significant part of the water is “extinguished” by the lip on the bumper, so much less dirty water gets onto the windshield.
- The universal rubber lip will appeal to those who, when parking, rely on the bumper scraping against the curb. The rubber lip will protect the bumper from chips, scratches, and tears. This universal part costs tens of times less than a bumper, and, if necessary, will take a damaging blow. The lining material rarely tears, never breaks, and quickly returns to shape after deformation.
What is a “lip” on a bumper
Bumper covers are tuning, which gives a certain look and protection from mechanical damage. The overlay is also called a lip. It is attached to the bottom of the bumper, exactly where the bumper most often hits something. Unfortunately, it is almost impossible to avoid various types of thermal or mechanical influences.
Almost every day you have to transport some objects or animals in the trunk, and situations arise in which significant pressure is accidentally applied to the bumper.
When a car is used under the influence of sunlight, precipitation, or temperature fluctuations, the paintwork of the car, including the bumper, is destroyed, which leads to the formation of scratches and cracks on it. To ensure that the appearance of your car continues to please you for as long as possible, there is a very good method - to buy and install trims on the front and rear bumpers. The rear bumper is one of the installation locations for the rear view camera.
The essence of this method is to install special covers made of durable material on the car bumper, which will provide long-term and reliable protection from damage, while the appearance of the car will remain stylish and harmonious. The bumper cover will provide effective protection of the bumper during the entire operation of the vehicle.
This pad is made of high-quality alloy steel that is resistant to corrosion and resistant to significant loads, and it is also resistant to various chemicals, including various solvents. The production of linings is carried out by the company WDG, which focuses on the manufacture of quality products, which provides it with a high rating among other companies.
Features of choice
The part is produced by several manufacturers in China, the USA and Korea. Products differ in the quality of rubber, the width of the tape, and the curvature of the contour along the width. Some manufacturers supply their creations with soldered decor of various colors - so that you can choose a lip to match the car body.
As already mentioned, the finished part is a tape of various lengths. The length of the rubber lip in the standard version is 2.3 meters. This length is quite sufficient for standard sedan cars. If a splitter is purchased for GAZelles, KAMAZs and jeeps, it makes sense to pay attention to tapes with a length of 250, 280, 300 or 330 centimeters. Just keep in mind that the longer the tape, the higher the cost.
In order not to get into trouble with choosing the length of the product, it makes sense to use a tape measure to measure the required length of the part of the car that you plan to refine: bumper, wheel arches, sills, rear bumper. Manufacturers recommend buying a lip 10 centimeters longer than the figure obtained as a result of the measurement.
What will you need to tune the bumper?
Every happy owner of a car dreams of emphasizing the individuality of his “iron friend”. Therefore, it resorts to various tricks in the form of restyling and tuning. The easiest way to create an amazing and unique image is to tune the front and rear bumpers yourself. You can, of course, not “bother” and purchase a ready-made, factory-made bumper on the automotive market. But this purchase will not give your car individual features, since, most likely, you are not the only owner of the purchased style.
And besides, the cost of a bumper decorated with your own hands is significantly lower than the cost of offers on the market.
To realize your dream, you don’t need any special, supernatural materials. To create a unique image you need: sandpaper, fiberglass or fiberglass, polyurethane foam and epoxy resin.
Installation: simple but delicate
In the simplest version, installation will involve attaching the apron to the bumper using double-sided tape. However, this method is not the most reliable; there is a risk of losing the apron at high speed or when the car is used harshly.
An alternative option involves attaching the skirt using a construction stapler. This method is more successful. During the work, you must ensure that brackets are placed at least 1 bracket per 10 cm.
The ideal, but also the most labor-intensive installation method involves fixing the product using self-tapping screws and plastic washers. The fastening step is also 10 cm. It will take a little more time, but you definitely won’t have to redo it!
When installing, it is recommended to make cuts along the edge of the tape so that it fits neatly in the bend areas. It is better to make cuts in the shape of the letter A.
The installation is most conveniently carried out on an overpass.
Nowadays, car stores offer a considerable variety of all kinds of spoilers. However, often those that you like in appearance are partially not suitable in size. Or those that fit perfectly fall somewhat short in terms of characteristics.
Fiberglass bumper manufacturing process
To make the product yourself, you will need not only components, but also competent guidance on how to make this tuning element.
What is needed to glue the product
An experienced car enthusiast can find most of the tools in his garage. Then you should check the list below and purchase the missing materials and equipment. You need:
- epoxy resin - 400 ml (if epoxy is not available, you can use polyester resin);
- fiberglass packaging (the best option is “Steklomat 300” and “Steklomat 600”);
- gelcoat hardener (taken at the rate of 1 cube per 200 ml of resin);
- Bulgarian;
- protective gloves, respirator, glasses;
- industrial plasticine - 5 kg;
- masking tape - 5 rolls;
- putty knife;
- rubber roller;
- sandpaper;
- Teflon polish.
Photo gallery: materials for work
Sequence of operations to create a part from scratch
The algorithm below will help you figure out how to properly glue the bumper:
- The standard bumper is removed from the car. Areas that have become unusable are carefully cut off using a grinder (this category usually includes the lower edge and openings of fog lights).
- Strips of masking tape are glued to the areas of the bumper surface that are planned to be changed, then a thin layer of warm industrial plasticine is applied to the tape.
- Next, a second layer of cold plasticine is applied, which is carefully pressed down and leveled with a spatula (a rubber roller can also be used for these purposes).
- Masking tape is again glued onto the upper part of the plasticine-coated bumper (this is what will be used to check the shape of the bumper and check the lines).
- Now a series of parallel lines are applied to the layer of tape with a marker, located at a distance of 10 cm from each other (this is necessary so that the future shape of one side of the bumper can be easily transferred to the other side, and this can be done with maximum accuracy).
- The adhesive tape profile obtained in this way is transferred to the second side of the bumper.
- Then the tape and markings are applied in the same way to the lower edge of the bumper, after which holes for the fog lights are carefully cut in the plasticine.
- The resulting model is installed in the working position, its symmetry and the correct location of the holes are assessed.
- Now, based on the modified bumper, it is necessary to make a matrix, according to which a new bumper will be created. The entire prepared surface is covered with Teflon polish in at least 3 layers (this will not allow the old bumper to stick to the matrix). Then a layer of gelcoat hardener is applied to the polish, which is sometimes mixed with aluminum powder.
- At the next stage, to strengthen the bumper, several layers of epoxy resin are applied to it, on which a layer of fiberglass is laid. In this case, it is necessary to ensure that no air bubbles remain under the fabric.
- Once the fabric has hardened, the surface is sanded to remove any loose fibers.
- The old bumper is carefully removed from the matrix. The plasticine remaining on it must be thoroughly washed off with either kerosene or white spirit.
- The resulting matrix is lubricated from the inside first with industrial wax, then with a gelcoat hardener, after which the first layer of fiberglass is applied. It is rolled with a rubber roller to eliminate bubbles. Next, the second layer is laid, then the third (and for the third layer it is recommended to use “Steklomat 600”).
- The resulting structure must be allowed to harden within 24 hours. After this, the finished fiberglass bumper is carefully removed from the matrix and processed with fine sandpaper. Now it is ready for painting.
What can you make a car spoiler from with your own hands?
If you encounter similar problems, then, of course, there is an option to buy a ready-made spoiler, and if there is not enough length, simply saw the object and make an insert. The time required is minimal, but here the cost of the material and paint is added to the cost of the spoiler itself. And this turns out to be quite expensive.
Creating a spoiler from scratch is profitable (the average cost is about 25-35 dollars) and convenient. In order to make a spoiler yourself according to your taste and necessary requirements, we will need:
- Styrofoam; - epoxy adhesive; - Sheet steel; - fiberglass or old silk-look shirts; - paint of the required color.
Some tips
- For homemade lips, I recommend preparing the epoxy glue in small batches, as it can quickly lose its viscosity.
- Epoxy glue is most conveniently applied with a brush; a spatula is less suitable for it. And don't forget to wear rubber gloves.
- The rubber lip on the bumper is not always securely secured with tape and may fall out while driving. I recommend additionally securing it with self-tapping screws. This is a universal and reliable method of fastening.
- When purchasing a universal sponge, pay attention to the quality of the material. The rubber must be sufficiently hard and elastic. And when it becomes deformed, return to its original form.
Spoiler creation process
Working with polystyrene foam is quite simple, but there is one caveat. After cutting, a lot of debris remains, which is very well electrified and can stick to the drying element at the most crucial moments. Therefore, try to remove the crumbs immediately.
We cut a sheet of foam plastic measuring 1x1 and 4.5 cm thick (sellers usually say 5 cm) diagonally. Cut out the wing blade. So the width of the foam sheet will definitely be enough for you. Next we move on to the fastenings. It is necessary to cut 1.5 mm plates from sheet steel. We drill 3 mm holes with a distance of approximately 2-3 cm. In order to reduce weight and improve adhesion, bend them with the letter L. After these manipulations, weld two 6 mm nuts to the base. Now you can glue them into foam blanks.
We glue the wing blade with epoxy glue and two layers of fabric. Then we assemble the structure.
Materials and tools
After creating the project, you should decide on the materials and tools for the work. The final result depends on this.
Depending on the selected materials, the set of tools required for work and the nuances of changing the body kit depend.
Also, before you start upgrading the body kit, you will need to use a mock-up or create a matrix; its peculiarity is that it is a “negative” in relation to an existing part. When designing a bumper, the material of the future body part is applied to the matrix, and a “cast” is obtained. It is used when upgrading or repairing an original body element.
To create a matrix, it is recommended to use technical plasticine. The material is not afraid of exposure to high temperatures and is easy to process.
Polyurethane foam
The material is used both to create a bumper from scratch and to modify an existing one. To construct the part, you will need the following materials and tools:
- Polyurethane foam (approximately from 3 to 5 cylinders);
- Foam gun;
- Masking tape;
- Epoxy resin;
- Fiberglass;
- Cooking foil;
- Fiberglass;
- Sharp stationery knife and replaceable blades;
- Sandpaper of different grain sizes;
- Automotive putty.
To create a bumper from polyurethane foam, it is important to have a developed eye, “straight hands”, patience, accuracy and master the skills of manual processing of materials. Only in this case, the quality of the manufactured element will be at its best.
To make a bumper from polyurethane foam yourself, follow the following steps:
- Creating a base from polyurethane foam.
- Use of fiberglass.
- Primer and painting.
You can get a bumper made of polyurethane foam through a step-by-step process:
- Remove the original component. It will serve as a template for creating a new product.
- Cover the internal cavity of the dismantled element with several layers of masking tape.
- Apply foam evenly.
- After drying, separate the frozen workpiece from the bumper.
- Using a knife, cut out the main holes on the new component.
- Carefully sand the resulting part with sandpaper.
- After the foam has dried, putty the workpiece. Afterwards, you should also process the future part with sandpaper, while gradually reducing the grain size.
Before you shape the future bumper, you need to make markings. This way you can achieve a symmetrical, neat part.
The application of fiberglass is carried out as follows:
- Cover the workpiece with foil. It will protect the product from exposure to aggressive materials and make it easier to remove frozen foam.
- Use epoxy resin. Place a layer of pre-cut fiberglass on top of it.
- Smooth the applied material with a rubber or plastic scraper. Do not allow wrinkles or air bubbles to appear on the surface to be treated.
- Repeat the procedure 4-5 times. Wait until the material hardens and dries.
- Remove the foam, make adjustments using putty, treat the surface with sandpaper, prime and paint the body part.
Working on the lip
The lip is done the same way - not very difficult. Remove the bumper and turn it over. Next, you need to glue the blank from foam plastic. We give it a shape and wrap it in plastic bags. Ideally, it is better to find ordinary nylon women's tights, pull them onto the form and coat them with epoxy glue. When the two layers of tights are dry, you need to pull the blank out of the lip. The bags are needed just so that the blank can come off easily, since the epoxy glue does not stick to them. We leave the structure for several days so that the epoxy completely polymerizes.
Foam bumper
You can make a homemade bumper using polyurethane foam in the same way as using polystyrene foam. First of all, a box is made. It will serve as a frame that holds the polyurethane foam sealant.
Remember, foam has the ability to expand in volume after drying. After the installation material has completely dried, start marking the bumper. Now you can cut out the product.
When preparing the model, do not forget about the fasteners; they will be identical on the bumper and the car.
Next, the bumper is processed with sandpaper, as well as the use of resin and fiberglass. Finally, the bumper is primed and painted in the desired color.
What is it for?
Contrary to the fairly widespread belief that the lip on the VAZ 2114 bumper is purely a tribute to fashion or a desire to stand out, it is completely wrong.
Of course, such an element adds individuality to the car and changes its appearance, but at the same time the lip also has a direct functional purpose - it changes the aerodynamics of the car and its behavior on the road (which is why in foreign countries, and often here too, it is directly related to aerodynamic elements such as spoilers).
In addition, they also perform some protective function of the bumper itself.
Some tips
- For homemade lips, I recommend preparing the epoxy glue in small batches, as it can quickly lose its viscosity.
- Epoxy glue is most conveniently applied with a brush; a spatula is less suitable for it. And don't forget to wear rubber gloves.
- The rubber lip on the bumper is not always securely secured with tape and may fall out while driving. I recommend additionally securing it with self-tapping screws. This is a universal and reliable method of fastening.
- When purchasing a universal sponge, pay attention to the quality of the material. The rubber must be sufficiently hard and elastic. And when it becomes deformed, return to its original form.
With your own hands
Of course, going and buying (or ordering) a bumper lip is the simplest solution, but it is quite possible to make such a body kit element yourself - this requires a minimum of tools and basic skills in working with them.
Of course, more advanced craftsmen can make a lip from scratch from sheet plastic, cutting and bending it to size, but now we will look at the simplest, and accessible to absolutely everyone, method - making it from the front bumper. In this case, the lip of the VAZ 2114 is made from a bumper also for the VAZ 2114.
How to make a power bumper
power bumper" width="660″ height="440″ />
The part is mainly installed on SUVs. Thanks to it, the vehicle, when driving off-road, will be able to overcome serious obstacles without risking its integrity. The passive safety of the driver and passengers will also significantly increase. The power bumper is made of iron. Homemade elements, in addition to safety, “give” the SUV an aggressive appearance. With a homemade power kit, you can drive. To obtain this permit, changes to the design of the vehicle must be registered with the traffic police.
Before starting work on creating a power element, you need to draw up a plan on how to make a bumper, and only after that, start working. To complete this you will need the following tools and materials:
- Tape measure, tape, marker, scissors.
- Sheet metal (up to 3 mm thick), and cardboard.
- Grinder, cutting and grinding wheels, welding machine.
The work process is slightly different, depending on the method used to create the bumper:
- Constructed from a single piece of metal.
- Construction from several parts.
Despite the differences, the process has some similar operations:
- Creating templates from cardboard.
- Cutting out the necessary elements from metal, or creating the desired shape from a single piece.
- Connecting several parts into one piece using a welding machine, or forming a structure by bending sheet metal (practically impossible at home, since powerful equipment is required).
- Primer and painting.
- Installation on a vehicle.
The power bumper is painted in dark colors or left unpainted (if stainless steel is used as the material).
