How to connect a radio so that it works without the ignition
Most often, the standard radio on cars only works when the ignition is on. This article presents several connection diagrams that will allow the head unit to work continuously. The instructions are suitable for all radios (for example, Lada Granta, Kalina, Priora, Vesta) with an ISO connector.
Lack of car radio power supply
When you turn up the volume on the speakers, the radio may also turn off because the cross-section of the wires cannot withstand the load, causing the fuse to trip. To solve this problem, you need to change the wires to thicker ones, and also power the radio directly from the battery. In 90% of cases, this helps to get rid of problems in the operation of the radio, as well as improve its performance: the device will work even when the engine is started, with the cigarette lighter working and the phone being charged.
The radio does not work without the ignition
Musical accompaniment, and just useful news information on the road sometimes helps us out a lot. But it often happens that as soon as you get there, you turn off the engine, and bam, the radio no longer works. Which is very unfortunate, because you want to listen to something, but you can’t do it. Since the radio turns off when you turn off the ignition in the car and that’s it. How to fix the situation? How can I make the radio work even when the ignition is off? This is exactly the topic we will talk about.
We will start with the very case in which problems arise. That is, the recommended case for connecting a radio from the manufacturer. Take a look at the diagram. Everything is very simple and clear. Two wires for power. At the same time, the yellow one is power and provides power to the memory, and the red one is the control one. To turn on the amplifier stages in the radio when it is running. If the red one is left on constantly, along with the yellow one, then the radio will not go into energy-saving mode and, of course, all this will end badly for your battery. That's why red is turned off through the ignition switch. But as we already understood, this does not suit us. This means we come up with another circuit that would ensure operation when the ignition is turned off. Take a look at this option.
This solution cannot but please the eye and mind if you know how to read diagrams. And if not, then we will now tell you what is happening here. Actually, we turn on the ignition, voltage is supplied to the red and yellow wires, which means the radio can be turned on. At the same time, power is also taken from the radio from the blue wire. This is power for an amplifier or active antenna. You can find out where to get all these wires by looking at the ISO connectors in the article “How to connect a radio in a car.” The result is self-pickup, through diodes that converge according to the circuit and are connected to the control voltage. That is, the radio will power its control wire itself, even if the voltage from the ignition switch suddenly disappears. This is very similar to a self-pickup relay circuit. Well, in the end, the algorithm works like this. Turn on the ignition and turn on the radio. Everything is working! We arrive, turn off the ignition, everything works! We turn off the radio and that's it, it turns off. In this case, it will not turn on again until we turn on the ignition and turn it on with the power button.
Actually, such a scheme and such an algorithm are quite pragmatic. For most motorists, you can stop there. However, let’s also fantasize about the convenience of powering the radio. Let's say we forgot to turn off the radio, or we just don't want to bother ourselves with this, but we just get out of the car, set it to the alarm and our radio turns off. In this case, the possibility of turning on appears again when we remove the car from the alarm system and turn on the ignition. The end result is something like this.
Why is this happening?
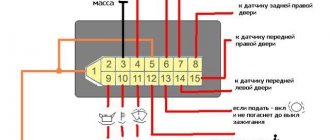
Currently, almost all car radio manufacturers use ISO connectors.
Consequently, the wires of almost all radio tape recorders are marked the same.
Namely flowers:
- Yellow – Constant power.
- Red – Ignition.
- Blue – Antenna power or signal wire to turn on the amplifier.
- Black – Mass.
Many car enthusiasts incorrectly connect the power cables of the radio.
Yellow wire.
It is completely wrong to take + from the cigarette lighter! The cigarette lighter power cord is designed only for the cigarette lighter itself.
When it is also loaded with a radio, voltage sags can occur on it.
It is the voltage drop that will lead to the radio turning off or rebooting. And because of this, the radio may not produce very high-quality sound.
Therefore, the wire must be routed directly from the battery terminal.
The optimal wire cross-section is 2.5, I don’t recommend anything less.
Important:
the positive cable must be protected with a fuse of the same rating as the fuse on the radio itself, placing it as close as possible to the power terminal!
This is done in order to protect your car from fire if a wire suddenly shorts out somewhere in the area.
Black wire.
It is advisable to hang the mass on some bolt screwed to the car body, having first stripped it down to metal.
With this connection, the radio will have the most minimal voltage drop.
Red wire.
This wire controls turning the radio on and off depending on the position of the ignition key.
If you connect it to the lock correctly, then when the ignition key is in the zero position, the radio should not work.
I myself don’t like it when the red wire is connected to the ignition switch. I usually wind it with a yellow wire so that I can use the radio at any time.
Some modern cars have such a system that when the starter turns, all other consumers are turned off so as not to interfere with the starter.
And in order for the radio to not turn off, you just need to wind the red wire together with the yellow one.
Good nutrition is the key to stable operation of the radio!
How to listen to music in an unstarted car without risk
So, we looked at whether it is possible to listen to the radio with the engine off, let's summarize:
- Yes you can, but this drains the battery;
- If you have a new battery and a new car with a modern car radio, the battery drain will be minimal, you don’t have to worry;
- It’s more difficult with old units - they literally run out of power from the wind. It’s uncomfortable to drive with this, and it can stall at any moment. Therefore, change it;
- To turn on the tape recorder in an unstarted car, use the standard audio system options.
- If you don’t want the music to stop after a set amount of time, leave the key in the lock (in the unlocked position).
How to avoid problems if the battery gives rise to doubts?
- You should listen to music on the radio, where the current consumption is minimal. It's another matter if you burn a disc and run it, because the optical drive requires more power.
- Do not listen at full volume - the quieter, the more economical;
- Buy a compact voltmeter and use it to monitor the condition of the battery;
- Carry a cigarette cord with you;
- If you have space in the trunk, you can also buy a starter-charger;
- And some people also advise carrying a spare battery, but do not forget to recharge it every couple of months.
Do you think it’s possible to play music in a car without a battery at all? Of course not. There are no options anymore!
And one moment! Some car owners are looking for a way to keep the music on when the engine is turned off. This is not entirely convenient, especially if the playback is from a flash drive or disk. In the unwinded position, the car radio has to be turned on again, and a new initialization of the drive begins and playback starts all over again.
Other problems
Problems with reading storage media arise no less often than difficulties with turning on. You can eliminate them yourself.
No sound or noise
This problem can be caused by several reasons, the most common of which are:
- No signal. In this case, the sound disappears or loses volume. Checking the high-level pulse supplied by the fourth pin of IC901 helps solve the problem. If there is no signal, the controller must be replaced. If the sound disappears when you start the engine and adjust the volume, you need to inspect the amplifier contacts.
- No voltage at the base. In this case, the sound fades or disappears completely when you try to increase the volume. This problem is determined by checking the bases with a voltmeter. If the tested parameter is zero, the transistors must be replaced.
- The Mute button is broken. The change in sound quality in this case is due to a controller malfunction. If you have problems with volume control, you need to check transistor Q802.
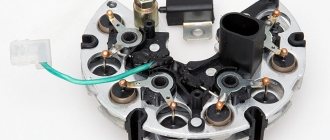
- Amplifier chips burn out. If there is no sound, you need to inspect all the cables connecting this module to the tape recorder. Repair involves replacing capacitors and microcircuits.
Does not read the disk, flash drive or the disk is stuck
When using the car radio, the following problems with reading information may occur:
- Inability to recognize the disc. Occurs when the laser head is damaged due to vehicle shaking. Replacing this part helps solve the problem.
- Inability to read flash drive. First of all, you need to check whether there is a light indication on the drive. If it is present, the connector is working. After this, check whether the type of flash drive matches the parameters of the radio. Older audio devices may not read large storage devices. Problems also arise when the software is damaged. They can be solved by flashing the radio.
- Disc jam. Associated with a breakdown of the motor, pressure roller or sensors. It is recommended to replace parts.
Source
How to connect a car radio in a car with your own hands? (photo - video instructions)
Good afternoon. In today's article I will tell you how to connect a car radio in a car and analyze typical errors in connecting radios. Traditionally for our site, the article is equipped with detailed photos and video instructions.
If, when connecting, you arrange the so-called. A short circuit can lead to melted wires, burns and, in extreme cases, a fire. Please, when connecting the car radio, be careful, carefully insulate all wire connections and do not forget about the fuse...
To connect the radio we need:
- The car radio itself, the speakers and their wires
- Stationery knife or special knife. tool for removing insulation from wires.
- Insulating tape.
- Fuse (10a-15a) and its connector.
- Multimeter or test light.
- Crown battery
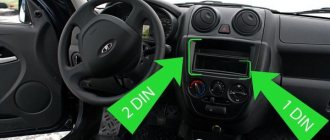
The simplest option is that the car has audio preparation.
Audio preparation – i.e. Special connectors, an antenna are installed in the car's wiring, and speakers are fixed in standard places. For many models, audio preparation is an option, and many owners refuse it in order to reduce the cost of the car when purchasing, but this should not be done, since radio installers will ask for much more money for it.
With factory audio preparation, installing a radio comes down to purchasing an adapter between the wiring connectors and your radio.
Adapters are freely sold in most stores that sell radio tape recorders, but if you want to save money, you can order them on AliExpress.
The adapters look like this:
The second most difficult option is that the car does not have audio preparation, but a radio tape recorder was previously installed (for example, a cassette).
In this case, you need to replace the radio connector with a new connector (or maybe you’ll be lucky and they will match).
The diagram for connecting a car radio looks like this:
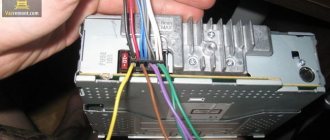
Most likely after you cut off the old radio connector (it’s better to do this with the battery terminal removed). You will have several wires and you need to determine where they are coming from, usually you need to find the permanent positive, positive from the ignition, ground and speakers.
How it's done?
— We expose the wires using a utility knife and arrange them so that they do not short-circuit.
— We put the terminal on the battery.
— We connect one terminal of the test lamp (or multimeter) to the car body (ground) and with the second terminal, sequentially, we touch each of the exposed wires. When the light comes on or the multimeter shows voltage, congratulations, you have found a permanent positive.
— It’s better to immediately twist it with the radio connector (usually the wire is yellow and BAT +12v is written on it) and insulate it with heat shrink or electrical tape. A fuse with a rating of 10-15 amperes must be installed on this wire.
— We are looking for the plus from the ignition switch, to do this we open the lock to the “ignition on” position and similarly, using a multimeter or a light bulb, we look for the required wire. The found wire must be connected to the red wire of the radio connector (usually ACC+ is written on the wire); we do not isolate it yet!
Note (sometimes this wire is connected to a permanent positive, but in this case the radio will drain the battery, since it will not have a standby mode)
— We are looking for ground, to do this we disconnect the control lamp from the body and connect it to the last twist we just made and connect the second terminal of the control (multimeter) in series with the remaining wires. Once the light comes on (or the multimeter shows voltage), you have found ground. We connect it with a twist to the black wire of the radio connector (usually it is labeled gnd, ground)
— We isolate it and the plus from the ignition switch.
All of you can connect the radio. If everything is done correctly, it will light up.... But you also need to connect speakers and an antenna to the radio.
Connecting speakers.
You have 10 wires left. One of them is an antenna cable, one plus antenna power and 8 wires from the speakers.
Wires from speakers usually come in pairs, but their markings are not always correct. Therefore, we need a crown battery.
We attach it to a pair of wires for 1-2 seconds and listen to which speaker clicks. Next, we look at the speaker itself and connect the battery again. If the speaker goes forward, then the polarity is correct, and we screw it + to + and – to -, in accordance with the diagram. If the speaker goes inside, it means the polarity is wrong and we connect it the other way around.
What you will need
To connect you will need a set of materials:
- a piece of copper cable;
- soldering iron and lead-tin solder;
- insulating tape on a fabric or polyvinyl chloride basis, the use of heat-shrinkable tubing is allowed;
- a set of tools for removing the steering column casing;
- test device.
Radio connection diagrams
You can connect the car radio using several options:
- using an ISO connector;
- combining wires with or without a chip;
- by combining the power wires with the battery screw terminals;
- through the ignition switch or a separate button;
- through the signal.
The connection of the radio is carried out by the owner of the car independently or in a specialized center. The operation of not only the multimedia center, but also the electrical system of the car depends on the correctness of the procedure.
The connection diagram for the radio is often located on the top of the equipment case. Such car radio diagrams display wiring markings in accordance with the standards:
- scarlet – power supply control;
- white with blue stripes – power supply to the antenna amplifier;
- black – electrical engineering;
- bright yellow – power supply to electrical equipment and amplifier.
To securely fix the wiring, you can use regular cable ties.
Connection with and without chip
Such installation of car radios is possible if there is an ISO connector built into it. If the radio has a proprietary electrical connector, then you will have to buy an additional adapter for it, which can be equipped with an additional chip or not.
If the proprietary electrical connector or tape recorder does not have a chip, then the cable is connected by soldering or twisting the wiring. Soldering is the most reliable method in this case. Connect according to the attached table. If the radio has a built-in parking screen, it is connected to the parking brake button.
Connection via battery
If the tape recorder has a high output power, then it can be connected directly to the battery. Such radio tape recorders are usually equipped with subwoofers and all this together reduces the capacity of the ignition contacts, and reliable operation of the device becomes impossible. This method can also be used if all devices are turned off when the engine is turned off. The car radio is connected using a cable whose thickness must be at least 3 mm2.
Turns off during operation
If the radio turns off during use, the cause should be sought in the following faults:
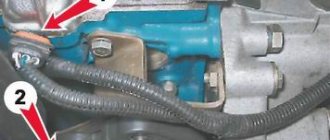
- Disconnecting contacts in the power circuit. This happens when driving on uneven roads. If the radio suddenly stops working, you need to connect the power wires more securely. You need to find the pin closest to the audio device and clean it. A part of the wire with a terminal of a suitable size is connected to the negative terminal of the radio. The terminal is thrown onto the stud and securely fastened.
- The audio device is not properly secured to the dashboard. If the radio often turns off, you need to check it for this malfunction.
- Timer triggered. This part of the radio helps to avoid draining the car battery when the audio device is used for a long time. The car radio needs to be rebooted, this will help cope with the problem caused by the timer.
Separate button
One of the most suitable connection options is to output a separate button that will turn off/on the power to the car radio. In this case, the red wire should be soldered not to the ignition switch wire, but to one of the button terminals. The second pin of the button is connected to the battery. Essentially, you can control the power supply yourself. Before parking overnight, you just need to press a button. You will no longer be dependent on the position of the key in the ignition switch.
The option of connecting via an alarm system also has a right to exist. The bottom line is to use contact relays and a diode. This scheme is not very common, so we will not dwell on it in detail.
Comments
TOP materials of the week
TOP products in the store (more)
Are you satisfied with the standard low beam of the Lada 4x4?
Lada.Online
Lada (“Lada”) is a brand of cars produced by JSC AVTOVAZ. Previously, it was used only for export cars, and for the domestic market, cars were produced under the Zhiguli brand. In 2004, the management of AVTOVAZ announced the transition to the Latin alphabet for the official spelling of the names of all cars produced by the plant: Lada - instead of "VAZ" and "Lada".
Lada.Online is the largest Russian-language automotive resource with a daily audience of thousands, which is dedicated primarily to cars of this brand, the domestic automotive industry and the automotive world in general.
This site is not the official LADA website.
© 2022 Lada.Online. Copying of material is permitted only with a link to the source.
Source
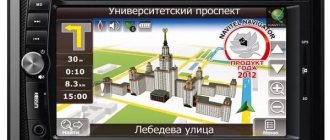
Multimedia on Android 316300-79130-00
Multimedia on Android 316300-79130-00
Post by Green_Monstr » Sat Sep 07, 2019 11:51
Good afternoon. Available from the car dealership is an installed multimedia system on Android 7.1.1 with navigation, etc. and so on. There are several questions: 1. how can I connect this unit with GooglePlay? Somehow I really want to install the application, and the Yandex navigator is much better than the installed Navitel. 2. What is the factory password on the unit for installing applications from unknown sources? 3. Does anyone have a pinout diagram for the radio in their stash, what is connected where and how, where to find the reverse wiring for connecting the camera, etc.? 4. Is it possible to modify the desktop?
Datsun Multimedia System Operating Manual
The Datsun manual gives some instructions regarding working with the radio. Thus, it is forbidden to adjust it while driving. First of all, this is justified by security measures.
For the audio system to work, you need to turn on the ignition system - turn it to the “ON” position. In this case, the engine can be either started or stopped. However, it is not recommended to use the radio for a long time with the power unit turned off.
Regarding the radio receiver, the quality of reception can be influenced by various factors: