Connection to battery
Many motorists tend to connect the radio to the battery directly. In this case, you can provide the device with optimal power. This will also allow you to listen to music without having to turn on the ignition or a special button (we’ll look at these methods below).
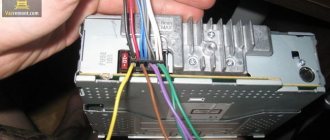
Power is supplied through three main wires - yellow, red and black.
- red wire – positive, connects to the positive terminal of the battery;
- yellow wire – positive, connects to the positive terminal of the battery through a fuse (10-20 A), is responsible for powering the radio settings memory;
- black wire – ground, connects in any convenient place to the car body or connects to another similar cable.
Important! Don't forget the fuse to avoid short circuit.
The disadvantage of directly connecting the radio from the battery is that when idle, the radio often consumes energy (especially Chinese products from little-known brands). As a result, one fine day your car’s engine may simply not start due to a completely discharged battery. That is why we recommend connecting using one of the methods below.
Optimal options for connecting a car radio:
- through the ignition switch;
- via button;
- through the alarm system.
Installing speakers in a car
In addition to the radio itself, you will need to correctly place and connect the audio speakers.
Installation of the rear and front speakers is carried out according to the same scheme. To do this, you will need to cut openings in the door trim, so for ease of installation you need to remove them. The upholstery is removed in the following sequence:
- the door handle is removed;
- The plastic casing under the handle is removed;
- the adjusting handle for raising the glass is removed (only for Lada Granta Standard).
Separate button
One of the most suitable connection options is to output a separate button that will turn off/on the power to the car radio. In this case, the red wire should be soldered not to the ignition switch wire, but to one of the button terminals. The second pin of the button is connected to the battery. Essentially, you can control the power supply yourself. Before parking overnight, you just need to press a button. You will no longer be dependent on the position of the key in the ignition switch.
The option of connecting via an alarm system also has a right to exist. The bottom line is to use contact relays and a diode. This scheme is not very common, so we will not dwell on it in detail.
conclusions
A sound system in a car is necessary because it makes travel much more comfortable. We looked at the most popular options for connecting a radio to a car battery. Which one to choose is up to you. In any case, we note that everything needs to be done carefully, because we are talking about an electrical circuit. You should not neglect safety rules, since a short circuit is not the most pleasant phenomenon, which can have very sad consequences.
Ignition switch grant malfunction
Ignition switch failures can be divided into two types: electrical and mechanical. Electrical faults include malfunctions of the contact group of the lock, as a result of which individual energy consumers (most often the starter) or the entire Granta electrical system as a whole stop working. This also includes a breakdown of the car's immobilizer. Mechanical malfunctions occur due to breakdown of parts of the ignition switch or contact group, as well as physical wear of the contacts. This also includes cases when, due to poor contact, heating and melting of the plastic parts of the contact group occurs. Signs of a malfunction in the ignition switch of the LADA Granta:
- the key does not turn;
- when turning the key the ignition does not turn on;
- The starter or other electrical appliances do not work.
The last two signs do not necessarily indicate problems specifically in the ignition switch, but they certainly appear when the contact group is faulty.
To eliminate the malfunction, it is necessary to replace the LADA Granta ignition switch or part of it, for example, a contact group.
What is needed to replace the Granta ignition switch
To replace the ignition switch you will need:
- key to 10;
- a thin chisel and a hammer (or a drill with a drill bit to drill out bolts with self-cutting heads);
- screwdriver;
- new ignition switch LADA “Granta” or contact group.
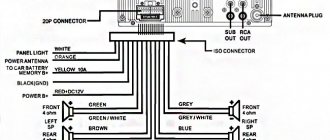
Correct connection of the radio
Black - ground Yellow - power supply +12 volts, from the battery Red - signal to turn on the radio (from the ignition switch), low-current +12 volts (logical “1”). Blue - turning on the Antenna or other devices (low-current +12 volts when the radio is on) Diodes - any, low-current type KD522B is sufficient. To connect the radio, you need to apply plus to two wires (red and yellow):
- Yellow - responsible for powering the radio memory (settings)
- Red - (power) turns off the radio.
| According to the instructions, the red wire is connected through the ignition switch, so the radio will turn off after the ignition is turned off. |
For owners of VAZ 2110 cars, in order not to pull the wire to the ignition switch, you can connect to pin 5 of the BSK block:
However, such a connection has its drawbacks, for example, you need to leave the ignition key with the passenger so that he listens to music, and even when the ignition is on, power consumption increases.
| Therefore, often these two wires (yellow and red) are twisted together and connected to the permanent positive together. Now the radio always works, regardless of the ignition. The negative aspect of connecting the radio this way is the constant current consumption (depending on the model of the radio, the current consumption is different), which leads to the battery being discharged when the car is parked for a long time. |
Connecting a radio via an additional button
Conclusion
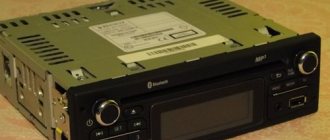
Classification of car radios by size
Car head units on the market differ in functionality, sound parameters and installation dimensions.
Developed by German manufacturers, the standard for car head units DIN 75490 was adopted in 1984 as international ISO 7736. It defined the standard mounting hole size for a car radio (1-DIN) as 180 x 50 mm. This size is the 1 DIN size. DIN stands for Deutsches Institut fur Normung - German Institute for Standardization. The abbreviation DIN stands for German standard.
Igor Syroedov
https://steer.ru/node/29859
Unification of installation dimensions expands the possibilities of using various radios in cars of different manufacturers and models. Currently, all radios are produced in accordance with the requirements of the international standard ISO 7736, but motorists prefer to refer to the similar international German standard DIN 75490.
All radios are produced in accordance with the requirements of the international standard ISO 7736, similar to the German DIN 75490
Usually there is enough free space behind the car console, so the standard regulates only the width and height of the radio, without limiting the depth. There are two formats: 1 DIN (178 x 50 mm) and 2 DIN (178 x 100 mm).
There are two radio size formats: 1 DIN (178 x 50 mm) and 2 DIN (178 x 100 mm)
In practice, the seat may be slightly wider and higher. In this case, to mask the cracks, decorative transition frames are used, which can be found on sale for almost any car model.
Decorative transition frames are used to mask the gaps between the radio and the seat
Adapter frames are also used when it is necessary to install a 1 DIN radio in a 2 DIN slot. The reverse procedure - installing a 100 mm high radio in a 50 mm opening - is impossible without significant modification of the console.
Video: choosing a radio by size
Stories from our readers
“Fucking basin. "
Hi all! My name is Mikhail, now I’ll tell you a story about how I managed to exchange my two-wheeler for a 2010 Camry. It all started with the fact that I began to be wildly irritated by the breakdowns of the two-wheeler, it seemed like nothing serious was broken, but damn it, there were so many little things that really started to irritate me. This is where the idea arose that it was time to change the car to a foreign car. The choice fell on the melting Camry of the tenth years.
Yes, I had matured morally, but financially I just couldn’t handle it. I’ll say right away that I am against loans and taking a car, especially not a new one, on credit is unreasonable. My salary is 24k a month, so collecting 600-700 thousand is almost impossible for me. I started looking for different ways to make money on the Internet. You can’t imagine how many scams there are, what I haven’t tried: sports betting, network marketing, and even the volcano casino, where I successfully lost about 10 thousand ((The only direction in which it seemed to me that I could make money was currency trading on the stock exchange, they call it Forex. But when I started delving into it, I realized that it was very difficult for me. I continued to dig further and came across binary options. The essence is the same as in Forex, but it’s much easier to understand. I started reading forums, studying trading strategies. I tried it on a demo account, then opened a real account. To be honest, I didn’t manage to start earning money right away, until I understood all the mechanics of options, I lost about 3,000 rubles, but as it turned out, it was a precious experience. Now I earn 5-7 thousand rubles a day. I managed to get the car buy after half a year, but in my opinion this is a good result, and it’s not about the car, my life has changed, I naturally quit my job, I have more free time for myself and my family. You’ll laugh, but I work directly on the phone)) If If you want to change your life like me, then here’s what I advise you to do right now: 1. Register on the site 2. Practice on a Demo account (it’s free). 3. As soon as you get something on the Demo account, top up your REAL ACCOUNT and go to REAL MONEY! I also advise you to download the application to your phone, it’s much more convenient to work from your phone. Download here.
How to connect a radio in a car or replace it with a new one?
To carry out this type of work, you will need a screwdriver, pliers, a multimeter, insulating tape and care when dismantling the decorative panels and installing the radio itself.
There should be no difficulties when replacing an old car radio with a new one. The speakers are already installed in the appropriate places, the wires are stretched and connected. All you have to do is check all the wires for integrity, the connections of the audio speakers and replace the radio itself in the car panel. When replacing, difficulties may arise when connecting a new radio , since the connectors may be different, you will have to buy a special adapter. Today there is a wide variety of all kinds of adapters on the market, so you won’t have any problems with this. In most cases, you can buy an adapter in the same place where you bought the car radio itself. Also included with some models. After you have connected the radio, you should check everything again and turn it on for the first time to see if everything works.
When connecting a radio from scratch, you should prepare more carefully. First of all, you need to decide on the wiring. It should be specifically for acoustics with oxygen-free copper with a cross-section of 2 - 4 mm kV. Install the speakers in specially designated places provided by the manufacturer. If there are no such places, you will have to make holes for the speakers yourself. And finally, install the car radio in the car panel and connect it itself.
Connecting a radio via an additional button
To prevent current leakage, place a button in the cut of the red wire:
- Button in the section of the red wire of the radio;
- The button switches between constant “plus” and after ignition;
- Through the alarm.
With the first option, I think everything is clear: just a regular on/off button is hung in the cut of the red wire on the radio. Thus, your radio always works, but if you decide to leave the car in the parking lot for a long time, then simply turn it off. button to supply current to the radio.
The second option is when an emergency button is used instead of a regular button. You will use the second emergency button to switch the power mode of the radio:
- The button is pressed - power is supplied to the radio through a constant plus
- The button is not pressed - power is supplied to the radio through the plus from the ignition
Example of connecting a car radio:
- The radio backlight wire to the cigarette lighter backlight wire.
- Plus after ignition from the clock block (orange wire)
- A permanent plus with a battery or cigarette lighter.
- Ground "-" from the cigarette lighter
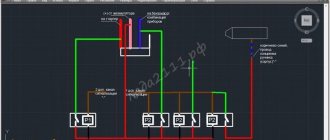
Third option : you can install a simple circuit that will supply a plus and automatically disconnect it from the alarm. If the car has a two-wire solenoid with activation for closing and opening by changing the polarity for each of these operations, then it should work like this: When the doors are opened, a positive pulse from the solenoid is sent to relay P1, and the relay will operate and actually go into self-retaining mode, providing power from the battery through the terminals of its contacts and relay P2 and connecting the radio to the power supply.
If there is a positive pulse during closing, relay P2 will be triggered, and the power supply circuit of relay P1 and the radio will break, the radio will turn off, and the relay will go into a de-energized state. But this scheme also has a minus - it is increased power consumption due to the additional relay P1, which will always be turned on along with a working radio.
Wire markings and topography of ISO connectors
Modern head units, as a rule, are equipped with connectors made according to the ISO 10487 standard. However, you can still find both radios and cars in which manufacturers use connectors of the original design. In such cases, the radios are connected via adapters.
ISO adapters are used to connect standard radios to original connectors.
The ISO standard defines the physical dimensions of three pads:
- block A black - power supply and control of the device;
- brown block B - connection of acoustics;
- block C is an optional section for connecting additional devices: navigator, additional amplifier, etc.
The ISO standard defines the physical dimensions of radio connectors
Despite the fact that the standard does not establish the purpose of the contacts, many manufacturers adhere to the same color marking of wires and topography (pinout, wiring) of connectors.
Radio began to sound in cars from the beginning of the 20s of the last century. At that time, there were two ways to improve a car: install a truck engine in a passenger car or install a radio in a car. The difficulty of improvement was equal. Car radios did not exist then, so the problem was solved as best they could. Home radios were converted to fit the 6-volt on-board network of the car, or simply ran on batteries. No one thought about sound quality. The home radio in the car did not last long. The constant shaking did its job, gradually destroying the electric lamps. A huge antenna was located under the ceiling, turning the car into a cage.
Igor Syroedov
https://steer.ru/node/29859
Table: pin assignments and color coding of wires of a standard ISO connector
| Section (block) | Contact number | Possible designation | Wire color | Purpose |
| A | 4 |
| Yellow | Radio power supply +12 V (main) |
| 6 |
| Blue | +12 V output to antenna amplifier | |
| 7 |
| Red | Radio power supply +12 V (control via ignition key) | |
| 8 |
| Black | Frame | |
| IN | 1 | RR+ | Violet | Right rear speaker (+) |
| 2 | RR– | Purple-black | Right rear speaker (–) | |
| 3 | FR+, RF+ | Grey | Right front speaker (+) | |
| 4 | FR–, RF– | Gray-black | Right front speaker (–) | |
| 5 | FL+, LF+ | White | Left front speaker (+) | |
| 6 | FL–, LF– | White black | Left front speaker (–) | |
| 7 | LR+, RL+ | Green | Left rear speaker (+) | |
| 8 | LR–, RL– | Green-black | Left rear speaker (–) |
The information given in the table is not exhaustive and completely reliable. You should check the markings of the wires and the purpose of the connector contacts in the documentation before connecting the radio.
Video: topography and disassembly of the ISO connector
What extensions can there be?
If you plan to connect a professional device via the ignition switch or directly to the network, then in order to do everything correctly, you need to take into account the extensions specific to the 220 radio. Thanks to this functionality, the device is equipped with additional functionality that makes using the radio more comfortable.
For example, these could be extensions:
- ANT. This extension will be useful if the car has a retractable antenna. That is, if you need to activate it, you can simply give a command to the device and the antenna will turn on automatically.
- REMOTE. Thanks to this function, you can connect an amplifier to the system and, accordingly, achieve better sound. If your car is basically small, then this function will not be particularly useful, since in any case you will not be able to achieve the desired sound background.
- ILLUMINATION. Using this extension, you can make sure that the brightness of the device is reduced while driving and does not distract the motorist. When the car stops, the system will automatically increase the brightness of the display.
- MUTE. This extension is enabled only when the car owner needs to talk on a mobile phone. When the phone rings, the system automatically turns on this extension and the speakers are turned off.
Audio system connection and wiring diagram
Other possible contacts
You may also encounter other markings on the product, so it will be useful to know them:
- AMP – contact responsible for turning on the power to the external amplifier;
- DATA IN/OUT – data input/output;
- LINE IN/OUT – linear input/output;
- ACP+/- – bus lines (most often used in Ford cars);
- AUDIO/R/L COM – common wire (ground), responsible for input/output for preamplifiers;
- SEC IN – additional input;
- ALARM – used to connect an alarm system (very often present in PIONEER radios);
- D2B-/D2B+ - optical communication lines.
How to connect a flash drive to a standard car radio via AUX with your own hands if there is no USB input
- Why connect USB
- Option with adapter
- Modulator
- Connecting a USB extension cable to the board
A car radio is not uncommon; it won’t surprise anyone. On the contrary, its absence may raise a number of questions. In addition to sound data, the device display informs the car owner about the speed and indications of external lights, as well as much more. But not every radio is equipped with a USB connector. It’s worth thinking about how to connect a flash drive to a car radio if there is no USB input.
Modulator
Connecting USB to the standard radio can be entrusted to specialists, or you can save money and carry out the operation yourself. For those wishing to listen to their favorite music from a flash drive, a special modulator can come to the rescue. It is represented by a device that transmits information from a memory card or flash card over a radio channel.
The device needs to be plugged into the cigarette lighter and adjusted to the required frequency, which is also adjusted on the radio. After this, you can enjoy music files from the media. If the radio range is very clogged, it will be most effective to build a modulator into the tape recorder. To do this you will need:
- soldering iron;
- shielded wires;
- modulator, the advantage of which is the remote control;
- radio;
- voltage transformer.
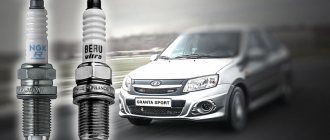
Rules for choosing an audio system
Before you begin installing the radio on Kalina, you should select it at a car dealership or hardware store. The choice should be approached carefully and carefully. And before going to the store, it is better to decide on your desires and capabilities.
When choosing a radio for your car, you should decide which music media will be used as the main one. This will help you save some money. If, for example, a car owner is sure that he will not need a CD or cassette player, then why should he overpay for a radio with these functions.
For those choosing CD players, there is one minor drawback that manufacturers are trying to combat - the loss of music fragments due to shaking during a trip. But progress does not stand still, and the mechanics are improving. The presence of ISO in the car and, accordingly, in the audio device will simplify the connection. The presence of a USB adapter will allow you to play music from various media.
Pioneer model range
When choosing a car radio, you should pay attention to the power ratings. They have a maximum and minimum threshold
Maximum power is rarely used, except in extreme situations. The choice should be made according to the rated power, that is, the one that is used most often. Manufacturers often indicate only maximum values on packages, so when choosing, you need to carefully study the instructions (passport), and not the box.
It is also worth paying attention to the control panel. It should be extremely simple and convenient, since it will most often be used while driving
Intricate designs can distract from the road. Convenient and understandable buttons and adjustable backlight brightness will only be beneficial. It is imperative to check the range of perceived frequencies. Since radio stations mainly broadcast in the range from 80 to 110 MHz, it is better that the tuner also has this range.
New Lada: Lada Kalina Lux6 (12.2011 - 03.2013)
Pay attention to the number of outputs to the speakers and the resonant frequency, it should be lower
Why connect USB
A flash drive is a reliable storage medium with greater capacity compared to cassettes and CDs. Another advantage is fast access and high speed reading and writing of multimedia.
Understanding how to connect USB to the radio is necessary in order to read and listen to files recorded on a flash drive or mobile phone. For ease of use, the socket can be placed in the glove compartment or ashtray in the car, if the adapter connected to the radio without USB is located separately from it.
Option with adapter
You can connect USB to the radio using a special adapter. Now there is a wide selection of such funds. The adapter is suitable not only for USB, but also for memory cards.
Most radio tape recorders have a suitable socket at the end. You need to do the following:
- Pull out the radio.
- Find the connection socket.
- Disconnect the disc player connector.
- Instead, install USB in the radio.
The radio will recognize this operation as a simple change of player. If it outputs MP3 format from disk media, then it can also output from a flash drive.
You can do it even simpler and insert a memory card from your smartphone into the adapter, if such a function is supported.
In addition to advantages, this solution also has disadvantages. When the owner decides to change the car, he will have to change the adapter, because each car has its own control protocol. But when buying a new car, this is not such an acute problem.