Replacing the camshaft oil seal
It is convenient to assess the condition of the camshaft oil seal when carrying out routine work to check the condition of the timing belt.
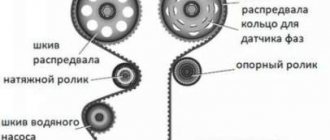
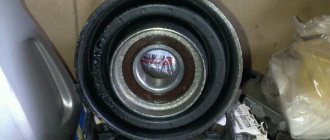
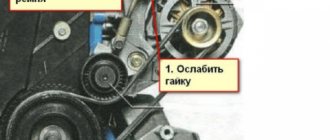
We change the oil seal if there are traces of engine oil under the camshaft toothed pulley or on the timing belt. To prevent the camshaft from turning when unscrewing the pulley mounting bolt, insert a “10” head with an extension through the hole in the pulley and put it on the nut securing the rear timing belt cover. Using a 17mm spanner, loosen the bolt securing the camshaft timing pulley. Set the piston of the 1st cylinder to the TDC position of the compression stroke and remove the timing belt (see “Checking the condition and replacing the timing belt”).
Unscrewing the pulley bolt...
...remove the pulley from the camshaft toe. Remove the tension roller of the timing belt (see “Checking the condition and replacing the timing belt”).
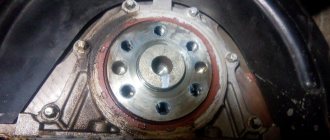
Using a 10mm socket, unscrew nut 1 and two bolts 2 securing the rear timing cover...
...and remove the cover.
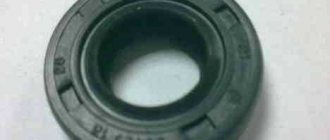
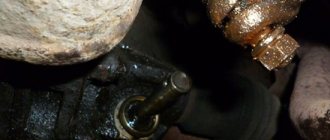
Use a screwdriver to pry up the oil seal (do not damage the shaft neck while doing this) and remove it from the cylinder head socket. Unlike the camshaft oil seal of the previous generation VAZ-2108, - 21114 engines for increased service life...
...the manufacturer installs an imported oil seal (with dimensions 28x42x6 mm), made of the least elastic material and without a bracelet spring. In the absence of a new imported oil seal, you can install an oil seal (with dimensions 28x42x7 mm) for the camshaft of engines of the previous generation VAZ-2108, -21114. Before installing the new camshaft oil seal, apply a thin layer of engine oil to its working edge.
We press in the oil seal using a tool head or a piece of pipe of suitable diameter. Before installing the rear timing cover, we check the condition of the rubber sealing gaskets and the rubber seals of the cover mounting bushings. If gaskets and seals are damaged (tears, cracks, deformation) or loss of rubber elastic parameters, the parts need to be replaced. To replace...
...remove the gasket from the edge of the cover. Similarly, remove the remaining sealing gaskets of the cover.
We remove the bushings with rubber seals from the holes in the cover.
Rear timing drive cover with sealing gaskets and bushings for securing the cover. The subsequent assembly is carried out in reverse order.
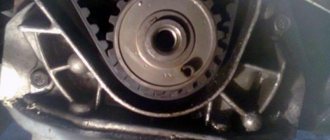
When installing the camshaft timing pulley, align the groove in the pulley hole...
...with a key on the shaft toe (for clarity, shown on the removed camshaft). We install a new timing belt (see “Checking the condition and replacing the timing belt”).
Source: wiki.zr.ru
When to replace the timing belt
There are several “symptoms” that indicate the need for replacement. They mainly concern changes in engine operation, namely:
- starting complications;
- noisier operation;
- the appearance of excessive vibration;
- the occurrence of third-party noise;
- reduction in power.
An exhaust with a black tint may also indicate a problem with the timing belt. The degree of wear of a given part can also be determined by visual inspection. If microcracks, worn internal teeth, delamination or other defects are detected, it should be replaced immediately.
Camshaft oil seal Lada Granta
It is convenient to assess the condition of the camshaft oil seal when carrying out routine work to check the condition of the timing belt. We change the oil seal if there are traces of engine oil under the camshaft toothed pulley or on the timing belt. To prevent the camshaft from turning when unscrewing the pulley mounting bolt, insert a “10” head with an extension through the hole in the pulley and put it on the nut securing the rear timing belt cover.
Using a 17mm spanner, loosen the bolt securing the camshaft timing pulley. Set the piston of the 1st cylinder to the TDC position of the compression stroke and remove the timing belt (see “Checking the condition and replacing the timing belt”).
Unscrewing the pulley bolt...
...remove the pulley from the camshaft toe. Remove the tension roller of the timing belt (see “Checking the condition and replacing the timing belt”).
Using a 10mm socket, unscrew nut 1 and two bolts 2 securing the rear timing cover...
...and remove the cover.
Use a screwdriver to pry up the oil seal (do not damage the shaft neck while doing this) and remove it from the cylinder head socket. Unlike the camshaft oil seal of the previous generation VAZ-2108, - 21114 engines for increased service life...
...the manufacturer installs an imported oil seal (with dimensions 28x42x6 mm), made of the least elastic material and without a bracelet spring. In the absence of a new imported oil seal, you can install an oil seal (with dimensions 28x42x7 mm) for the camshaft of engines of the previous generation VAZ-2108, -21114. Before installing the new camshaft oil seal, apply a thin layer of engine oil to its working edge.
What to do in such cases?
As mentioned above, one of the likely problems may be incorrect installation of the element. In particular, if the inner side of the rubber band is bent, then liquid can flow through it. Thus, the element only needs to be changed, despite the fact that it is relatively new.
Replacing the rear oil seal
- Dismantle the gearbox (use the operating manual for your vehicle to do this).
- Then take a screwdriver or any other object with a sharp tip, a regular knife will do. Remove the failed oil seal. Be careful with the work surface when doing this.
- Clean the surface of the crankshaft. Please note that this can only be done with a rag. Some “craftsmen” clean the crankshaft with sandpaper. Under no circumstances should this be done, as this will cause the crankshaft to fail faster.
- Install a new oil seal in place of the old one.
- Install the gearbox.
Replacing the camshaft oil seal Lada Granta
Tools (for 8-valve engine):
- 5 mm hex key
- Jack
- Wheel key
- Medium flat screwdriver
- 17 mm straight box spanner
- Driver for socket attachment
- 10mm wrench attachment
- 17mm wrench attachment
- 15 mm straight box spanner
- A special key for turning the tension roller (or a circlip remover)
- A key for fixing the camshaft pulley (or an extension for the end attachment on the wrench)
- Large hammer
- Tool head
Tools (for 16-valve engine):
- Open-end wrench 19 mm
- Open-end wrench 15 mm
- Open-end wrench 10 mm
- 17 mm straight box spanner
- 8mm straight box spanner
- Driver for socket attachment
- Extension for the end attachment on the wrench
- 8mm wrench attachment
- 10mm wrench attachment
- 17mm wrench attachment
- Hex key 5 mm
- Large flat screwdriver
- Medium Phillips screwdriver
- A special key for turning the tension roller (or a circlip remover)
- Camshaft pulley locking key
- Large hammer
- Wheel key
- Jack
- Tool head
Parts and consumables:
- Camshaft oil seal (for 16-valve engines - 2 pcs.)
- A piece of pipe with a diameter of 25 mm and a length of 100 mm (for pressing in the oil seal)
- Rear timing cover gaskets and bushings (as required)
- Engine oil
- Rags
Note:
It is convenient to assess the condition of the camshaft oil seal when carrying out routine work to check the condition of the timing belt. Change the oil seal if there are traces of engine oil under the camshaft toothed pulley or on the timing belt.
1. Remove the timing belt and tension pulley, as written here (for 8-valve engines) or here (for 16-valve engines).
2. Remove the camshaft pulley and the rear timing cover, as written here (for 8-valve engines) or here (for 16-valve engines).
3. Use a flathead screwdriver to remove the key from the camshaft groove.
4. Using a screwdriver, pry up the oil seal (do not damage the shaft neck while doing this) and remove it from the cylinder head socket.
Note:
Unlike the camshaft oil seal of the previous generation VAZ-2108, - 21114 engines, to increase the service life, the manufacturer installs an imported oil seal (with dimensions 28x42x6 mm), made of the least elastic material and without a bracelet spring.
In the absence of a new imported oil seal, you can install an oil seal (with dimensions 28 × 42 × 7 mm) for the camshaft of engines of the previous generation VAZ-2108, -21114. Before installing the new camshaft oil seal, apply a thin layer of engine oil to its working edge.
5. Press in the oil seal using a piece of pipe of suitable diameter or a tool head.
6. Before installing the rear timing cover, check the condition of the rubber gaskets and rubber seals of the cover mounting bushings. If gaskets and seals are damaged (tears, cracks, deformation) or loss of rubber elastic parameters, the parts need to be replaced.
7. Install the parts in the reverse order of removal.
The article is missing:
- Photo of the instrument
- High-quality photos of repairs
Source: carpedia.club
Why is it necessary to replace on time?
On the left is the new seal, and on the right is the old one
It will be no secret to anyone that timely replacement of the camshaft oil seal will not harm the engine in any way, but will only increase its performance characteristics. The time period for replacing it is not determined in any way and depends only on the mileage and driving style. Since frequent and intensive use of the engine leads to rapid wear of all these parts.
Timely replacement of the oil seal will prevent oil leakage from the engine, which is its main task.
However, if this moment was missed, and a leak did occur, this will be accompanied by very unpleasant facts:
- Oil consumption will increase.
- The engine will be constantly dirty , since dust from the road will constantly stick to the oil that spills onto the engine.
- Also, oil that leaks from the engine will negatively affect the general condition of various electrical contacts and elements. First of all, this applies to electrical power supply blocks, where contact may be deteriorated.
Elimination of external leaks.
To solve most small external leaks, there is a simple and inexpensive solution - an oil system sealant. At the first symptoms of a leak, one of which is the appearance of oil stains under the car or a heavily polluted engine, you can use one of the best products on the market - the German Liqui Moly Oil Verlust Stop oil system additive-sealant.
The additive eliminates leakage through seals and gaskets,
restoring the elasticity of cushioning materials and rubber.
The additive also acts on valve stem seals,
eliminating this type of internal leaks.
The additive begins to act in full after a run of 500-800 km.
The additive is absolutely safe for any type of engine and is suitable for all existing engines.
Even if it didn’t work, then this is a signal for repairs,
part of which should be the replacement of seals that have become unusable.
Rating of the best manufacturers of oil reflective caps
The same model of valve stem seal from different manufacturers
A review of valve stem seals with their brief characteristics, positive and negative sides, indication of conveyor applications and current prices will help you choose parts for a specific engine.
The table below contains valve seals from all the most popular manufacturers, available in Russian retail.
Valve seals: manufacturer ratings
| Manufacturer | A distinctive feature of the brand, the caps themselves | Which cars are most often installed on from the factory? | Price for summer 2022 in rubles* per 1 piece |
| Elring | Elasticity of rubber, good wear resistance, which is achieved through the selection of materials for various types of engines and high-quality casting. In addition to classic fluorine rubber, polyacrylic rubber, nitrile rubber, Teflon and other modern materials are used | BMW, Mercedes-Benz, Porsche, Toyota, Volkswagen, MAN, Iveco, DAF, Renault | From 150 |
| Victor Reinz | Good caps made of heat-resistant but flexible fluorine rubber. The original is often green in color (dark shades); it can also be black. They are distinguished by good adherence to geometry, which effectively removes excess oil and prevents its consumption. | BMW, Mercedes-Benz, VAG, Nissan, Opel, Renault, Fiat, Ford | From 150 |
| Corteco | Valve seals from one of the world's largest manufacturers and suppliers of automotive seals. They produce both domestic and discontinued models. They are made mainly from fluorine rubber, which combines elasticity and heat resistance; other fluorine-containing materials are used less frequently. | Alfa Romeo, BMW, Audi, Citroen, Ford, Fiat, Isuzu, Lancia, Iveco, MAN, Nissan, Opel, Peugeot, Mercedes Benz, Renault, Saab, Rover, Volkswagen. | From 100 |
| NOK | Japanese valve seals, factory installed on many local brands. They are distinguished by high quality workmanship and the correct selection of materials. They last a long time, and with gentle operation they last longer than the allotted resource. Often in Corteco packages you can find exactly NOK valve stem seals (as evidenced by the casting mark), because both companies belong to the same concern. | Toyota, Honda, Lexus, Mitsubishi, Nissan, Suzuki | From 150 |
| Goetze | German valve stem seals are often made of fluorine rubber or acrylate rubber. Teflon and other heat-resistant polymers with fluorine are used only for rare product models. | BMW, Fiat, Renault, Ford | From 100 |
| Glaser | Budget valve stem seals of good quality, originally from Spain. Elastic, they cut off oil well under normal operating conditions. Among the disadvantages is the fear of overheating. | Suzuki, Nissan, SEAT, Chrysler, John Deere, Ford. | From 50 |
| Ajusa | Inexpensive, but high-quality valve stem seals made of soft fluorine rubber. They work for 60–100 thousand km without problems, and if you regularly operate the engine in a gentle mode, even more. | SEAT, Nissan, Daewoo, Fiat, VAG and others. | From 100 |
| THO | Japanese THO valve seals combine elasticity, heat resistance, high precision performance and affordable price tags. Original parts serve the allotted 100 thousand km and even more. | Nissan Suzuki, Mitsubishi, Toyota | From 50 |
| Payen | Affordable MSCs made from high-quality fluorine rubber. They are distinguished by elasticity and at the same time have a long resource. They are also notable for the fact that they rarely become victims of counterfeits in Russia. | Ford, General Motors, Mercedes, Renault, Honda, Chrysler | From 70 |
| S.M. | Inexpensive, but high-quality valve stem seals. Viton fluorine rubber is used for production, combining elasticity and durability. | Aprilia, Audi, Bitzer, BMW, Copeland, DaimlerChrysler, Delmag, Deutz, Ducati, Ferrari, Hatz, Renault, Rotax, Voxan | From 30 |
How it works?
The oil seal consists of a rigid (outer) surface that is mounted in a hole. Often the kit includes a metal ring that is hermetically connected to the rubber seal. It fits tightly into the landing niche.
The inner part is softer, it seems to envelop the rotating shaft. The oil seal leaks from the inside of the circle. Manufacturers are constantly looking for compromise:
- hard material is more durable, but does not fit tightly around a rotating object;
- soft, elastic rubber provides excellent sealing, but wears out quickly.
To enhance the girth, a ring spring is often installed on the inner side. If it comes off, the grenade seal will leak.
The best valve stem seals
Among the companies that produce valve stem seals, there are several brands that are distinguished by the quality and reliability of their products. Each manufacturer has an individual set of characteristics for their products. These features are noted in reviews by car owners, as well as service station technicians.
Description. The Japanese brand NOK is one of the popular manufacturers of automobile parts. Part of the production goes to the assembly line of Japanese cars.
Aftermarket parts are similar in characteristics to the originals, which leads to a good reputation for the company. Factories are located in several Asian countries. There are also partnerships with a number of European companies. An example would be Germany, where one of the company's offices is located.
Oil seals are considered original spare parts that are installed on some car models, including Honda and Toyota. There are several series of caps on the secondary market that differ in quality.
The characteristics most similar to the originals are those of spare parts that are manufactured in Japanese factories. Production zones that belong to the brand and are located in other Asian countries also produce certified products, but they have reduced characteristics compared to the original.
A distinctive feature of the caps is the use of durable materials that have good resistance to temperature and other negative factors. Separately, they note the impossibility of marriage due to high-tech conveyor production.
Life time. The guaranteed service life is 1 year. Duration of operation exceeds 2-3 years depending on the country of origin or 60,000 mileage.
Source
Reasons for wear of the rear crankshaft oil seal on a Priora
According to experts from large auto repair shops, the most common causes of damage to the rear crankshaft oil seals are three factors:
- Untimely oil change.
- Poor quality product.
- Excessively high temperatures when the engine is running.
In the first case, the following happens: used oil contains a large number of microparticles and contaminants that can cause damage to the elements of the system and the rubber seal in particular.
The second factor is quite common due to the increased number of counterfeit automobile products. Naturally, fakes and defective products do not meet quality standards and do not have wear resistance or long-term tolerance of high operating temperatures.
The third reason is due to severe overheating of the internal combustion engine, which has a detrimental effect on the material of the sealing ring, as a result of which it may partially melt and lose its tightness.