If you decide to do the maintenance of your Lada Granta yourself, you probably noticed that one of the mandatory maintenance items is cleaning the drainage holes in the front panel or engine compartment.
AvtoVAZ regulates this procedure to be carried out every 15 thousand kilometers or at each maintenance. At the time of publication of this article, the mileage of the editorial Grant was close to 40 thousand kilometers. Now we will look:
- where are the drainage holes located?
- how to get to them;
- how to check their performance;
- how they can be cleaned if necessary.
Reasons for the appearance of water in the passenger compartment under the passenger or driver's rug
While operating your vehicle, you may encounter a situation where water appears under the carpet on the driver's or front passenger's side and the carpet becomes wet.
There are several reasons why water gets into the car interior; we will tell you about each of them in detail. Water in the cabin after rain
:
- The drainage holes under the frill (wind flap) were clogged, the leak went through the stove intake into the cabin (detailed case with Vesta).
- Clogged drain holes in doors.
- The door seal broke.
- Water runs through the weld seam of the engine shield of the body.
- Water enters the cabin through through holes in the bottom. Check the rubber plugs (they may have popped out)
- Water enters through technological holes in the engine shield (for example, where the hood cable passes).
- On station wagons and hatchbacks, the water supply hose to the rear window may break.
- The air conditioner condensate drain pipe has come off. It is located at the left foot of the front passenger under the glove compartment. To prevent this from happening in the future, secure the hose with a clamp.
The last case is shown in the video:
If instead of water there is antifreeze in the cabin, check that the hoses of the engine cooling system are securely fastened near the heater radiator.
Let us remind you that to extend the life of the car body, you need to regularly monitor the condition of the drainage holes, otherwise rust may appear in the internal cavities. Also, do not forget to lubricate the rubbing parts of the body. Read more about this here.
Source
Fuel tank drain hole
Many vehicles have a fuel tank drain hole under the gas cap in the body that is supposed to drain water from under the cap (this hole also drains any remaining fuel that may have gotten under the cap when you removed the fuel nozzle at the gas station). Also, water drainage through the drainage hole helps protect the fuel tank from water ingress.
Because the fuel filler cap is not sealed, if the drain hole becomes clogged, rainwater may accumulate near the filler neck, causing water to enter the fuel tank. Unfortunately, to remove water from the tank, in most modern cars you will have to remove it. That's why car owners should keep an eye on this drain hole under the gas filler door. Remember that water in the tank not only negatively affects the fuel, but is also a source of corrosion to the gas tank and fuel systems.
How to clean
You can ask for the drain hole under the gas filler door to be cleaned when you wash your car at the car wash. To thoroughly clean this hole from dirt, it is necessary to blow out the drainage using a high-pressure pneumatic gun, which is used to blow out the car after washing in winter. You can also clean out the drain under the gas cap yourself using some long wire. Attention: the wire should not be too short, otherwise it may get stuck in the hole.
I'll tell you where the water comes from under the carpet in your car and how to fix the problem.
Recently on the channel I published a review on how to get rid of water in the cabin that is under the carpet. It accumulates in many cars. They started writing to me and asking me to explain how to prevent water from appearing under the carpet and where it comes from. Today the topic of the review is exactly this.
Of course, water doesn't just appear under the carpet. If you are constantly somewhere in the snow, you put your feet on the mat, it all melts. Many people drive like this, and then water accumulates. But this is not the main reason when water accumulates on the floor covering of a car.
The main problem with water appearing under the floor carpet is a clogged drainage pipe. In every car, in the area of the air intake part, that is, in front of the dashboard under the hood, where air is taken in, water gets there along with it.
To allow water to come out of this bath (this place is made in the form of a bath), a drainage hole is made. There may be one hole or several, depending on the design of the car. It happens that there is a drain hole, and there is a rubber tube at the bottom that goes outside the car. So that the water from the bath flows outside the car body.
But sometimes, during installation, assembly, or repair of a car, this rubber tube is accidentally touched or crushed, and all the water flows through the air intake into the passenger compartment. This causes water to accumulate under the car's floor covering.
There may also be damage to the bath itself. There were cases when a small hole or something else rusted. Each case is individual, you need to look and check. If you have water under your carpet, then pay close attention to where it comes from.
Look at these drainage holes and clean them if necessary. Sometimes they become clogged with leaves, dirt or poplar fluff. All this stuffs into the drainage holes and clogs them.
The water level rises and it flows into the cabin. Check the drainage holes, then there will be no more water in the interior of your car. I hope I explained it clearly enough. Be sure to subscribe to the channel so you don't miss the next reviews.
Let us know in the comments if there is water or dampness under the carpet in your car, how you remove it, and where it came from. Good luck and health to everyone!
Source
How to remove puddles from the floor
Often during rainfall, water enters the car interior. To prevent this, you need to dust off your shoes before putting your feet in the salon. To do this, just knock your feet against each other. But even this sometimes cannot protect against moisture getting under the rug. To reduce the risk, you can put special absorbent sheets or just a few old newspapers under your feet.
In this case, it is important to promptly change soiled or moisture-soaked products. If there is frosty weather outside, then this should be done after the stove has been running for a while in the cabin. Otherwise, the material may freeze to the floor and it will be quite difficult to remove them.
Wet under the driver's mat of the Lada Granta
- To the beginning of the forum
- Forum Rules
- Old design
- FAQ
- Search
- Users
..there was a lot of water. really water?
The heater radiator is leaking wet under the driver's mat. faucet is wet under the passenger side. verified by personal experience1
You probably have a Japanese stove, left-handed)))
You probably have a Japanese stove, left-handed)))
From personal experience in dealing with this phenomenon. 1. It may leak from under the seal of the china (especially if the drain hole is clogged). Also pay attention to the plug through which the hydraulic corrector tubes pass. 2. Check the windshield seal. 3. Drainage holes in the floor.
I used sealant around the sealant of the ChYa, cleaning the drain. And I did the same with the windshield seal. The main thing is to know when to stop using sealant, especially on the windshield. I took out the carpet and the standard Shumka completely (threw out the last one - it rotted and smelled terrible). I dried it with newspapers and wipe rolls. Then a control wash and inspection for the presence of smudges (newspapers as an indicator).
When it rained, water flowed from the mounting points for the electric motor of the heater, right from under the hood, it dripped quietly, I couldn’t find it for a long time. I asked my wife to take a watering can and spray the windshield liberally, and he climbed into the area of the pedals with his muzzle and got a tasty splash on his forehead, coated everything with sealant, like gud.
And a year later, the stove froze, it was replaced from the aluminum and metal mounting points, it was also not visually visible where it was dripping from.
Then, half a year later, the plastic body of the faucet burst, this time it was diagnosed from where it was running quickly, because it scalded my feet.
Currently it’s wet under the rug again, but I don’t give a fuck, I’m done... sorry.
We understand everything)))) moreover, we know. It's really quite annoying in places
From personal experience in dealing with this phenomenon. 1. It may leak from under the seal of the china (especially if the drain hole is clogged). Also pay attention to the plug through which the hydraulic corrector tubes pass. 2. Check the windshield seal. 3. Drainage holes in the floor.
I used sealant around the sealant of the ChYa, cleaning the drain. And I did the same with the windshield seal. The main thing is to know when to stop using sealant, especially on the windshield. I took out the carpet and the standard Shumka completely (threw out the last one - it rotted and smelled terrible). I dried it with newspapers and wipe rolls. Then a control wash and inspection for the presence of smudges (newspapers as an indicator).
I'll join. Also, nothing prevents you from looking at the heater tap, peeling back the noise and carpet, and feeling the radiator pipes. about the CY. I have a leak in the area of the drain plug near the china, at the junction of the metal sheets. there the plasticine often rots and falls out. After the rain, you can properly feel the area under the CN with your hand from inside the cabin.
ps if it’s dry in these places then be calm)
Once upon a time it also leaked. I searched for a long time, and finally found it. (How can I explain this?)) There is a drain hole near the CY with the front parts. So to the right (3 cm) of it, in the corner there is a body seam. It is not welded from the factory, but is simply covered with Velcro. Over time, the Velcro dries or comes off. And water flows into this seam (4-5 mm wide!) and then under the driver’s floor. I fixed it this way: I threw out the Velcro, cleaned everything, filled it with plenty of sealant, sprayed it with anti-gravel and now everything is dry
PS I need to look for photos. If I find them, I’ll post them.
[quote=”Junglist”] about ChY. I have a leak in the area of the drain plug near the china, at the junction of the metal sheets. there the plasticine often rots and falls out. After the rain, you can properly feel the area under the CN with your hand from inside the cabin. quote]
Here Mlyn is ahead!
The heater radiator is leaking wet under the driver's mat. faucet is wet under the passenger side. verified by personal experience1
about the CY. I have a leak in the area of the drain plug near the china, at the junction of the metal sheets. there the plasticine often rots and falls out. After the rain, you can properly feel the area under the CN with your hand from inside the cabin. quote]
Here Mlyn is ahead!
Cool! I injected silicone sealant into it! And he made the relief in such a way that the water would not accumulate, but would flow into the drain.
This fall I want to solve the problem of the stove valve - install a ball valve. Question: will the faucet for connecting an old machine withstand the effects of hot antifreeze?
I don’t know if it will work with a photo under the CN or not (although everything is clear without a photo))) Up to 1.jpg
The heater radiator is leaking wet under the driver's mat. faucet is wet under the passenger side. verified by personal experience1
Source
Cleaning drainage at every service
To avoid such tragic consequences, the manufacturer recommends that every 15,000 km (or at each maintenance) you clean the drainage holes in the doors and sills, which are made specifically to remove accumulated moisture.
The thing is that over time, these drainage holes can become clogged with dirt, and therefore require periodic cleaning. Of course, even with clean drainage, the bottom of doors and sills can rust, but if the holes are clogged, then corrosion increases significantly.
Now let's see:
Drainage in front doors
Let's start with the front door. We take the mounting blade and disconnect the clips that hold the sill seal. Disconnect the 1st clip. 2,3,4,5,6,7
Then lightly moisten a rag with gasoline and wipe the surface from dirt.
As you can see, the surface is in almost perfect condition. There is no visible rust. The drainage holes (those that are oval) are not clogged with anything.
Drainage in rear doors
Let's move on to the back doors. Disconnect the clips. 1,2,3,4
As on the front door, we wipe away any dirt.
Here we also see an ideal surface, without traces of corrosion. The drainage holes are also clean.
Traces of factory anti-corrosion treatment
I would like to once again draw your attention to these dark spots under the drainage holes.
They indicate the presence of factory anti-corrosion treatment. In these places, excess anticorr leaked out, leaving behind a characteristic mark. Therefore, there is no need to additionally treat the inside of the doors with Movil.
If your car does not show signs of anti-corrosion treatment (and this may well be the case), then you should do it yourself. We will not focus on this now, since this is the topic of a separate article. Go ahead.
Stock up on clips
If you suddenly decide to inspect the drainage holes in the doors, be sure to stock up on new clips, since approximately one third of them break.
The cost of one such clip varies within 10 rubles.
To rot or not to rot?
Next, let's look at a question that worries many. The fact is that when the previous material was published about the installation of these same rubber seals (RGI-135), negative reviews began to appear in the comments to the video, such as: “I installed such a seal on my Grant and a year later the doors below rotted.”
By the way, these seals have been on the editorial Grant for just 1 year.
However, no dirt or rust is observed. Why? Why do some people's doors rot while others don't? Interesting, isn't it? There are 2 reasons that could explain this phenomenon:
The first reason for the premature appearance of rust at the bottom of the doors is the lack of anti-corrosion treatment from the factory. or it is of poor quality. Considering the specifics of “our assembly”, this factor cannot be excluded. So check and check again.
The second reason is car washing. Some people wash their car the old fashioned way using a bucket of water and a rag, while others use a high pressure washer. What's the trick? - you ask. The trick is that when they wash your car at a car wash, they must open each door one by one and thoroughly wash its lower part, exactly where the rubber seal is installed.
Here is a little photoshop for clarity, so that it is clear what we are talking about.
So, under high pressure, all the dirt that accumulates under the seal simply flies out from there with a whistle. If you don’t do this, then the dirt under the rubber plus water and reagents will quickly do their job.
Editorial Granta regularly washes herself in a car wash. Maybe that’s why, even after a year, there are no signs of corrosion on the doors? Maybe, but this is just speculation. If you know of other causes of corrosion, write in the comments! And we move on.
Threshold drainage holes
We move on to the drainage holes of the thresholds. There are 4 drainage holes per side of the car or per threshold. Accordingly, there are 8 drainage holes for the entire car.
It is best to view them from below the car from an overpass or from an inspection hole. Let's start with the driver's side.
Please note that first there is a normal threshold, then a dent from hitting a bump or stone - depending on your luck.
In our city, in the private sector, there are heaps of this stuff. Why is it worth focusing on this? Because it is from such impacts that the drainage holes are tightly clogged. Now you will see it.
And here is the drainage hole, damaged by an impact with an obstacle being overcome. As you can see, it has rolled up, completely losing its functionality.
It’s a similar story with the drainage hole located at the front jack under the jack.
As practice shows, the first two drainage holes are the most vulnerable. After all, when we move over a high obstacle, we run the risk of “squatting on our belly” in these very places. Therefore, when inspecting the sill drainage, first of all pay attention to the first two holes.
As you have seen, the drainage can be rolled up tightly even the next day after purchase. And if you don’t do anything, the saffron milk caps on the doorsteps will bloom much earlier than you expected.
Cleaning drainage holes in Lada Granta sills
Now let's start cleaning the drainage. As a rule, if the holes are not rolled, then they are clean inside and do a good job of removing moisture. To clean the holes, I took a regular piece of copper wire, one and a half square in cross-section, and bent one end.
It is better to take the wire with insulation so as not to scratch the inside and not scrape off the anti-corrosive material inside. Now let’s open access to the rolled drainage hole.
As soon as we started to bend it, dirt immediately fell out. Let's expand the access a little with pliers and start cleaning the wires with a piece of wire until dirt stops pouring out of the drainage hole.
There is no need to show how the remaining drainage holes are cleaned; we hope that the principle is clear. In general, we do the same with other holes if they are clogged.
Anti-corrosion treatment
Now all that remains is to process the drainage holes, or rather the surface around them. When we straightened out the rolled drainage holes with a screwdriver and pliers, the protective layer of mastic and paint was torn off. Therefore, to prevent corrosion, these areas need to be treated. For these purposes, you can use Movil or another anti-corrosion compound. First, use a brush to remove any remaining dust and dirt.
Then we take a brush and coat the surface with anti-corrosion agent.
In this way we process all drainage holes and adjacent surfaces. At this point, the work on cleaning the drainage holes in the doors and sills of the Lada Granta car can be considered complete.
Wet under the driver's mat of the Lada Granta
If you were leaking somewhere, suddenly.
If you were leaking somewhere, suddenly.
Dron_spb
For some reason I don’t remember such a through hole in the floor on my right. I have a plug there from the factory.
While I have removed the plugs from the bottom, I am looking for time for a complete disassembly.
Have a nice day. I had something similar this summer. One morning after a night thunderstorm, I opened the car, and there was water on the driver’s carpet right up to the brim. I poured it out, looked at the seals, didn’t find anything critical - I thought that the door wasn’t closed all the way. The next night - almost the same. Almost - because this time the water poured not onto the rug, but under it! After some deliberation, it was decided to go to the garage and look for the leak, since weather forecasters promised three days of precipitation. After understanding what was happening and a short search, it was discovered that, for some unknown reason, the plug for the hydraulic corrector tubes in the engine shield had flown out from its rightful place. After installing it in place, the ugliness associated with water getting into the cabin stopped. True, water is still sometimes found in the sides of the trunk, but that’s a different story.
PS and after the photos with the sound insulation, I’ll probably also take a look at what’s going on under it, otherwise who knows how much water got in there.
from the thresholds, it flowed across the diameter of the floor, from it it spread along the stiffening ribs both forward and backward. there were no plugs in the thresholds.
Can you explain more specifically? What is the diameter of the floor? Where is the middle pillar? I just took off the plastic door sills this summer and cleaned up the rust. There were no plugs, I didn’t install anything, I sanded, painted, and sealed the linings into place. Where to put the plugs. It’s just that the holes into which I poured oil seem to be outside the threshold and under the plastic protection, how can it leak out from under them?
Source
Drain hole at the bottom of the trunk
Most modern cars have drain holes located in the trunk floor. Naturally, many car owners may not see these drain holes even after owning the car for a long time. These holes are usually located under the spare tire.
In many cars there are often two of them. Unfortunately, sometimes some car owners, having discovered these holes in the trunk, insert blind rubber plugs into them, believing that there is no need for holes in the trunk. Many even criticize automakers for leaving holes in the trunk. But under no circumstances should you do this if you don’t want water to stand under the spare tire and for the trunk floor to bloom in a short time. These holes play an important role in draining water from the trunk.
How to clean
Be sure to lift the spare tire and carefully inspect all drainage holes in the floor. In many cars, manufacturers install rubber plugs in the trunk drainage, which tend to clog quickly. Unfortunately, the drain in the trunk is hidden from our eyes by the trim and the spare tire.
Water inside the car under the carpet
1200 rub. for the photo report
We pay for photo reports on car repairs. Earnings from 10,000 rubles/month.
Write:
The rainy season always brings some new surprises to car owners. Either “triple”, or poor starting, and for some it’s even more original, such as water under the rug. What a surprise for the driver when, upon opening the car doors, he discovers a puddle of water either on the driver’s side or on the passenger’s side. The question immediately arises: where did the water come from?
It would be nice if there was some kind of rusty trough, then there would be at least some considerations, but it looks like it’s not old, but there’s a flood. Just to solve such issues, I will cite the main weak points and holes through which water leaks, by how to visually determine the influx of water it will not be possible at all... The problem seems to be general and applies not only to domestically produced cars, but also to foreign cars. The rug also often catches me.
Most drivers are not aware of these holes in the car.
Two engineers met - a Japanese and a Russian. Japanese: We check the tightness of the car with the help of a cat: if after a couple of days the cat suffocates, then the car is sealed! Russian: we also check with a cat.
We put you in the car and come back in the morning - if you don’t get out, it means the interior is sealed.
People's joke.
More and more people in our country are becoming motorists. In Russia, the country's vehicle fleet has been growing for more than 20 years. But those who bought a car for the first time do not know many basic rules for car care. However, even new car owners understand that the engine and transmission play a vital role in a car.
Therefore, we all monitor these important units, guarding them like the apple of our eye, forgetting about many other equally serious things. But did you know that there are many small designs and solutions in a car that are also very significant and useful? Unfortunately, such things are often overlooked by many car owners. For example, every car has small drainage holes that play an important role, but since they are invisible, many car owners are not even aware of their existence.
However, it must be remembered that if these drainage holes are not cleaned for a long time, this causes them to become clogged, the consequences of which are very serious: leaks and harmful bacteria appear in the car, which can even lead to mechanical damage to some parts of the car.
Where does water come from?
Water can be poured through the stove air intake (depending on the model, it appears both on the left and on the right side of the tunnel at the feet). In such a situation, you need to clean the drain holes in the engine compartment, and then coat the joint of the body and the air duct with sealant . If the liquid is from the side of the stove, then first of all it is worth checking whether it is antifreeze (the faucet often leaks simply through clamps and pipes or the heater radiator). The heater can also leak through the engine.
This is where water can flow into the Hyundai Accent
It is possible that water may leak through the gasket in the mounting block and fuse box. Also, in domestic cars, liquid leakage through the windshield frame can occur ( water leaks in the corners ). This situation can arise for several reasons:
- First, the drain holes may be clogged (they need cleaning).
- Secondly, the seal may not adhere tightly to the glass (due to drying out or cracking).
- Thirdly, perhaps the formation of a gap between the glass and the body.
It is not uncommon for water to seep through rubber door seals (torn, shriveled rubber) that need to be replaced. How simple would it be? But a lot also depends on the installation of the seal; it happens that it was simply installed incorrectly, here you need to be extremely careful. Or because the doors have sagged or are not adjusted correctly. This results in water pouring in through the doorways. In rare cases, water gets into the steering rack or cables from the driver's side.
Water under the passenger mat of a VAZ 2114 can appear for various reasons. Every owner takes care of his own car, and as soon as even a small malfunction occurs, he immediately begins to sound the alarm, trying to quickly “cure” the car. It would seem that water under the passenger mat of a VAZ 2114 does not cause much concern, but this must be eliminated immediately so that there are no more serious problems in the future.
Advice from “old school” drivers
From the experience of owning a VAZ-21099, I can say that condensation in the trunk appears due to rubber carpets that do not allow air to circulate well. This is especially noticeable when the car is stored in a garage for a long time. When I leave my Granta in storage for a long time in the garage, I even take out the interior mats. All January holidays Grant costs separately, and rugs separately.
Today I picked up a rubber mat and was stunned by the amount of water that the carpet absorbed. White spots were also visible - mold began to form:
I removed the plastic above the threshold and pulled up the carpet:
Started wiping the water:
Of course, I cut out the insulation under the carpet into pieces as much as I could - it needs to dry.
I started pouring water on the glass to detect a leak, poured it here:
I found a trickle of water in the cabin:
Then it seemed that it was leaking from the elastic band that seals the cord:
Having looked closely, I realized that I was mistaken and, after pouring water for the 100th time, I ran up to see where it was leaking and found a place: (without an assistant who will pour water, don’t even get down to work - it’s difficult)
Water dripped directly onto the rubber band, and from the rubber band under the insulation and onto the metal floor at the driver’s feet, so at first it seemed like it was dripping from the rubber band.
I started looking for where it was pouring from, and even took off the strut cover:
I remembered that on the forum some people wrote that there was a leak above the mirror near the windshield - I checked the norm.
I took off the locker and checked the notorious rubber band, which was also causing some people to leak water:
But it turned out not to be the rubber band.
Then I remembered that someone had coated some kind of joint under the toad of the wiper gear motor. I took off the toad and started looking. Having recognized the bend that I had read about in one post on the eve of the repair, I started pouring water on it:
This is where it flooded from! To be honest, I didn’t go anywhere until I remembered the bend with the joint described in the post.
There was no sealant on hand to test the hypothesis. Tomorrow I will update the post with the final result on the bend and joint)))
Arriving home, I found the post I had read www.drive2.ru/l/7134534/ and imagine my surprise that the place where it flows into the interior is the same as mine (when I was flipping through before the repair, I didn’t pay attention to those windows in the red square: ca. d-cd.net/243a3b2s-960.jpg the author thought that the seam was leaking)))) Also, the place where the water flowed in (the bend with the joint) coincided.
Tomorrow I’ll still miss the mark and make sure for sure.
To be honest, I was exhausted, it was normal outside, it got dark on top of that + it was snowing and I had the frill removed and the door was swinging open and the snow had already started to land on the previous one)))
I won’t say hello to the plant, and so they know that their products will only be bought by those who have not yet messed around with AVTOVAZ’s products, or by a person who likes to fool around, or by someone who has not yet tasted all the delights of AvtoVAZ repairs))))
Of course, an incredible desire appeared to take out a new car on credit.
Once again, looking at my logbook: www.drive2.ru/r/lada/839787/logbook/ I understand that this is overkill. Although some do more with the car.
PS: I wanted to just ride, but it doesn’t work out - I have to constantly repair something.
I applied sealant to everything; you can’t really get to the joint without removing the wing:
It still leaks into the cabin, I already covered the glass where it was watered))) - it didn’t help.
It became clear that water was leaking somewhere between the wing and the body at the junction; I did not want to remove the wing.
A European window worker I knew asked what I was doing, asked him for some mounting foam and “boomed” - there are no leaks!:
PS2: If you open the door, you can see a bit of foam - I inserted paper into it to smooth out the bulging))) I put on a plastic cover - you can’t see what’s foamed at all, when selling the car, I don’t care what they say, the main thing is that it’s dry)))
I used a hairdryer to dry the insulation today. I put the cut out insulation on the battery and will put it in place later while I’m riding without the sill cover, so that I can lift it up at any time and see if there is water or not.
He pointed around where the foam was pouring from above. He poured water into the same place, then it seeped into some gap and flowed out through the oval into the car, the oval is located just above the rubber band with the wire for the turn signal:
Price tag: 0 ₽ Mileage 70000 km
When water gets under the passenger mat of a VAZ
If moisture appears in the car interior, then the driver has no peace of mind until he figures out what’s wrong and fixes the leak. Most often, such a nuisance happens after rain. The most common cause is a windshield that is not sealed properly, which allows raindrops to enter the cabin.
It happens that you have to disassemble the door in order to make sure that the plastic screens, whose function is to close the technological windows, are in order. You can check the windshield by having someone spray it while watching from below what is happening.
The following can happen if the channels are clogged: the water flow will split, one part will go to the driver's side, the other to the passenger's seat. Then, under the hood, the water will go into the drain hole, and through the body it will begin to flow to the stove pipes.
But in VAZ 2114, 2107, water can accumulate on the floor if the rubber seals, which are located on the inside along the perimeter of the door, are worn out. Worn seals, which now do not fit tightly, can be identified immediately - the rubber becomes torn and shrunken.
So it's time to replace them. In this case, professionals advise installing double seals, so before disassembling half the machine in search of the cause, you need to check if there are any cracks that allow moisture to pass through. During assembly, they can also make a mistake and install them incorrectly, therefore, even if the car is completely new and water appears in the cabin, the seals should be checked first. The main thing is that the glass and the body are one.
Clogged drainage holes in the bottom may leak water. In this case, it is enough to clean them. Previously, they were made of rubber, but now they are using plastic, which allows water to pass through.
The cause of moisture may also be in the door if it is warped.
It happens that it is poorly adjusted, then, especially during a trip in rainy weather, it is very easy to get water into the cabin through the resulting gaps.
Work order
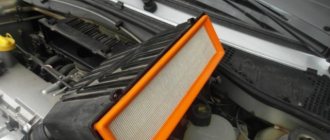
To get to the drainage holes, you need to remove the frill or this plastic cover.
The frill consists of two parts: left and right. Both will have to be removed since there are drainage holes on both sides. To do this, we need to unscrew 9 screws and 2 nuts. Here are the screws that are immediately visible - there are 4 of them.
Three screws are hidden under the plugs and 2 under the hood buffers - these are rubber bands on the sides, they can also be removed so as not to get in the way.
You also need to remove the plugs securing the windshield wiper nuts.
There is even a small recess, specifically for a screwdriver, so that you can pick it up. Let's take them off. In the next image, the plugs and rubber seals have been removed, now all the fasteners are visible.
Next, use a 13mm head to unscrew the nuts securing the windshield wipers.
To remove the lever with the brush, you need to bend it. Then it comes off easily.
Then we proceed to unscrew the screws. For this we need a T-20 TORX bit.
Unscrew all 9 screws in this way. After all the screws have been unscrewed, you can remove the frill; first remove one part, having first disconnected the rubber washer hose from the tee.
Then remove the other half, also first disconnecting the washer hose.
Next, you need to remove the protective cover of the cabin filter, as it complicates access to the drainage hole, which is located under it.
This casing is held in four places: on the left you see a latch, on the right it is secured with a screw, and from below, its removal will be hindered by the washer hose, which is attached to the casing with two brackets.
First of all, unhook the washer hose from one bracket.
Then from the other one on the left.
After this, unscrew the screw.
Then disconnect the latch. To do this, you need to press on this fungus.
The cover can now be removed. First we take out the part where the latch is located.
This is the order that will cause you the least hassle. Removing the cover you will see the cabin filter.
The filter is held in place by just two latches on the sides, so replacing it is a snap.
In order not to unscrew everything ten times, it is best to clean the drainage holes and replace the cabin filter at the same time. However, now we are more interested in the drainage hole. After all, it was for him that we dismantled half the car.
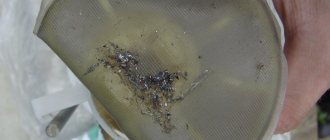
So, pay attention to the hole that is located below the cabin filter, currently it is circled with a red oval - this is the drainage. Our task is to ensure that these holes, both on the right and left sides, remain open, that is, they are not clogged with leaves and dirt.
The pictures below are an example of what the bulkhead MAY look like where the drain holes are located. This is the right side, passenger side.
And this is the left, driver's side.
If your picture is approximately the same, then all foliage and dirt need to be removed. However, it is too early to talk about the completion of cleaning the drainage from debris.
You yourself understand that if leaves and other debris can penetrate from the street through the grille into the frill,
Moreover, it easily penetrates into the drainage hole.
Where does the infiltrated debris end its journey? Let's find out.
Path of garbage
For clarity, let's pour some water into the drainage.
See where the safety locker starts to get wet?
This is where the water flows, and, by the way, the garbage too.
To get to the final point of waste accumulation, the protective locker will have to be removed.
The locker is attached in sixteen places.
First, unscrew the mudguard, which is secured with four self-tapping screws.
The first self-tapping screw is the only self-tapping screw with a TORX 25 bit head.
All others are unscrewed with a TORX 15 bit.
And here are the rest of the TORX screws - 5,6,7.
Next we have four clips.
The clips have a complex design, consisting of two parts and working on the principle of an anchor.
When snapped, the tip of the clip moves apart and fixes it in the hole. Therefore, in order to pull it out without breaking it, you need to insert a screwdriver or spatula between the two caps.
Having loosened the clip in this way, it is then easily removed from the hole.
The clip is inserted back in the same way, in the extended state and then snaps into place.
We go further, and at the end we are left with self-tapping screws or screws (as you like) with a turnkey head for 8. There are only 5 of them. Three screws in sight.
And two self-tapping screws secure the locker in the upper part of the wheel arch.
Having freed the locker from the fasteners, remove it by pulling it down and put it aside.
Now we have reached the drainage hole.
This is the same hole that we saw on the outside of the front panel.
It is through it that water flows out, and so does debris. Then the water gets into this recess in the locker and flows down.
Pay attention to the lower part of the wheel arch - no leaves or dirt.
Although, everything may be different, for example, as in this illustration.
Reasons for the appearance of garbage
Where do the leaves and dirt come from here? From the engine compartment, leaves and dirt fall into the space between the locker and the wheel arch. And then, they roll down the locker to the lower part of the arch. It is here that the “last refuge” of all the garbage collected from the street is formed. And this is where some of the most severe corrosion in a car occurs.
Now you understand why it is not enough to simply remove the leaves from the front panel. Equally important is cleaning the lower part of the wheel arches from leaves and other debris.
You may ask: “Why does the editorial Granta have no debris either in the front panel or in the wheel arches?”
In fact, over a year and a half of operation and forty thousand kilometers, the editorial Granta has never had the drainage in the front panel and arches cleaned. And the photographs from the sheet showed cars with much lower mileage, but a lot of garbage.
Where does your car live?
Why? It all depends on where you park your car. Yes Yes. Not from the driver, but from the parking lot. The editorial car is mostly parked in the garage. Even in the yard near Grant's house it stands where there are no trees nearby.
Some courtyards of houses are planted with trees, the leaves of which begin to fall off already in the middle of summer. Thus, leaves, plus poplar fluff and other debris blown by the wind, partially penetrate into the engine compartment and, over time, clog the drainage.
Therefore, if your car mainly “lives” on the street, then be prepared to regularly clean the drainage to prevent premature corrosion.
Mysterious cracks in the front panel
I would like to draw your attention to another design feature of the drainage in the engine compartment. It turns out that the drainage holes we looked at are not the only holes through which water flows.
Experiment
Let's do a little experiment. Let's begin to slowly pour water into the front panel, but so that the pressure is small. If the pressure is not strong, then you can see that the stream of water does not even reach the drainage hole, but goes into this small gap.
And then it ends up not in the wheel arch, but in the engine compartment.
Flowing down the partition of the engine compartment, water can fall, for example, onto a corrugation with wires, and then through the corrugation penetrate into the car interior. Such cases do occur.
It is unlikely that these gaps were made on purpose.
Most likely this is a banal design flaw or mistakes made during assembly.
Some “grant drivers” simply cover these cracks with sealant to prevent unauthorized penetration of water into the car’s interior.
The resurrection of air conditioning. Start. — Lada Kalina Universal, 1.4 l., 2008 on DRIVE2
When we bought the car, the air conditioner was faulty; the previous owner said that the radiator had broken. It was decided to repair it, although with this summer it may not be necessary, but since it’s there it should work. Let's get started.
Full size
We remove the bumper and see that there is no radiator and even the fan has disappeared 
Full size
Corrosion was also discovered, which we will deal with a little later, and both headlights had broken lower headlight mounts, but that’s another story.
Finding O-rings for the connections turned out to be a big problem; there are none in stores or online stores. I took my measurements and bought these.
Full size
I also purchased a radiator and fan.
Full size
Full size
I installed the whole thing, the O-rings fit perfectly.
Full size
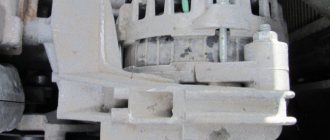
He pulled himself together and went to the gas station. We filled the system with nitrogen to check the tightness of the system, but the pressure was rapidly dropping. We started looking for the leak, the first thing I thought was that the O-rings didn’t fit. But as it turned out, everything was fine there, the problem was different, the leak was from under the pipeline fastenings to the body.
Full size
Full size
Full size
They are attached in two places and poison from both. I went home for dismantling, removing the tubes and cutting off the rubber bands, it turned out that the tubes were rotten, the area of damage was large, I decided to replace them with new ones. They were out of stock, so I'm waiting for delivery.
Price: 6,200 ₽ Mileage: 153,000 km
Cleaning the air conditioner — Lada Kalina Hatchback, 1.6 l., 2013 on DRIVE2
Since the car was 13 years old and sometimes the air conditioner had a smell, it was decided to clean the evaporator, because mold and microorganisms form there due to moisture) I didn’t want to clean it with the so-called “checker”, as it doesn’t inspire confidence and, according to reviews, it doesn’t really help. I also didn’t want to use sprays because I have to go to the cabin filter (and I just changed it yesterday and have no desire to go there again), and I read that it settles on the air ducts and flows through the cracks onto the brain or somewhere else. I chose a foam one and took the Runway to try Maxidome for 219 rubles. After reading the reviews, I decided to spray only in the evaporator. To do this, we remove the passenger mat and move the carpet under the driver's seat and see there a rubber tube from the evaporator, going under the hood (to the street). It is possible from the street, but it is not at all convenient there.
Full size
Picks up this phone:
Full size
Next, we insert the tube from the purifier into the evaporator and spray (everyone writes differently, some say until the foam comes back, others say 10 seconds, and some say the whole tank). I sprayed until the foam started to flow back, 5 seconds maximum and quickly put it on rubber outlet back and wait until it starts flowing out onto the street:
Full size
Then, when the dripping stopped, I decided to lather it a second time. Again I took the tube off, sprayed it and quickly put it back on. The second time it seemed like I sprayed it longer. And again I wait:
Full size
After almost no dripping, I turn the heater on to the coldest position (without air conditioning) at maximum speed for about 10 minutes (dry the evaporator, and the smell of the cleaner will disappear. And it smells the same as the active foam for cleaning the interior from the same company) Then I turned on the air conditioner for a couple of minutes, then turned it off and dried the evaporator again. How much it helped, I can’t say yet, but there was no smell from the air conditioner (although there was no smell before, it only appeared from time to time)
Mileage: 48,300 km
Lada Kalina Station wagon Kalinwagen) › Logbook › How not to clean the air conditioner in Lada Kalina 2
Hi all!
I decided to clean the air conditioner in my car, although there were no smells or any other problems, but still three years have passed and I think it’s worth it.
Full size
air conditioning cleaner and cabin filter
I decided to do everything as indicated in various manuals here on the drive, basically there are two ways:
Method 1 through the salon
Full size
Drainage in the cabin
1. crawled under the front passenger seat; 2. disconnected the drainage tube; 3. I tried to put the cleaner tube into the evaporator, but it only went in there by 1.5 cm!
Method 2 through the air intake
1. Take out the old and dirty filter
Full size
I’m always ready for this, but I never cease to be surprised
2. Fill the air intake with foam and turn on the air conditioner for a couple of seconds so that the foam gets into the system, then wait 10 minutes for the foam to start “working”
cleaner foam in the air intake
3. Turn on the air conditioner, gradually increasing the power and at maximum power it spins for about 10 minutes. 4. Then install a new filter and everything is ready.
And everything seems fine, but as they say, if you don’t know the ford, don’t go into the water. With the second method, the cleaner began to drip into the cabin from the wires under the dashboard. I took a chance and turned the heater on all the way and the cleaner quickly came out through the drain, then I waited a bit, wiped the wires and turned on the stove, everything dried out quite quickly, and it was hot outside. It looks like I didn’t fill anything in, but I don’t want to risk it anymore. There are no complaints about the cleaner itself, the cabin felt fresher, and the smell of the cleaner disappeared by the end of the day, the cabin filter generally fit perfectly without the slightest gap.
As a result, I had a question: What did I do wrong?