Bendix is relatively reliable and often does not cause much trouble for car enthusiasts, but a breakdown cannot be ruled out. The gears and rollers can wear out - these parts experience serious loads when starting the engine and when moving off the car.
The main signs that the part is faulty:
- the engine does not start - the starter does not spin, but there are clicks;
- when the power unit is running, the bendix does not disconnect from the flywheel, that is, the starter continues to spin;
- smoke with a burning smell appears from the engine compartment;
- When you try to start the engine, you can hear the starter whirring. The engine can be started only after several attempts.
These symptoms may indicate that the Bendix needs to be replaced with a new one.
Do-it-yourself Bendix starter repair (photos and videos).
Good afternoon. In today’s article I’ll tell you how to repair a Bendix starter with your own hands. Traditionally for our website, the article is a detailed instruction with photo and video materials.
What is a Bendix (overrunning clutch)?
In modern cars, the engine is started using an electric starter. The starter is a DC electric motor that transmits rotation to the engine flywheel through a special clutch.
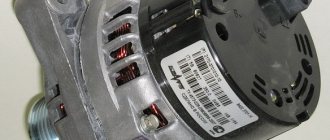
This is what the starter looks like:
This is what the flywheel looks like:
Typically, the gear on the starter has 10-12 teeth, and the flange on the flywheel, with which the starter engages and starts the engine, has more than a hundred teeth.
If you exclude the overrunning clutch, then after the engine starts, even at idle, the starter will spin up to an incredible 100,000-200,000 rpm! Naturally, it will collapse.
To prevent this from happening, a special overrunning clutch is used, colloquially called a bendix.
It works on the principle of the rear hub of a bicycle, i.e. torque is transmitted only in one direction - from the starter to the engine.
Causes of Bendix malfunctions.
All malfunctions manifest themselves in the same way - the bendix fires every once in a while or does not work at all, while the starter spins.
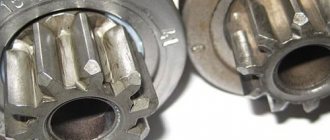
Visually, a Bendix malfunction appears like this:
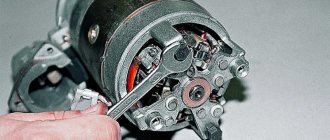
To repair a Bendix, you will need a screwdriver that can withstand blows from a hammer, a hammer, a yew, or a rag.
It is difficult to buy spare parts for Bendix, since Bendix is usually sold assembled. But there is one life hack - we buy a Bendix from a VAZ-2101 (the cheapest) and disassemble it for spare parts. The diameter of the rollers is almost always the same; if you don’t find the right diameter or if you have a large hole, you can cut it with a drill; springs are almost always suitable. The author of this article repaired the bendix on the Chery Amulet starter by replacing the rollers and springs with similar ones from VAZ.
The causes of failure are listed in order of likelihood, from most common to least common.
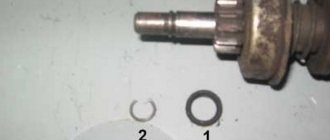
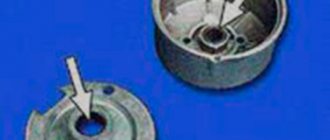
Loss of spring elasticity.
In the picture above, you can see that the rollers are pressed by springs. When the springs lose their elasticity, the bendix begins to slip, and the starter itself fires every other time.
Repair - we flare the starter bendix, carefully remove the inner part, replace or stretch the old springs, assemble without lubrication; if the bendix is lubricated, it will slip, and flare it.
Roller wear.
This is the second most common reason: the rollers do not spin during their operation and therefore only wear out on one side, sometimes they flatten and become oval.
Repair - we flare the bendix, carefully remove the inner part, turn the rollers over on the other side or replace them, assemble them without lubrication, and roll them.
Oiling.
This problem is relevant only for gear starters. Sometimes gear lubricant gets into the bendix, in which case it begins to slip constantly.
Repair - we flare the bendix, carefully remove the inner part, wipe all the rollers with gasoline or acetone, assemble without lubricant, and roll it. It is advisable to replace the lubricant in the starter gearbox with a more refractory one, or reduce its quantity.
If you prefer to watch a video, below is a detailed video on how to repair a starter bendix with your own hands:
Conclusion.
That's all for me today. After reading the article, repairing the Bendix starter should not cause you any difficulties. It is important to understand that Bendix is not such an expensive part and it costs 200-300 rubles, therefore, it is advisable to repair it only if there are no spare parts, or if the car is very expensive.
Possible causes of failure
As mentioned above, gear rotation is only possible in the direction of rotation of the starter armature. If rotation in the opposite direction is possible, this is an obvious malfunction, that is, the bendix must be repaired or replaced. There may be several reasons for this:
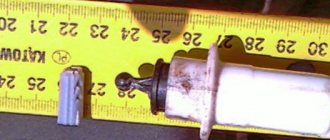
- Reduction in the diameter of the working rollers in the cage due to natural wear. The way out is to select and purchase balls of a similar diameter. Some car enthusiasts use other metal objects, such as pieces of a drill, instead of balls. However, we still do not recommend doing it yourself, but buying balls of the required diameter.
- The presence on one side of the roller of flat surfaces formed due to natural wear. Repair recommendations are similar to the previous paragraph.
- Grinding the working surfaces of the driving or driven race in those places where they come into contact with the rollers. In this case, repair is hardly possible, since such excavation cannot be removed. That is, it is necessary to replace the bendix.
Another reason for failure is wear of the gear teeth. Since this happens for natural reasons, repair in this case is impossible. It is necessary to either replace the mentioned gear or the entire Bendix.
Since the starter not only experiences heavy loads, but also comes into contact with the external environment and is susceptible to irritants such as moisture, dust, dirt and oil, freewheeling can also occur due to deposits in its grooves and rollers. A sign of such a malfunction is the noise of the armature when the starter is started and the immobility of the crankshaft.
Removing and connecting a new starter
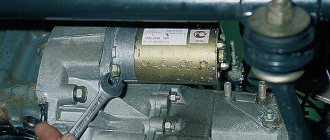
In absolutely any of the cases described above, you will be faced with the need to take a closer look at the device. It should be noted that with the release of the VAZ 2109, the question of how to remove the starter became more easily resolved, because in this model the arrangement of components under the hood is much simpler. So, you will need socket and socket wrenches and an inspection hole. Now, regardless of whether it is necessary to replace only the bushings or the entire VAZ 2109 starter, it must be removed. First of all, all the wires of the traction relay are disconnected, after which the block is dismantled. Don't forget to remove the high voltage wire from the battery.
The next step is to dismantle the engine crankcase protection; to do this, simply unscrew the mounting bolts. Then the approach to the mechanism of interest to us is cleared. To remove it, you need to unscrew three nuts - two on the block and one in the engine compartment. The connection diagram for the new VAZ 2109 starter is the same, only it is in the reverse order, so it will not cause any difficulties.
Features of mechanism diagnostics
The starting unit is checked using a tester. After turning on the device, the voltmeter reading should not be higher than 8V, and the current should not exceed 23A.
You can check the windings using a tester; if it lights up, it means there is a short circuit. To perform a visual inspection of the starting unit, it must be removed and cleaned of dirt (video author - Irina Kuzilova)
When disassembling the device, each part should be visually inspected. Scores and scratches can be removed using sandpaper. Broken and worn parts must be replaced. It is also necessary to replace the VAZ 2106 starter bushings if they are badly worn.
A faulty collector cannot be repaired; it is advisable to replace it. The height is checked on the brushes. More than 12 mm is considered optimal, otherwise the brushes must be replaced.
Performance evaluation
After completing the work, you should check how the engine starts. The starting engine should run smoothly, without knocking and grinding noises characteristic of a faulty overrunning clutch. This is a sign of a high-quality replacement of the Bendix on VAZ-2109-2115 cars.
In some cases, changing the bendix is not enough. Prolonged operation of a faulty clutch leads to wear and damage to the flywheel teeth. In this case, the symptoms of failure that existed before replacing the gear may become weaker, but do not disappear completely. In such cases, it is necessary to replace the flywheel.
VESKO-TRANS.RU
AutoNews / Reviews / Tests
How to Remove Bendix from VAZ 2109 Starter
Self-changes Bendix VAZ-2109
Bendix. This is a device without which you cannot drive your own VAZ-2109 in another car. His task. transmit torque from the starter rotor to the flywheel crown. It contains only two parts: a gear needed to transmit torque, in addition to a movable clutch that prevents the first element from rotating in the opposite direction. If this system has a problem, start over with the car. You can no longer do this and you will need to change the mandix to the VAZ-2109. Now we will analyze the procedure for KZATE starters used by AvtoVAZ.
What do you need for work?
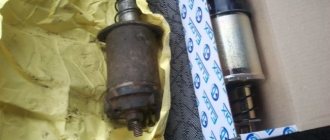
Please note right away that Bendix cannot be repaired. Accordingly, if this fails, you will need to spend time and money to install a new one. Modern, its price is not so high, so there is no point in trying to return the irreparable. Moreover, the procedure for installing a new device is not that complicated. The main thing is that the necessary parts and tools are nearby. Because the work is good for you:
- screwdriver plus and minus;
- wrenches 13 and 10;
- hammer;
- pliers;
- replacement part.
Not all bandix
suitable for a specific starter. Therefore, you will need to purchase the appropriate product.
Workflow
Let's start with the previous steps. First you need to disconnect the negative terminal from the battery. Replacing the Bendix requires manipulation of the wiring, since disconnecting the battery is a mandatory safety requirement. Then we come to the retractor relay. He can see two bolts: top and bottom. The conductor that connects the relay to the battery is connected to the former. You will need to turn it off, here you will need a key to 13. Next you will notice a small wire that supplies power to the winding when the key is turned on in the ignition. It should also be disabled, you just need to pull it slightly to the left.
Main stage
It is necessary to adhere to the following algorithm of actions:
- Open the car hood.
- Remove the “-” terminal from the battery. This is necessary to avoid electric shock, since the work will involve power wires.
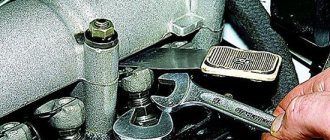
- Remove the “+” terminal from the top bolt of the starter solenoid relay using a size 13 wrench.
- Disconnect the nearby thin wire - pull it to the left, towards the wing. The purpose of this wiring is to energize the relay winding when the ignition key is turned to the “Start” position.
- Using a size 13 wrench, unscrew the nuts on the starter. Three nuts are located on the front of the part: bottom, middle, top.
- Remove the starter.
Replacing the starter on a VAZ 2108-VAZ 21099
Removal
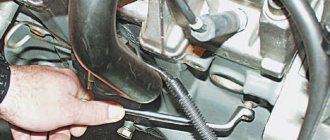
1) Disconnect the negative terminal from the car battery to cut off the power supply to the starter. Having trouble disconnecting? – See the article: “Replacing the battery in a car,” point one.
2) Now think about which part of the car will be easiest for you to remove the starter from the car (top/bottom). Advice: with carburetor engines, in the absence of an inspection hole nearby, it is easier to remove from above. For injection machines, it is also possible to remove it from above, but in addition it is necessary to remove the air filter housing. Please note that it is much more convenient to shoot from below, using a pit. Unscrew the bottom bolt without any problems (by the way, you most likely won’t even be able to unscrew the bottom bolt without a special tool). If there is a crankcase protection, remove it (not present on all cars, because protection is not installed from the factory, but a mudguard that protects the engine from contamination is always installed, be sure to remove it, instructions are “here”).
3) Having removed all the obstructing parts, we proceed to removing the starter itself:
- disconnect the wire block by pulling it (photo 1);
- proceed to unscrewing the nut securing the battery terminal and unscrew this nut completely (photo 2);
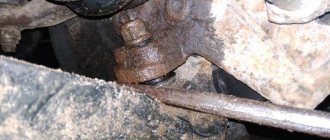
- remove the terminal from the starter stud where it is located (photo 3);
- Remove the three nuts securing the starter to the car engine.
Installation
The new part is installed in the reverse order of removal.
Note! We recommend sanding the terminal connected to the starter if there is rust or ingrained dirt. A clean terminal will ensure better contact, and to prevent it from rotting and oxidizing in the future, lubricate it with grease or Vaseline.
Additional video: Details of checking the starter for functionality are demonstrated in the video at the link below:
How to replace Bendix yourself
In the starter, important importance is given to the bendix, if it breaks down it will not be possible to start the engine. And, if a characteristic metallic sound is heard during startup, this indicates an immediate replacement of this part.
Qualified craftsmen are not recommended to even try to repair the Bendix; according to them, it is much more advisable to replace the old worn-out part with a new Bendix. Such a timely replacement of the bendix, rather than repairing it, will prevent imbalance of internal parts with the prospect of increased wear on the starter motor.