I have long wanted to try to flash the brains of my car and today I realized my idea. ECU JANUARY 7.2 stock firmware A203EL36.
Standard equipment that is used for diagnostics and changing firmware at home consists of a computer (laptop), a USB - RS 232 adapter, and an RS 232 - K-Line adapter. The last two are replaced with a VAG-COM 409.1 cable. Out of all this, I had a computer with a COM port and a null modem cable 8 m long, with which I loaded new BISS keys into the satellite tuner located in the kitchen. Well, I’m too lazy to carry the tuner back and forth, so I made a long cord from computer twisted pair cable.
Since the computer had a COM port (RS 232), and I didn’t have a laptop, I didn’t spend money on a USB-RS 232 adapter, but immediately started making a K-Line adapter. Having looked at the information on them here, on the drive and on chip tuning sites, I settled on the simplest circuit, it was well described by himiks in the article Simple K-line adapter with 2 transistors. I got it like this:
Firmware set from Motor Master for Priora with Bosch ECU 7.9.7+.
Priora_motor 124 from MMK
B106DR10_E-0_1 fan B106DR10_E-2_1 fan This firmware uses one cooling system fan speed. Use it instead of stock firmware for Priora: B173DR01 B174DR03
B106DR10_E-0_2 fans B106DR10_E-2_2 fans Equipped with air conditioning, 2 fan speeds for the cooling system. XX in air conditioning mode – 1000 rpm. Install instead of stock firmware for Priora: B174DT05 B174DT06 B174DT07 B174DR04
Priora engine 126 MMK
B174DR03_1 fan
This B174DR03 firmware uses one cooling system fan speed. Use it instead of: B173DR01 and B174DR03
B174DR04_2 fan_air conditioning
This firmware B174DR04 is installed instead of all other serial versions:
B174DT05 B174DT06 B174DT07 B174DR04 The firmware supports two coolant fan speeds and air conditioning. XX in air conditioning mode – 1000 rpm.
ECU VAZ 2114 main faults and ways to eliminate them
Greetings, dear friends! I decided to devote today’s post entirely to the ECU (Electronic Engine Control Unit) of the VAZ 2114. After reading the article to the end, you will learn the following: what ECU is on the VAZ 2114 and how to find out its firmware version. I will give step-by-step instructions for its pinout, tell you about the popular ECU models January 7.2 and Itelma, and also talk about common errors and malfunctions.
The ECU or Electronic Engine Control Unit of the VAZ 2114 is a unique device that can be described as the brain of a car. Absolutely everything in the car works through this unit - from a small sensor to the engine. And if the device starts to malfunction, then the machine will simply stop, because there is no one to command it, distribute the work of departments, and so on.
Useful tips
To give the car a modern look, you must first decide what firmware is needed, then find it on the Internet and, accordingly, download it. If you want to flash a VAZ 2110 injector, you should decide whether such an installation will really make sense. Also remember that in cases of failure of factory options, you will be provided with information about an error in the data output.
Before installing a new downloaded program, you should definitely check whether the car has factory firmware, which often provides for disabling misfire detection. If this option is available on the car, no further steps regarding flashing will be required.
In this case, you also need to check the type of factory installation, which can be done as follows: using a scanmatic, you should check the diagnostics, which will allow you to determine the system configuration of your machine. If you are unable to find the required type of available firmware, you will need to visit a specialized store that sells the cover and DF.
Where is the ECU located on the VAZ 2114
In a VAZ 2114 car, the control module is installed under the center console of the car, in particular, in the middle, behind the panel with the radio. To get to the controller, you need to unscrew the latches on the side frame of the console. As for the connection, in Samar modifications with a one and a half liter engine, the mass of the ECU is taken from the power unit housing, from the fastening of the plugs located to the right of the cylinder head.
Location of the VAZ 2114 ECU
In cars equipped with 1.6- and 1.5-liter engines with a new type of ECU, the mass is taken from the welded stud. The pin itself is fixed on the metal body of the control panel near the floor tunnel, not far from the ashtray. During production, VAZ engineers, as a rule, do not securely fix this pin, so over time it can become loose, which will lead to the inoperability of some devices.
Nuances of self-diagnosis
Indications for self-diagnosis and contacting specialized service stations will be different, error codes are also displayed differently. Therefore, today we will consider two options.
It is not at all necessary to use the on-board computer to diagnose problems with the car. Not all VAZ 2114 owners know about this method, so we will definitely tell you about it.
It consists of the following steps.
- Sit in the driver's seat and hold down the odometer button.
- Then turn the ignition key to the first position.
- Release the odometer button. After this, the arrows will start moving.
- Press the button again and turn it off. This will allow you to see which firmware version is used in your case.
- Press and release the button a third time. So you will see codes indicating the presence of certain errors in the operation of the car.
We recommend: Decoding and methods for eliminating error codes on Ford Focus
Since this is not specialized equipment, the codes will be presented in this case as two-digit designations, rather than four-digit ones.
Let's now look at the most popular errors that occur during such diagnostics and figure out what the code means. Even without an on-board computer, you can detect faults on the VAZ 2114 using the odometer codes.
We suggest you familiarize yourself with them in the table.
| Code | Description |
| 1 | Problems with the microprocessor |
| 2 | There are problems in the fuel level indicator sensor circuit in the tank. |
| 4 | The power supply voltage is too high |
| 8 | Voltage too low |
| 13 | There is no signal from the oxygen sensor |
| 14 | Coolant temperature sensor signal level is very high |
| 15 | Coolant temperature sensor signal level is very low |
| 16 | The voltage in the on-board network is too high |
| 17 | Very low voltage in the on-board network |
| 19 | The crankshaft position sensor is sending an incorrect signal. |
| 24 | Vehicle speed sensor is faulty |
| 41 | Phase sensor sends incorrect signals |
| 51 | Problems detected with the persistent storage device |
| 52 | Problems detected with the random access memory device |
| 53 | CO potentiometer does not work |
| 61 | Lambda probe sensor does not work |
It is important to take into account the fact that mistakes can add up. For example, if your car has faults indicated by codes 4 and 1, the odometer will show the number 5.
Plus, all fault codes will be stored in memory until you manually reset them. To do this, you need to disconnect the terminals from the battery while keeping the ignition on, wait a few seconds and connect it back. Don’t forget to do this, especially if you are going to go to a service station for diagnostics. They will find these errors and will eliminate them, although in fact you have already done everything yourself before. Pay extra money? No, it's not worth it.
How to find out which ECU is on the VAZ 2114 – January 7.2 January 4 Bosch M1.5.4
Today, there are 8 (eight) generations of electronic control units, which differ not only in characteristics, but also in manufacturers. Let's talk about them in a little more detail.
ECU January 7.2 – technical specifications
And so now we move on to the technical characteristics of the most popular ECU January 7.2
January 7.2 is a functional analogue of the Bosch M7.9.7 block, a “parallel” (or alternative, as you like) domestic development with M7.9.7. January 7.2 is externally similar to the M7.9.7 - assembled in a similar case and with the same connector, it can be used without any modifications on the Bosch M7.9.7 wiring using the same set of sensors and actuators.
The ECU uses a Siemens Infenion C-509 processor (the same as the ECU January 5, VS). The block’s software is a further development of the January 5 software, with improvements and additions (although this is a controversial issue) - for example, an algorithm has been implemented, literally an “anti-shock” function, designed to ensure smoothness when starting and shifting gears.
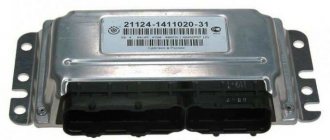
ECU January 7.2
The ECU is produced (хххх-1411020-82 (32), firmware begins with the letter “I”, for example, I203EK34) and “Avtel” (хххх-1411020-81 (31), firmware begins with the letter “A”, for example, A203EK34) . Both the blocks and the firmware of these blocks are completely interchangeable.
ECUs of series 31 (32) and 81 (82) are hardware compatible from top to bottom, that is, firmware for 8-cl. will work in a 16-cl. ECU, but vice versa - not, because the 8-cl. block “does not have enough” ignition keys. By adding 2 keys and 2 resistors you can “turn” an 8-cell. block of 16 cells. Recommended transistors: BTS2140-1B Infineon / IRGS14C40L IRF / ISL9V3040S3S Fairchild Semiconductor / STGB10NB37LZ STM / NGB8202NT4 ON Semiconductor.
Typical ECU parameters January 7.2 for diagnostics
ECU January-4 - technical specifications
The second serial family of ECMs on domestic cars was the “January-4” system, which was developed as a functional analogue of GM control units (with the ability to use the same composition of sensors and actuators in production) and was intended to replace them.
Therefore, during development, the overall and connecting dimensions, as well as the pinout of the connectors, were preserved. Naturally, the ISFI-2S and “January-4” blocks are interchangeable, but are completely different in circuit design and operating algorithms. “January-4” is intended for Russian standards; the oxygen sensor, catalyst and adsorber were excluded from the composition, and a CO adjustment potentiometer was introduced. The family includes control units “January-4” (a very small batch was produced) and “January-4.1” for 8 (2111) and 16 (2112) valve engines.
What's the result?
Taking into account the above, we can conclude that making any changes to the standard ECU firmware or installing additional modules is carried out by the owner at his own peril and risk. Sometimes it happens that tuned firmware from unverified sources may contain errors. As a result, the power unit operates with large deviations from the norm and quickly breaks down.
You need to understand that modified software for control units from various manufacturers can cost from 150-200 USD. up to 3000 USD and even more. The price depends on the type and model of the engine, as well as a number of other factors.
However, handicraftsmen do not have such an opportunity or material base. The main task for them is to purchase firmware as cheaply as possible. As a rule, such offers come exclusively from little-known manufacturers or even private individuals. Naturally, further checking and editing of the software is then carried out directly on the machine.
Finally, we note that if the owner has a strong desire to do chip tuning of his car, then you need to be prepared for the fact that after the firmware the power will increase by 5-15%, but the life of the internal combustion engine will be reduced by at least 10-20%. At the same time, fuel consumption may increase, and the requirements for fuel quality and its octane number will increase.
It should be added to this that it will be necessary to further reduce the service interval for changing engine and gearbox oil, fuel filters, antifreeze or antifreeze in the cooling system, spark plugs and other “consumables”.
In other words, in order to preserve the life of the engine after chip tuning, it will be necessary to naturally increase the total costs of maintaining and servicing the car. It becomes clear that, taking into account all the risks and nuances for an ordinary civilian vehicle, the feasibility of this type of tuning is greatly questioned.
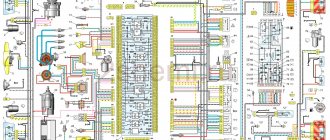
ECU pinout diagram January 7.2 VAZ 2114
The VAZ 2114 controller often breaks down. The system has a self-diagnosis function - the ECU queries all components and issues a conclusion about their suitability for operation. If any element fails, the “Check Engine” lamp will light up on the dashboard.
ECU pinout diagram January 7.2
It is possible to find out which sensor or actuator has failed only with the help of special diagnostic equipment. Even with the help of the famous OBD-Scan ELM-327, loved by many for its ease of use, you can read all engine operating parameters, find the error, eliminate it and delete it from the memory of the VAZ 2114 ECU .
How to properly chip an engine and operate a flashed motor
It becomes clear that for competent chip tuning you need to have special equipment, as well as extensive access to technological maps of the engine. Much will depend on the experience and qualifications of the specialists themselves.
The fact is that changing any parameter (for example, ignition timing or injection) leads to the fact that other parameters will also require correction. Moreover, this should be done only taking into account a full understanding of the process and various nuances. Only this approach makes it possible to obtain an increase in power and torque with minimal damage to the internal combustion engine.
The reason is that all systems remain standard, but their performance reserve is not always enough to cope with the additional power without consequences for the engine.
It turns out that the engine life depends not only on the firmware and qualifications of the tuners, but also on the driver himself. If we take into account that even a stock engine with factory firmware will fail faster under heavy loads, then it is clear that a constantly loaded chipped engine will fall into service even faster.
In other words, the driver does not need to constantly use the additional capabilities of the unit that appeared after the firmware. It is also important to understand that if the engine is worn out and has lost power, it is forbidden to try to improve the performance of the internal combustion engine by changing the program of the control unit. In this case, serious malfunctions are likely to quickly appear.
VAZ 2114 ECU burned out - what to do?
One of the common malfunctions of the ECU (electronic control unit) on the fourteenth is its failure or, as people say, combustion.
Obvious signs of this breakdown will be the following factors:
- Lack of control signals for injectors, fuel pump, valve or idle mechanism, etc.
- Lack of response to Lambda - regulation, crankshaft sensor, throttle valve, etc.
- Lack of communication with the diagnostic tool
- Physical damage.
In these cases, it is recommended to purchase a new ECU and replace the faulty one. How to do this is very simple!
Meaning and decoding of codes
During self-diagnosis of a VAZ 2115 with an injector, only numbers or flashes that code the error will be shown on the instrument panel. When reading trouble codes from an electromechanical instrument cluster, it is necessary to record the number of flashes and calculate error numbers from them. Their purposes can be deciphered using a special list. Most of these faults can be resolved independently by replacing failed sensors.
Self-diagnosis codes
When performing diagnostics, it is necessary to take into account that the number on the screen may indicate two summed errors. For example, 9 indicates the presence of two faults - numbered 1 and 8.
| Numeric combination | Decoding |
| 1 | ECU problem |
| 2 | Incorrect data from the fuel level sensor |
| 4 or 8 | Network power problems |
| 12 | Malfunction of the error lamp circuit in the instrument cluster |
| 13 | No signal from lambda probe |
| 14 or 15 | Incorrect data from temperature sensor |
| 16 or 17 | Problems with the network power supply, it is necessary to check for short circuits |
| 19 | Motor shaft position sensor error |
| 21 or 22 | Throttle sensor error |
| 23 or 25 | Incorrect operation of the intake air temperature sensor |
| 24 | Speed sensor faulty |
| 27 or 28 | No signal from lambda probe |
| 33 or 34 | No air flow data available |
| 35 | Idle speed control sensor is faulty |
| 42 | Ignition control circuit problem |
| 43 | Knock sensor failure |
| 44 or 45 | Violation of the composition of the mixture |
| 51 or 52 | ECU memory errors |
| 53 | Error in CO setting sensor (installed on cars without converter) |
| 54 | Octane corrector sensor (installed on cars without a converter) |
| 55 | Violation of the composition of the mixture |
| 61 | Failure of the lambda probe |
An example of error 14 appearing on the panel
We recommend: The engine does not develop power: what to do?
Table of decoding codes for flashes calculated during diagnostics.
| Error code | Flash combination | Decoding |
| 12 | Long-pause-two short | Diagnostic circuit malfunction |
| 14 | Long-pause-four short | Engine temperature sensor malfunction |
| 15 | Long-pause-five short | Likewise |
| 16 | Long-pause-six short | Abnormally high mains voltage |
| 17 | Long-pause-seven short | Abnormally low mains voltage |
| 19 | Long-pause-nine short | Crankshaft position sensor failure |
| 21 | Two long, pause, one short | Incorrect data from the throttle position sensor |
| 22 | Two long, pause, two short | Likewise |
| 24 | Two long, pause, four short | Problem with the speed sensor |
| 27 | Two long, pause, seven short | Lambda probe failure |
| 28 | Two long, pause, eight short | Likewise |
| 33 | Three long, pause, three short | Air flow meter needs to be checked |
| 34 | Three long, pause, four short | Likewise |
| 35 | Three long, pause, five short | Idle speed outside the tolerance range |
| 43 | Four long, pause, three short | No signal from knock sensor |
| 51 | Five long, pause, one short | Memory error in block |
| 52 | Five long, pause, two short | Error in controller |
| 53 | Five long, pause, three short | Memory error in block |
| 61 | Six long-pause-one short | No signal from the immobilizer |
The data obtained allows you to quickly find the faulty element and eliminate the cause of the error.
The video from the Garage channel shows diagnostics on a VAZ 2115 using a scanner and laptop.
Controller errors
The most common controller errors encountered during diagnostics are listed in the table.
| Program error number | Decoding |
| R 0030-0038, 0141 | Malfunction of the lambda probe heating system |
| R 0102 and 0103 | Incorrect signal from the air supply sensor |
| R 0112 and 0113 | Error in data from intake air temperature sensor |
| R 0115-0118 and 0217 | Problems detecting engine temperature or overheating |
| R 2122 and 2123, 0222 and 0223, and 2138 | Incorrect signal from the gas pedal and throttle position sensor |
| R 0171-0172 | Incorrect mixture parameters |
| R 0201-0204 | Faulty injectors (each cylinder has its own code) |
| R 0261-0272 | Problems with injector control |
| R 0130-0134 | Problems with the functioning of the lambda probe before the converter |
| R 0136-0140 | Problems with the functioning of the lambda probe after the converter |
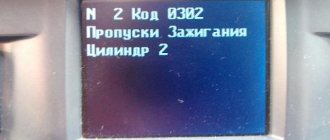
| R 0300 | Multiple misfires |
| R 0301-0304 | Cylinder misfires |
| R 0326-0328 | Knock sensor failure |
| R 0351-0352, 2301 and 2304 | Monitoring the operation of ignition coils |
| R 0422 | Failure of the neutralizer |
| R 0691-0692 and 0693-0694 | Failure of the first and second cooling fan start relays |
| R 0560-0563 | Problems with power supply |
| R 0627-0629 | Indicates incorrect operation of the fuel pump control circuit |
| R 1602 | Malfunction in the engine parameters control controller |
Reset errors
After self-diagnosis, finding out the cause of the problem and correcting the breakdown, the errors can be reset.
To do this, go to the error viewing menu, press the odometer reset key and wait a few seconds. The number 0 will light up on the screen - the error has been reset. In this case, data about problems is stored in the unit’s memory and must be deleted. If left, the “Check Engine” light will light up in the instrument cluster. In addition, self-diagnosis may not read all electrical system errors; the error removal procedure will show whether a more detailed analysis of the vehicle’s electronics is needed.
To reset the error, do the following:
- Turn on the ignition.
- Open the hood and remove the negative terminal from the battery. Wait about a minute, connect the wire back and close the hood.
- Turn off the ignition.
- Turn on the ignition again and start the engine. The Check Engine light may come on briefly and then go off.
If the symbol remains illuminated, there is an ongoing problem with some sensor or wiring in the vehicle. It can only be found out using a special scanner. It is necessary to conduct additional diagnostics to determine the problem node. Then carry out repairs and clear any existing errors using a computer diagnostic program for the ECU.
Resetting errors on cars with an electromechanical instrument cluster is carried out by disconnecting the negative terminal of the battery from the on-board network for 10 seconds. The ignition must be turned off.
How to remove and replace a faulty ECU on a VAZ 2114
When carrying out work to remove the VAZ 2114 ECU, do not touch the terminals with your hands. There is a possibility of damage to electronics due to electrostatic discharge.
- Using a screwdriver, unscrew the 3 screws securing the right panel of the instrument panel console and remove it.
- Release the clamp of the block with wires
- Disconnect the block from the ECU.
- Using a 10mm wrench, unscrew the 4 nuts securing the ECU to the bracket.
- We move the ECU forward and remove it from under the console.
- Remove the ECU from the bracket.
- Reinstall the ECU in reverse order.
How to do a self-diagnosis
If a fault check is done at a service station, a special device is connected to the on-board computer, which displays errors in a four-digit format. However, domestic manufacturers have provided another way to obtain information about the condition of the car - to do this, it is enough to run self-diagnosis. It’s easy to do it yourself if you follow the following instructions:
- Below the speedometer on the dashboard there is a dedicated odometer button.
- Press it and turn the ignition key to the first position.
- Immediately after turning the ignition key, release the button.
- After these actions, the instrument needles should begin to move.
- Press the button again and release immediately. If you did everything correctly, data about the firmware version of the on-board computer will appear on the speedometer.
- Press the button one last time and release it. After this action, fault codes should appear on the display.
Please note that during self-diagnosis, the on-board computer has a habit of adding the resulting combinations.
For example, car enthusiasts often look for information about failure number 10, which hides stacked errors 2 and 8.
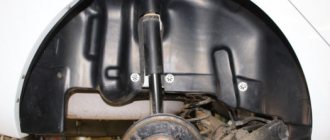
Where is the mass of the VAZ 2114 ECU located?
The first ground pin from the ECU on cars with a 1.5 engine is located under the instruments on the power steering shaft mount. The second terminal is located under the instrument panel, next to the heater motor, on the left side of the heater housing.
Location of the mass of the VAZ 2114 ECU
On cars with a 1.6 engine, the first terminal (mass of the VAZ 2114 ECU) is located inside the dashboard, on the left, above the relay/fuse block, under the sound insulation. The second terminal is located above the left screen of the center console of the instrument panel on a welded stud (fastened with an M6 nut).
Where is the relay and fuse of the VAZ 2114 ECU located?
The main part of the fuses and relays is located in the mounting block of the engine compartment, but the relay and fuse responsible for the electronic control unit of the VAZ 2114 are located in a different place.
Relays and fuses of the VAZ 2114 computer
The second “block” is located under the dashboard on the front passenger side. To access it you just need to unscrew a few fasteners using a Phillips screwdriver. Why is it in quotes, because there is no such block, there is an ECU (brains) and 3 fuses + 3 relays.
Description of firmware methods
You can, of course, take your car to a service center where professionals will do everything for a fee. But if you have little experience working with electronics, you can flash the VAZ 2110 yourself in 2 different ways. Let's take a closer look at each.
- To install the firmware, you need to purchase a special cable from a car store, then download the required type of firmware and the ChipLoader program. Then, in the passenger compartment of the car, where there is a passenger seat, you should put your hands under the dashboard and loosen the ECU mounting bolts, and on the other side, the driver’s side, remove the electrical control unit connector. It is recommended to rewrite the name of the firmware version; it is often indicated directly on the ECU. You should connect the purchased cable to the electrical unit and carefully connect the “K” line to pin 55, ground to pin 19, and on the “=” designation you should attach contacts numbered 18, 27, 37 and 47. The cable must also be connected to the COM port PC and, turning it on, configure the previously installed ChipLoader program so that it can connect to this port. In the program that opens, go to the menu in the field with the type of firmware that was installed, and to establish communication with the electrical unit, you must disable and re-enable pin 27. Select the firmware and load it into the ECU.
- The second method also involves choosing the optimal type of firmware for the VAZ 2110 car. You can find out which one is suitable only by error and trial. You can install the required ECU firmware without removing the chip from the car, using a computer and a program (ChipLoader or AutoProg). The main thing is to correctly connect all cable contacts to the electrical control unit.
In comparison with the first method, the second procedure discussed will be mastered only by those who have the skills to operate a soldering iron and microcircuits, since they have to disassemble the ECU and solder some of the wires to the contacts of the microcircuit. Only after this, the firmware, as in the first method, is uploaded into the memory of the electrical unit.
Hello everyone, lovers of VAZ chip tuning!
Do you want your basin to fall? Do you want that after installing a sports camshaft, receiver, exhaust, cylinder head boring, your basin will go with the money that you invested in it? You don’t want to pay a lot of money for an online repair, or you don’t have a smart tuner in town with straight hands, or you just want to start flashing your car yourself! Then read, dear friend, it will be interesting, I will share with you my experience, although not very much. Many people ask me how to flash, what to download, how to connect, how to roll back the firmware. I will try to answer all these questions. So I decided to write detailed instructions on how I do it, because I was able to get a real result after the work done with the firmware of my three-wheeler - 9 seconds to 100 km/h, before the firmware - 12 seconds! Do you feel the difference? And this is a simple 8 valve engine.
I’ll say right away that the instructions are for beginners, just like me! For ordinary boys and, of course, lovely girls of our huge country who want to master chip tuning on their own)) Ha-ha-ha, I haven’t met anyone like them yet, I hope to meet them someday) I only know one who can understand and can grind valves) Okay, first of all, CHIP tuning, then we’ll give the girls a blast, for sure!
What to do if the scanner does not see the VAZ 2114 ECU
Reader question: Guys, why does it say during diagnostics that there is no connection with the ECU? What to do? What to fix?
So, why doesn’t the scanner see the VAZ 2114 ECU? What should I do so that the device can connect and see the block? Today you can find many different adapters for testing a vehicle on sale.
If you buy an ELM327 Bluetooth, most likely you are trying to connect a low-quality device. Or rather, you could have purchased an adapter with an outdated version of the software.
Car diagnostics using a scanner
So, for what reasons does the device refuse to connect to the block:
- The adapter itself is of poor quality. Problems can be with both the device’s firmware and its hardware. If the main microcircuit is inoperative, it will be impossible to diagnose the engine operation, as well as connect to the computer.
- Bad connection cable. The cable may be broken or inoperative itself.
- The wrong version of the software is installed on the device, as a result of which it will not be possible to achieve synchronization (the author of the video about testing the device is Rus Radarov).
In this case, if you are the owner of a device with the correct firmware version 1.5, where all six of the six protocols are present, but the adapter does not connect to the ECU, there is a way out. You can connect to the unit using initialization strings, which allow the device to adapt to the commands of the machine’s motor control unit. In particular, we are talking about initialization lines for diagnostic utilities HobDrive and Torque for vehicles that use non-standard connection protocols.
Do-it-yourself firmware for VAZ 2110 8 valves
Firmware for the VAZ 2110 is simply a necessary procedure for those car enthusiasts who value fast and dynamic vehicle control.
However, the question arises: should you entrust such a task to specialists or do all the work yourself? There is no definite answer, since specialists provide some guarantees for their services, although a good specialist has yet to be found. At the same time, everything will cost the vehicle owner relatively expensive. But changing the “brains” of the car yourself allows you to save a lot and not worry about the fact that your favorite “iron friend” will fall into unreliable hands.
But it is recommended that those car enthusiasts who have at least a little idea of the complexity and importance of the upcoming procedure take on such a task. And here it will help you, if you have decided to do everything yourself and gain new experience, detailed instructions and useful tips on how to properly flash a VAZ 2110 with your own hands.