Tuning work for the Lada Largus interior
Installing the backlight for the handle
This process takes place in several stages, so each action must be performed carefully and thoughtfully, since careless movement can lead to damage to the item. First of all, you need to remove the seat trim
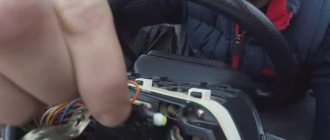
Next, the actual preparatory work begins: unscrew the screws located under the plastic tabs and remove the clips, after which you need to disassemble the handle. To attach an LED, you need to drill several holes on the moving part of the object, and they must be at a certain angle. Pass the wires pre-connected to the LED through the holes.
Front interior lamp for Lada Largus “Lux”
It is used to replace a standard lamp that has become unusable, as well as to modify the interior for the “Lux” package.
Applicability:
Lada Largus.
Payment to Sberbank VISA card
The most convenient and profitable payment method for you. Payment can be made through the Sberbank Online system, through a payment terminal (Sberbank ATM), provided that you have a card from this bank. If you are not a client of this bank and you do not have a card, then you can top up your balance at any bank branch through an operator; they will accept cash payment and top up your balance. Commission from 0 to 1%
Cash on delivery (payment upon receipt)
Payment for the order will be made at the post office upon receipt of the goods. For cash on delivery services, Russian Post takes an additional commission - approximately 4% of the cost of the order (parcel) upon receipt.
Applicability:
- Lada Largus.
Weight, kg: 0.1 Dimensions, cm: 19 x 6 x 5 Volume, m3: 0.00057
Note!
Below are the shipping methods available specifically for this product. Payment options may vary depending on the shipping method. Detailed information about delivery and payment methods can be found on the “Delivery and Payment” page.
Delivery by Russian Post
Available payment methods:
- Cash on delivery (payment upon receipt)
- Payment to Sberbank card
- Yandex money
- QIWI
- ROBOKASSA
Shipping throughout Russia. Delivery time is from 5 to 12 days.
Front interior lamp for Lada Largus “Lux”
It is used to replace a standard lamp that has become unusable, as well as to modify the interior for the “Lux” package.
Applicability:
Lada Largus.
Payment to Sberbank VISA card
The most convenient and profitable payment method for you. Payment can be made through the Sberbank Online system, through a payment terminal (Sberbank ATM), provided that you have a card from this bank. If you are not a client of this bank and you do not have a card, then you can top up your balance at any bank branch through an operator; they will accept cash payment and top up your balance. Commission from 0 to 1%
Cash on delivery (payment upon receipt)
Payment for the order will be made at the post office upon receipt of the goods. For cash on delivery services, Russian Post takes an additional commission - approximately 4% of the cost of the order (parcel) upon receipt.
Replacing the interior light bulb of Lada Largus (VAZ Largus)
- Lada Largus.
Weight, kg: 0.1 Dimensions, cm: 19 x 6 x 5 Volume, m3: 0.00057
Please note!
Below are the shipping methods available specifically for this product. Payment options may vary depending on the shipping method. Detailed information about delivery and payment methods can be found on the “Delivery and Payment” page.
Delivery by Russian Post
Available payment methods:
- Cash on delivery (payment upon receipt)
- Payment to Sberbank card
- Yandex money
- QIWI
- ROBOKASSA
Shipping throughout Russia. Delivery time is from 5 to 12 days.
Lada Largus salon: increasing comfort in the car
Most car owners start by tuning the interior in order to increase comfort and convenience. For this it would be advisable:
- Replacing seats – standard car seats are not comfortable and cause discomfort during long trips. Ideally, it is recommended to replace the stock chairs, but a budget option would be to purchase covers with side supports. The average cost of replacing a front pair of seats is 5-7,500 rubles, a set of good covers starts from 3,500;
- Modernization of the air conditioner - the air cooling system in the cabin in Largus is not configured ideally, which is fraught with the development of colds in passengers and low comfort on the road. From practice, many drivers have noticed that installing an air filter on the air conditioner in the Lada Largus allows you to equalize the temperature range of the system, and will also have a beneficial effect on the quality of the air circulating in the cabin. Installing a filter for a car owner will cost no more than 1,000 rubles;
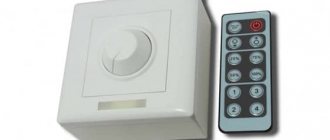
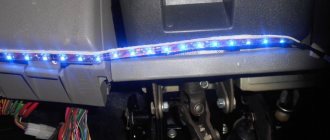
- Replacing the backlight - there is insufficient lighting in the vehicle interior. You can replace dim light by installing LED strips or lamps with a wide lighting profile. Depending on the number of lighting elements, replacing standard lighting with decorative interior trim will cost around 2-5,000 rubles.
Also, for decorative purposes, most drivers replace the stock dashboard with a more aggressive one. Custom dashboards at Largus Cross can be found from 3.5,000 rubles, and the new panel will be more comfortable for use at night.
Photo gallery: tuned Lada Largus Cross
External tuning allows you to change the car beyond recognition. To obtain additional space, you can install a box on the roof. Illumination of the passenger and driver’s feet makes being in the cabin more comfortable
The interior reupholstery emphasizes the individual character of the owner
Installing non-standard floor mats makes the interior more comfortable and attractive
One of the simplest options for tuning the interior is to install a braid on the steering wheel.
Lowering the suspension makes the car more manageable and changes its appearance
By changing the finish of the door cards, you can make a comfortable car from a standard Largus
Airbrushing makes the car stand out from the traffic flow, making it more noticeable. The dashboard cover changes the interior and makes it possible to put any objects
Any ideas and modifications to the Lada Largus Cross can be done with your own hands. It all depends on the goals and financial capabilities of the owner. If desired, you can turn a standard car into an attractive car, both externally and internally, which will also have a higher level of comfort.
Interior trim of Lada Largus
The easiest way to improve your car is with the interior trim.
The first thing you should pay attention to is the installation of armrests, since they are an integral element of the interior. Thanks to them, the salon will acquire a stylish appearance.
In addition, the direct task of the armrests is to give your arms a chance to rest during a long journey. The armrest most often takes the form of a small box installed between the two front seats.
Another original and very useful solution would be to install a backlight for the handle. In the dark, it will be very useful, especially for those who are in your car for the first time.
To completely improve your salon, you need to spend a small amount on items such as:
- microswitches;
- 4 LEDs;
- connectors and adapters;
- 4 resistors with a resistance of 510 Ohms.
Problems when paying with bank cards
Sometimes difficulties may arise when paying with Visa/MasterCard bank cards. The most common of them:
- There is a restriction on the card for paying for online purchases
- A plastic card is not intended for making payments online.
- The plastic card is not activated for making payments online.
- There are not enough funds on the plastic card.
In order to solve these problems, you need to call or write to the technical support of the bank where you are served. Bank specialists will help you resolve them and make payments.
That's basically it. The entire process of paying for a book in PDF format on car repair on our website takes 1-2 minutes.
If you still have any questions, you can ask them using the feedback form, or write us an email at
Tuning with “protection elements”
During a complete transformation of a car, it is worth thinking about its safety. Most often, the protection system concerns the rear and front bumpers. They are equipped with special elements made of stainless steel or polymer coated. These pads are used to prevent damage to the rear bumper from damage, for example when loading luggage through the rear doors. To protect the wheels from various stones and dust, wheel arch liners are used.
A rubber seal is installed on the rear doors of the car, which serves as a soundproofing element. To protect the radiator, you can install a special mesh (most often black or chrome is used), its cells allow air to pass through perfectly, and at the same time protect the radiator from various types of foreign bodies (stones, dust, insects).
Carbon film is an excellent element of protecting the body from minor scratches, which will also give a stylish look to your car. There is a huge selection of different colors and materials.
Thus, in order for your improved “steel” friend to serve you for a long time and reliably, tuning should be approached comprehensively. In any case, after tuning, the quality and appearance of the Lada Largus depend on the amount of money invested, as well as the skills and patience of the owner.
EVERYTHING about the interior lamp – FAQ
or the light at the end of the tunnel There are two such lamps installed in Largus - in a 7-seater they are both built into the ceiling lining, connected in parallel and have three operating modes OFF/ON FROM THE DOOR/ON, in a 5-seater the front one is built into the ceiling, the rear one is in the luggage compartment side wall and have - the front three operating modes OFF/ON FROM THE DOOR/ON, the rear only ON FROM THE DOOR. I am not considering the navigation lamp (section) and the Van option. The ON FROM DOOR operating mode turns on the lamp when opening any door and smoothly extinguishes it when it is closed after 30 seconds (polite illumination) or immediately if the ignition is on, control is carried out by minus from the CEB unit. The ON mode turns on the lamp permanently, the control is carried out by mass. IF no actions were taken with the car within 30 minutes (opening/closing doors, central locking, turning on the ignition), then the relay installed in the CEBCS unit turns off PLUS from the lampshade.
After replacing incandescent lamps with LED lamps in the ON FROM THE DOOR mode with the doors closed, the LED lamps continue to GLOW, this is due to the binding of the control transistor in the UCB unit. A 10-20 kOhm resistor with a power of 0.125 W will help get rid of their smoldering. Let's consider several options: 1. if you leave an incandescent lamp in the trunk light in the 5-seater lamp, and change the lamp in the front lamp to an LED one, then installing an additional resistor is not necessary, this lamp will serve as its role. 2. if you install a resistor as shown in the photo (either in the lampshade itself or on an LED lamp), then you will need to install a resistor in each lampshade or on each lamp
3. if you install a resistor as follows, you will need to install only one of them in any of the lampshades
The following phrase was recently heard
| alex2105: in general, it would be logical if passengers in the dark could find the lamp by its “duty” glow, rather than “wiping their hands” on the roof lining in search of it |
At the request of clients, I am posting two options 1. When using a standard incandescent lamp in the rear lamp, you must place any 2-3 Volt LED you like in a suitable place in the lamp (either inside, or in the key itself) and solder it together with a 5-volt resistor -10 kOhm according to the diagram
2. When using an LED lamp in the rear lamp, you will need a 2-3 Volt LED and two 5-10 kOhm resistors
It turns out something like this
As a result, we get an indicator of the location of the interior lamp for passengers
Good luck to all!
Comments
Guests cannot leave comments on the site, please log in.
- Replacing lamps in the headlight (low and high beam lamps, front dimensions, turn indicator)
Products for LADA at the best price
A selection of accessories for LADA from AliExpress
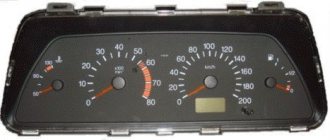
Technical description Overall dimensions Internal dimensions Identification plates Engine compartment design Main components and assemblies (bottom view) Dashboard design Lamps used in the car Liquids used Thread tightening torques Running in a new car Maintenance Starting the engine Starting from an external battery About the ABS system on the car ERA-GLONASS system Tires and wheels Tire pressure Replacing a wheel Use manual transmissionUse of air conditioningCaution against coastingCatalytic converterFuel consumptionHazard lamps on the panel Operation of the radiator fanUse of lighting devicesAdjusting the headlights with a correctorRecommendations for useTrunk shelfPassive safety systemStorage boxes in the cabinTrunk roof crossbarsRear seats (folding)Instructions for the radioHow to update the radioHow to set the clockStorage and care of toolsHow to unscrew a broken boltRestoring broken threadsAbout disassembling car partsSpark plugs (replacement)Device spark plugs Marking of spark plugs ignitionTest DriveGoing on a road tripPrecautions during repairEnvironment and the carLargus CNG (on gas)Operation of Largus CNGLargus for transporting disabled peopleService experience after 100 thousand kmService experience after 130 thousand km.Used Lada Largus - pros and consFeatures of winter operationManufacturers of Largus componentsSelection clamps
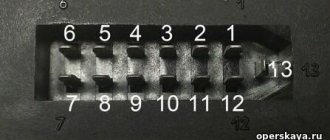
| Lamp | International designation | Power, W | No. in photo |
| Headlamp unit: (catalog numbers of lamps, how to change) | |||
| high/low beam lamp | H4 | 60/55 | 1 |
| front turn signal lamp | PY21W | 21 | 5 |
| side light lamp | W5W | 5 | 7 |
| Fog lamp (FTF) (how to change) | H11 | 55 | 2 |
| Side turn signal lamp | WY5W | 5 | 6 |
| Rear light: (catalog numbers of lamps, how to change) turn signal lamp | PY21W | 21 | 5 |
| side light and brake light | P21/5W | 21/5 | 3 |
| fog lamp | P21W | 21 | 4 |
| reverse lamp | P21W | 21 | 4 |
| Additional brake signal lamp (how to change) | P21W | 21 | 4 |
| License plate light bulb (how to change) | W5W | 5 | 7 |
| Trunk light bulb | W5W | 5 | 7 |
| Interior lamp (how to change) | W5W | 5 | 7 |
| Individual lighting lamp | W5W | 5 | 7 |
| Glove box light bulb (how to change) | W5W | 5 | 7 |
| Cigarette lighter lamp | W1.2W | 1.2 | 8 |
| Illumination lamp for the ventilation, heating and air conditioning control unit (how to change) | W1.2W | 1,2 | 9 |
| Hazard warning switch illumination lamp | W1,2W | 1,2 | 8 |
Refinement of the interior lighting of the Lada Largus
February 27, 2022 Lada.Online 29,889
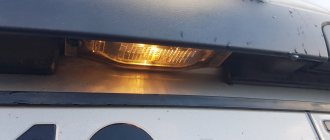
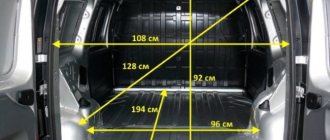
The standard interior lighting of the Lada Largus cannot be called bright enough; two small lamps are not capable of fully illuminating the spacious interior of the station wagon. This is why many owners decide to do a little tuning of the Lada Largus interior. Let us tell you in more detail how you can improve interior lighting.
So, the Lada Largus interior lamp uses W5W lamps. The easiest way to make the ceiling brighter is to replace the lamps with LED ones. To remove the standard light bulbs, you must first remove the diffuser (No. 2) by picking it up with a flat screwdriver, and then the lamps themselves (No. 3), pulling them towards you so that they come out of the base.
We install the LED lamps in the reverse order, observing the polarity. We check the work.
You can achieve even brighter lighting in the car interior by installing an additional light source, for example, an LED board (12V SMD COB 9W Interior Dome Door Car Light Panel Lamp Van Truck 180LM). We connect it parallel to the standard lamp and secure it with double-sided tape next to it. Foil, which can be glued to the inner surface of the lampshade, will help to enhance the dispersion of light.
Let us remind you that other photo reports can be found in the section Modifications and tuning of Lada Largus.
Keywords: roof Lada Largus | interior lighting Lada Largus
3
Found an error? Select it and press Ctrl Enter..
Replacing a light bulb
Choice
First of all, it should be said that the low beam lamp for the Lada Largus uses a halogen H4 standard, i.e. contains two threads and is responsible not only for near, but also for distant lighting.
Currently on the market you can find such lamps from a variety of manufacturers, among which are the following:
- Bosh;
- Osram;
- Philips;
- Narva, etc.
In addition, domestic Mayak light bulbs have recently proven themselves to be quite good. Their advantages include not only low price, but good quality.
Advice! It is advisable to purchase light bulbs in specialized stores, since recently a lot of counterfeit products from China have appeared that quickly fail or produce poor-quality light.
Of course, when choosing lamps you need to pay attention not only to the brand, but also to the following characteristics of the lighting element:
| Characteristics | Optimal parameters |
| Brightness (light beam power) | Up to 1550 lm |
| Lifetime | Up to 1500 hours |
| Power | 45-60 W |
Standard halogens provide an unnatural yellowish glow. However, recently light bulbs have appeared with a bluish glow. People call them pseudo-xenon.
However, it should be noted that such light illuminates the road well only in dry weather. In fog or rain, ordinary lamps are preferable.
Interior lighting – minor improvements + video
Very often, in a typical car assembly, an ordinary, rather dim light bulb is placed under the interior lamp, but you can fix this yourself, as well as come up with something else spectacular.
How to remove the interior lamp yourself?
This question usually arises only for beginners who have recently started driving; car owners with extensive experience are usually familiar with all the tricks, unless, of course, they prefer a personal driver.
However, before answering this question, let’s ask another – why is this necessary? After all, different situations require different actions.
If you want to change a light bulb, the operation scheme will be standard; if the lens has burst and requires replacement, you will not have to remove the lampshade at all.
Before removing the interior lamp or changing a light bulb, which is much easier, you need to separate the diffuser from the base
Usually it is held by spring clips or on fasteners-flags; in the first case, it is enough to pull the cap, in the second, you need to carefully pick it up with a “minus” screwdriver.
And here in front of you is the lighting filling itself, you can change the light bulb. Determine the light source, depending on the type you will have to remove it from the socket by pressing the spring clip if it is an incandescent lamp, or disconnect the wires from the contacts of a fluorescent lamp.
The second option involves first removing the casing that protects the power terminals by unscrewing a pair of screws. The lampshade itself is usually held in place by 2-4 screws, by unscrewing which you can easily remove the housing from the hole in the casing.
Next, all that remains is to disconnect the wire connector.
Smooth turning off of the interior lights as a reason to remove the lampshade
As a rule, a light under the ceiling of the car is connected to the door closing mechanism and automatically turns on and off depending on whether you slammed the door or opened it. But often the light comes on suddenly and also goes out immediately.
And this is inconvenient if you drive into a dark garage and, after getting out of the car, have to find the light switch, but don’t want to leave the door open.
You can correct the situation by installing a small scarf in the interior lamp with several radio components connected in a circuit
How smoothly the light fades in the cabin will be depends on the capacity of the installed capacitor; the larger it is, the longer the light lasts. When the door is open, the capacitor is charged, the circuit is completed, if the car is closed, the circuit breaker will open and the current from the capacitor will feed the lamp for a certain time.
Cost of lamps
All of the above lamps can be purchased at almost any auto store. For example, a Philips H4 Premium +30 low beam lamp installed from the factory costs about 120-150 rubles. PTF lamp H11 Philips Eco Vision about 500-600 rubles per joke. All other lamps cost no more than 40-50 rubles.
Low beam bulbs on a Lada Largus car are a short-lived element, so sooner or later car owners will definitely have to deal with replacing them. For beginners, this task usually raises many questions. Therefore, below we will look at how to choose the right one and how to change the low beam bulb on Largus.
Choice
Currently on the market you can find such lamps from a variety of manufacturers, among which are the following:
In addition, domestic Mayak light bulbs have recently proven themselves to be quite good. Their advantages include not only low price, but good quality.
Of course, when choosing lamps you need to pay attention not only to the brand, but also to the following characteristics of the lighting element:
However, it should be noted that such light illuminates the road well only in dry weather. In fog or rain, ordinary lamps are preferable.
Note! To install xenon and halogen lamps, you should contact a service center for help, since this work requires the installation of additional equipment and changes to the software. Accordingly, the installation of such lighting is quite expensive. Thus, each driver can choose the most suitable light bulb, taking into account his own financial capabilities and the conditions in which the car will be operated.
Thus, each driver can choose the most suitable light bulb, taking into account his own financial capabilities and the conditions in which the car will be operated.
Replacing the low beam lamp on a Lada Largus is carried out in the following order:
- Next, you need to install a new light bulb in place. It is better to do this work with gloves so as not to touch the glass flask with your own hands. The fact is that traces of fat can lead to rapid burnout of the lamp.
- Then you need to fix the base with a spring clip, put the block on the contacts and then install the plug in place.
- At the end of the work, you should connect the battery and check the operation of the headlights.
This completes the replacement of the low beam lamp in Largus. As we can see, this operation is carried out extremely simply.
If, after replacing the lamp, the low beam on the Lada Largus still does not light up, the cause of the malfunction may be a blown fuse. Replacing them is even easier than the paws, since they are located in the cabin, on the left side of the steering column.
- F9 - left headlight.
- F10 - right headlight.
Often the cause of the malfunction is poor contacts of the fuse terminals. In this case, you just need to clean them.
Often the light goes out due to poor contact of the machine ground wire. In this case, the problem is also solved by thoroughly cleaning the contact. If it was not possible to restore the light, you need to contact a service center for help.
We cooperate with:
PEC
Find the nearest representative office, track the cargo and calculate the cost of delivery pecom.ru
Find the nearest representative office, track the cargo and calculate the cost of delivery dellin.ru
Find the nearest representative office, track the cargo and calculate the cost of delivery baikalsr.ru
Find the nearest representative office, track the cargo and calculate the cost of delivery nrg-tk.ru
Find the nearest representative office, track the cargo and calculate the cost of delivery tk-kit.ru
Find the nearest representative office, track the cargo and calculate the cost of delivery jde.ru
Russian federal company for the transportation of consolidated cargo. The geography of cargo transportation is all over Russia. Road freight transportation provides regular and express services.
Find the nearest representative office, track the cargo and calculate the cost of delivery vozovoz.ru
Find the nearest representative office, track the cargo and calculate the cost of delivery cdek.ru
Deadline for order delivery to T.K. from 1 to 4 business days from the date of receipt of funds.
Lead time for orders including painting services: 3-8 business days.
The lead time for placing orders and “made to order” items is from 14 days; you can check with the manager for more detailed information.
Delivery is carried out throughout Russia and the CIS.
Orders for pickup are placed on the website, the formation time is on average 1-4 business days, after the items arrive at the pickup point, the manager will notify you when you can receive your order.
ATTENTION! All fragile goods (headlights, plastic products, glass, etc.), by default, are sent in additional paid packaging from TK. If you take responsibility for the integrity, we can ship without it. To do this, you need to make a note in the comments when placing your order.
For additional information, please contact the managers.
We recommend watching:
- Grant clutch cable gearbox article number
- Door stop VAZ 2109 price
- Radio cassette player Lada Kalina 2 Lux
- Grant generator bosch 110a price
- Priora timing kit 16 valves ina
- VAZ 2110 seat slides
Removing the interior lamp and replacing the lamp
Place the car in the workplace, apply the parking brake, and turn off the ignition.
Raise the hood, disconnect the earth wire terminal from the battery.
Interior lighting
Open the front door of the car.
Use a flat screwdriver to remove lens 2
Press lock 2 and remove the interior lamp from the car roof upholstery.
Disconnect connector 1, instrument panel wiring harness from the interior lamp
To replace lamp 3, Figure 2, pull it towards you and remove it from housing 1, Figure 1, interior lamp
Lamp used for lampshade W5W
Cargo compartment lighting (for a van)
Use a flat screwdriver to remove lens 2.
Press lock 4 and remove the cargo compartment lamp from the car body upholstery.
Disconnect the wiring harness connector from the cargo compartment lamp and remove the interior lamp.
To replace the lamp, pull it towards you and remove it from the cargo compartment lamp housing.
For replacement, use only a certified W5W lamp
Install the lamp and interior lamp and cargo compartment lamp in the reverse order of removal.
Interior lighting, cargo compartment lighting - removal, installation, replacement of lamps
Place the car in the workplace, apply the parking brake, and turn off the ignition. Raise the hood, disconnect the ground wire terminal from the battery (key “10”).
Lamps used
Lamps for driver and front passenger seats.
Rice. 6.13.9. Interior lighting unit
To replace the lamps in the driver's and front passenger's seat lamps, do the following (Fig. 6.13.9): • using a flat (slotted) screwdriver, carefully pick up the side surface of the front panel of the interior lighting unit 1 and remove it; • press out the two latches on the body of the interior lighting unit 1 and pull it out of the seat of the headliner frame; • disconnect the electrical connector from the interior lighting unit 1: • replace the faulty lamp (if you cannot pull the lamp out by hand, you can gently push it with a screwdriver from the back of the interior lighting unit 1); • attach the front panel to the interior lighting unit 1; • connect the electrical connector to the interior lighting unit 1: • snap the interior lighting unit 1 into the seat of the headliner frame.
Interior lighting
Open the front door of the car.
Remove lens 2, Figure 12-1 (flat head screwdriver).
Press lock 2, Figure 12-2, and remove the interior lamp from the car roof upholstery.
| Figure 12-1 — Interior lighting: |
1 — interior lamp housing
2 - diffuser;
3 - switch
| Figure 12-2 — Removing the interior lamp: |
1 - switch;
2 — clamp;
3 - lamp
Disconnect connector 1, Figure 12-3, of the instrument panel wiring harness from the interior lamp.
Figure 12-3 — Disconnecting the front wiring harness block:
1 — block of the front wiring harness to the interior lamp
To replace lamp 3, Figure 12-2, pull it towards you and remove it from housing 1, Figure 12-1, of the interior lamp.
Note: For replacement, use only a certified W5W lamp.
Cargo compartment lighting (for a van)
Remove lens 2, Figure 12-4 (flat head screwdriver).
Figure 12-4 - Cargo compartment lighting lamp: 1 - cargo compartment lighting lamp body; 2 - diffuser; 3 - switch; 4 - latch
Press lock 4 and remove the cargo compartment lamp from the car body upholstery.
Disconnect the wiring harness connector from the cargo compartment lamp and remove the interior lamp.
To replace the lamp, pull it towards you and remove it from the cargo compartment lamp housing.
Note: For replacement, use only a certified W5W lamp.
Installation
Install the lamp and interior lamp and cargo compartment lamp in the reverse order of removal.
Tip (LEDs for interior lighting) In Largus, the interior lighting is dim. Therefore, I was delighted to learn that the Kaluga association Energomash produces LED panels for interior lighting. For Largus (as, indeed, for many other machines built on the B0 platform) they offer a board with 24 LEDs and a W5W lamp base. It fits perfectly into the standard lampshade and shines much brighter. But there is a nuance: if you also install an LED lamp in the second “chandelier” (above the second row of seats), then when the doors are closed the LEDs will continue to glow palely. There are two ways out: leave the incandescent lamp behind or, after disassembling the lampshade, solder a 30-100 Ohm resistor parallel to the lamp. (A. Revin)
Video
Downloading a book
After successfully completing the payment (by any method) and returning to the KrutilVertel store from the payment system website, you will be taken to the successful payment page:
The book you purchased will be in your personal account, from where you can always download it.
Please note that after making the payment, you need to return back from the payment system website to the KrutilVertel website. If for some reason you did not return back to the site and closed the payment system tab with a message about the successful completion of the payment, please let us know - we will send you a letter indicating access to download the book
If for some reason you did not return back to the site and closed the payment system tab with a message about the successful completion of the payment, please let us know - we will send you a letter indicating access to download the book.
Removing the interior lamp and replacing the lamp
Removal
Place the car in the workplace, apply the parking brake, and turn off the ignition. Raise the hood, disconnect the earth wire terminal from the battery.
Interior lighting
Open the front door of the car.
Lamp used for lampshade W5W
Cargo compartment lighting (for a van)
Use a flat screwdriver to remove lens 2.
Press lock 4 and remove the cargo compartment lamp from the car body upholstery.
Disconnect the wiring harness connector from the cargo compartment lamp and remove the interior lamp.
To replace the lamp, pull it towards you and remove it from the cargo compartment lamp housing.
For replacement, use only a certified W5W lamp
Install the lamp and interior lamp and cargo compartment lamp in the reverse order of removal.
Removing the glove compartment lamp
Release the lock 1, Figure 2, from its engagement and remove the lampshade 2, Figure 1, of the glove compartment lighting 1.
Disconnect connector 2, Figure 2, of the instrument panel wiring harness from the glove compartment lamp.
To replace the glove compartment lamp, you must remove it and replace the burnt-out lamp.
Install the lamp and glove box lighting in the reverse order of removal.
For replacement, use only a certified C5W lamp
Interior lamp, cargo compartment lamp - removal/installation and replacement of lamp
Place the car in the workplace, apply the parking brake, and turn off the ignition. Raise the hood, disconnect the earth wire terminal from the battery (10mm wrench).
Interior lighting
Open the front door of the car.
Remove lens 2, Figure 12-1 (flat head screwdriver).
Press lock 2, Figure 12-2, and remove the interior lamp from the car roof upholstery.
| Figure 12-1 — Interior lighting: |
1 — interior lamp housing
| Figure 12-2 — Removing the interior lamp: |
Disconnect connector 1, Figure 12-3, of the instrument panel wiring harness from the interior lamp.
Figure 12-3 — Disconnecting the front wiring harness block:
1 — block of the front wiring harness to the interior lamp
To replace lamp 3, Figure 12-2, pull it towards you and remove it from housing 1, Figure 12-1, of the interior lamp.
For replacement, use only a certified W5W lamp.
Cargo compartment lighting (for a van)
Remove lens 2, Figure 12-4 (flat head screwdriver).
Press lock 4 and remove the cargo compartment lamp from the car body upholstery.
Disconnect the wiring harness connector from the cargo compartment lamp and remove the interior lamp.
To replace the lamp, pull it towards you and remove it from the cargo compartment lamp housing.
For replacement, use only a certified W5W lamp.
Install the lamp and interior lamp and cargo compartment lamp in the reverse order of removal.
Tip (LEDs for interior lighting) In Largus, the interior lighting is dim. Therefore, I was delighted to learn that the Kaluga association Energomash produces LED panels for interior lighting. For Largus (as, indeed, for many other machines built on the B0 platform) they offer a board with 24 LEDs and a W5W lamp base. It fits perfectly into the standard lampshade and shines much brighter. But there is a nuance: if you also install an LED lamp in the second “chandelier” (above the second row of seats), then when the doors are closed the LEDs will continue to glow palely. There are two ways out: leave the incandescent lamp behind or, after disassembling the lampshade, solder a 30-100 Ohm resistor parallel to the lamp. (A. Revin)
Fuel system
Fuel tank, Water level sensor, Fuel level sensor, Tank vent valve, Fuel tank button, Fuel tank cap, Fuel neck, Fuel pump, Fuel pump, Fuel pump strainer, Fuel pump gasket, Fuel pump relay, Fuel injector, Injector ring, Throttle valve, Sensor throttle valve, Throttle pipe, Idle air regulator, Air receiver, Throttle valve heating tube, Turbine (turbocharger), Turbine gasket, Solenoid valve, Injection pump, Injection pump valve, Compressor, Compressor gasket, Carburetor, Fuel rail (rail), Fuel pressure regulator , Fuel line, Fuel valve, Fuel hose, Fuel pipe, Air flow meter, Engine control unit, Air pipe, Intake manifold, Intake manifold gasket, Additional air pump, Fuel pump, Gas pedal, Potentiometer, Throttle cable
EVERYTHING about the interior lamp – FAQ
Commencement of operation September 1, 2012. During this time, Largus attended club meetings: Saransk, Belgorod, Orel, Ulyanovsk, Tambov, Voronezh, Kursk, Lipetsk, Murom, Nizhny Novgorod, Moscow, Bryansk. , on the way I stopped by tubers in Pyatigorsk, Stavropol, Krasnodar, Volgodonsk, Voronezh, Tula, Penza, Syzran. - to be continued.
There are two such lamps installed in the Largus - in the 7-seater, both are built into the ceiling trim, connected in parallel and have three operating modes OFF/ON FROM THE DOOR/ON, in the 5-seater the front one is built into the ceiling, the rear one is in the luggage compartment on the side wall and have - front three operating modes OFF/ON FROM DOOR/ON, rear only ON FROM DOOR.
I am not considering the navigation lamp (section) and the Van option.
The ON FROM DOOR operating mode turns on the lamp when opening any door and smoothly extinguishes it when it is closed after 30 seconds (polite illumination) or immediately if the ignition is on, control is carried out by minus from the CEB unit. The ON mode turns on the lamp permanently, the control is carried out by mass. IF no actions were taken with the car within 30 minutes (opening/closing doors, central locking, turning on the ignition), then the relay installed in the CEBCS unit turns off PLUS from the lampshade.
After replacing incandescent lamps with LED lamps in the DOOR ON mode with the doors closed, the LED lamps continue to GLOW, this is due to the binding of the control transistor in the CEBCS unit. A 10-20 kOhm resistor with a power of 0.125 W will help get rid of their smoldering.
Let's consider several options: 1. if you leave an incandescent lamp in the trunk light in the 5-seater lamp, and change the lamp in the front lamp to an LED one, then installing an additional resistor is not necessary, this lamp will serve as its role.
2. if you install a resistor as shown in the photo (either in the lampshade itself or on an LED lamp), then you will need to install a resistor in each lampshade or on each lamp
3. if you install a resistor as follows, you will need to install only one of them in any of the lampshades
The following phrase was recently heard
| alex2105: in general, it would be logical if passengers in the dark could find the lamp by its “duty” glow, rather than “wiping their hands” on the roof lining in search of it |
At the request of clients, I am posting two options 1. When using a standard incandescent lamp in the rear lamp, you must place any 2-3 Volt LED you like in a suitable place in the lamp (either inside, or in the key itself) and solder it together with a 5-volt resistor -10 kOhm according to the diagram