The vacuum brake booster (abbreviation VUT) is rightfully considered one of the main mechanisms of modern cars. This is not surprising, because the effectiveness of braking and, consequently, the level of safety of the driver and passengers depend on the correct operation of the device.
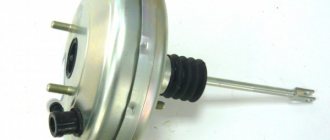
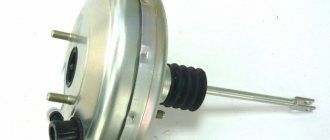
Vacuum brake booster
This is why periodic inspection and troubleshooting of the brake booster is important. What are the easiest signs to use to diagnose a malfunction? Is it possible to repair or replace a device in a garage? We will consider these and other points below.
About malfunctions
The main factor in the malfunction of the “vacuum unit” is the inability to create a vacuum in the chamber. It may not be fully produced or may be completely absent from the system. Often the source of the problem is the loss of tightness of the hose that connects the engine to the amplifier.
But breakdowns are also possible due to loss of elasticity of the valve or damage to the working surface of the diaphragm. In any case, before replacing the vacuum brake booster, it needs to be checked. You can do this yourself.
How to check the vacuum brake booster?
There are several ways to do this. So, you need to start the engine and turn it off after at least 10 seconds of operation. Next, press the brake pedal. With the engine turned off, it will be squeezed out to the fullest extent. Since there is remaining vacuum in the system, it will pull on the diaphragm and increase the force. The second and third press will require more effort. The pedal travel will become shorter. But if it is hard already at the first press, it means that the brake booster valve is not doing its job. Additional force is not implemented in the system.
After completing the operations, you can do one more. The motor must be turned off. Next, press the brake pedal. If this method is done first, you need to press the pedal several times. It is important for us to completely free the system from vacuum. Then, with the brake pedal pressed, we start the engine. In the first seconds of engine operation, you will feel the pedal smoothly begin to press to the floor, with much less effort. If it remains in the same place or only drops slightly, it can be stated that the vacuum brake booster is faulty. If the mechanism is working properly, a vacuum will form in the vacuum chamber. The membrane will press on the rod, and the latter will pull the pusher, which is connected to the pedal.
Engine misfire (misfire) when pressing the brake pedal
An air leak through the brake booster can cause misfires while the engine is running. Damage to the diaphragm or internal valve leads to the fact that the optimal ratio of air and fuel is disrupted. Misfire usually occurs when you press the brake pedal while idling.
If checking the vacuum hose, connections and check valve does not reveal anything, you need to perform the following check:
- start the engine at idle speed;
- tighten the handbrake;
- ask another person to press the brake pedal;
- pinch the vacuum hose using pliers (do not forget to place a rag so as not to damage the hose);
- If the engine does not stall and its operation stabilizes, the vacuum brake booster is the culprit for misfires.
Checking engine vacuum using a vacuum gauge
Sometimes the VUT copes well with its tasks, but the motorist still has certain doubts that it is fully operational. If the amplifier on your car did not pass or barely passed the previous tests, you need to make sure that there is enough vacuum. Such diagnostics are performed using a vacuum gauge.
- Disconnect the vacuum hose from the brake booster and connect it through a tee so that you can use a vacuum gauge.
- Start the power unit.
- The sensor should display approximately 400-540 mmHg. Art. If you see a lower value, there is a vacuum leak through the intake manifold (gaskets or crack), hose, engine (cylinder head gasket, etc.) or other components.
Checking VUT with a manual vacuum pump
This method allows you to definitively check the operation of the amplifier. Everything can be done in just a few minutes.
- the engine must idle for about 15-25 minutes to reach operating temperature;
- stop the engine and disconnect the vacuum hose from the check valve on the VUT;
- connect the vacuum pump to the valve;
- apply approximately 500 mm Hg. Art. vacuum to the amplifier;
- wait 5 minutes, a working vacuum booster should hold vacuum normally;
- Without turning off the vacuum pump, press the brake pedal - the vacuum should drop by approximately 125-250 mmHg. Art.; if the vacuum remains at the same level or decreases to zero, the amplifier is faulty;
- Apply vacuum to the amplifier to return it to 500 mmHg. Art.;
- press the brake pedal and hold it in this position for 30 seconds; the vacuum should drop slightly and then be maintained for the remaining 30 seconds; a significant drop in vacuum indicates a faulty VUT.
The principles discussed in this article help to check the vacuum brake booster on most cars - VAZ 2106, 2107, 2109, 2110, 2114, GAZelle, as well as other models of domestic and foreign production.
What if it is not replaced in time?
Very often, when an amplifier breaks down, air begins to enter the system. Typically this happens due to a faulty control valve. As a result, the pressure in the circuit drops. The pedal becomes too soft. Often drivers think that the system is simply airy and bleed the brakes. But after the first trip, the pedal becomes soft again. The response time of the system also increases. This can lead to accidents on the road.
In the worst case scenario, the valve fails completely. Because of this, the system is not able to work at all. In this case, driving out onto the road is extremely dangerous. Therefore, if there are any signs, you should carefully inspect the system and replace the faulty element.
Let's get started
Work should be carried out during daylight hours or in a garage with good lighting. So, put the car in gear and raise the hood. The amplifier is located on the left, driver's side and is screwed to the engine bulkhead. At the first stage, we need to disconnect the clamp of the rubber tube that is connected to the body. This can be done with a flat or Phillips screwdriver. At the next stage, remove the brake fluid level sensor chip. then move the driver's seat as far back as possible. This is necessary in order to conveniently perform work under the steering column. So, lowered into the pedal assembly. It can be dark here, so a portable lamp will not be superfluous. Next, using pliers, remove the stopper from the bushing that connects the pedal to the vacuum rod. The rod connector itself is easy to identify. It is a U-shaped plate with several holes.
Next, remove the rod and lower it to the floor. We return under the hood to the amplifier. To remove it, you will first need to remove the brake master cylinder. It is dismantled along with the iron tubes. Do not unscrew them separately under any circumstances. Otherwise, air will get into the system, some of the fluid will spill out and you will have to fill it in, followed by pumping all four brake mechanisms.
Then we clean the threaded connection on the master cylinder bushings with a metal brush. If necessary, you can use a liquid key lubricant. Please note: the nuts must be unscrewed carefully without damaging the threads. If the nut does not “go”, tighten it one turn, and then unscrew it back. This should help. Also, together with the nuts, remove the washers that are in a compressed state. If they are stuck and difficult to remove, use a flat-head screwdriver. By walking slightly along the cylinder body, you can get these washers out.
What's next?
At the next stage, you can proceed to dismantling the master brake cylinder. It is important not to damage its tubes. The element is removed forward, without distortions to the side. Now you can unscrew the vacuum booster. As we have already said, it is located on the partition and mounted on brackets. The latter is secured on two studs. They often rust. Therefore, it is recommended to first apply lubricant or soda solution here. After this, unscrew the nuts and remove the amplifier along with the bracket. Next, unscrew the two “blind” bolts from the vacuum seal. We screw the new amplifier to the bracket and install it in the reverse order.
Is it necessary to carry out additional work on the brake system? If the tubes were not damaged and the fluid level did not drop, there is no need to bleed or do anything else.
Hisses when braking (with video example)
In the following video you can hear this characteristic sound:
By the way, according to the instructions, the standard “vacuum unit” of the VAZ-2110 cannot be repaired, only replaced, but we “do it ourselves.” And judging by the number of different instructions for self-repairing cars posted on the Internet, it can be argued that any domestic car enthusiast with more than five years of experience can safely be awarded the title of design engineer in absentia. Therefore, we will consider the repair procedure, especially since the difference in cost between the repair kit and the vacuum booster itself is disproportionately high.
In any case, first we will have to dismantle the VUT; for this we will need a minimum of available tools.
Tools
- Open-end and socket wrenches in sizes “10”, “13”, “17”;
- Powerful flat screwdriver;
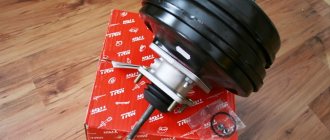
- Repair kit or VUT assembled;
- Sealant and a little desire to do it yourself.
At this stage, we have a choice: either do everything as the manufacturer’s instructions say (disconnect the main brake cylinder from the VUT, unscrewing all the brake pipes from it, and then bleed it) or a little simpler and with little cost (simply moving it away to the side).
In any case, the choice is yours, but I will take the easy way:
- Disconnect the push rod from the brake pedal: Remove the latch and pull out the pin.
- Disconnect the block with wires from the brake fluid level sensor: Disconnect the block.
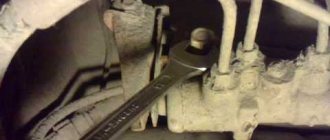
- In the engine compartment, unscrew the two nuts securing the master brake cylinder to the “vacuum chamber”:
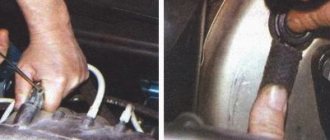
Two nuts at “17”. - Holding the check valve, remove the vacuum pipe from it: Removing the vacuum pipe.
- It is at this point that all “manuals” require disconnecting the brake pipes from the brake pipe, but I suggest unscrewing just one nut securing the brake lines to the passenger compartment and simply moving the brake pipe to the side:
Nut at “10”. - In the cabin, under the instrument panel, unscrew the four nuts securing the brake pedal bracket:
Nuts at “13”. - We dismantle the vacuum booster together with the bracket: Dismantling the VUT.
- Having unscrewed the two nuts securing the pedal bracket and prying it up with a screwdriver, we disconnect it from the “vacuum unit”: Nuts for “17” Repair.
- We purchase a repair kit for VAZ - 2108/2109 in the store:
Contents of the repair kit. - Using a powerful screwdriver and a hammer, carefully flare the vacuum amplifier housing: Flaring.
- Since there is a return spring inside, to prevent the free half from “shooting out”, we tighten the previously unscrewed nuts onto the studs. This is the picture that opened up to us: Aperture defect.
- It will not be possible to disassemble the diaphragm further, since the pins securing it to the body are riveted. We simply remove its cuff from the body with a relatively light movement of the hand: Dismantling.
- You can see for yourself that the catalog number of the “native” and the purchased cuff matches! Catalog number.
- We install the cuff into the diaphragm body, while carefully using a screwdriver to help its edge get into the internal groove: Internal groove of the diaphragm.
- Next, lubricate the seat of the washer on the stud with the corrugation with sealant... Lubrication with sealant.
- ...and the junction of the pedal bracket with the vacuum booster housing: Sealing.
- At this point, the repair of the vacuum amplifier can be considered complete; all that remains is to carefully roll the attachment points of the previously flared halves. Installation of the “vacuum seal” occurs strictly in the reverse order.
This problem occurs when air leaks in the vacuum pipe of the brake booster. It is necessary to check for the presence of leaks both the pipe itself and its connections with the intake manifold and VUT. Since this malfunction causes depressurization of the engine intake system, the air mixture in the third and fourth cylinders becomes depleted and the engine begins to “sputter.” You can learn more about diagnosing this malfunction in this video instruction.
Cost and how to spot a fake
If we talk about the VAZ-2109, a vacuum brake booster costs from 1.2 to 1.5 thousand rubles. You can buy it in any store or online. A VAZ-2110 vacuum brake booster will cost exactly the same. The exception is the yellow “Sport” amplifier. It is sold for 2.3 thousand rubles. We also note that the amplifiers are interchangeable on VAZs. For example, the vacuum seal from the “eight” is ideally installed on the “nine”, 13, 14 and 99 models. The amplifier for the “ten” is also suitable for “Lada” 11th and 12th models. If we talk about manufacturers, Pekar and DAAZ have proven themselves well. The so-called sports amplifier works in the same way as regular factory ones. Therefore, there is no point in overpaying money for it.
When purchasing, it is important to pay attention to the packaging. It should be made of corrugated cardboard. There is always a label on the box that says:
- Item release date.
- Manufacturer's name.
- Batch number.
- Factory article number.
Necessary tool
If you decide to do the repairs yourself, it is better to approach the process carefully. Collect all the necessary tools from the list:
- Screwdriver Set;
- Pliers;
- Collar;
- Extension;
- Kardanchik;
- Socket head 13;
- Open-end wrench for 10 and 13.
In addition, you should keep a container of brake fluid on hand. You may need to top it up after installing a new part. Also choose a suitable place for repairs; it is best to do this indoors, where weather conditions will not interfere with you. Let's look at the question “how to replace the vacuum booster on a VAZ 2114.”
Let's sum it up
So, we found out what a vacuum brake booster is. This is a very important element in any car. In general, a vacuum brake booster rarely fails. This is a fairly reliable and simple mechanism. Sometimes it is not changed for 10 years. It does not have a specific resource. And malfunctions most often relate to air leaks due to the hose through which the vacuum flows from the engine to the amplifier. But if during diagnostics the pedal does not behave as it should, it is worth making an urgent replacement. Indeed, in emergency situations, you simply may not have enough distance to stop the car.
Failure of the “vacuum seal” is a rather rare failure, but unpleasant - to slow down and stop the car, the driver has to press the brake pedal hard. A sudden failure of the mechanism while driving can provoke an accident - the driver does not have time to change lanes and apply the required force at the right time. To identify signs of critical wear of an element, it is proposed to consider the operating principle of a vacuum brake booster (VBR) and diagnostic methods in a regular garage.
Service replacement cost
You may not be able to change the part yourself because you don’t have enough tools, knowledge, or a place where you can do it. In this case, you can contact a car service; the repair price will be around 1000 rubles, taking into account the average prices in Russia. In this case, the total repair budget will be around 3,000 rubles , unless replacement of additional elements is required. There is one important advantage when contacting a service center. When people who know their stuff work there, they will be able to identify other shortcomings of the system during the analysis and show them to you clearly so that you know exactly what you are paying for. Remember that repairs should be made immediately when the problem is diagnosed, since driving with a broken vacuum booster is very dangerous. For this repair you do not need special knowledge, so you can easily replace the vacuum booster yourself, saving a third of your budget.
Vacuum brake booster
VUT (vacuum brake booster) is an indispensable thing for a comfortable and safe ride. Research shows that this part can reduce the effort required for effective emergency braking by almost 200% (from 13 kg to 7 kg at a deceleration of 6 m/s).
Vacuum brake booster
Today, the automotive spare parts market is replete with VUTs for VAZs (it is worth mentioning that the information presented in the article is applicable for the VAZ 2115 and VAZ 2113) from a variety of manufacturers - from cheap Chinese models of dubious quality to very expensive models. In general, VUT of more or less acceptable quality will cost you about 1 thousand rubles.
We can confidently recommend for purchase “SPORT” vacuum cleaners from Polytech-Auto (Togliatti), the quality of which has been tested by numerous car enthusiasts. The warranty service life of such VUTs is one year, but in practice, they last much longer. According to reviews, replacing a VUT with a VAZ does not take about 3-4 years.
From this article you will learn how to change the vacuum on a VAZ 2114 with your own hands, without spending money on service stations.
As soon as you have any doubts about whether the vacuum pump is working properly, you need to immediately check the vacuum brake booster of the VAZ 2114. It is worth noting that brakes are one of the key systems of any car, on which the life and safety of you and yours directly depends passengers, therefore, no negligence or irresponsibility is acceptable here.
Signs of a faulty vacuum brake booster, which indicate that the vacuum brake on a VAZ is broken, are as follows:
- The need to apply more force than before to press the brake pedal;
- Deterioration in the braking efficiency of a vehicle at the same pedal pressure.
As soon as any of these factors appear, immediately begin checking the spare part. To do this, you need to turn off the engine and press the brake pedal several times with sufficient force, then stop it in the middle of the range of motion (your foot fixes the pedal), and restart the engine.
If the vacuum brake booster of the VAZ 2114 is working properly, then the pedal itself will fall a little to the bottom, but if the vacuum booster fails, the pedal will remain in the same position.
After identifying the problem, you need to find out what exactly is wrong with the vacuum seal. This requires a visual inspection. In general, the inspection is carried out on the following points:
- The vacuum chamber is checked for tightness of the connection between the check valve and the pipe;
- The integrity of the fixing flanges is checked;
- A situation is possible when, due to wear in places of bends, the pipes have cracked, this is evidenced by characteristic wet marks on their surface;
- Often the main reason for failure of the vacuum seal is damage to the shank - check the protective cap on the seal; it should not stick. Remove the cap and start the engine; if you hear a hissing sound after bleeding the shank, that’s the problem.
Upon completion of the diagnosis, when the need to replace the part is obvious, before starting work it is necessary to prepare the tools and spare parts required for replacement.
First of all, purchase a new vacuum brake booster for your VAZ 2114; we also recommend replacing the connecting hose at the same time if it shows any signs of wear.
Replacing the vacuum on a VAZ 2114 requires the following tools:
- Pliers;
- Open-end and socket wrenches with a diameter of 10, 13 and 17 mm;
- Screwdriver.
Look at the condition of the plugs and fittings; you may need to replace them too, so when purchasing the necessary materials, do not forget to purchase them.
It’s worth clarifying right away that replacing the VAZ 2114 vacuum booster itself is not anything overly complicated, and if you have the above tools and one and a half to two hours of free time, it can be done at home without any problems, so in order to repair the vacuum brake booster, it is not necessary to contact a service station.
Let's consider replacing the vacuum seal on the fourteenth with our own hands step by step:
- First of all, it is necessary to dismantle the rod that connects the vacuum seal and the brake pedal. This, as a rule, does not cause any inconvenience - just pry out the locking plate with a knife or screwdriver and unscrew the locking element;
- Next, open the hood and move to the engine compartment. We need to disconnect the TC (brake cylinder) and the vacuum seal. This is done with socket or ring wrenches, depending on what connections were used for fixation (usually ordinary nuts). There is one dubious issue here that you will have to decide: the fact is that you can do it in different ways - disconnect at the same time all pipes from the brake cylinder, which will make removing the VUT somewhat easier, since nothing will interfere with the process, but subsequently you will need to re-bleed the brakes. Or leave them in place and try to remove the VUT by unscrewing only the 10 mm nut that secures the tubes to the inner surface of the body.
- After the TC is moved to the side, we need to remove the hose that connects the VUT and the manifold;
- Next, we remove the vacuum seal from its attachment to the body wall; it is fastened with 13 mm nuts, so for dismantling we will need the appropriate wrench;
- We remove the amplifier along with the bracket on which it is attached. According to reviews, in rare cases, in order to remove the VUT, it may be necessary to unscrew the strut spacer;
- Now you only need to install a new VUT, using a similar algorithm in reverse order.
It is worth saying that the vacuum brake booster of the VAZ 2115 and VAZ 2113 changes in a similar way, so this instruction is applicable for these cars as well.
Checking the vacuum booster. Replacement VUT VAZ 2114
VUT is, of course, a very important mechanism in the braking system of a car. Its malfunction can become a source of danger, so periodic performance checks are required.
Next, we will talk about indicators of malfunction of the vacuum brake booster on VAZ 2114 cars, and the algorithm for replacing it yourself.
Design and operating algorithm
The first passenger cars produced in the last century were not equipped with “vacuum seals”. To sharply slow down the car in case of emergency braking, the pedal had to be pressed with a force of about 80 kg. The device of the vacuum brake booster installed on modern vehicles makes it possible to reduce the mentioned force to a light press.
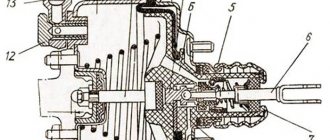
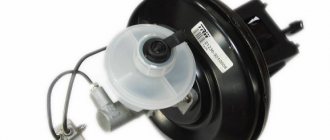
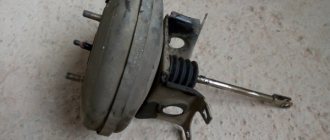
To diagnose malfunctions of this unit, you need to know its design and operating principle. The amplifier is a cylindrical metal housing, inside of which the following elements are located:
- a diaphragm pushed by a return spring;
- air valve with two channels - atmospheric and vacuum;
- in the center of the body there is a rod connected at one end to the brake pedal, the other to the main cylinder, and a diaphragm is attached to it;
- vacuum supply pipe from the engine intake manifold connected to the check valve.
In fact, the body of the “vacuum generator” is divided by a membrane into 2 separate chambers. The first is supplied with vacuum from the power unit, while in the second the air pressure is equal to atmospheric pressure. The chambers communicate with each other through the channels of the air valve, which alternately open when the driver presses and releases the pedal.
Signs and causes of malfunctions
A breakdown of the booster does not lead to a complete failure of the braking system, but much more physical effort is required to slow down the car. The first and main symptom of VUT failure is a sharp decrease in braking efficiency and a feeling of “hardness” in the pedal. Other signs also appear:
- increase in free play (up to about half);
- unstable operation of the power unit, especially at idle;
- the mechanism continues to slow down the car after releasing the pedal - the brakes “stick”.
Note. The amplifier is unable to function normally without supplying vacuum from the motor. Therefore, symptoms of problems should only be checked with the engine running.
The above symptoms of a faulty vacuum brake booster occur for the following reasons:
- air leakage through a gust or loose connection of the vacuum hose;
- wear of the diaphragm leading to loss of tightness;
- failure of the air valve;
- depressurization of the housing;
- decrease in spring elasticity.
The first reason can be easily eliminated in your own garage; the main thing is to check the “vacuum unit” for functionality. Sealing connections or replacing the pipe will not be a big problem. Another issue is when the amplifier breaks down; usually the entire mechanism has to be replaced.
Methods for diagnosing VUT
If one of the above symptoms is detected, you should immediately check the vacuum brake booster for functionality without removing it from the car. Diagnosis is simple:
- Start and warm up the engine.
- Leaving the engine idling, use your hand or pliers to press down the vacuum outlet pipe leading from the manifold. Another option is to disconnect it from the fitting and plug the latter with a wooden wedge.
- Constant behavior of the motor indicates the tightness of the system. The serviceability of the air valve is checked in another way, described below.
- If the speed of the power unit has stabilized or increased, air is leaking through the VUT or supply hose.
Having determined that the amplifier is faulty, exclude the vacuum transmission hose from the list of “suspects”. Disconnect the pipe and inspect for cracks and tears. Check the condition of the clamps, install new clamps if necessary.
If sealing the pipe does not produce results, proceed to checking the “vacuum tank” itself:
- Without starting the engine, sit in the driver's seat and apply the brake 3-5 times. The first presses will be light, but on the last ones the stroke will be greatly reduced. In this case, the diaphragm draws air through the hose and pumps it inside the housing; a check valve prevents it from coming out. Remember, the atmospheric channel is closed.
- Having completed the last movement, hold the pedal depressed and start the engine.
- After starting the engine, the pedal should go down about halfway.
This brake booster test identifies problems with the check valve or air valve. If the first one is faulty, then it will not be possible to pump air into the housing - the pedal will sag all the way. A worn air valve will not open the air passage while the engine is running and the pedal lever will remain in the up position or drop very slowly.
The tightness of the VUT housing is checked as follows:
- Start the power unit.
- Squeeze the brake all the way.
- Without releasing the pedal, turn off the engine.
If the amplifier housing or diaphragm does not allow air to pass through, the pedal lever will remain depressed. Otherwise, it will return to its original position under the action of the spring. Then you need to remove the mechanism and replace it with a new one. Repairing a VUT in a garage is a rather difficult task, since the body of the element is held together by factory rolling.
Functionality check
This instruction will be relevant when checking the vacuum booster on VAZ models from 2113 to 2115. So the technique is clearly universal.
- Press the brake pedal all the way to the floor about 4-5 times. In this case, the engine should not be started. Due to these presses, you will create equal pressure in two sections of your vacuum booster. The valve will report problems as soon as you start pressing the pedal. If you hear squeaks while pressing, this indicates a serious malfunction.
- Once the pressure is even, start the engine while keeping the brake pedal to the floor. If the brake booster system is working properly, then the pedal will rise by itself after the engine is started. If this does not happen, then you will definitely have to face repair work.
- If the check shows problems with the amplifier, do not forget to additionally check the quality of the hose fastening and the condition of the flange. When the mount is abnormal, this may result in the brake pedal not lifting.
Sometimes poorly fixed fasteners cause quite expensive and actually unnecessary repairs or replacement of the vacuum booster. Conduct a preliminary check so as not to complicate your life.
When to change the amplifier
Brakes are a whole system that consists of many elements. Each of them must function correctly and efficiently.
In addition to checking the vacuum booster itself, you should inspect the condition of the brake fluid pipes, make sure there are no brake fluid leaks, and look at the current condition of the brake pedal.
If no faults were found in the braking system, you can think in more detail about the issue of replacing the vacuum booster.
There is no point in repairing the element. It's easier to start replacing right away. The functionality of the car and the power that your engine is capable of producing depend on the quality and timeliness of the work performed. Lack of power negatively affects the speed and comfort of movement around the city and beyond.
Replacement
To replace a vacuum booster you will need a certain set of tools and materials. It includes:
- Screwdriver Set;
- Pliers;
- Socket wrench for 13 and 17 millimeters;
- Special wrench for brake pipes;
- New plugs;
- New fittings.
Replacement procedure
Let's get straight to work.
- Removing the vacuum booster can be difficult due to the brake cylinder. Therefore, we advise you to remove it first. Another option is to disconnect the pipes from the brake cylinder and move them to the side for a while. Here you decide for yourself what is more convenient for you.
- The cylinder is not the main problem. It is difficult to cope with the mounting of the vacuum booster. It's just not very convenient to do this. This is the design of the VAZ 2114.
- Start with the valve - remove the hose fasteners from it, remove the support bush, after which you can pull out the brake pin.
- Next, using a 13 mm wrench, all four fasteners of the vacuum booster are dismantled.
- After all the inconveniences of the work done, you can remove the element and get ready to install a new amplifier in its place.
- To do this, you will have to install a special mounting frame. The frame is tightened with a 17 mm wrench, after which the new component is installed inside the car.
- If you want to make your work as easy as possible, do not forget to first connect the brake pedal to the booster with your finger when reassembling it. After this, it is much easier to cope with putting the vacuum seal back into place.
When replacing the vacuum booster, be sure to change the old vacuum hose at the same time. This element is far from eternal, therefore, as it wears out, it will negatively affect the quality and efficiency of the new vacuum seal.