Cars admin26.02.2020
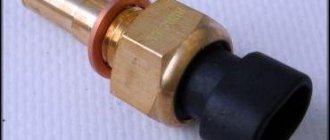
1. Turn off the power to the car
2. Remove the front bumper of the VAZ 2172 (see “Removing and installing the front bumper of the VAZ 2171”).
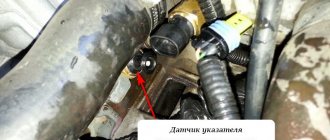
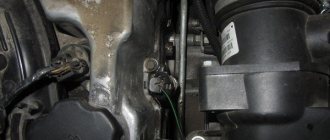
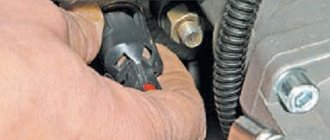
3. Overcoming the resistance of the clamps, remove the sensor from the bracket...
4. ...press the clamp of the wiring harness block...
5. ...and remove the sensor from the Lada Priora.
6. Install the sensor and front bumper of the VAZ 2170 in the reverse order of removal.
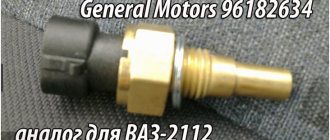
| Manufacturer: | Lada Holding GMBH Vienna |
| Vendor code: | 2172-8121210 |
| Name: | Air temperature sensor VAZ 2170 Priora external 2172-8121210 |
| Department: | VAZ |
Pickup from a warehouse in Yekaterinburg
Payment upon receipt:
- Cash
- Transfer to card
- By bank card
- By invoice (for organizations with VAT)
Important. Before receiving the product, check its availability by phone or place an order on our website.
Delivery by courier in Yekaterinburg and nearby cities
- Payment in cash upon receipt of goods
- The cost of delivery within the city and nearby cities is 100-250 rubles
- Free delivery throughout Yekaterinburg for orders over 10,000 rubles.
- Please check with the RusAvto manager for delivery times and costs.
For minimum order and delivery costs, see the Delivery section.
| Minimum order | Cost of delivery | Free delivery from | |
| Ekaterinburg | 1000 | 150 | 6000 |
| Upper Pyshma | 3000 | 200 | 10000 |
| Berezovsky | 3000 | 200 | 10000 |
| Aramil | 3000 | 200 | 10000 |
| Revda | 5000 | 400 | 17000 |
| Pervouralsk | 5000 | 400 | 17000 |
| Polevskoy | 7000 | 500 | 26000 |
| Sysert | 7000 | 500 | 26000 |
| Novouralsk | 10000 | 600 | 34000 |
| Nevyansk | 12000 | 700 | 37000 |
| * does not apply to large spare parts and special goods. price | |||
Delivery by Russian Post
- Prepayment 30% of the cost of the goods (Cashless payment on invoice)
- The balance of the amount is cash on delivery upon receipt of your goods at the post office.
- Delivery services are paid by the recipient according to the current tariffs of Russian Post.
Idle speed control
The idle speed regulator, also known as IAC, is installed in the throttle valve. Designed to regulate idle speed on engines without the E-GAS system. The sensor is quite unreliable and fails very often. It is a motor with a worm gear. If there is a malfunction, the “CheckEngine” light does not light up.
Signs of malfunction:
- Not smooth idle;
- The revolutions are floating;
- Troubles the engine;
Oil pressure sensor
The oil pressure sensor is installed in the cylinder head. Designed to indicate oil pressure and indicate oil pressure when the engine is running. A very reliable sensor that rarely fails. The “CheckEngine” light does not light up when there is a malfunction.
Signs of malfunction:
- The oil pressure light is constantly on;
- The oil pressure light does not light up when the ignition is turned on;
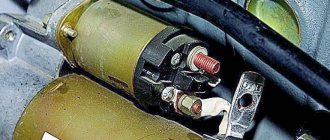
Crankshaft position sensor
Crankshaft position sensor, also known as DPKV. Installed on a bracket near the generator belt drive pulley. Works on the law of electromagnetic induction. Reads readings from the crown of the generator drive pulley. Sets the ignition timing angle (IAF). If there is a malfunction, the “CheckEngine” light comes on.
Signs of malfunction:
- The engine runs intermittently;
- The engine does not start (no spark);
Throttle Position Sensor
The throttle position sensor (TPS) is installed on the throttle valve on cars without the E-GAZ system. Designed to regulate engine speed. The sensor is not reliable and often fails. If there is a malfunction, the “CheckEngine” light does not always light up.
Signs of malfunction:
- Not smooth idle;
- The revolutions are floating;
- Troubles the engine;
- When starting the engine, the speed is increased;
- Spontaneous increase or decrease in speed;
Lada Priora wiring block diagrams
1,2,3,4 – blocks of the instrument panel wiring harness to the blocks of the rear wiring harness; 5 – block of the instrument panel wiring harness to the block of the ignition system wiring harness; 6,7,8 – blocks of the instrument panel wiring harness to the blocks of the front wiring harness; 9 – lighting control module; 10 – ignition switch; 11 – on-board computer mode switch; 12 – windshield wiper switch; 13 – passenger airbag module; 14 – light signaling switch; 15 – instrument cluster; 16 – hours; 17 – diagnostic block; 18 – recirculation switch; 19 – control unit for windshield wiper and external lighting; 20 – micromotor gearbox for driving the heater control damper; 21 – rear window heating switch; 22 – alarm switch; 23 – brake signal switch; 24 – electric amplifier control unit; 25,26 – blocks of the instrument panel wiring harness to the radio; 27 – mounting block: K1 – relay for turning on low beam headlights and side lights; K2 – relay for turning on the heated rear window; K3 – starter activation relay; K4 – additional relay; K6 – relay for turning on the high speed windshield wiper (automatic mode); K7 – headlight high beam relay; K8 – sound signal relay; K9 – relay for turning on the alarm sound signal; K10 – relay for turning on fog lights; K11 – relay for turning on the electric heating of the front seats; K12 – windshield wiper activation relay (intermittent and automatic modes). 28 – lampshade lighting of the glove box; 29 – glove box lighting switch; 30 – automatic lighting control switch; 31 – electrical package controller; 32 – controller of the automatic climate control system; 33 – rotating device; 34 – driver airbag module; 35 – sound signal switch.
Knock sensor
The knock sensor is installed on the cylinder block under the intake receiver. Based on the principle of the piezo element. Engine detonation is measured and the air-fuel mixture is adjusted. Quite a reliable sensor. If there is a malfunction, “CheckEngine” does not light up.
Signs of sensor malfunction:
- Loss of vehicle dynamics;
- Unstable idle;
- Jerking when moving;
Phase sensor
The phase sensor is installed on an engine with 16 valves, located near the fuel rail. Based on the law of electromagnetic induction, it takes readings from the intake camshaft master pulley. Participates in the process of formation of the air-fuel mixture for each cylinder separately. In the event of a malfunction, the engine begins to operate in emergency mode. When there is a malfunction, the “CheckEngine” light almost always comes on.
Signs of malfunction:
- The engine runs intermittently;
- Increased fuel consumption;
- Unstable engine operation at idle;
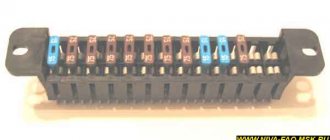
Priora relay and fuse blocks
Location of relays and fuses in the DELRHI 15493150 mounting block
Location of relays and fuses in the mounting block 1118-3722010-00
Lada Priora relay - purpose
K1 Relay for turning on low beam and side lights of headlights (automatic lighting control system) K2 Relay for turning on heated rear window K3 Relay for turning on starter K4 Additional relay K5 K6 Relay for turning on high speed (automatic mode) windshield wiper K7 Relay for turning on high beam headlights K8 Relay for turning on sound signal K9 Relay for turning on the sound alarm signal K10 relay for turning on the fog lights K11 relay for turning on the electric heating of the front seats of the headlights
Lada Priora fuses - purpose
F1
Reserve
F2 (25 A)
Mounting block, relay for turning on the heated rear window (contacts) Electrical package controller, contact “10” of the XP2 block Rear window heating element
F3 (10 A)
Right headlight, high beam lamp Instrument cluster, high beam headlight indicator
F4 (10 A)
Left headlight, high beam lamp
F5 (10 A)
Mounting block, horn relay Horn
F6 (7.5 A)
Left headlight, low beam lamp
F7 (7.5 A)
Right headlight, low beam lamp
F8 (10 A)
Mounting block, alarm horn relay Sound alarm signal
F9
Reserve
F10 (10 A)
Instrument cluster, pin “20” Brake light switch Brake light lamps Interior lighting unit Interior lighting lamp Threshold lamp, right front doors Additional brake light
F11 (20 A)
Mounting block, windshield wiper high speed relay Wiper and washer switch, terminal “53a” Wiper and washer switch, terminal “53ah” Rear window heated switch Mounting block, rear window heated relay ( winding) Windshield wiper motor Rear window wiper motor (2171, 2172) Windshield washer motor Rear window washer motor (2171, 2172) Airbag control unit, pin “25”
F12 (10 A)
Instrument cluster, pin “21” Electrical accessories controller, contact “9” of the block X2 Electromechanical power steering control unit, contact “1” of the block X2 Reversing light switch Reversing light bulbs Parking system control unit, contacts “11” and “14”
F13 (15 A)
Cigarette lighter
F14 (5 A)
Side light lamps (left side) Instrument cluster, main light switch indicator License plate lights Trunk light Electrical package controller, pin “12” of block X2
F15 (5 A)
Side light lamps (right side) Storage lamp box
F16 (10 A)
Hydraulic unit, contact “18”
F17 (10 A)
Left fog light
F18 (10 A)
Right fog light
F19 (15 A)
Seat heating switch, contact “1” Front seat heaters
F20 (10 A)
Switch recirculation (switch on) Mounting block, relay for low beam headlights and parking lights (automatic lighting control system) Heater electric fan relay Automatic lighting control switch Windshield wiper and external lighting control unit, contacts “3”, “11” Automatic climate control system controller , pin “1” Automatic windshield wiper sensor (rain sensor), pin “1”
F21 (5 A)
Light switch, pin “30” Diagnostic deck, pin “16” Clock Automatic climate control system controller, pin “14” "
F22 (20 A)
Windshield wiper motor (automatic mode) Mounting block, windshield wiper relay and high speed windshield wiper relay, (contacts)
F23 (7.5 A)
Wiper and exterior lighting control unit, contact " 20”
F24-F30
Reserve
F31 (30 A)
Electrical package controller, terminal “2” of the block X1 Electrical package controller, terminal “3” of the block X1 Driver’s door module, pin “6” Threshold light of the left front door
Reserve F32
Oxygen sensor
The oxygen sensor is installed in the exhaust manifold of the car. Serves to monitor exhaust gases and adjust the air-fuel mixture. A reliable sensor rarely fails. If there is a malfunction, the “CheckEngine” light does not always light up.
Signs of sensor malfunction:
- Loss of vehicle dynamics;
- Unstable idle;
- Jerking when moving;
- Difficulty starting the engine;
- High fuel consumption;
- Black smoke when driving at high speeds;
Speed sensor
The speed sensor is installed on the gearbox housing and is designed to measure the speed of the vehicle and calculate the kilometers traveled. The speed sensor also provides readings for preparing the air-fuel mixture while the car is moving. You can notice that when the car is rolling at neutral speed, the idle speed is slightly higher than when the car is stationary. When there is a malfunction, the “CheckEngine” light almost always comes on.
Signs of sensor malfunction:
- There are no increased speeds when driving at neutral speed;
- Speedometer does not show speed;
- The odometer does not work;
- EUR does not work;
Scheme VAZ-2170 - VAZ-21728 Lada Priora
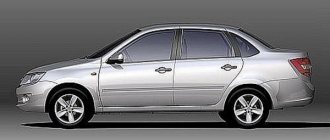
Complete information is provided about electrical equipment, wiring, relays and fuses of VAZ-2170 - VAZ-21728 vehicles. The collection is intended for auto electricians and those who, having some knowledge of circuit design, can carry out minor auto repairs with their own hands. The Lada Priora sedan (VAZ-2170) has been produced since 2007, the VAZ-2172 hatchback since 2008, and the VAZ-2171 station wagon has been produced since 2009. In 2013, the car was modernized and they began installing an AMT robotic gearbox (21723, 21728).
There are 4 main harnesses in the Priora electrical circuit:
- from the instrument panel;
- providing motor control;
- front electrical harness;
- rear electrical harness.
All these harnesses are connected to each other using detachable connections. The connectors are located under the dashboard. Each of the harnesses is assigned a serial number.
In addition to the main ones, there are also secondary ones:
- installed in the front passenger door;
- identical in both the left and right rear doors;
- installed in the driver's door;
- connecting the backlight of the license plate;
- connecting the electrical package.
Each element in the diagram corresponds to a number with an explanation. Since all elements are standardized, their designations are identical on car diagrams of all car manufacturers. Next to each electrical appliance, the connectors that go to them are indicated. The pins or sockets of the pads are also numbered.