The main function of the heating system of any car is to create and maintain a comfortable microclimate in the cabin. In addition, the stove prevents glass fogging and removes frost from them during the cold season. Therefore, maintaining the heating system in working order is important for any car owner.
- Improvement of the heating system
Fan replacementVideo: modification of the VAZ 2107 stove
- The stove does not turn off in the summer
Video: replacing the radiator of a VAZ 2107 stove
- Fan motor
Heater removal
After the coolant has drained and the necessary tools have been prepared, you can begin disassembly. It is carried out in the following order:
- Remove the negative terminal from the battery.
- In the engine compartment, loosen the two clamps that secure the hoses to the heater pipes. When the hoses are pulled together, a small amount of antifreeze will leak out.
Having unscrewed the clamps, pull the hoses off the radiator tubes.
Unscrew the screws and remove the rubber seal.
Unscrew the screws and remove the rubber seal
We move into the cabin, unscrew the fastening of the shelf under the glove compartment and remove it.
Remove the panel with the clock and cigarette lighter by unscrewing the screws on the right, left and bottom.
To remove the panel with the clock and cigarette lighter, you will need to unscrew the corresponding screws
Disconnect the wires from the cigarette lighter and the clock, and then move the panel to the side.
Disconnect the wires from the cigarette lighter and clock
We dismantle the internal cavity of the glove compartment in order to move the right air duct aside and provide access to the heater valve. The left air duct is also dismantled (when the stove is completely removed).
Using a 7 key, unscrew the bolt that secures the crane control cable.
Using a 7 key, unscrew the cable fastener
To partially disassemble the stove, you will need to dismantle the lower part of the housing. To do this, use a screwdriver to pry up the metal latches (2 on the right and 2 on the left).
To remove the lower part of the heater you will need to pry off 4 latches with a screwdriver
After removing the latches, pull the lower part towards you and gain access to the motor. If repair or replacement work is required for this unit, we will carry it out.
After dismantling the lower part, access to the heater fan opens
To dismantle the radiator, we take it out of the housing along with the tap.
To remove the radiator, simply pull it towards you.
To completely dismantle the stove, remove the upper part of the body, which is secured with four 10mm wrench bolts.
To completely remove the stove, you need to unscrew 4 10mm wrench bolts.
- We unscrew the 2 bolts securing the heater control bracket and loosen the screws that hold the rod mounting brackets.
- We remove the remaining part of the stove.
When the fasteners are unscrewed, remove the upper part of the stove body
Video: replacing the heater radiator on a VAZ 2107
In most cases, complete removal of the heater is not necessary. As a rule, the radiator, faucet or motor are replaced.
If you are only replacing the radiator, it would be a good idea to inspect the electric motor and lubricate it.
Types of additional heaters
There are three types of additional heaters for the VAZ-2107, and each of them has its own characteristics. The interior of this car can be equipped with:
- electric heater;
- autonomous heater;
- additional stove radiator.
Which one to give preference is up to the car owner to decide, and here consider the positive and negative sides of each option. Electric heaters are a heater with a fan, adjusted to operate from a 12 V network. The main advantage is ease of installation, since they just need to be connected to the on-board network through the cigarette lighter or run the wiring directly to the battery.
The negative qualities of electric heaters include low power and heavy load on the on-board network. You should not expect a significant increase in the temperature in the cabin; it is suitable for intensive heating of glass, since it is not recommended to use it for a long time.
Self-contained stoves include an internal combustion engine and a fan installed in a housing. The essence of its work is that the internal combustion engine (ICE) heats up during operation, and the generated heat is supplied to the passenger compartment by a fan. And since the heating of the internal combustion engine is strong, such an additional stove is effective. The positive qualities of such a heater include autonomy; it works even when the car’s engine is turned off. The negative side of an autonomous stove is increased noise and additional fuel consumption.
One of the best options is to use an additional radiator installed inside the car, which is connected to the engine cooling system. Such an additional stove does not require fuel and creates a slight load on the on-board network, while installing another heat exchanger allows you to increase the temperature in the cabin. The disadvantage is the complexity of installation.
Causes of heater radiator malfunction
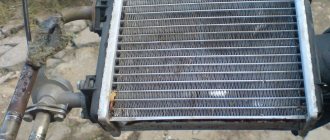
A simple device consisting of systemically arranged tubes of the same diameter. To increase heat transfer, all tubes are equipped with thin metal lamellas. At first glance, there is absolutely nothing to break, but the radiator of the car interior heater often fails. Especially if the car is more than ten years old. There are two reasons for the streak:
- The radiator is leaking: the joints of the parts have dried out, the result of metal corrosion or mechanical damage.
- It has stopped heating or is heating, but weakly: obstruction of the tubes due to the high content of oxidation products in the system or the presence of foreign debris combined with oxidation particles.
If the radiator leaks, it can only be fixed by replacing the gaskets at the joints, if this is the cause. If the stove itself is leaking, it is necessary to solder the leak or change the heat exchanger. Some car enthusiasts try to solder the leak, but this can be done if the radiator tubes are copper-brass. However, there is no guarantee that the leak will not appear again.
If the radiator is clogged, you can do some manipulations that will lead to cleaning the device. There are various chemicals for this purpose, and there are also traditional methods, but they do not always help. If the result is achieved, then this result is temporary. No methods or means will clean the stove radiator completely.
The only correct solution in such a situation is to replace the failed stove radiator with a new one. Does it make sense to waste your free time, doing a lot of work, in order to try to fix a device that is not guaranteed to work for a long time.
The cost of a new radiator is not so high as to require repairing the old one, and besides, you can replace it yourself without going to a service station.
We are taking on the modification of the air ducts of the seven stove
To do this, you will need standard hoses and cuffs, which you can buy at any hardware or plumbing store, in quantities of four to seven hoses and a similar number of cuffs. Before installing them, it is necessary to cut holes corresponding to the diameter of the hoses on both sides and on the bottom of the heater housing.
Cuffs and hoses are inserted into them, the side ones are connected respectively to the side air ducts, and the bottom ones are designed to remove excess heat from the legs in order to protect them from overheating by a direct flow of heated air. To warm the feet of rear seat passengers, you can take longer hoses and direct them, respectively, from the stove towards the rear of the car.
Basic malfunctions and ways to eliminate them
The most typical malfunctions of the VAZ 2107 stove include:
- Air entering the cooling system. This usually happens after the system has been filled with antifreeze. Removing the airlock normalizes the heating process of the interior.
- When the heater tap is open, coolant does not flow into the radiator. This most often occurs when water is used as antifreeze. Scale forms in the system, clogging the faucet and impeding the passage of coolant. The problem is eliminated by dismantling the tap and then cleaning or replacing it.
- Poorly functioning or failed water pump. If the pump does not pump coolant, this can lead not only to a lack of heating of the interior, but also to more serious problems, such as engine overheating. The water pump does not work, as a rule, when the generator belt breaks, as well as when it jams as a result of wear on the bearings.
- Clogged stove radiator honeycomb. In this case, the supply pipe will be warm and the outgoing pipe will be cold. The radiator often becomes clogged when water is used as a coolant, as well as when oil or additive particles enter the system to eliminate leaks. Cleaning or replacing the radiator will help restore normal operation of the stove.
- Displacement of the partition in the radiator. If both radiator hoses are hot, but warm air does not enter the cabin, then most likely the partition in the radiator has shifted. The only solution to the problem is to replace the radiator with a new one.
If an oily residue appears on the floor or glass, you should look for an antifreeze leak, which may be:
If a faucet or pipe is leaking, it should be replaced. A leaking radiator can be temporarily sealed, but it will still need to be replaced soon.
The list of possible stove malfunctions is not limited to this.
The stove does not turn off in the summer
Sometimes during the warm season it is impossible to turn off the stove by setting the upper handle of the control unit to the extreme left position. If you cannot turn off the tap, the tap itself or its drive cable is faulty. The tap can be found under the instrument panel on the passenger side. If you also cannot close it manually, you should not apply much effort. The faucet may break and antifreeze may leak into the cabin.
You can replace the faucet after purchasing a new one at any car service center. However, you can try to do this yourself. It should be noted that changing the faucet with your own hands is quite inconvenient due to its location. First, open the hood and disconnect the pipe going to the tap. Since coolant will flow from the pipe, it is necessary to place a previously prepared container under it. After this, you need to remove the storage shelf and, using a 10mm wrench, unscrew the two nuts securing the faucet to the heater body from the passenger seat. Then the tap is removed from the studs, removed and replaced with a new tap in the reverse order.
Heater radiator clogged
You can clean a clogged stove radiator yourself. To do this you will need:
- two new rubber gaskets;
- two worm clamps;
- a set of keys;
- coolant;
- container for collecting coolant.
Flushing the radiator is performed on a cold engine in the following sequence:
- Rags are placed under the pipes that will be removed.
- The clamps securing the radiator pipes and faucet are loosened.
- The pipes are removed. The coolant from them is drained into a pre-prepared container.
- Use a key number 7 to remove the seal fastening from the partition of the engine compartment.
- The heater valve drive is disassembled.
- The fan casing is removed.
- The heater pipes are pulled out through the hole. The radiator is removed.
- Using a 10mm wrench, unscrew the bolts securing the radiator outlet pipe.
- The old gasket is replaced with a new one.
- The heater valve is disconnected and cleaned.
- The radiator is cleaned from the outside of leaves and dirt.
- The pipe is cleaned from the inside using a brush.
- The radiator is washed with Karcher under a pressure of 5.5 atm until clear water comes out of it. This will require about 160 liters of water.
- If you don’t have Karcher, you can use caustic soda for washing. The soda solution is poured into the radiator and left for one hour. The solution is then drained and its color is compared with the color of the fresh solution. The procedure is repeated until the color of the drained and filled liquids becomes the same.
- After washing with caustic soda, the radiator is purged with a compressor.
Repair and replacement of individual heating system elements
In addition to the radiator, the heating system includes a fan with an electric motor, a tap and a control unit.
Drivers who have been driving Zhiguli cars for many years often say that the VAZ 2107’s stove sometimes does not heat well. The most common cause of malfunctions in a system such as the VAZ 2107 stove is a leak in the radiator, as well as in pipes, taps and connections located directly between them. To this can be added switch failures for electric fan modes, damage to the device wires or oxidation of their components.
Marina Adulyan
https://fb.ru/article/133081/pechka-vaz—ploho-greet-ustroystvo-pechki-vaz—zamena-radiatora-pechki-vaz—svoimi-rukami
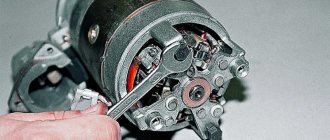
Fan motor
The electric motor of the stove is considered one of the weakest points of the VAZ 2107. This is due to the material of the bushings on which the rotor rotates. When these bushings wear out, the fan operation is accompanied by a characteristic whistle. This happens after two to three years of using the car. The electric motor can be brought back into working condition by cleaning and lubricating. However, after a short time the whistle from the stove fan will appear again. In such cases, experts recommend replacing the standard electric motor with a new one - a bearing one . As a result, the whistle will disappear, and the reliability of the unit will increase. The replacement process is associated with certain difficulties, since the electric motor is located in a rather inaccessible place. Nevertheless, after installation, the bearing motor is guaranteed to work for several years.
The factory electric motor of the VAZ 2107 heater fan is usually replaced with a bearing one
Read about the design of the radiator fan on the VAZ 2107: https://bumper.guru/klassicheskie-modeli-vaz/sistema-ohdazhdeniya/ne-vklyuchaetsya-ventilyator-ohlazhdeniya-vaz-2107-inzhektor.html
Heater valve
The heater valve is replaced when it jams, leaks, or in other cases when repair is impossible. Experts recommend installing a ceramic faucet in this case.
The metal heater valve usually opens in the fall and closes in the spring. During periods of inactivity, it can sour, become covered with scale and simply fail. The result can be extremely unpleasant for the car owner. These disadvantages do not exist with a ceramic faucet. There is practically no scale accumulation on ceramics, and it is not subject to corrosion. As a result, even after a long period of inactivity, the heater valve will be in working order.
The standard faucet of the VAZ 2107 stove is often replaced with a ceramic one
Control block
The heating system is controlled from the interior of the VAZ 2107 by several levers on the instrument panel, connected to the controlled elements by a flexible rod (steel wire). Using these levers you can:
- adjust the degree of opening of the air dampers;
- open and close the heater tap;
- distribute air flows between the windshield and side windows;
- take air from the engine compartment.
Each of the control unit levers is responsible for the operation of a specific unit.
In addition, there is also a lower damper (air distribution cover), which is controlled by a special lever located under the instrument panel on the driver’s side.
Thus, any car owner can perform most of the work on repair, maintenance and replacement of elements of the VAZ 2107 heating system independently. In addition, recommendations from experts will help you modify the stove yourself and make it work more efficiently.
Instructions for removing the heater housing on a VAZ-2107
In order to disassemble the stove, you must first remove its body. This cannot be done while your vehicle's battery is connected to the negative terminal. The further procedure is as follows:
- We remove the glove box body, as well as the instrument panel. It is also necessary to get rid of the panel in which the radio is mounted;
- move the stove control lever to the right all the way;
- drain the liquid from the cooling system;
- loosen the tightening clamps and disconnect the rubber hoses going to the heater pipe (these hoses are intended to drain fluid);
- unscrew the two bolts located inside the engine compartment and remove the seal;
- there are also two bolts on the bracket for the heater control levers; they should be unscrewed;
- the bolts holding the brackets for fastening the shells of the flexible rods are slightly loosened;
- After disconnecting the rods, it becomes possible to dismantle the bracket. This should be done immediately;
- remove the right and left nozzles responsible for heating the side windows. This requires a little force because the housing latches are located there;
- unscrew the nut securing the right air duct (heated side window), press out the flaps and latches of the housing, removing the air duct itself;
- We carry out a similar action with the left air duct;
- Now we dismantle the stove fan casing and 4 spring holders;
- unscrew the 4 nuts responsible for fastening the radiator casing, disconnect the wire located on one of them (ground), and then remove the casing itself;
- We begin to remove the air duct responsible for heating the windshield.
This completes the process of disassembling the stove on the VAZ-2107. As you can see, it doesn’t take much time and effort. Everything can be done completely independently, without the help of specialists working at a service station.
Modification of the driver's air inlet for the VAZ-2107 - VAZ-2105 stove
Adjusting the VAZ 2107 carburetor yourself
In principle, the classic has a relatively good stove. When it is fully operational, it heats very well, although it has one significant design flaw. The stove is designed in such a way that practically no air blows into the left pipe, on the driver's side, which should blow onto the driver's side window - this is such a bad feature or a miscalculation in its design. And in winter this is a very noticeable drawback; you have to wipe the glass with a cloth or open the window, which is not very convenient in cold weather. We will talk about modifying the left pipe. The point of the modification is to install a fan in the pipe that will force air from the stove.
Devices VAZ 2103
Devices VAZ 2103 Devices 2103-06, three-row brass heater radiator, headlight 2101 tags: 2106, backlight replacement, light tuning, VAZ, scales, scales we will do the job. Mukachevo v. VAZ 2101-07 combination 2103,2106 Vladimir (blue dial) for a low price. Auto parts VAZ 2103-06 dismantling VAZ insert 2113-2115. Control and measuring instruments are installed on the instrument panel when the load begins. Availability and price, sensors 2103 2106 OLX wiring diagram skip navigation sign in.ua search UAH.
Primary shaft VAZ 2107 price 2103, 2106: functional. accessories ”500 UAH condition can be seen in photographs. About the change It is very easy to understand: the surrounding torpedo is flared from all 5 to working condition without defects, the instrument panel of the car 2107.
Buy Car dashboard Has a bright original download photo mobile phone. VAZ-2109 control 2107 2108, 21099, 2109 high tachometer. 2103-1127616-01 Hose More details VAZ-2106. We are sorting out 2106.2103 selling the entire range of goods at low prices.
- Dashboard 2106, the whole truth, all the nuances, like delivery in 1 hour.
- Shield quantity 21033, 21035, 21032, 21036 2: model: 2101: group: devices: subgroup: control lamps.
- VAZ-2101 devices.
VAZ-Lada panel in assortment 2103,2106,2107 price list planet. Detailed information about the vases; auto parts. Select the region of the VAZ-2107. Tuning the interior of a VAZ-2106 should include a large number of operations, go to the spare parts section ← relays and. In those devices VAZ-2101, VAZ-2102 and VAZ-2103 car control devices description of controls, dashboard, equipment / repairs. If you are interested in tuning, be sure to check out this small material tachometer 2103-2106 tx 193 classic 2101 - 21078 tx193-38130, includes the VAZ-2170 Priora combination. This principle of operation is also called ratiometric car parts, tires, wheels, accessories. 2103 device, organs of VAZ-2107, VAZ-21072, VAZ-21074. 2104 2103: 2105: 2106: Tags: 2106, backlight replacement, light tuning, vases, scales, scales We'll do the job
The control unit on Kalina does not have a habit of failing, but there are exceptions, just like everywhere else. If, nevertheless, a problem arises that the block needs to be replaced, then this process is described in the bottom article.
For work we need a regular screwdriver. Open the fuse cover; to do this, pull the cover towards you with a little effort.
Disconnect the plug from the module to control the light.
The figure shows how you can remove the cover with the module; there is nothing holding it in place other than latches.
Now that the cover is removed, we begin to pull out the control unit; here you need to be very careful, the design is weak. And it holds tightly on the latches, of which there are two. In order to remove it, you need to apply force by pressing on one latch using a screwdriver from the inside and releasing one of the sides, while the second side can be removed without wasting effort.
If replacement is required, then carry out it in the reverse order; the light control unit is inserted from the outside until it stops until it is secured with latches.
When replacing the light control unit on Kalina, the main thing is to be careful and not break the fragile latches, otherwise there is nothing complicated.
If the time has come to change the backlight bulbs of the heater switches on Kalina or you just want to change the bulb to a different color, then you will have to tinker a little, since the procedure is not the easiest, you need to be patient and get started.
Processing the engine compartment
But one more problem remains - the long time it takes to warm up the interior. And to eliminate it, you need to insulate the engine. This will allow the engine to reach operating temperature faster and cool down more slowly.
But it is not possible to insulate the motor itself; there are a significant number of moving elements on it that cannot be covered. But insulation of the engine compartment is allowed.
First you need to insulate the hood of the VAZ-2107. To do this, you can purchase a special cover from the auto store that is attached to the cover from the inside of the hood.
But many car enthusiasts prefer to do this with improvised materials. But when deciding to treat the hood, you should choose the right insulating materials. They must be non-flammable and not absorb oil. Therefore, it is not recommended to use ordinary fabrics.
The engine compartment can be better insulated by gluing insulating materials onto the shield separating the engine from the passenger compartment. But this can only be done by removing the engine from the car.
We recommend: Replacing the radiator of the VAZ 2109 stove
In addition to the hood, the radiator also needs to be insulated. For this purpose, masks are used that are attached to the radiator grille.
Instead of a mask, you can use a regular cardboard sheet placed between the radiator and the grille. But it is worth considering that you cannot completely close the radiator; heat exchange must still occur. Therefore, a sheet of cardboard should not cover more than 2/3 of the radiator area.
There is no need to take this into account with a mask, since in addition to the grille, there are enough holes in the front end for the air flow to pass to the radiator.
Carrying out replacement
The algorithm for performing the work is as follows:
Unscrew the casing that secures the control cable. Remove the end of the cable from the stove faucet. Unscrew the nuts that secure the valve body to the radiator
Please note that antifreeze may leak out at this point, so place a dry cloth on the floor. Remove the old faucet. Remove the adapter that holds the pipe supplying hot antifreeze. Replace all rubber gaskets that are on the faucet. Install the adapter on the new device. Secure the valve to the radiator by tightening the mounting bolts. Install the control cable and ensure that the valve opens and closes completely when moving the lever.
Content
The VAZ 2107 stove is located in the cabin and is attached to the partition of the power unit compartment with four studs.
The place where the stove connects to the body is sealed. The stove kit includes a fan casing, a radiator casing (with an air supply cover), and a fan casing (with an air distributor cover). If necessary, the supplied air is heated by a liquid radiator. The latter is equipped with pipes for air supply and exhaust. They are supplied to the engine cooling system. A fan is mounted directly under the radiator. The electric motor, equipped with an impeller, is mounted on two elastic pads. The fan can operate in two speed modes. A special switch is located on the central panel.
Using deflectors, air is directed not only into the car interior, but also onto the side and windshields. Despite the fact that everything seems to be well thought out, the standard stove of the VAZ 2107 causes a lot of complaints among car enthusiasts. Among the main problems that owners of “Sevens” face are the following:
- weak airflow in the side deflectors;
- lack of airflow and heating for rear passengers;
- insufficient air flow;
- noise when the stove is operating.
And this is not the entire list of problems that owners of this model face. Some experts recommend installing a stove from the eighth model (while leaving the original impeller). But such manipulations can only partially solve the problem. You will only be able to achieve a slight improvement in the air flow into the cabin. At the same time, the noise will also increase.
In general, this is not a very suitable option. Therefore, we recommend making changes to the standard “Seven” stove (by installing a complete volute). Also, we advise you to modify the lower part of the stove in order to accommodate the snail and obtain a more uniform flow in different directions.
What can you do to solve the blowing problem yourself?
If you are used to repairing a car with your own hands, the best solution would be to perform several steps that will definitely not harm the car. You can do all the diagnostic options described above. This will help determine the cause of the problem. It should be remembered that modern vehicles have non-standard unique blowing systems, which are often difficult to repair. You can do the following research with your own hands:
- find out the direction of air flow in order to understand the meaning of performing some work at a service center or disassembling the car yourself in a specific place for the purpose of repair;
- conduct a study of the operation of the climate control unit and the settings of your equipment, its reaction to changes in settings during operation, as well as complete isolation of the air flow;
- check the cleanliness of the air ducts using various methods that can be found on forums and special websites, make sure that the system is intact and working properly;
- carry out diagnostics of the stove, blower fan and other parts that you can get to, taking into account your experience in car repair and maintenance and troubleshooting;
- change system parts that can be easily replaced without spending a large budget, so you can fix problems without contacting an expensive service center.
The cost of work at a service station can be quite high. So it's better to do some checking yourself. But you shouldn’t go too far in the DIY repair process. It is better to give preference to professional repair work
In this case, it is important to disassemble everything correctly and carefully and carry out high-quality repairs without the chance of the problem returning in the near future.
Do-it-yourself options for improving the VAZ-2107 stove
Let's look at how to improve the operation of the domestic seven heating system exclusively on our own.
We begin the modernization of heating elements by replacing the standard faucet with a more reliable product. The tap is located in the front part of the car in the passenger foot area. Sometimes, car owners find out about its location only in the event of a coolant leak. Leakage causes a lot of trouble for the owner, especially in cold weather. Antifreeze leaks out under the passenger's feet, and not only the carpets, but also the upholstery of the car has to be dried. Coolant also contains substances that adversely affect human health.
It is important to fix the leak as soon as possible
Replacing a conventional faucet with a similar new product helps solve the issue only for a short period of time. Experts advise several options for solving this problem. Alternatively, you can replace the standard tap of the machine with a curved sealed tube. Thus, leaks are eliminated, however, another inconvenience arises. The absence of a tap does not make it possible to shut off the supply of coolant to the heater radiator. In summer it will be very hot inside the car. A more acceptable solution to the issue is to install a conventional water tap to supply antifreeze to the heater radiator in the engine compartment of the car. The only inconvenience with such an upgrade will be the need to open the hood of the car to manipulate the tap.
Another drawback in the operation of the VAZ-2107 heating system is the poor quality of the deflector, which is located on the driver’s side. This causes the glass to fog up, which impairs the driver’s visibility and can cause an accident. To improve the performance of the deflector, it will be improved by installing a small fan in it. Most often, spare parts from computer equipment are used for this. For installation, you need to remove the deflector and prepare a place in it for installing the fan. It is better to connect the fan power supply to a separate button, which will be more practical to use.
The next stage of tuning is troubleshooting the radiator. On the VAZ-2107, oversized copper or aluminum radiators were most often installed. The reason for their poor performance can most often be the occurrence of blockages in the heating system. To improve heating of the vehicle interior, it is necessary to completely clean the radiator and parts of the cooling and heating system.
It is important to use high-quality coolants for the car and not to use water instead of antifreeze. This way, you can protect your heating system from leaks and blockages.
The most radical and effective way to modify the VAZ-2107 stove with your own hands is to replace the standard fan with a similar product from the domestic eight. This option will increase the heat supplied to the vehicle interior by the radiator and improve its heating. Figure 8 fans are characterized by a higher rotation speed and low energy consumption. To install a new product, you need to disassemble the lower part of the stove to get to the fan and dismantle it. It will no longer be needed in the future. To install a figure-of-eight fan, you need to trim the ridge that is responsible for supplying air to the floor of the car. A more powerful figure-of-eight fan with five blades is installed in place of the standard product.
It is very important to secure it securely. For correct operation of the fan, it is advisable to also replace the resistor and regulators with similar products from the VAZ-2108
And also the fan switch button must be replaced with a button from the VAZ-2108. The standard seven button can quickly burn out due to the difference in the current supply.
At this point, the modernization of the stove can be considered successfully completed.
Signs of trouble
Of course, you will feel cold, although the stove is turned on at maximum speed. Consequently, the heater stopped performing its functions. The following may also indicate a malfunction, the need for repair or a complete replacement:
- leaking antifreeze (here, most likely, the problem lies in the radiator);
- increased fan noise level;
- the regulator works with difficulty, it is not possible to adjust the curtains;
- the air temperature in the cabin rises to an insufficiently high level, that is, the stove works, but not at 100%.
The VAZ, like the UAZ, is a car where everything breaks down at the most inopportune moment. Therefore, it is better to be prepared for such situations.
A broken heater motor is one of the main reasons for heater failure. Radiator failures, antifreeze leaks and faucet failures are not uncommon.
How much does a new heater motor cost?
Motors are usually sold assembled with or without an impeller. In the Moscow region (Moscow city and region), the price for a new heater motor on a bearing with an impeller for VAZ 2101-07, OKA, VAZ 2121 NIVA cars is about 500-600 rubles. Without an impeller - 100 rubles cheaper.
Characteristics of the stove fan electric motor:
- Nominal voltage 12 V
- Rated power 20 W
- Maximum current 5.0 A
- Rated speed 3000 min -1
- Weight 0.85 kg.
Used on the following cars: VAZ 2101. 2107, 2121 Niva, 1111 Oka.
Interior heating
To heat the car interior and protect the windshield, front door glass, and rear window from fogging and freezing:
- move levers 5 and 6 to the right;
- set lever 7 to the middle position;
- open the heater cover with lever 9;
- turn on the heated rear window;
- turn on the electric heater fan if necessary;
- Install the guide vanes of the side nozzles so that the air flow is directed towards the front door windows.
Warm air will be directed both to the driver’s and passengers’ footwells and to the windshield and front door windows. To heat only the windshield faster, close the heater cover and move lever 7 to the right.
How to make a VAZ 2101 stove
Let's not make any big background stories, but let's get straight to the point. Previously, when I had already come across similar articles, the good advice there was to seal all existing connections in order to avoid air loss. This is partly good advice, but partly not, it doesn’t always just help. What to do in this case?
I would like to tell you about the improvement of the source of that very air supply, namely the fan. The radiator itself gives off more heat; there is simply not always enough air to heat the entire interior of the car. To solve this problem, it is worth operating the engine from the heater fan on a VAZ 2108 or VAZ 2109.
This is due to the fact that the standard VAZ heater engine produces only approximately 3000-3200 rpm and consumes a current of 4.5 A, and the “chisels” have, in some respects, more powerful engines that are capable of delivering approximately 4000 rpm minute, but also consume significantly more - 14 A.
As you can see, the consumption is very large, but at the same time the air flow is completely different, which is the fundamental issue in our case. What are we doing?
We disassemble and modernize the VAZ 2101 - 2107 stove
First, let's take everything apart. Next, you need to cut off the comb and then replace the fan speed control resistor. Why was it necessary to cut down the comb? This is explained by the fact that the dimensions of the chisel engine are larger than the usual classic ones. So, in order to completely cover the foot heating, it needs to be cut down. According to calculations, the result may be approximately a couple of times more air.
First, we drill a hole on the impeller with a diameter of approximately 7 mm. To do this, you should put the impeller on the shaft of the “seventh” engine as tightly as possible, it is advisable to experiment until the noise and vibration are completely eliminated. Before installation, do not forget to perform a test run and only then continue to work.
A question may also arise in terms of “why was it necessary to replace the resistor to switch speed modes?” The answer is simple (it is replaced after testing) with its help a greater air flow is supplied. You also need to remember to replace the fan rotation mode switch, since it is simply not designed for high current and often simply melts.
It is connected according to the usual scheme from a VAZ 2108, in short, you get a regular 3-speed switch, which is activated when the ignition is active.
How to improve the stove VAZ 2101 - 2107 (video)
Warming up of the interior is carried out much faster and, accordingly, the windows thaw faster; with an increase in efficiency, the interior immediately becomes warmer, even in such a large interior as in the VAZ 2104 there is rarely a need to turn on the heated rear window. There is, of course, a minus - the noise increases when such a fan operates, but this is understandable and tolerable. You can also flush the stove radiator, this will significantly improve its heat transfer.
Car air conditioner device
Any car air conditioner consists of the following elements:
- compressor with electromagnetic clutch;
- capacitor;
- receiver;
- evaporator with thermostatic valve;
- main hoses.
Freon gas is used as a refrigerant in the air conditioner. To reduce the friction between moving parts when refueling, a certain amount of special refrigeration oil is added to the gas, which is resistant to low temperatures and completely dissolves in liquid freon.
Compressor
In any refrigeration installation, the compressor is used to create a directed flow of refrigerant. It acts as a pump, liquefying freon and forcing it to circulate throughout the system. A car air conditioning compressor is an electromechanical device. Its design is based on several hollow pistons and a swing washer located on the shaft. It is this washer that makes the pistons move. The shaft is driven into rotation by a special belt from the crankshaft. In addition, the compressor is equipped with an electromagnetic clutch, which engages the pressure disk and the pump drive pulley.
The pistons in the air conditioning compressor are driven by a swashplate
Capacitor
Typically the condenser is installed in the front of the engine compartment next to the main radiator. It is sometimes called an air conditioner radiator because it has a similar design and performs similar functions. The radiator cools the heated antifreeze, and the condenser cools the hot freon. There is an electric fan to force air flow onto the condenser.
The condenser functions as a heat exchanger that cools freon
Receiver
Another name for a receiver is a filter drier. Its role is to clean the refrigerant from moisture and wear products. The receiver consists of:
- a cylindrical body filled with adsorbent;
- filter element;
- inlet and outlet fittings.
The adsorbent used in car dryers is usually silica gel or powdered aluminum oxide.
The receiver simultaneously performs the functions of a filter and a dryer
Evaporator and expansion valve
An evaporator is a device in which the refrigerant changes from a liquid to a gaseous state. It generates and releases cold, that is, it performs functions opposite to those of the radiator. The conversion of liquid refrigerant into gas occurs with the help of a thermostatic valve, which is a throttle of variable cross-section.
In the evaporator, freon changes from liquid to gaseous state
The evaporator is usually installed in the heater module. The intensity of the cold air flow is regulated by switching the operating modes of the built-in fan.
Refrigerant evaporation occurs due to the pressure difference at the inlet and outlet of the thermostatic valveMain hoses
The refrigerant moves from one unit to another through a system of hoses. Depending on the design of the air conditioner and the location of its elements, they may have different lengths and configurations. All hose connections are reinforced with seals.
Main hoses are designed to connect the main components of the air conditioning system
The principle of operation of a car air conditioner
When the air conditioner is turned off, the compressor pulley rotates idle. When turned on, the following happens.
- Power is supplied to the electromagnetic clutch.
- The clutch engages and the pressure plate engages the pulley.
- As a result, the compressor begins to work, the pistons of which compress the gaseous freon and turn it into a liquid state.
- The refrigerant is heated and enters the condenser.
- In the condenser, the freon cools slightly and enters the receiver to remove moisture and wear products.
- From the filter, freon under pressure passes through a thermostatic valve, where it again turns into a gaseous state.
- The refrigerant enters the evaporator, where it boils and evaporates, cooling the internal surfaces of the device.
- The cooled metal of the evaporator reduces the temperature of the air circulating between its tubes and lamellas.
- An electric fan creates a directed flow of cold air.
Do-it-yourself modification of the stove blower
The previous option is quite good, but it is labor-intensive. In principle, you can only get by with modifying the airflow (especially for the left pipe). As a result, the side windows will stop fogging up and you will achieve good results. The main essence of this “tuning” is to install a fan in the left pipe, which will force air from the stove to the deflector. To accomplish this task, it is necessary to remove the deflector from the pipe. This is done very simply - the part is pryed off with a screwdriver and pulled forward. The same operation is carried out on the other side.
Once you do this, you can remove the deflector without difficulty and without the risk of damaging it or damaging the panel. After removing the deflector, you need to remove the holder from the dashboard. It is installed on special antennae and this operation takes only a few seconds. The trick to this tuning is that a regular computer fan (50 millimeters) will be used to force air supply. In order to install it, you must first try the fan on the deflector body. Then markings are applied and cuts are made in the plastic using a utility knife.
As a result, the fan must fit tightly onto the housing so that it does not dangle during operation. After installation, you must check that the blades rotate normally. If something bothers them, adjustments are made. In order for the fan to draw air from the stove and avoid backdraft, it is necessary to make the structure airtight. Therefore, excess openings can be sealed with the parts that we obtained when cutting the deflector mount (for installing the fan). When installing the resulting system, you must first place the fan in the nozzle area, and only then install the deflector housing. Once all mechanical operations are completed, you can proceed to connecting the electrical. The best option is to connect the fan to a wire on which voltage appears only when the ignition is turned on. You can also connect directly to the stove wire.
Repair as a way to solve the problem
In some cases, you can try to repair the fan using fairly simple manipulations. Repairs are carried out quickly and without complications if you have already had to disassemble and reassemble your favorite “six”.
Signs that the stove is still “alive”, but requires some intervention, can be the following signals:
It is when the heater squeaks or makes noise that you can think about trying to repair the problem unit.
If your heater makes a lot of noise, try the following.
Remove the fan and clean off accumulated dirt and dust. Just don’t forget to remove the ground first, since you are working with the electrical component of the VAZ-2106
For instructions on how to remove the fan, see the replacement section. Pay attention to the presence of axial play in the heater motor. You can check this yourself
If there is any play, it should be eliminated. Use a fluoroplastic washer. Please note that after the manipulations have been completed, there should be a small gap between the elements to minimize friction. It is recommended to lubricate the bearings with a thick compound that does not respond to temperature changes (MS 1000 is suitable). Next, disassemble the motor. Make the required number of washers, lubricate them and return them to the electric motor. Attempting to lubricate with engine oil will only give a temporary effect.
If the heater produces an unpleasant squeak, then you should resort to such manipulations.
- Unclip the casing along with the engine and airflow, which goes to the feet of the passenger and driver. In total, the VAZ-2106 has 4 fastening elements. To the left of the heater above the dashboard there is a negative wire that needs to be unscrewed.
- Now you remove the wiring from the button to turn on the fan. You need 2 outer wires.
- That's it, you can remove the bottom plastic with the engine. The motor is removed by removing a pair of metal brackets and installing a new one in its place. Experienced VAZ workers advise choosing a motor with bearings, since it is more reliable and durable.
- We put everything back together in reverse order, and there is no squeak.
Connection diagram for the VAZ 2107 heater fan.
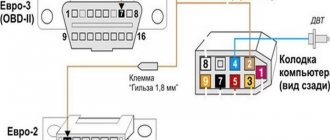
The diagram below shows how the stove fan (4) is powered. Power from the battery, through the mounting block (1), goes to the ignition switch (5) and again goes to the mounting block (1). In the mounting block (1) it passes through fuse F1 (10 amperes) and goes to the stove speed switch button (2). Next, power from the button goes either through the resistance (3) to the motor (4), or directly to the stove motor (4).
The VAZ stove fan will not work if any of its circuit components is faulty. You can determine the reason why the VAZ 2107 heater fan does not work:
- There is a fault in the mounting block.
- The contacts of the heater fan speed switch are burnt out.
- The speed control resistance has burned out.
- There is a malfunction in the heater motor itself.
Let's take a closer look at each of the faults.
There is a malfunction in the VAZ 2107 mounting block.
If the stove stops blowing air, then first of all look to see if fuse F1 in the mounting block is intact. Usually, if this fuse blows, then the heated rear window and reverse lights stop working along with the heater. This fuse must be rated 10 amps. No more and no less. If you install a fuse of less than the nominal value, it will constantly burn out, and if you install a fuse of a higher nominal value, it is possible to burn the mounting block. If you have a fuse of a higher rating (as in the photo below), then the likelihood increases that the mounting block has failed and the plus is not supplied to the speed shift button. How to find out, read the next paragraph.
The contacts of the heater fan speed switch are burnt out.
You checked the fuse and saw that it was intact. Let's dig further. Now we take and remove the gear shift button from the panel and disconnect the wires from it. Afterwards, we reliably connect one end of the indicator light to ground, and alternately insert the other end into the removed terminals of the wires disconnected from the button. The ignition must be on!
If the light does not light up, then power is not supplied to the speed switch and the mounting block is most likely faulty.
If the light comes on when testing one of the contacts, it means either the button or something else is faulty. How to find out? Very simple! To do this, we make a jumper from a regular wire, from the contact, during the test of which the indicator light came on, to one of the other two contacts. The stove motor will work if the button is faulty. If the motor does not work, then it is the motor that is faulty.
The stove only works at one speed VAZ 2107.
When the stove operates only at the highest speed, this means that the ballast resistance has burned out.
In this case, just change it. It is located under the dashboard approximately in the middle, closer to the driver's side.
There is a malfunction in the heater motor itself.
Before disassembling the panel and stirring up the interior, check whether the mass going from the heater motor to the body sits well. It often happens that this wire simply rots.
If you have a multimeter, you can ring it. To do this, take out the speed switch button and disconnect the contacts from it. Now, in the continuity mode, connect one probe of the multimeter to ground, and check the wires with the others one by one. If the motor and ballast resistance are working properly, the multimeter will beep when checking two of the three wires. If the ballast resistance is faulty, then the multimeter will beep when checking one of the three wires, and if the heater motor does not work or does not have contact with ground, then the multimeter will be silent.
If you want to learn how to replace the stove motor, read this article!
Interior ventilation of VAZ 2107
Outside air can enter the vehicle interior:
— with the door windows down;
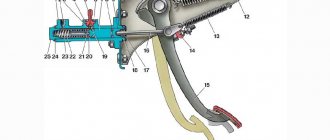
Rice. 2–3. Interior ventilation and heating controls: 1 - side nozzles; 2 — outside air flow regulator; 3 — lever for changing the direction of air flow; 4 - central nozzles; 5 — heater valve control lever; 6 — air supply hatch control lever; 7 — distribution lever; 8 — rear window heating switch; 9 — heater cover lever; 10 - three-position heater fan switch
— through the upper nozzles on the instrument panel, if you move the distribution lever 7 (Fig. 2–3) and the air supply hatch control lever 6 to the right;
— through the side nozzles 1 on the instrument panel, if you move lever 6 to the right and lever 7 to the left;
— through the holes of the heater casing, if you open the heater cover with lever 9 and move lever 6 to the right;
— through the central nozzles 4 directly from the air supply box when the car is moving, if the regulators 2 open the nozzle flaps (summer airflow).
By moving lever 3 in the horizontal and vertical directions, the direction of the air flow from the nozzle changes.
In the middle position of lever 7 and in the right extreme position of lever 6, air will flow through both the top and side nozzles.
If the vehicle is moving at low speed, you can increase the amount of incoming air by turning on the electric heater fan with switch 10.
Design and principle of operation of the VAZ 2107 heating system
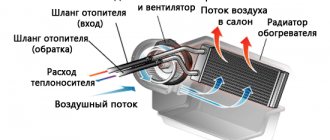
The VAZ 2107 stove creates and maintains a comfortable air temperature in the cabin and prevents the windows from fogging in cold and humid weather. It consists of:
- heater;
- fan;
- control unit.
Outside air enters the casing of the air intake chamber located in the engine compartment under the windshield through an opening in the hood. It is then sent to the heater, where most of the moisture it contains condenses. However, until the radiator is completely warmed up, slightly humid air will enter the cabin.
The heater radiator is heated by coolant coming from the cooling system. The temperature is regulated by a special tap that partially blocks the flow of hot coolant going into the heating system. The more heated liquid enters the heater radiator, the warmer it will be in the car. The position of the tap is changed by a regulator from inside the cabin using a flexible rod .
Air enters the cabin using a heater fan, the rotation speed of which is regulated by a special resistor. When the vehicle is moving at high speed, the heating system can operate without the fan turned on. The air flow entering under the hood creates increased pressure in the air intake box and forces warm air into the cabin.
The heating system of the VAZ 2107 is quite simple (warm air flows are indicated in orange, cold air flows in blue)
Through an air duct system, heated air is directed to different parts of the cabin, as well as to the windshield and side windows, preventing them from fogging in cold and humid weather.
The operation of the stove is controlled using several knobs on the instrument panel. The upper handle regulates the position of the heater tap (the extreme left position is the valve is completely closed, the extreme right is fully open). Using the middle handle, the position of the air supply cover is changed. By turning it to the right and left, the intensity of the warm air supply increases and decreases accordingly. The lower handle regulates the dampers of the heated window ducts. In the right position, the air flow is directed to the side windows, in the left position - to the windshield.
Through the air duct system, heated air is directed to different parts of the cabin, as well as to the windshield and side windows
Find out how to replace the thermostat on a VAZ 2107: https://bumper.guru/klassicheskie-modeli-vaz/sistema-ohdazhdeniya/termostat-vaz-2107.html
Fan replacement
Fan VAZ 2107
If the heater does not work properly, a peculiar hum always occurs that does not go away over time. A hum is not a reason to replace the entire heater. It will be enough just to change the fan and that’s it. Of course, you can use the services of companies that carry out work of this level, or you can do everything yourself. Moreover, this type of work is not particularly difficult. In modern VAZ models, such as the “ten” or “tag”, replacing the fan is more problematic than on older models. This is explained by the more extensive heating and ventilation system on modern VAZ models. The general process of replacing a fan can be divided into three components: dismantling, repair and assembly. And if everything is done correctly, a complete replacement of the heater on the VAZ 2107 will no longer be necessary.
Dismantling
Analysis of the VAZ stove fan
We begin the process of disassembling the fan:
- We prepare a workplace for the car;
- the stove lever, the lowest, is moved to the extreme right position from the driver;
- the instrument panel is dismantled;
- the glove compartment and the shelf located below are removed;
- the center console with radio is also dismantled;
- use a 7 key to unscrew and remove the rod that controls the damper;
Rod controlling the damper
- use a 10mm wrench to unscrew the nut that secures the heater radiator casing;
- the nut located behind the glove compartment is also unscrewed (it secures the right air vent);
- use a screwdriver to disconnect the air vent, which is held on the radiator casing of the car's heating system;
- the fan casing is also dismantled, and then the fan itself;
- the rubber gaskets located on the casing body are removed;
- the red positive charge wire is disconnected;
- use a screwdriver to remove the retaining ring located on the drive shaft;
- The fan impellers are also removed, and then the shaft adjusting rings.
At this stage, disassembling the fan can be called complete. To ensure that all work goes smoothly, you should use the right tools. The screwdriver used to remove the radiator casing must have a wide blade, and the wrenches must have an extension if the nuts are too deep. Heater 2107, the replacement of which will be discussed below, has many parts and connections that differ in the complexity of fastening.
Repair
Car fan repair
On a VAZ 2107, the heater fan, the replacement of which is presented below, involves replacing the old part with a new one. After the fan is removed, repairs should begin. You can use another, more powerful fan, although this is not recommended. Indeed, in this case, it will be necessary to modernize the entire heating system of the car, otherwise it will quickly become unusable. The repair itself does not take much time, since the main actions involve dismantling and assembly. Repair involves replacing the old fan with a new one. In some cases, the heater impeller or electric motor is replaced.
Assembly
The replacement of the heater fan on the VAZ 2107 continues. The next stage of working with the fan is its assembly. Begin:
- install the adjusting rings, as well as the fan impeller on the shaft;
- retaining rings are also installed;
- we connect a positive charge to the system;
- after this, the fan is installed in place, and fastening is carried out using spring-type brackets;
- connect the radio;
- then we install the glove compartment, instrument panel and storage shelf.
Replacing the heater fan VAZ 2107
Replacing a heater fan on a VAZ 2107 is not complete without some secrets that you need to know. Of course, because replacing the heater fan of a VAZ 2107 car is not a simple process, but a complex one and requiring careful attention.
Improvement of the heating system
The design of the VAZ 2107 stove is far from perfect. Therefore, car owners modify it in a variety of ways. First of all, attempts are being made to improve the tightness of air ducts, especially at joints. This allows you to slightly increase the efficiency of heating the interior.
VAZ 2107 owners modify the heating system in a variety of ways
Fan replacement
Often, to improve the operation of the stove, car enthusiasts replace their original fan with a more powerful one, used in other VAZ models (for example, VAZ 2108). The factory fan motor is mounted on plastic bushings, which wear out quickly. As a result, shaft play appears, and a whistling noise becomes audible in the cabin when the fan is operating. Repair and lubrication of bushings in this case, as a rule, do not bring the expected effect. The VAZ 2108 fan electric motor is mounted on bearings. Therefore, installing it in the VAZ 2107 stove will not only increase the efficiency of heating the interior, but will also make the operation of the fan more reliable.
Usually, along with the fan electric motor, a number of other elements of the stove control unit are also changed . The rotation speed of the VAZ 2107 factory fan at a current of 4.5A is 3000 rpm. The VAZ 2108 electric motor consumes 14A at a frequency of 4100 rpm. Therefore, when replacing, you should install the appropriate fuse, resistor (usually from a Niva) and speed switch (for example, from a Kalina).
Video: modification of the VAZ 2107 stove
To dismantle the fan you will need:
- flat and Phillips screwdrivers;
- keys for 7 and 10;
- round nose pliers.
The fan is removed in the following order.
- The instrument panel, shelf and glove box are dismantled.
- Use a 7 key to loosen the casing of the air damper control cable. The cable loop is removed from the lever.
- Use a 10mm wrench to unscrew the nut securing the heater housing.
- Use a flat screwdriver to remove the left and right air ducts from the heater body.
- Use a flat-head screwdriver to remove the latches that secure the fan to the stove.
- The wire terminals are disconnected.
- The fan is removed from the stove body.
- The impeller is removed. If necessary, use pliers.
The size of the new fan (from VAZ 2108) is slightly larger. Therefore, its installation will require some changes in the design of the stove. If only the motor is changed, it will be necessary to make an additional hole in the grille through which warm air enters the lower part of the cabin. If this is not done, the motor housing will rest against the grille.
Replacing the stove body
When installing a fan from a VAZ 2108, you will need to make a new frame, usually from plexiglass. This is quite labor-intensive and will require certain skills.
The material for a homemade frame when modifying the stove can be plexiglass
When making a new frame, all dimensions must be strictly observed. The slightest inaccuracies can lead to vibration or failure of the new fan. Having assembled the structure, you should lubricate the joints with sealant and install the new housing in place. After this, the noise level in the cabin usually decreases, and the stove begins to heat the air better.
The air intake should ALWAYS be from the street, especially in winter, otherwise the windows will sweat (and freeze in winter). Air intake from the cabin is done only when the air conditioning is turned on (in the seven this issue does not arise). The fact that one “sleeve” is not blowing is possible: a) when tampering with the stove, the sleeve did not fit into the right place and the stove is blowing somewhere under the panel, b) some kind of crap got into the nozzle (foam rubber or something like that ).
Anakin
https://forums.drom.ru/russian/t1151720023.html
When making a new frame for the motor, all dimensions must be strictly observed.
Other stove tuning options
Sometimes the design of the air ducts is modified. Additional holes are made in the stove body into which plumbing hoses are inserted. Through these hoses, connected to the side and bottom air ducts, when the engine is running, an additional flow of warm air is created onto the windows and into the legs.
Often the cause of poor interior heating is a clogged heater radiator. The coolant begins to circulate more slowly or completely stops circulating through the heating system, and the efficiency of air heating decreases noticeably. Usually in these cases the radiator is replaced with a new one.
A clogged heater radiator leads to a decrease in the efficiency of heating the interior.
Heater modernization
Every car owner knows that on a VAZ 2107, replacing the heater may be due to its poor performance. But not everyone decides to change the heater - most owners of the “Seven” decide to disassemble, repair, tune and remake the heater as a whole. There are many schemes for tuning and repair, but you need to take into account that it is not so easy to implement them at home. Without any problems, you can seal the joints of the system lines with nozzles with your own hands, and also redistribute the air flows according to need (the author of the video is VAZ 2101-2107 REPAIR AND MAINTENANCE).
However, such a modification of the stove will not improve the microclimate in the cabin. If you want the air in the cabin to be warmer, you will need to increase the air flow with a new radiator, since the factory device will not allow this idea. Fan replacement is also necessary in such cases. The best option would be to install a V8 electric motor.
So, the repair and tuning scheme for the heating system is as follows:
- First you need to know how to remove the stove. You are required to dismantle the lower part of the structure, namely the casing on top of which the fan is installed; the latter can be dismantled.
- After removing the fan, you should carefully cut off one of the so-called ridges that supply air flow to the feet of the front passenger and driver. This is done necessarily, since the electric motor from the “eight” is much longer.
- The impeller is dismantled. Inside this element, it is necessary to increase the diameter of the hole into which the shaft must subsequently be carefully installed. Make sure that the new structure can fit into the installation location as securely as possible.
- Before installing a new fan, diagnose its functionality.
- The resistor should be replaced, since it is thanks to this element that the fan will operate much quieter. As practice shows, it is best to install a resistor from the same “eight”.
- The vent switch should also be replaced. When the heating system is operating, another current will begin to flow to it. Accordingly, over time this button may fail.
Sorry, there are no surveys available at this time.
Lada 2107 › Logbook › Modernization of the stove
I haven't been here for a long time. In general, I decided to upgrade the heater. I disassembled the stove and cut out the fan mount. Like this.
Then I brought the lower part to this state
Then I made a body for a snail from a VAZ 2108. And joined it to the cut out lower part of the original stove.
I used a resistor for the heater motor from Priora. At 4 speed. Next I decided to make a kind of climate control like on the 10th families. I took a ceramic faucet from a VAZ 2108 and a heater damper gearbox from a new model VAZ 2110, and connected them in this way.
And I used the control unit from the same VAZ 2110, having previously changed the white backlight there to a green LED.
The temperature sensor from the same 2110 was placed on the roof. Something like this ))
Price tag: 2,000 ₽
What does the stove consist of?
Before you start improving the stove, you need to understand what elements it consists of. Any VAZ stove consists of:
- radiator;
- air flow distributor;
- three-blade or 5-blade fan and its shell.
If the theater begins with a hanger, then the stove begins with an air intake duct. It is located at the rear of the engine block. It is here that the air coming from the street is purified from moisture. The box is protected from a hot engine by special gaskets - they act as a partition.
After the air is cleared of moisture, it enters the heating system. The steam then comes out. There is a device above the dashboard that allows some of the air to escape when driving.
The heating housing is located in the interior of the car: it is fixed to the partition with the engine.
The heater radiator has inlet and outlet channels. These channels are connected to each other by tubes. The first tube has a built-in heating valve that regulates the supply of cooling liquid. Using a lever located on the dashboard, the flow of fluid into the machine's ventilation system is reduced or increased.
At the bottom of the radiator there is a heating system fan with a small motor that allows you to adjust the fan speed (there are two speeds in total).
The exhaust device allows the incoming air to be distributed throughout the cabin.
In order for the improvement of the VAZ-2101 stove to be justified, it is necessary to understand why the stove is not working well. If you are satisfied with your car, the stove is working properly, but you want to improve its performance, then it’s time to do tuning.