Good day! Today we will talk about the next redesign of the Priors. 4 years after buying the car, I finally got around to the rear brakes. I spent a long time studying the information on which supports to collect this pornography on. I didn’t want to use Taz calipers (I had experience with a previous car), I was looking for an option with a cable handbrake. I went through a bunch of information and settled on Solaris/Rio calipers. The reasons why I did this: - quite reliable (I haven’t heard anything bad about them) - cable handbrake - it’s not a problem to find a drawing for the adapter plate - not expensive (I took it for 3500 rubles from a car with a mileage of 5 thousand km)
We’ve finished the preface and let’s actually move on to the implementation of our plans!
1. We start by finding a drawing of an adapter plate for a Rio/Solaris caliper online, transferring it to the compass and sending it to production to make, fortunately we have a lot of them. Here are a couple of drawings that I managed to find:
From this drawing I took the dimensions of the caliper bushing and the handbrake cable bushing, but the handbrake cable bushing had to be adjusted, as it did not fit in the drawing, I had to shorten it by half.
From this drawing I took the dimensions of the caliper bushing and the handbrake cable bushing">
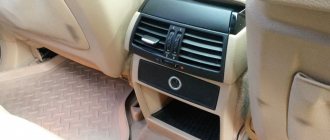
2. When we receive our spacers, we begin to disassemble our old, non-working drum brakes and it’s better to immediately throw everything that relates to them into the trash (that’s what I did).
The most popular car among beginners and experienced drivers is the VAZ-2109. Over time, the realization comes that the car is not ideal and, first of all, there is a desire to change drum brakes to disc counterparts, since they have many advantages.
Benefits of rear disc brakes
Rear disc brakes on the VAZ-2109 are in demand in the automotive spare parts market for a number of obvious reasons:
- with them the braking distance of the car is significantly reduced;
- ZDTs greatly simplify pad maintenance;
- the reliability of the brakes is greatly increased, which improves the safety indicator;
- Braking power is applied evenly across all wheels;
- due to the special method of thermal dissipation, overheating of the heat exchanger is eliminated;
- unsprung mass is reduced;
- in the winter season you don’t have to deal with such a problem as frozen brakes after washing;
- From an aesthetic point of view, the wheels look better.
ZDT for a classic with a mechanical handbrake
Skip to content
DIY rear disc brakes on a VAZ 2107
Progress does not stand still and produces results. Our car enthusiasts are increasingly drawing ideas from new technologies. Modern cars are equipped with disc brakes both front and rear. Domestic cars are still equipped with drum brakes. Progress began in series, starting with the eighth model VAZ. But, as before, disc brakes are installed only on the front axle.
Rear disc brakes on the VAZ 2107. The effectiveness of disc brakes is already known to almost everyone. Therefore, car enthusiasts often convert drum brakes to disc brakes themselves. Such a replacement is accompanied by some difficulties, but this does not stop enthusiasts. What will you need? If you decide to improve the performance of the brakes, then let's figure out what we will need. Firstly, two VAZ 2107 axle shafts, both old and new will do, it all depends on their condition, they have retaining rings, bearings and seals (they must be new).
Secondly, the calipers and brake discs are from the V8. You will also need four lower caliper mounting bolts 21075, more nuts, bolts, washers and clamps. And lastly, front wheel spacers, 5 mm thick. You will also need to make caliper mounting brackets according to the drawing. How to install rear disc brakes on a VAZ 2107 with your own hands? How to remove the rear axle axle shafts can be found in any instruction manual. If old axle shafts will be used, they need to be washed in gasoline.
Since the changes will affect the brakes, drain the brake fluid and remove the entire brake mechanism down to the brake pipes. We will need to remove the hub bearing along with the retaining ring. The locking ring is designed for a tearing load of up to three tons; it is almost impossible to remove it without a press. Since we will no longer need them, we saw through them with a grinder, but not completely (damage to the axle shaft is unacceptable). Then we take a chisel and use it to split the bearing, being careful not to damage its seat. Now you will need the help of a turner.
It is necessary to machine the axle shaft with a spacer to the inner diameter of the brake disc. Due to the design of the disc, we grind the spacer to a slightly larger diameter. Then you can start assembling. We begin assembling the axle shafts. First you need to wash the parts from dust and dirt, then dry them. We install the boot, caliper mounting bracket and compensating ring. Next comes the bearing, also washed to remove process grease and dust. It is better to press it using a piece of pipe; its diameter should be equal to the diameter of the inner ring of the bearing.
One end of the pipe is pressed against the inner ring of the bearing, and the other is struck. There is no need to rush this, as the bearing may be damaged. Hitting the outer ring of the bearing is strictly prohibited, since the working surfaces of the bearing can be broken, and it will very soon fail during operation. The bearing is pressed to the landing stop. After this, check whether the bearing is seated tightly. Next, using a gas torch, heat the retaining ring red-hot and very quickly throw it onto the axle shaft.
The main thing is not to mix up the sides of the ring and make sure that it fits tightly, otherwise you will have to cut it down later and install a new one. By the way, insufficient heating can lead to a loose ring fit, so you also need to monitor this. It is impossible to hammer a cold ring into the seat. Final assembly. After the axle shaft has cooled, we proceed to final assembly. First, a bored spacer is installed, and the brake disc is placed on it. We install the entire structure on the car. Next we install the caliper, connect the brake hoses and bleed the brakes.
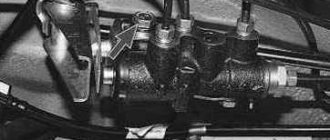
To prevent the brake hose from fraying, we put a piece of rubber hose of a larger diameter at the junction of the brake pipe and the rubber hose and tighten it with a clamp.
The main problem with this design is that for the handbrake you need to use a hydraulic drive or a caliper of a different design (such calipers can only be found from foreign manufacturers).
What should you prepare for?
Using the example of installing rear disc brakes on a UAZ, you can see that such a design change requires a large number of strictly individual solutions.
In the worst case scenario, you yourself need to take measurements of some components of the rear brake system; some of the information can be found by the vehicle’s VIN code and original spare parts catalogues. Having the necessary measurements, all that remains is to select standard disc brakes from another car. Some elements will have to be selected empirically in an auto parts store, at a car dismantling station, or even ordered from a turner. There are easier ways to replace drums. Judging by the reviews, not a single driver who has replaced drum mechanisms with disc brakes regrets the time and money spent.
Source: https://avtotop.info/zdt-na-klassiku-s-mehanicheskim-ruchnikom/
Disadvantages of TRT
Naturally, where there are advantages, there are always several disadvantages:
- First of all, it is worth noting the price, which is significantly higher than that of drum brakes.
- The need for high-quality adjustment, which may cause a call to the service center.
- Poor-quality installation leads to the fact that the safety of the car is reduced - the car skids.
- In the case of the VAZ-2109, like any other VAZ model, the installation of an anti-aircraft protection device is not a certified event and may result in a fine from the traffic police.
- If you get into an accident, most likely, the expert will find you at fault, since the improvements to your car will be illegal.
- The lack of high-quality tuning can lead to the fact that the rear wheels can brake much better than the front wheels, which is fraught with serious consequences and emergency situations.
In other words, self-installation of the HCD on the VAZ-2109 is recommended only if you are confident in your capabilities. Otherwise, it is recommended to contact a service center. Despite the fact that the safety of your car with such tuning will increase, you may encounter problems with the traffic police, since such improvements are not legal.
Necessary materials
If you decide to install the HTD yourself, then you will need the following materials:
- Directly disc brakes, machined under the hub by 0.6 cm. The diameter of the disk should be 24 cm. Please note that it is not necessary to grind the disk itself. If you want to leave it unchanged, then you need to groove the hub.
- Front calipers and hoses.
- Faceplates necessary for attaching calipers. You will have to tinker with this part, since it is quite unusual and requires separate manufacturing to the exact dimensions.
- High quality pads that fit true to size.
- 12 bolts M10 × 1.25 with groovers.
- 8 spacers. You can use timing belt tensioner roller washers for the VAZ-2108.
When you have acquired all the necessary materials, it’s time to proceed directly to the replacement. The procedure is performed in several stages.
Removing fastening elements
So, let's start replacing the brake discs. First you need to loosen the wheel bolts. Then you need to lift the car using a jack. When the wheel nuts are safely unscrewed, you should remove the wheel itself and place it under the front suspension. This is necessary for safety reasons, otherwise you never know what could happen during the work. It is recommended to place a board between the wheel and the suspension.
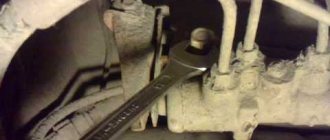
The two fastening bolts, which are located on the back side, must be unscrewed using a socket or spanner. You first need to feel the second bolt with your hand, because you won’t see it right away. The next step is to unscrew the two guide pins. It’s worth warning right away that you shouldn’t even try to unscrew them using a simple ring wrench No. 7. In this case, it is best to take two keys, and ideally use a long 7-mm socket.
Stage 1. Removal of the PTA
First of all, you need to remove the wheel. After this, you need to loosen the handbrake cable and bring the pads together. The guide pins are unscrewed using a 12mm wrench.
If the car is old or the brakes have not been changed for a long time, it is recommended to treat the seats with a wire brush, and also lubricate all running surfaces with WD40. This will help you remove the brake drum without much effort.
Please note that even if the drum is tight, you need to remove it gradually, gently tapping it with a hammer along the entire circumference. If you do not want to damage the part, then use a hammer with a rubber tip or a rubber gasket.
Next, remove the tension spring and guides by prying them off with a screwdriver. After this, the brake pad needs to be lifted up, the spacer bar removed and the pad and tension spring removed.
To remove the second block, you need to remove the handbrake lever from the cable. The bolts that secure the hub to the beam should be treated with WD 40 and unscrewed with a split or regular 17 wrench.
At the last stage, the brake tube of the hub is dismantled. After this, you can begin installing the HCD.
How to change rear brake pads on a Lada Granta
- We hang the rear wheel in the same way as the front. You just don't have to use the handbrake. On the contrary, it needs to be weakened.
- We remove the wheel, and then unscrew the two drum screws with a 7mm wrench. But it can turn sour. Then we screw the same screws into adjacent holes. Wrap them slowly and evenly. They will resist and will pull off the drum. You can tap it lightly. Usually a characteristic click is heard and the drum starts moving.
- Using two mounts, we compress the pads and, accordingly, the brake cylinder. The liquid goes back into the tank.
- Now, using a special hook made of strong wire, remove the four springs. Two of them hold the pads in the center (small ones), and the other two tighten them at the top and bottom (large ones). You can work without a hook, but it is much more difficult, and without experience it is painful.
- Remove the spacer bar. It has different cutouts - the back one is larger to accommodate the handbrake lever. It must be removed from engagement with the cable, and then removed from the block. To do this, you need to unscrew it and knock out the finger.
- If everything is in order except the pads, you can reassemble the system in reverse order, after thoroughly cleaning all components.
- After assembly, adjust the handbrake according to the instructions.
If the design differs in the presence of a master disk and an ABS sensor, the disk must be removed, and of course, do not forget to install it. The sensor is removed from the back of the wheel, but careful craftsmen can do without dismantling it. Otherwise the procedure is similar to that described above.
Stage 2. Installation of the HCD
First, the caliper is mounted. It can be placed in relation to the axis in front or behind, but the second option is recommended as the most symmetrical.
Next, you should dock the hub with the faceplate so that the holes completely coincide. If inaccuracies are observed, you can correct this deficiency using a hammer.
A hammer is also used to straighten the corners of the beam, on which the caliper will rest in the future. Please note that there is no need to place the engraver under the upper left bolt, since the caliper bracket will rest against it. But, again, you have a choice - you can refuse the engraver or grind off its head using a grinder.
The brake is mounted on the hub and secured with a faceplate. The necessary gaps are made using washers. Tightening must be done with a force of 3-4 Nm.
Next, the block is installed, the hose is connected to the caliper, and only after that the tube is connected to the hose.
The line needs to be sealed and checked - this is very important. If you are sure that the HCDs are installed efficiently, you can proceed with mounting on the second wheel.
pros
Let's look at why disc brakes are better than drum brakes:
- Braking becomes more reliable, braking distance is reduced;
- Braking forces are distributed more evenly, given that the VAZ 2110 is a front-wheel drive car;
- There is an effect of faster response after pressing the pedal;
- Unsprung masses are reduced;
- Heat dissipation occurs better, which is especially important when driving on a mountain road or during active acceleration/braking. For this reason, the brake system is cooled better;
- Disk ones are much easier to dismantle and replace;
- There is no need to adjust the handbrake after each repair of the rear brakes, although this will have to be done the first time;
- They do not freeze in winter after washing, like drum ones;
- Rear disc brakes installed on the VAZ 2110 are much more convenient to control and promptly notice pad wear.
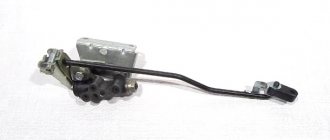
Parking brake (handbrake) VAZ 2101, 2106, 2107 classic
Hi all! Here is a report on installing a hydraulic handbrake on a classic with standard drum brakes. But my installation has one peculiarity - I completely left the standard cable handbrake. The idea is that by tightening the handbrake cables, the brake pads are separated, reducing the working stroke both when the handbrake is operating and when the brake cylinders are operating. Having thrown out the standard handbrake, we increase the working stroke of the brake cylinders since the pads are not spread apart. Well, the standard handbrake remains for regular use.
Minuses
Replacing brakes with disc brakes was not without the famous “fly in the ointment,” although it rather concerns precisely those problems that their installation can cause.
Firstly, our law enforcement agencies consider their installation on a VAZ 2110 as a design change.
What might this entail?
- Fine when passing a technical inspection;
- You can be simply wrong in a controversial accident if traffic police officers emphasize that you have “wrong” brakes;
- And the insurance company may also consider this a reason for non-payment of insurance.
Secondly, the handbrake will additionally need to be modified - or replaced with a hydraulic handbrake, although the latter weakens over time.
Thirdly, it is necessary to refine or carefully adjust the sorcerer so that on the VAZ 2110 the rear wheels do not brake more than the front ones, as this will certainly cause a skid, especially on ice or wet asphalt. To do this, sometimes you even have to grind down the pads by a quarter, or even more.
Choosing pads for Grant
Pads are consumables. Sooner or later they will have to be replaced, so it is advisable to have a set in stock. Then, most likely, defects will smoothly turn into replacement, and the work can be completed faster.
The original pads are produced by the Russian company TIIR.
The catalog number of the front brake elements Grants with an anti-squeak plate is 21920-3501080-10.
At the rear, components are installed for both a system with and without ABS. The version for ABS differs not only in the hole for the sensor, but also in the lining material, adapted to work with the anti-lock system.
Catalog numbers of rear brake pads for Grant:
- With ABS - 21920-3502090-55
- without ABS - 2108-3502090
Among foreign analogues, such eminent manufacturers as TRW, ATE, Brembo, Bosch and others enjoy the largest number of positive reviews. They all produce high quality products. Therefore, the choice of the best parts depends on the preferences and financial capabilities of the owner.
For a quiet ride, softer linings are suitable, which will ensure comfort and safety of discs and drums. At the same time, they themselves wear out faster. The wear of brake elements for sports driving is more intense. There are pads with and without a wear sensor.
Not the least indicator is the tendency of the pads to squeak. When the brakes squeal constantly, it becomes unbearable. Customer reviews will help in this matter.
In order not to make a mistake when choosing, it is best to provide the VIN of the car to the seller, who will not make a mistake when determining catalog numbers or article numbers.
Design Features
It is better to purchase rear disc brakes as a complete set. The VAZ 2110 fits 13 or 14 inch brake discs (ventilated or non-ventilated). Try to purchase certified discs so that they do not have to be modified.
Rear disc brake kit with necessary components
You also need a caliper, which comes in three types, so you need to select it to match the disc. The caliper comes with a hose and brake pads. The kit includes a universal clamp suitable for all calipers - a faceplate.
What are brake discs for?
The essence of the brake disc's operation is to convert the kinetic energy of the vehicle's movement into thermal energy by friction against the pads. When braking is completed, the heat is dissipated. The main requirements are resistance to mechanical and thermal loads.
The disk itself consists of two parts - the rotor and the central part. It is the rotor that the pads come into contact with when braking. This is the heaviest part cast from cast iron. Sports car brakes have holes on the rotor to allow more efficient air flow to the surface and better cooling.
The central part is attached to the wheel hub. On ventilated brakes, this is where the holes are located. This part should not transfer heat to the wheel bearings, so it is made of heat-intensive metals - aluminum, titanium. The rotor is soldered to the central part or represented as a separate component. On cheap machines, the central part is cast iron and is combined with a monolithic rotor.
Installation
It's time to install disc brakes instead of the removed rear drum brakes.
Having knocked off the hub, we will put it back, but in a different way:
- It should be installed through the plate into which the caliper is already mounted. Carefully ensure that all holes line up. Particular attention to alignment;
- Next, use a hammer to straighten the corner of the beam so that the caliper does not rest against it;
- Now you can put the brake disc on the hub, placing spacers between these parts, and secure the disc with a bracket;
- We install brake pads from VAZ 2110;
- First, carefully and securely attach the brake hose to the caliper, and then to the tube;
- To reduce the braking force of the rear brakes compared to the front, you need to partially grind off the friction material of the pads.
Tips for choosing tools
Original wheels for Kalina
We can advise you to immediately purchase everything you need so as not to be distracted later. With the right tools, you can always do your own car repairs. Moreover, operations can be of absolutely any complexity. We can only advise that when purchasing tools, first of all, choose those that are exactly suitable for repairing your car model.
Particular attention should be paid to brands and manufacturers, because this indicator can say a lot about the quality of the product. Collect the optimal set of tools for repairing your car, including all kinds of wrenches, sockets, ratchets, profiles and much more useful things.
Strictly following the instructions for replacing disks on Kalina will allow you to avoid unnecessary mistakes and do everything as quickly and efficiently as possible.
Examination
Having carried out all the above operations - first on one wheel, and then on the second, you also need to check the system for leaks. The first phase is to simply press the pedal.
The fact that everything is done normally is indicated by the fact that the pedal is pressed with force, quite tightly.
But this is not enough. Have someone else press the brake pedal while you try to rotate the parts that make up your new rear disc brakes.
If nothing moves, it means that your VAZ 2110 now has new rear disc brake systems - better and more reliable than the previous ones.
To minimize the braking distance, it is recommended to install a vacuum booster. Details: https://vazweb.ru/desyatka/tormoza/vakuumnyi-usilitel-tormozov.html
Bleeding and adjustment
After any manipulations with the brake system (it doesn’t matter whether you repaired the rear, front or parking), on a VAZ 2110 it is vitally important to bleed the brakes so that an air plug does not form anywhere in them, which can negate the ability to brake at the right moment.
It is convenient to do this together, but you can do it yourself, although this requires some additional equipment. Many people know how to bleed the brakes on a VAZ 2110. The main thing is not to forget to do this diagonally, always starting with the front wheels, and pump the right one first.
After bleeding, you still need to check the braking forces. This requires an outside observer. You accelerate and brake sharply, and he watches as the brakes apply. The front ones should work first, then (with a small gap) the rear ones, and the braking force should be greater for the front ones.
Final stages of work
Before replacing the caliper, you can immediately change the pad apron. This work will not take much time. In addition, replacing the old caliper with a new one is quite simple.
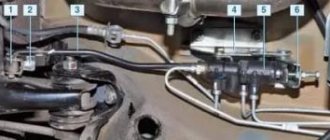
This is how the brake system is adjusted
It is also advisable to change the bleeder fitting. You can install a fitting from the Volga, since these parts are identical. After this, we return to screwing the caliper with the VAZ bracket. You can not unscrew the hose from the old caliper immediately, but only after the new unit is installed. If only the bracket is being changed, then the hose should not be touched, and there is no need to bleed the brakes either.
After finishing the work, you can paint the discs with alkyd enamel. It is best to apply three layers. The replacement of the front and rear brake discs can be considered complete. All that remains is to put on the wheel.