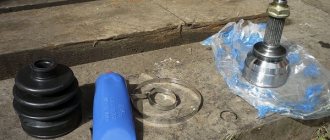
TV - the front bar under the hood on which the radiator, headlights, etc. are mounted.
After a frontal impact, it very often becomes unusable, deforming and taking on part of the load from the impact. During repairs, they usually don’t repair it, but simply bend it “in place”; naturally, it doesn’t hold anything after that. They do this because in the Capella (as in most cars) the TV is welded. But for example, in Mark-2 it is bolted.
Repair as such consists of: - removing the TV from the car - straightening and repairing - installation on the car
Corrections and repairs are done only by the most stubborn, normal people buy used ones for disassembly (along with pieces of side members). They wanted to give it to me for 3000 rubles, yeah right! After the repair, I climbed onto the existential, there is a horizontal bar for 3000 rubles, and vertical ones for 600 rubles, moreover, they are new in the ground, blah!
Equipment and materials. To remove the TV: - Drill + drill bit for drilling out welding points
To repair it: - Straightening hammers - Something to repair it on (anvil)
To put back: - Resistance welding machine - Kriptsangs
I’m not even talking about the fact that you need a set of screwdrivers, keys, pliers, you have to work with gloves, etc. Straight arms are also desirable. I won’t talk about how to sculpt and clean the putty, apply primer and paint; look for rules for using sandpaper and blocks in any textbook for bodybuilders. It would be a good idea to inspect the condition of the bolts and nuts, as well as run the threads in all threaded holes (I broke 3 bolts).
Article on the topic: Bypass what is it on TV
This is what the car looked like before the repair:
Get hit in the face:
This is what happens to the TV:
A couple more angles:
Like everyone else, I first decided to quickly straighten it out with wooden blocks - yeah, I ran away. It didn't look even at all (I thought I took a picture of it).
It seemed to be outwardly even, but in fact the lock was 2 cm deeper than the hood, and the hood naturally did not close.
The procedure is as follows. We disassemble the face: remove the bumper, headlights, bumper buffers (if the car is hit in the face, it’s a piece of cake to remove). We unscrew the front pieces of hardware on which the headlights and air conditioning tank are attached. In the photo it is still hanging, unscrew it. We also unscrew and remove the air conditioner pipes going to the radiator (I couldn’t remove the TV without removing them, except by sawing it into 3 parts). We also remove the wiring. In short, we make it so that only a piece of iron remains from the TV.
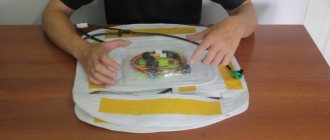
Remove the wings if desired. The desire must be very strong, because... To remove them you need to unhook the fender liner, and to do this you need to remove the wheel, you need to jack it, etc. Therefore, you can unscrew only 4 bolts and place a wooden block. Here you can see:
Here you can see how crooked the TV is. In principle, it will not be possible to align all this “in place”.
It's time to shoot. Some specialists sharpen ordinary drills with a “feather” and drill out welding points with it. After 4 unsuccessful attempts to sharpen a drill like this, I bought it at the store. I thought the feather would be sold, but here it turned out to be a cunning mechanism:
We remember labor lessons for boys. Before drilling, mark the points. Then use a 2.5 drill to drill holes. Attention! At the welding points, 2-3 pieces of iron converge, and they are hardened. Breaking a drill is a no-brainer! I lost 2 drills.
Then we drill everything out with a welding drill. Result:
Article on the topic: How to pickle cucumbers in a bag in the refrigerator
Attention! From the factory, the welding points on the Capella are not treated in any way; the car rots underneath them. We clean off the rust with sandpaper and under no circumstances treat it with anything. Otherwise, weld the figs later.
Here you can see a dent at the very left bolt, because of which the left edge of the TV looked up. It can only be tapped from the inside and with a powerful hammer; I can’t imagine how to do this without removing the TV from the car.
On the other hand, it’s normal:
Bottom left. The vertical rib is broken at its very bottom, near the hole. Because of this, it could not bear the load at all. Everything came out. And it was this piece of iron that pierced my engine radiator (which contains antifreeze).
I couldn’t bend the metal on top of the vertical slats: it stretched and became soft, it didn’t hold the load, it bent as I wanted. I had to strengthen it by welding.
Bodybuilders strongly do not recommend cleaning off the paint with a wire brush, but there was no other way. Moreover, with some practice, you can peel off the paint, leaving the original gray primer. Result:
We seal the welded points with masking tape. We treat all welding areas and areas of special corrosion with Dinitrol (anticorrosive agent based on orthophosphoric acid). Once it hardens, we clean it by hand and apply putties. Once it hardens, we clean it up, apply it again, and so on until we achieve the ideal shape. Again we clean and prime. It is necessary to cover the inside with soil, because... There’s no way to crawl into place (if you don’t remove the engine). From the factory, the TV is covered with gray primer on 2 sides and only the horizontal bar is painted. My soil is white. Those who are especially stubborn can paint it right away. Well, or there, cover it with bitumen anticorrosive.
Last edited by Kiryavchik; 11/21/2010 at 12:20 pm.
Sequencing
First, we’ll tell you how to replace this part yourself. You will need to prepare the car - sequentially disassemble it from the engine compartment so that you have access to the radiator. Dismantle it and the old part. Next you need to do:
- Sand the new part (it is covered with shipping primer) and re-paint it with automotive primer. Do this only in advance, since later it will be impossible to do this work from the engine compartment.
- Use a chisel and hammer to remove the old grate.
- Clean the welding points, putty and coat with primer. Take measurements and weld the new frame. Place the weld points where they were.
- Paint the outside of the structure. It is advisable to additionally cover it with anti-gravel.
- Reassemble the car in reverse order.
Article on the topic: How to break a TV in The Sims 4
Replacing the TV is extremely important, as if it is weak, it may sag and break. The cost of this work at a service station is quite high, so car enthusiasts often try to make the replacement themselves.
Varieties
All power steering can be divided into two types:
- Electrical. The system is represented by an electric motor, a control mechanism and a mechanical transmission. The peculiarity of this type of device is the creation of additional force when turning the steering wheel using a special electric drive. Provides perfect handling at all speeds and during sharp turns. If a malfunction occurs in the control units, the electrical device may suddenly turn off.
- Electrohydraulic. The hydraulic pump is started by an electric motor, which is powered by a generating device. In terms of fuel economy, the electro-hydraulic booster is more preferable. The spare part is efficient and informative.
You can pick up the spare part at the place of purchase:
- At the car market.
- In the auto parts store for VAZ cars.
- At the transport dismantling point.
- In the online store.
- According to the advertisement.
Preparatory activities
To repair the bottom with your own hands, you first need to prepare in a certain way. You will need a set of tools, premises, a lot of time, experience and desire to do such things.
Of the tools, it is especially important to prepare the following components:
- Welding machine. In the case of repairing the underbody of a car, it is better to use a semi-automatic machine with wire and carbon dioxide. It is better, more efficient and more reliable than gas and electrodes;
- Angle grinder. It will be useful, if necessary, to remove rust from the floor, to adjust elements and patches, to clean seams and surfaces;
- Car stands. Here you can use various items. So look for what you have;
- The rest of the kit is standard and includes such components as anti-corrosion solution, mastic for seams, welding wire, sandpaper, primer, soundproofing sheets, paint, etc.
Now you need to drive the car into the garage or other equipment room and put it on stands.
The machine should be positioned in such a way that it is comfortable and safe to work under it.
Disconnect the battery, then remove the doors. In this case, experts advise providing spacers for doorways in order to maintain body rigidity and the necessary geometry.
Dismantling the interior
Since you need to repair the underbody not only under the car, but also from the inside, you will have to completely disassemble the interior. This is a difficult task that will take a lot of time. Be psychologically prepared for this. You will have to dismantle:
- Armchairs;
- Floor tunnel lining;
- Carpeting;
- Air ducts;
- Soundproofing layer.
Carefully collect all the wiring, combine it into bundles if they are not collected, so that later there will be no problems with assembly. Collect all fasteners, distribute them into boxes or bags, and label them. This is extremely important because you may face serious problems later.
Article on the topic: How to check capacitors on a TV
If you plan to completely replace the bottom or weld a panel to the floor, then the dashboard and beard will have to be removed to create open access to the engine shield.
Lifting a car
Welding
So, you have disassembled your VAZ 2110, so now you can really assess the condition of the bottom, as well as analyze the required amount of work. The most optimal situation is one that does not require replacement of elements. The rust spots are cleaned until high-quality metal is obtained, after which they are strengthened by patches. But not everyone manages to face such a situation.
If the holes in the bottom turn out to be through, this will lead to a loss of body rigidity, therefore it is strongly recommended to replace the element completely. In the case of the VAZ 2110, the following body elements are distinguished:
- Floor panels;
- Support platforms;
- Threshold extensions;
- Spar extensions;
- Crossbar;
- Connectors.
Now let's discuss a few basic nuances of welding.
- To replace a part that has “slipped” due to corrosion, it must be drilled out at the welded points or simply cut off using a grinder.
- Do not forget that the brake and fuel system pipelines pass under the bottom. It is extremely difficult to dismantle them, so the easiest way is to cut them off and install new pipeline elements during reassembly.
- If the floor panels are in critical condition, the entire bottom assembly should be replaced. But in this case, be sure to dismantle the exhaust system.
- If it is necessary to change the thresholds, they are dismantled and new ones are installed one by one. It is important to control the geometry.
- If the floor and thresholds are being replaced at the same time, the thresholds are replaced first, and only then the floor panels.
- Carefully mark the elements for welding. The old components must strictly correspond to the new ones being cut out.
- You cannot do without an assistant, so agree in advance with someone who can help you.
- Always start the bottom from the bottom, then grab it.
- Do not make the main weld using a continuous weld. Maintain a step of approximately 4-5 centimeters.
Related article: How to reset network settings on a Samsung TV
When welding work is completed, be sure to carry out anti-corrosion treatment.
Finishing
Now the condition of the new, or rather updated, body should be brought to perfection, providing the necessary high level of protection against corrosion, destructive rust, gravel and other troubles. To do this, perform several sequential operations:
- Clean the metal, removing scale and achieving shine;
- Lubricate the surfaces with joint compound;
- Treat metal elements with primer;
- Apply a coat of paint to match the body color;
- Treat the outside of the bottom with mastic and anti-gravel compound;
- Measure carefully and then cut out the sheet sound insulation with scissors. It is heated with an industrial hair dryer and placed on the bottom. This is if we are talking about bitumen noise.
Updated body
Now the work on repairing the underbody of your car is approaching its logical conclusion. However, a difficult, important stage of reassembly awaits you ahead. Therefore, we strongly do not recommend relaxing.
If you correctly disassemble the interior and dismantle the underbody elements, there should be no problems with their assembly. We advise you to write down each stage, record it on video, and sign each bag with fasteners.
As you can see, it is quite possible to repair the bottom yourself. Just do not work at random, without prior preparation and appropriate tools. This is a good way to save money, but if you lack experience and skills, it is better to contact specialized service stations with such problems.
Differences between EUR and power steering
These are completely different units. To understand the main differences, it is enough to study the hydraulic booster. Its main component is a pump driven by the crankshaft, it is integrated with other parts. The operating principle of the hydraulic booster is based on hydraulics.
As for the electric power steering, it is driven by an electric motor. Its design also includes an electronic control unit, a steering shaft with a torsion element and sensors. The EUR works according to a different scheme:
- When the steering wheel rotates, the torsion shaft twists;
- Special sensors record changes in the position of the shaft and send data to the electronic control unit;
- After analyzing the information, the unit sends commands to the electric motor;
- As a result, the unit creates the necessary force or facilitates turning the steering wheel.
Electric power steering device
Car enthusiasts often argue which option is preferable for the “ten”. In fact, power steering is an obsolete unit that is being actively removed from modern passenger cars. The electric booster works even when the engine is turned off and weighs less than the power steering. The main advantage over “hydraulics” is reliability - the electric unit requires virtually no maintenance. There is less load on the engine, and as a result, less fuel is also needed. The EUR is also good for our conditions because it functions well at low temperatures.
But the electric booster also has its drawbacks. Its design is more complex than that of “hydraulics”, hence the high price. Sometimes the electronic control unit sends incorrect commands, this was especially felt by the owners of the first generation Kalina. If you drive for a long time on a poor-quality road surface (or lack thereof), the EUR may turn off for several minutes due to overheating.
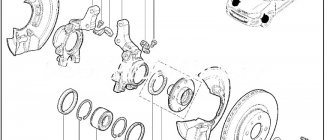
Front wing
On the “ten”, the front fender is dismantled for repair or replacement, as is the radiator frame. Here are the instructions to follow when making a replacement:
- The battery is de-energized by disconnecting the terminals;
- The fender liner is removed;
- The decorative element of the threshold is then dismantled;
- The wing is moved slightly to the side, the side repeater is removed from its place;
- The protective cover is removed, after which the socket with the lamp is disconnected;
- There is a bolt at the bottom that secures the buffer on the side; it needs to be loosened;
- Now you need to unscrew the 5 nuts securing the protective component of the crankcase;
- Another bolt securing the wing from below is unscrewed with a 10mm head;
- All that remains is to unscrew the rear and top bolts. It will be more convenient to do this through the wheel arch;
- The wing is removed;
- A new one is installed, and the seal and cuff must also be changed;
- After carefully adjusting the gaps, the bolts are finally tightened.
Article on the topic: How to hack a Samsung smart TV
Installing power steering - step by step instructions
This instruction is intended for VAZ 2110 cars, which do not have power steering at all. Such models were produced a long time ago, but they can still be found on the road today. In this case, the car can be upgraded with your own hands.
You can install the power steering yourself; for this you will need a power steering kit - today it can be purchased for about 20 thousand. From the tools, prepare a set of keys and screwdrivers; you should also take care of the amplifier fluid in advance.
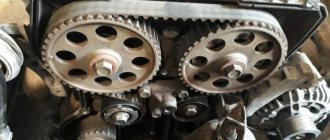
- We dismantle the timing case and install the bracket on three bolts. There are already holes in the interior, so there is no need to drill new ones. Now we install the pin on which the roller will later be installed. There are no holes for it, so we make new ones. Let's put on a video.
How to amplify a new TV on a VAZ-2109
In the process of self-repair, you can strengthen the structure.
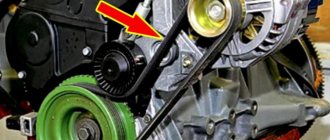
To automate the process, the old TV is removed using a drill. Therefore, the upper and lower parts are often removed separately. During the process, monitor the condition of the bottom - the place where the part is attached to the body. You will need to join two sheets of metal. To do this, leave the width only 2 millimeters, many masters leave 5, which is wrong. Carefully, slowly, remove the metal to leave the desired sheet width. It is necessary to drill holes around the perimeter of the new TV to help secure the part more securely. Through them you can fasten the grille with self-tapping screws. Next, install the headlights, look at the gaps and weld the structure. Clean the weld spots.
To strengthen the structure, weld a profile pipe at the bottom. Weld it to the walls, and then install the second part of the TV. The pipe profile should be square 50x50 millimeters. Thanks to this profile, the structural parts will not rotate. On 16-valve engines, it is imperative to use a pipe, since this power unit is heavier in weight. After you have made the first welding points and secured the part, remove the screws and weld the structure again.
If you find an error, please select a piece of text and press Ctrl+Enter.
The feasibility of installing EUR
Installing an EUR on a VAZ 2110 is relevant if the car is equipped with wider wheels that differ from the standard ones by several sizes. And in any case, installing an electric power steering will allow you to achieve more comfortable control, since the steering wheel will respond even to minor touches. The car will become more “obedient” on the road, and the driver will not have to hold the steering wheel with both hands, although this is contrary to traffic regulations. Installing an electric booster will ensure safer driving (the author of the video is the sokur64 channel).
Body stretching by heating
One of the most effective methods for straightening minor damage is to pull back the metal with heating. It is carried out on its own using a welding inverter. Stretching of the metal is carried out after heating the damaged area - this way the material becomes more pliable, it will be easier to avoid the formation of cracks and other defects. Before starting work, a video with an example of such an operation will help you understand the essence of the process. After warming up, a completely standard tool is used for leveling - rubber and metal hammers of different weights. The damaged area is gradually tapped with them to its normal shape.
It should be borne in mind that stretching must be completed in a timely manner, that is, the metal must cool down by the end of the work, otherwise it may deform and again spoil the surface geometry.
Disassembling the steering rack
- Remove the support and protective cap from both sides of the mechanism.
- Release the protective covers.
- Remove the stop nut using a special wrench.
- Remove the drive gear with bearing.
- Remove the support sleeve and rack.
Next, you need to replace all the elements that are included in the steering rack repair kit, check the product for play and conduct a visual inspection. After disassembling the rack, special attention should be paid to the worm gear mechanism and the support sleeve. Also, if the anthers are damaged, then corrosion of some parts of the mechanism may occur. Everything here needs to be cleaned and rinsed, and also generously lubricated. It is necessary to change the retaining ring and the rack stop. These parts are subject to the most wear and tear. After installing the rack on the car, it is necessary to adjust it.
If disassembly is needed
Let us immediately note that if you have to replace the lining with a new one (the one you choose), then a complete disassembly may not be necessary for this.
Article on the topic: How to dry meat in the refrigerator
But if noise insulation is planned due to the fact that the dashboard rattles when driving, then this cannot be avoided.
Disassembly work requires a lot of time and special scrupulousness. After all, if some fastening is spoiled or broken, then the new or tuned torpedo will not work as it should, it will creak and rattle unhappily while driving, spoiling the mood of the careless disassembler.
conclusions
The desire for additional amenities leads to the complication of the car. And this, in turn, is fraught with a decrease in reliability and costs. In addition, people become weaker physically.
When we want to simplify our life in some way, it turns out that, on the contrary, we make it more difficult. Installing a hydraulic booster on a VAZ 2112 is advisable when there is a genuine need for it; in all other cases it will only be an additional convenience.
Liquid leakage from the system along the way will lead to failure of the amplifier. In winter, due to low temperatures, noise may occur during operation of the device. This brings some discomfort, as the process of driving a car may be disrupted.
Methods for replacing the spar
To replace the spar with your own hands, you must first align it and only then remove it. This is done by cutting. Incisions are made only along clearly defined lines. After this, a new one is installed in place of the old spar. For this purpose, special spot welding is used.
Partial replacement
If there is no need for a complete replacement, then it is quite possible to do it partially. This refers to the renewal and improvement of weakened areas. Only those sections of the side members that do not bear the entire load can be replaced. Most often, through partial replacement with your own hands, the spars are given shock-absorbing properties, and this is done as follows:
- In the production process of stamping parts, special unique folds are provided. They are necessary so that in the event of an accident the spar does not deform, but simply folds into an accordion in a given place;
- installation in the main S-shaped building;
- installation in a housing of variable cross-section, as well as special holes and chamfers.
Do-it-yourself partial replacement has its positive sides. No coupling or specific type of welding is required. This part is installed very easily, and after all the work is done, it is adjusted to the required dimensions and installed back.
Complete replacement of the rear spar
If the spar is severely deformed or does not fulfill its main shock-absorbing tasks and does not fully provide the strength of the body, then its complete replacement will be required. To make the operation easier, the machine is driven onto an overpass or inspection pit. In cases where this is not possible, a regular jack will come to the rescue.
Article on the topic: Okof plotter what to choose
You should start by dismantling the parts attached to the spar, after which pulling is carried out. It is clear that it will not be possible to give it its original shape, but it is worth trying to get closer to this. Afterwards the protective coating is removed, and only then the spar itself is removed, that is, cut off from the fastenings.
If the spar has been successfully removed, it is time to prepare a grinder for further work, on which a special type of stone is mounted. Using this device, all welding residues are removed, and areas where corrosion processes have begun are also removed.
Upon completion of these works, the wheel arch is prepared, which is connected to it. Installation of the spar is carried out in the reverse order and is secured using welding. After installation, a thorough check. To do this, use the chiseled method.
Using a grinder, you need to refine all the places where the welding joint was made. To do this, the welding is removed using a grinder, and then these places are covered with a special sealant.
The process of replacing the front spar is carried out using a similar method.
Radiator frame
This body part of the “tens” is called a TV. The element is replaced in the event of a strong front impact, when the “original” part is easier to replace than to repair.
As a rule, in an accident during a frontal impact, the upper frame and the beam, which serves as a reinforcement for the bumper, are most deformed. But the TV is changing completely in any case.
According to experts, replacing a TV on a “ten” is much easier than on a “nine” or other models released by AvtoVAZ earlier. This is explained by the simplicity of the design of the “Desyatovskaya” radiator frame.
Note. In some cases, you can find the upper frame and lower beam separately for sale.
The TV is mounted to the body using welding points. They are located in 4 places - the radiator frame is attached in the places where it connects to the wing reinforcements (“booms”) and to the side members. To dismantle the TV, it will be enough to drill out the points in these places and then cut them off with a sharp chisel.
Advice. In the process of removing the TV, it is possible to dismantle the radiator itself, only in this case you must remember to disconnect the radiator pipes.
After the new radiator frame is put in place, the welding areas will need to be thoroughly cleaned with an emery wheel and puttied. In places where the frame touches the body, sealant must be applied.
Article on the topic: How to connect an hdmi cable to an lg tv