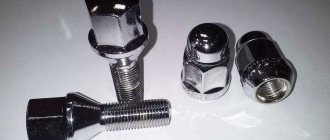
Hi all ! Everyone posts photos of beautiful installed cast and forged wheels, but few people bother with the choice of wheel bolts
, and some fasten the new casting with the bolts left over from the stamps, and many tire fitters unknowingly do the same.
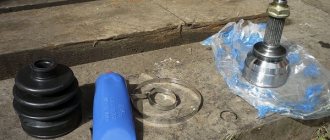
Here are the bolts on the grant stamps
To avoid screwing in bolts that are too long - which can simply jam the wheels or snag, break the cable and break the parking brake system mechanism, and vice versa - installing too short ones - the installation of which risks the wheel coming off while driving. In order to find out how many mm a bolt is screwed into a hub that has a thickness or, more correctly, a width of approximately 10 mm, you need to calculate how many turns the bolt makes when unscrewing or tightening the disk and multiply this number by the thread pitch of 1.25 for vases, i.e. on stamps the bolt makes about 7 revolutions 7×1.25=8.75, which corresponds to almost full insertion of the bolt into the hub=10mm, ideally the bolt would come out of the hub by the size of the bolt chamfer or 2mm. When selecting bolts for my casting, I took bolts from a VAZ2101-07 with an ideal size of 27 mm, in contrast to the stock 24
also with the same dimensions come bolts from the VAZ-1118 Viburnum Viburnum with a shoulder M12x1.25x27mm turnkey 17mm Why did I take bolts from the classics,
Practical advice
In order not to repeat the mistakes of novice car enthusiasts, I want to give you some tips.
They will definitely come in handy when repairing a LADA Granta car:
— buy bearings only from trusted sellers. Preferably in a car store, and not in your hands;
- do not buy a cheap product. The price, of course, tempts you, but then you will have to replace the product again.
- You may not have to replace the rear wheel bearing. Just try tightening the nut with a torque wrench. If the hum goes away, you can continue driving.
- if you have already undertaken to replace the bearing on one side of the car, it is advisable to do it on the other, even if it cannot be replaced. Its resource has also been exhausted. After a short period of time it will need to be replaced.
During the renovation process, you may encounter unexpected problems and questions. Feel free to write in the comments, contact me. I'm always in touch and ready to help with practical advice!
Spacers to increase ground clearance
We offer spacers to increase ground clearance (ground clearance) for imported and domestic cars. The material of manufacture is high-strength aluminum alloy AK 12 with anti-corrosion treatment (polymer coating).
Spacers to increase ground clearance provide:
- increase in ground clearance (clearance) by 20, 25, 30 mm or more;
- compensation for sagging springs. Returning the body position to its original state;
- reducing the likelihood of getting caught by the bottom and bumper when the road is uneven;
- avoiding the “nod” effect in case of emergency braking.
- Can be sold either in parts (back - front) or as a set.
If you do not find a suitable spacer in our catalog, you can order production according to individual parameters.
A little about wheels
Tires - Today, these are one of the most high-tech products on which safe and comfortable movement by car directly depends. There are a large number of tires on the market today from many different manufacturers. They consist of a frame, a protector and a breaker layer between them. And also the toughest part of the tire - the bead, which is designed for reliable fixation and sealing on the rim.
Disks - In the modern world, a wheel includes two parts: the rim - which is a surface closed in a ring with sides on which the tire is fixed, and the disk - which is a support for the rim with holes for fixing the entire wheel to the hub, most often using bolts or hairpins. Currently, there are the following types of discs: stamped, cast, forged, composite and combined.
What is the effect of different tire and wheel sizes?
| Options. | Increasing the diameter of the disc. | Increasing the width of the disk. | Increasing tire width. |
| Exterior of the car. | will improve | will improve | will improve |
| Behavior on the road. | will improve | will improve | will improve |
| Control stability. | will improve | will improve | will improve |
| Road grip. | Will not change | Will not change | Will improve |
| Resistance to gliding on the water surface. | Will not change | Will not change | will get worse |
| Comfort while traveling on rough roads. | will get worse | Will not change | will improve |
| Noise from the road surface. | Will not change | Will not change | will increase |
| Gasoline consumption. | Will not change | will increase | will increase |
| Tire wear. | Will not change | Will not change | will increase |
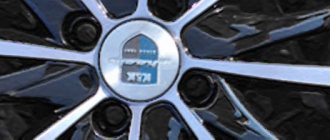
View of Lada Granta with different types of tires
In order to more clearly understand how the appearance of a car will change depending on the type of tires and wheels, we offer a collection of pictures.
Tightening the wheel bolts
The Lada Granta wheel fasteners require mandatory tightening during installation. This must be done correctly. Otherwise, the hub may be damaged or the bolts may unscrew while driving.
Procedure
Wheel bolts for the Lada Granta are tightened with the car standing on a flat surface. At the same time, it must be securely secured with a handbrake and first gear engaged when the engine is not running to prevent independent movement. It is better to tear off old bolts from the threads while the car is standing with all wheels on the ground, but then it needs to be suspended using a lift or jack to lift the wheel to be removed from the ground. If you do not do this, you will not be able to remove the wheel rim.
To install and secure the wheel, proceed as follows:
- put the wheel rim on the hub or drum, aligning the holes (guides screwed into the hub and drum help with this);
- press the disk with one hand, and with the other, insert the bolt and attach it to the thread;
- the inserted and tightened fasteners are tightened by hand, then all other bolts are inserted and tightened in the same way, installing them crosswise;
- when all the fasteners are fastened, they are tightened using a wheel wrench, holding the wheel with your hand, working crosswise;
- remove the car from a jack or lift so that its wheels are on the ground and tighten it with a bolt or torque wrench to the required torque, also crosswise.
Sometimes it's not easy to get into the thread with your hands. Therefore, you can insert the bolt into the head. The bolt is tightened strictly clockwise.
Tightening the wheel bolts
Tighten the fasteners crosswise with noticeable force. It should be as indicated in the manual so that the bolts do not come loose on the road. But at the same time, it is important not to overtighten them, because this can lead to pressing through the metal of the stamped disk or breaking the thread.
Tool
The bolts are tightened with a wheel wrench. It can be cross-shaped or with a telescopic handle. You can use a torque wrench to control the force. At the end of the tightening, to enhance the effect, many take a pipe mounted on a barrel, but this is justified only for keys with a very short handle (20-30 cm).
An effort
The force when tightening fasteners for Lada Granta wheels is 90-120 Hm. But you can accurately determine it with a torque wrench. In its absence, you will have to rely on your own feelings. It is important that the bolts are tightened firmly, but not overtightened.
Tightening fasteners on cast, forged and stamped wheels - is there any difference?
There are no significant differences in tightening on different rims. The difference lies in the correct choice of bolt length. But novice car enthusiasts should be more careful when working with alloy wheels. Careless actions can ruin the appearance of the casting tool.
Locking bolts for alloy wheels
Secret wheel bolts for the Lada Granta are an excellent solution for those who have expensive or exclusive alloy wheels. They are being hunted by criminals.
Such fasteners should not be unscrewed with a regular wheel wrench, gas screwdriver or other tools. They come with a special key, and sometimes two. Only they allow you to unscrew such a bolt without any problems.
High-quality secrets are expensive. The price of such a kit is about 2000 rubles. They come with two keys, which need to be kept in a safe place. Unscrewing fasteners without special tools can be difficult.
We change the timing belt on 8-valve engines with our own hands: photos and videos
According to the regulations, the timing belt needs to be replaced every 75,000 km. The advice applies to VAZ-11183, 11186 and 21116 engines. All of them are 8-valve and are installed in Grant cars. Let's consider replacement steps.
Preparatory operations, all engines
First, remember a simple rule: the 11183 engine cannot bend its valves, so you can rotate the crankshaft and camshaft pulley separately. For motors 11186 and 21116 this would be unacceptable! Read more about engine 21116 in this material.
Before carrying out any work, disconnect the battery terminal (key 10), as well as the DPKV sensor. But first you need to remove the protective cover.
Unscrew the 4 bolts and remove the protection
To remove protection you need:
- 11186/21116 - using a “5-point hexagon”, unscrew the 4 bolts on the upper part, which is then removed. And the lower part is also dismantled;
- 11183 – use a 10mm wrench to unscrew the 3 fastening bolts.
It will not be difficult to cope with what is said above.
Disconnect the connector, unscrew one screw
The crankshaft position sensor (CPS) is disconnected from the connector (see photo). Then the fastening screw is unscrewed with a “10” wrench. The sensor itself must be removed.
Installation of all shafts according to marks
First check that the gear is in neutral. There is a rubber cover on the crankcase body closer to the clutch assembly. It needs to be removed.
Inspection window and rubber plug
The point is to achieve alignment of the marks on the flywheel and in the scale slot. When this is done, fix the flywheel with a screwdriver.
Of course, it is easier to perform such an operation with two people. Know that the desired position of the shaft corresponds to the alignment of marks AB and CD (see figure).
Timing drive in 8-valve engines
The crankshaft itself must be rotated to the right using a 17 or 19 key (motor 11183). The meaning of this is illustrated in the photo.
You need to turn the generator drive pulley
The alternator belt needs to be removed
The alternator belt blocks access to the timing drive parts. You will have to loosen the fastening and remove this belt.
More about this:
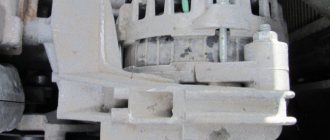
Generator mounting, 13 bolts
Use a 13mm wrench to loosen the lower mounting bolt. Then unscrew the upper fastening nut and remove the bolt. The generator casing is pressed against the engine and the structure is secured with wire. The belt can now be removed.
Installation of the alternator belt is carried out in the following sequence:
- Secure the generator;
- Throw the belt over the pulleys, as shown in the photo;
Installation of the alternator belt, first step
- Having engaged 5th gear, roll the car back.
Please be aware that reusing the alternator belt is a last resort. It would be better to buy a new part.
Replacing the timing belt
Make sure the engine flywheel has been correctly installed and secured (see above). Then, using a “17” or “19” wrench (ICE 11183), unscrew the screw holding the generator drive pulley. The pulley itself and the protective washer are then removed.
Now you need to weaken the clamping force in the tension roller:
11186/21116 – using a “15” round wrench, unscrew the fastening bolt 2-3 turns. The roller will “release” the belt automatically;
Automation will work to weaken
All that remains is to replace it: a new part is installed in place of the old timing belt, and that’s it. Installation of the remaining parts is carried out in the reverse order.
Basic replacement operation
To increase downforce, the outer roller assembly is rotated counterclockwise. For engines 11186/21116, an additional requirement must be met: the two rectangular marks must coincide.
Mandatory requirement for motors 11186/21116
Upon completion of installation, the marks AB and CD should also match. The drawing for them is given above.
Tightening torques
To perform installation correctly, you need a wrench with a force regulator. The value on it is set depending on the type of part:
- Tension roller mounting screw (11186/21116) – 17-27 N*m;
- Roller fastening nut (11183) – 30–36 N*m;
- Generator pulley fastening – 105–110 N*m.
First, the tension is adjusted on the roller, and then the fastening nut or bolt is tightened.
Parts from the VAZ catalog
Let’s immediately look at the list of VAZ components and special tools:
- Tensioner roller for internal combustion engine 11183 – 2108-1006120, nut for it – 00001-0021647-21;
- Timing belt (11183) – 2108-1006040-10;
- Automatic tension roller – 21116-1006226;
- Timing belt (11186/21116) – 21116-1006040;
- Key for automatic roller – 67.7812.9573-01;
- Key for roller VAZ-11183 – 67.7834.9525.
The tension roller of the "2108" family has two slots on one side. These slots should look “up”, that is, away from the engine.
Tensioner roller for motor 11183
The slots were made for special tools. It is designated by the numbers “67.7834.9525” (see list). And for automatic rollers, the key is designated differently - “67.7812.9573”. What it looks like is shown below.
The automatic roller can also be adjusted
It remains to list how the mounting bolts, washers, etc. are designated:
- Three bolts for the VAZ-11183 cover – 00001-0009024-11, washers – 00001-0026406-01;
- Timing drive cover (11183) – 21080-1006146-10;
- Bolts for VAZ-21116 covers – 2108-1003286-00, spring washers – 00001-0011977-73;
- Top cover – 21116-1006226-00, bottom cover – 21116-1006218-00.
We hope no questions arise here.
Imported analogues
Various components are suitable for replacing belts “2108-1006040-10”:
- GATES – 5521 or 5521XS;
- BOSCH – 1 987 949 095;
- DAYCO – 94089;
- CONTITECH – CT527;
- Finwhale - 2108-1006040.
The timing belt “21116-1006040” can be replaced with another part:
- GATES – 5670XS;
- CONTITECH – CT1164;
- QUARTZ (Germany) – QZ-5670XS.
Usually the choice is made in favor of GATES products. The letters "XS" in its catalog mean "reinforced". Grantovods have already told us in detail about the timing of replacing the timing belt, its choice, and signs of wear in the material: when to change the timing belt on Grant: recommendations from the plant and grantovods.
Original timing belt and fake
Attention! Components from GATES (England) are most often counterfeited! From the photo you can understand what the main difference is. Beware of fakes.
Disc brake systems "Tornado"
For owners of front-wheel drive VAZ and all-wheel drive Niva cars, the Vector Company offers: – sets of rear disc brakes “Tornado”. Ford Focus I calipers and pads are used, a standard handbrake is connected without modification. The delivery set includes a set of fasteners and parts necessary for installation. Instructions and certificates of conformity are included. – sets of front reinforced brakes “Tornado” for GAZ pads: R 14 or R 15 for VAZ cars and R16 for VAZ “2121” cars.
In terms of its consumer qualities, the design is superior to most existing analogues, and in terms of price/quality ratio it has no equal on the Russian market. In the process of developing the Tornado braking system, two Russian patents were obtained.
“Tornado” brakes are intended for front-wheel drive VAZ 2108 – 2115, Lada Kalina, Lada Priora, Lada Granta and their modifications with ABS, as well as VAZ cars with all-wheel drive.
General background information
Ranges of possible values for tires and wheels Lada Granta 2019.
Tires
| Diameter | 13″–15″ |
| Width (mm) | 175–185 |
| Profile (%) | 55–70 |
| The smallest size | 175/70 R13 |
| The biggest size | 185/55 R15 |
Wheel disks
| Diameter | 13″–15″ |
| Width (inches) | 5–6 |
| Reach (mm) | 35–35 |
| Drills | 4×98 |
Expert advice
When choosing tires for a car, you must first follow the manufacturer's instructions. Ask yourself a few questions.
- On what roads will the car be primarily used?
- Do you need increased cross-country ability?
- How much of the route will be city roads and how much will be highways?
- Will the vehicle carry heavy loads?
The answers to these and similar questions will help determine which tire parameters you need to pay special attention to.
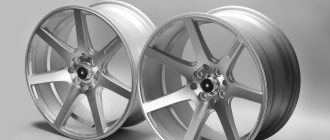
How to choose the right wheels for Lada Granta 2022?
3 types of rims:
- Stamped (economical price category) - made from a sheet of iron by stamping on a press.
- Light alloy - manufactured by casting (more reliable than stamped ones).
- Forged (the highest quality and more expensive than the previous ones) - made from light alloys by stamping at high temperatures.
The choice depends on financial capabilities. However, it should be borne in mind that the quality of the road surface on which you have to drive every day must also be taken into account.
So, if it gets into a hole, a stamped disk will bend and will not cause harm to the tire, but a forged or cast one can cut it. There is a possibility that the cast disc may burst or crack.
It should also be noted that repairing “stamping” wheels is cheaper than repairing cast or forged wheels. But wheels with high-quality cast and forged disks kill the suspension less, because lighter and have more perfect geometry (better balanced).
The same wheels may or may not rub with tires on the same car - wheel alignment adjustment will help here.
What is the tire pressure?
It is the driver's responsibility to constantly monitor tire pressure. This will avoid standard problems associated with vehicle operation. An abnormal pressure value often causes:
- deterioration of management;
- uneven tread wear.
Often the car owner independently reduces the pressure in the wheels of his own vehicle. This reduces the load on the suspension, and the car “passes” various road irregularities an order of magnitude easier. But it is worth noting: a decrease in pressure even by 0.1 MPa leads to serious problems. The main ones include:
- increased fuel consumption;
- rapid wear of the outer tread segments;
- the car becomes less maneuverable.
An overinflated wheel causes no less problems. The central part of the cylinder begins to wear off quickly. In addition, at ambient temperatures of more than 60 degrees Celsius, the tire may simply explode. Which will lead to driving into the oncoming lane.
© 2019-2021 Avto Sprav. Directory of factory parameters of disks and tire sizes.
Attention! Our catalog is an information resource and does not guarantee full compliance of the proposed dimensions with your car. Make sure that your car has wheels of the appropriate radius.
The bolts are tightened with a wheel wrench. It can be cross-shaped or with a telescopic handle. You can use a torque wrench to control the force. At the end of the puff, to enhance the effect, many take a pipe mounted on a balloon.
Lada Granta wheel fasteners are of interest to many car owners. After all, the need to remove or replace a wheel arises unexpectedly and for various reasons. Therefore, you need to know how and with what to fasten it.
Adjusting the wheel bearing VAZ 2107
Let's take a closer look at the process using a classic example. This will also be useful for owners of Niva, Kopek cars, and the entire model range of classic Lada cars. There are two ways:
- Using a torque wrench (according to the manual), which everyone always has ready in their garages.
- Using traditional methods, by touch, “by eye”. In this case, we will only need “straight” hands and the key to “27”.
Let's consider both methods
The only difference will be in the use of special tools and the right hands.
1. Hanging the wheel on a jack
2. Remove the protective cap to gain access to the hub nut.
3. Use a sharp object (a thin screwdriver, a sharpened rod) to unlock the edges of the nut. It is recommended to replace it with a new one. Since after repeated adjustment, the old crimping points on the sides of the nut may not coincide with the grooves on the steering knuckle axis.
4. In case of replacing new bearings, turn the wheel in different directions. Some people recommend hitting it vertically several times. This is necessary so that the rollers of the new bearings take their position in the hub race.
5. Tighten the nut. Using a torque wrench – 1.9-2 kg/cm. if without it, go all the way, but without fanaticism. We rotate the wheel again several times in different directions. We check for play. In this case it shouldn't exist.
6. Loosen the nut and tighten it with a force of 0.7 kg. Without a “fashionable” key - a little looser than the previous tightening.
7. Loosen the adjusting nut half way or 20 degrees. I think not everyone will be able to accurately calculate these 20 degrees. Therefore, we divide the edge of the nut in half and unscrew it to this distance.
8. Check the play by rocking the wheel in a vertical direction. The backlash will be minimal.
9. If you are doing this for the first time and do not know what the play should be, then it is recommended to loosen the nut a little more and try how the wheel will play. You can compare whether it has become larger or not. Tighten the nut until it becomes barely noticeable.
10. Lower the car from the jack and lock the hub nut. It is advisable to do this with the car lowered. This way you will avoid a barely noticeable shift in the adjusting tightening of the nut. In the lower position, the wheel will be locked together with the hub, which will prevent them from turning.
11. Check the presence of lubricant in the protective cap. If necessary, we change it.
Video on how to independently adjust the front wheel bearing on a VAZ classic:
Factory tire and wheel sizes
These durable steel wheels consist of a rim onto which the tire is directly attached. This entire structure, or rather its elements, are connected to each other using strong welding. And for convenience during operation, each disc contains information about the width of the rim profile, the moment of disc departure and other indicators.
After a certain point in time, the wheel rims will need to be checked for lateral and radial runout. Such maintenance should certainly be carried out at tire service stations or technical service stations. service.
Wheel rim bolt pattern on Lada Granta
All these parameters are most clearly presented in this picture.
Table of ideal wheel and tire parameters
Thanks to this table, you can select the optimal tire and wheel parameters.