If, when the car is moving, an unpleasant noise is heard in the area of the wheel, which may disappear when entering a sharp turn, then this indicates a malfunction of the VAZ 2110 wheel bearing.
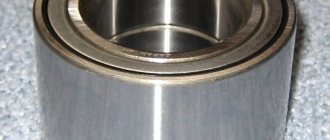
Front wheel bearing
This is a fairly common malfunction; it occurs on every fourth car with high mileage. It’s not difficult to correct the situation; you just need to have a garage with a pit and detailed instructions for work.
Experienced technicians recommend not delaying the replacement of this component in order to avoid unnecessary troubles.
Tools and spare parts
The fact is that the VAZ 2110 wheel bearing is a small part, and in order to work with it, you need sufficient lighting and some convenience. Therefore, a car prepared for repair should be driven into an inspection hole and sufficient light access should be created to the repair unit.
Before going down into the pit, you need to prepare all the tools and materials. It should also be noted that replacing the front wheel bearings is much more difficult than doing the same work on the rear components.
Therefore, you need to start work from the front node.
Front wheel hub diagram
A list of required tools should be provided:
- A special puller to remove the bearing;
- The so-called mandrel, that is, a pipe cut of the required size. This device is used to knock out hubs;
- Head 30, equipped with a high-quality wrench;
- Socket wrenches 19 and 17 sizes.
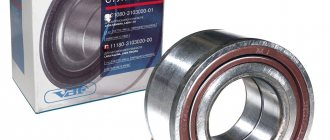
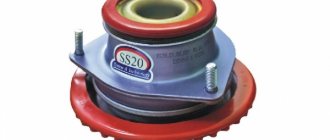
In addition, you need to purchase new suitable bearings that will be needed for replacement. For a VAZ 2110 car, you should choose Russian-made bearing parts rather than giving preference to Chinese analogues. The difference in price for these products is small, so there is no need to experiment.
Hub design
It is necessary to know the structure of the front wheel hub in order to detect and eliminate possible malfunctions. Despite its relatively complex functional purpose, the element has a fairly simple internal structure. Among the main parts of this unit are:
- hub body;
- bearings;
- wheel studs;
- special sensors.
The hub body is a durable cast part made of a special alloy and processed with turning tools.
This element must be considered as a single complex having bearings and studs. For the majority of manufacturers, these elements are only included as a set; they are inseparable from each other.
Stages of work
Work begins with the car being placed in a comfortable position and in first gear. To prevent it from rolling, it is better to install special wheel chocks under the wheels.
Now you can go down into the inspection hole and begin actions that are carried out in the following order:
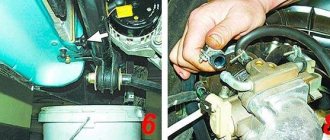
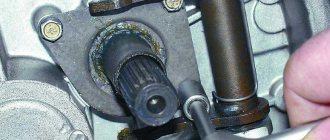
- Using a wrench, unscrew the wheel bolts, followed by unscrewing the bearing nuts from the front wheel hubs with a 30mm wrench. It is worth noting here that if a VAZ 2110 car has alloy wheels, you will have to remove the wheels. In order to turn the front hub nuts, you must press the brake pedal at the moment of turning, so an assistant is needed here;
- Now you need to use a screwdriver and use it to press out the calipers;
- As soon as they are pressed out, you need to use the 17th key to unscrew the calipers from the steering knuckles. As a result of these manipulations, the caliper may hang on the brake hose; to prevent this from happening, you must carefully tie it up;
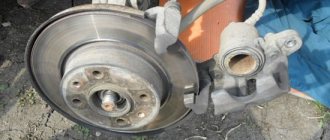
- Next, you need to carefully unscrew the brake discs directly from the hubs.
Remove the cap
Unlock the nut on the hub
Unscrew the hub nut
Remove the wheel, caliper and brake disc. unscrew the hub nut completely
We screw in the studs and attach the brake disc to them
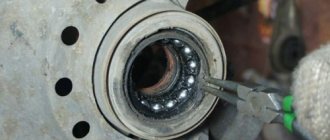
We knock the hub out of the bearing with blows
Remove the bearing from the CV joint
Remove the retaining ring in front of the bearing
Use a puller to press out the wheel bearing
Wheel bearing and puller
Pressing in a new bearing
Press the hub into the bearing
In addition to the listed types of work, you may also need to remove:
- Trunnion assembly;
- Hub cap;
- Retaining ring.
After this, the hub part is available to the master and can be replaced. There are several options for reinstalling a component, so a few words should be said about each.
How to replace the front wheel bearing of a VAZ 2110 without dismantling the steering knuckle
In order to quickly remove the wheel bearing without removing the hub itself and the entire steering knuckle, you need to secure it well, put the car on the handbrake, remove the wheel (after unscrewing the hub nut with a “30” wrench).
After this, you need to perform all the same steps as when replacing a brake disc: remove the caliper and the brake disc itself. To dismantle the hub you will need 2 head bolts and a brake disc. We screw the studs (bolts) evenly into the hub through the holes of the brake disc. Next, you should gradually pull off the hub with sharp jerks. Or use a hammer to knock it out through the disk.
As a result, the hub will come out of the steering knuckle, leaving the inner part of the bearing on it, and the outer part in the steering knuckle (trunnion).
To press out the bearing, perform the following steps:
Pressing out the bearing with a puller
- Remove the retaining ring (it’s most convenient to use a ring puller).
- Using the socket “17” we unscrew the ball joint.
- We move the rod and lever down, move the steering knuckle and pull out the grenade.
- To press out the bearing, you need to use a special puller (article 77722), which consists of a bolt, a support washer, a cup, large, medium, small washers and a nut.
- Before installing the puller, it is necessary to remove the second retaining ring from the inside of the steering knuckle.
- On the same side we install the puller cup, and on the outer side we install a washer and screw the nut onto the bolt.
- By gradually tightening the nut, you will be able to press out the bearing.
- After removing the old bearing, you need to replace the retaining ring from the inside of the knuckle (it will support the new bearing).
- Then we press in the new product using the same puller, turning it in the opposite direction.
Finally, install the hub, brake disc and caliper in reverse order.
Replacement methods
First way
So:
- In the first case, it is necessary to use a puller to remove the bearing;
- Simply carefully remove the bearing and replace it with a new one;
- After installation, all the steps above should be carried out in reverse order.
The main advantage of this method is the fact that the technician will not need to touch the camber adjustment bolt, which is very difficult to put in place later.
Bearing puller from the hub
If we talk about the disadvantages, we can note the following: the master will have to take a very uncomfortable position to perform actions. That is why it is necessary to prepare a lift and climb into the inspection hole.
But it is still very inconvenient for a car enthusiast to knock out the hubs in this position and press in the bearing assembly.
Second way
Consists of the following steps:
- To remove the bearing using the second method, you must carefully dismantle the steering knuckle and completely remove the hub;
- After this, the master will need to go to the workbench;
- The VAZ 2110 wheel bearing is replaced directly on the workbench;
- After this, everything is installed back, just as it was removed before.
Remove the retaining ring
Relying on the inner ring of the bearing, use a piece of pipe to knock out the bearing
Or press it out with a puller
Press a new bearing into the cleaned and lubricated hub.
This method is undoubtedly much easier than the first, but since it affects the camber, problems with adjustment cannot be avoided. Before you begin to unscrew the knuckle mounting bolts from the strut, you need to mark their position with chalk or a marker.
The first mark in this case will indicate the location of the adjusting bolt on the rack. The second mark will indicate the previous position of the fists.
After the master begins assembly, he will focus precisely on these marks. Of course, it will be difficult to achieve great accuracy and it will not be possible to return the parts to their place. But with careful work, installation errors can be minimized.
There are some steps to follow:
- The master puts marks;
- Knocks out the knuckle bolts;
- Unscrews the mounting bolts from the lower ball joint;
- The bearing must be knocked out of the hub;
- The retaining rings are dismantled;
- Using a vice, the bearings are pressed out.
Before reassembly, the space in the fists must be thoroughly and thoroughly lubricated.
This method is often used when repairing not only one bearing component, but the entire chassis. As a result of this method, it will also be possible to safely replace ball joints, silent blocks of levers and steering tips.
Third way
It is carried out in the following order:
- In this case, you will need to remove the entire rack completely;
- After all the components have been removed, the technician will need a special vice;
- The wheel bearing will be replaced at the vise and all parts will be reinstalled.
This method is the most complex and difficult because it requires the technician to dismantle the entire rack. In addition, it will be necessary to unpress the steering tip, and you also need to unscrew the fastening nuts, they secure the upper support to the body base.
Direct removal of this VAZ 2110 unit is carried out only after the entire rack has been removed from the car. And this process takes a lot of time.
Chassis 2110
The front suspension of the VAZ 2110 is independent, telescopic. It is based on hydraulic shock absorber struts and coil springs, as well as lower wishbones with braces and a stabilizer bar.
Telescopic stand
1 – compression valve body; 2 – compression valve discs; 3 – throttle disk of the compression valve; 4 – compression valve plate; 5 – compression valve spring; 6 – compression valve cage; 7 – recoil valve nut; 8 – recoil valve spring; 9 – recoil valve plate; 10 – recoil valve disc; 11 – throttle disk of the recoil valve; 12 – piston; 13 – bypass valve plate; 14 – bypass valve spring; 15 – plunger; 16 – plunger spring; 17 – rod guide bushing with a fluoroplastic layer; 18 – guide bushing cage; 19 – sealing ring of the rack housing; 20 – rod seal; 21 – oil seal cage; 22 – gasket of the rod protective ring; 23 – rod protective ring; 24 – nut of the strut body; 25 – compression buffer support; 26 – rod; 27 – spring cup; 28 – rotary lever; 29 – rod limit sleeve; 30 – rack body; 31 – cylinder; 32 – drain tube
Front suspension assembly
1 – telescopic stand; 2 – nut; 3 – eccentric bolt; 4 – nut; 5 – steering knuckle; 6 – front wheel drive shaft; 7 – protective cover of the hinge; 8 – external shaft joint; 9 – lower lever; 10 – ball joint; 11 – decorative disk (cap) of the wheel; 12 – hub; 13 – brake disc; 14 – protective casing; 15 – rotary lever; 16 – lower support cup; 17 – suspension spring; 18 – protective cover of the telescopic stand; 19 – compression stroke buffer; 20 – upper support cup; 21 – upper support bearing; 22 – upper support of the rack; A – control size
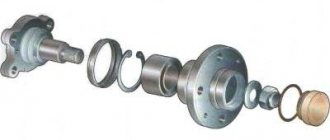
Steering knuckle and front wheel hub parts
1 – steering knuckle; 2 – outer mud ring; 3 – hub bearing; 4 – wheel hub; 5 – thrust washer; 6 – nut; 7 – retaining rings; 8 – internal dirt ring
Figure 1 shows part of the front suspension. It is based on a telescopic hydraulic shock absorber strut 1, the lower part of which is connected to the steering knuckle 5 with two bolts. The upper bolt 3, passing through the oval hole of the strut bracket, has an eccentric collar and a washer. Turning the top bolt changes the camber of the front wheel.
The following elements are installed on the telescopic rack: - a coil spring 17, - a polyurethane foam buffer 19 for the compression stroke, - an upper support 22 of the rack assembly, - a bearing 21.
The upper support is secured with three self-locking nuts to the body mudguard strut. Due to its elasticity, the support ensures the rack swings during suspension movements and dampens high-frequency vibrations. A bearing built into it allows the rack to turn along with the steered wheels. Parts of a telescopic hydraulic shock absorber, shown in Fig. 1, are mounted in the strut housing. Telescopic stand.
A hydraulic recoil stroke buffer is installed in the upper part of the cylinder, consisting of a plunger 15 and a spring 16. It limits the movement of the rod during the recoil stroke. The lower part of the steering knuckle 5 (see figure “Front suspension assembly”) is connected by a ball joint 10 to the lower suspension arm 9. Braking and traction forces are perceived by longitudinal braces, which are connected through rubber-metal hinges to the lower arms and to the front supports of the front suspension cross member. At the junction of the brace with the lever and the front support, adjusting washers are installed, which change the angle of the longitudinal inclination of the steering axis.
In the steering knuckle (see figure “Steering knuckle and details of the front wheel hub”) a double-row angular contact bearing of a closed type is attached, on the inner rings of which the hub 4 of the wheels is mounted with interference. The bearing is tightened with nut 6 on the shank of the outer wheel drive joint housing and is not adjustable. All front and rear wheel hub nuts are the same and have right-hand threads. The anti-roll bar is a bar, the knees of which are connected to the lower suspension arms through struts with rubber and rubber-metal hinges. The middle (torsion) part of the rod is attached to the body with brackets through rubber pads.
Nuances
In the process of reassembling the entire node, you must proceed as follows:
- Press in the bearings;
- Install retaining rings;
- Collect your fists;
- Mount new bearing components on them;
- Mount the assembly on the hub;
- Using a mandrel, you need to drive the hubs until they stop.
You can use a puller or press to press in bearing parts. But in no case should you use a hammer, since in this case cracking of the component will inevitably occur. The forces should be directed to the outer rings.
It should also be noted that double-row ball bearings are installed in the hubs, which do not require lubrication and adjustment measures.
Due to the lack of such care, the VAZ 2110 bearings will certainly be destroyed when removed from the hub, so this measure should only be resorted to for a complete replacement.
Diagnostics
The wheel hub contains single row roller bearings . There are 2 of them. They require care while the vehicle is in use. This maintenance includes changing the lubricant and adjusting the gaps.
To check the clearance or play, you need to hang the wheel and rock it a little. A simple adjustment does not always get rid of the backlash. If noise occurs when the wheel rolls, most likely the front wheel bearing on your VAZ 2110 needs to be replaced because it has failed. It is not uncommon for two bearings to break at once.
Check whether the bearings rotate freely on the axle, whether there are any jams, and there should be no signs of wear or chipping on the rings. If this is available, you should definitely figure out how to change the bearing.
Types of wheel bearings
Modern foreign cars no longer use serviceable bearings of outdated models (the so-called zero-generation bearings), which require adjustment and lubrication. Their place was taken by double-row bearings of the HUB-I type (first generation), which can be replaced separately from the hub.
The second generation is HUB-II bearings, the outer race of which is equipped with a flange with mounting holes, and with its help the bearings are fixed to the suspension elements.
HUB-II bearings with rotation along the inner (left) and outer ring (right).
The most modern option is the third generation hub bearing HUB-III, which is an assembled hub unit in which the bearing is protected from external influences, has minimal radial runout and deviations from linear dimensions. The surface of the hub itself is used as one of the sides of the race (rolling surfaces) in HUB-III bearings, which further reduces the weight of the entire structure.
HUB-III hub units for drive (left) and driven wheels (right)
Bearings of the second and third generations are equipped with cassette seals, which allow gases to escape from the working cavity, but do not allow moisture and dirt to enter.
The fourth generation HUB-IV hub units are combined with CV joints, and the fifth generation designs are combined with brake discs. Such solutions have not yet been widely implemented, being in the development and testing stage.
avtoexperts.ru
In general, it can be noted that this part is one of the most important in the suspension system of any car. The steering knuckle is attached to the suspension using “ball joints”, which makes it possible for the wheels to turn. Don’t think that this is a separate part, no, the brake system, hubs, steering ends and, ultimately, the strut (shock absorber) are also attached to it.
One of the main purposes of this part is the ability to withstand loads and create conditions for the wheel to turn. It must withstand all the impacts that fall on the wheels.
They are often made from durable alloy steel or cast iron, depending on the models and manufacturers. As a rule, the metal grade chosen is 30-40X. Remember that during production it is important to maintain precise geometric parameters, otherwise the part will simply be unsuitable for use. Also, even at the time of production, special grooves (cuts) are made in the “fist” for the hub bearings.
Do not forget that during operation, not only the mechanism itself is susceptible to negative influence due to the effects of the suspension in general, but also the trunnion. The trunnion is called differently depending on where it is located. In general, you should know that this is a certain part of the shaft on which the hub bearing is located. So, when it wears out, the bearing ends, and the steering knuckle begins to experience overload, excessive friction occurs, cracks appear, and the like. Pay close attention to this, because control may become seriously difficult.
It is clear how the steering knuckle is attached; for this purpose, the upper and lower levers are used, through ball joints.
Device and types
It should be remembered that, despite the steering knuckle adopted as a standard, the so-called “straight cross”, the sizes are different for everyone. Therefore, when choosing a part, pay special attention to the seller’s model of your car. In some cases, even the year of manufacture will be important. After all, a deviation of several centimeters will not allow the suspension to cope with the task. For example, ball joints “won’t work”, there won’t be enough “angle” for traction, and the like.
In addition, different modifications of the “fists” may not even fit on the same car. For example, before restyling, a wheel rotation sensor was not installed on the car, but after restyling, such an element appeared, and a separate “ear” was made for it. As a result, the old “fists” are not suitable for modern modifications, despite the generally same size and format of the part.
Resource
It’s difficult to say reliably how long it lasts, even on bad roads; everything is quite individual. Depends on driving style, quality of the original alloy, etc. In principle, car manufacturers consider this unit to be “long-term”, that is, one that can last longer than other suspension components.
Often, the service life is measured in tens of thousands of kilometers; someone manages to maintain a unit for up to 200,000 km.
Malfunctions and possible symptoms
Please note if the following symptoms and malfunctions begin to appear:
• The car began to “pull” in different directions, the problem is not solved even after checking the camber.
• We noticed that the wheels began to turn out at a smaller angle, most likely it was the “knuckle” or the ball joint that was to blame.
• Frequent malfunctions include wheel “separation”. This happens due to a broken thread on the axis of the assembly or a broken “finger” of the ball, which is also not uncommon.
• It is not uncommon for axle surfaces to wear out in the places where the bearings are located. The reason lies in the incorrect location of the bearing or loose wheel nuts. If the wheel is not tightened, an uneven force will be transmitted to the axle, which after some time will lead to misalignment of the bearings and, accordingly, it will begin to wear out and play will appear.
Situations arise when the assembly is basically intact, the surface of the axle is without damage, but a small crack has been identified. Someone will advise brewing it, but, according to safety rules, such methods are prohibited. Do not forget that in most cases, parts are made of cast iron, and when exposed to welding, its density is disrupted. As a result, it may simply burst when moving.
How to remove the steering knuckle?
Initially, it might seem that the design is quite complicated, but in fact, dismantling such an element is not difficult at all. What is required of you:
1. First, remove the wheel.
2. Unscrew the brake calipers.
3. Unscrew the shock absorber strut.
4. Remove the steering tip (it’s better to do this with a special puller).
5. Remove the axle shaft from the hub splines.
Don’t forget to release the wheel rotation sensor; naturally, if your car has one, it is attached directly to the “fist”.
6. Next, remove the “fist” assembly from the ball joint of the lower arm. It is enough to loosen the fastening of the “clamp” with a chisel or a screwdriver and the part can be easily removed, without the need to “hammer” it with a hammer.
7. As a result, all that was left was the hub, the brake disc and the fist itself. Now we unscrew the hub locknut, having first loosened the splines. We take out the bearing, screw the wheel mounting bolts into the special holes and tighten them until they stop. Then, with small blows, we knock out the hub and release the “fist”.
Adjustment
Checking its functionality and adjusting it is carried out as follows:
- Raise the front wheel using a jack;
- Remove the wheel;
- Using a chisel, remove the protective cap on the front hub bearing;
- Remove the brake pads;
- The indicator holder should be secured to the steering knuckle;
- Place the leg of this indicator against the hub, as close as possible to the adjusting nut;
- Rings of spanners are placed on the studs and the nuts are tightened. While holding them, the hub rotates and moves in the axial direction;
- Using the indicator, the movement or gap indicator is determined. If it is more than 0.15 millimeters, the gap must be adjusted;
- Reinstall the wheel without using the protective cap. Secure it with two bolts screwed in diametrically;
- Using a chisel, straighten the flange on the bearing nut and remove the nut with a 27mm (socket) wrench;
- Using a torque of 2.0 kg-cm, tighten the new adjusting nut;
- Loosen the nut, then tighten it again, but now with a torque of 0.7;
- Slowly release the adjusting nut 25 degrees and turn the wheel in a vertical plane. There should be a slight play;
- Check the gap. Its indicators should be in the range from 0.08 to 0.02 millimeters;
- In this position, lock the nut with the collar caulked in special grooves. They are located on the steering knuckle at the end of its axle;
- Remove old grease from the protective cap and apply new one. About 25 grams. Experts recommend using Litol 24, although there are worthy alternatives;
- Install the protective cap on the bearing;
- The wheel is installed in its rightful place.
What do we need?
As a tool we will need:
- The most common jack for lifting car wheels;
- Wooden beam;
- Balloon wrench;
- Special puller for the hub;
- Pliers (useful for removing retaining rings) or a special puller;
- Socket wrench (“30”);
- Socket wrench (“12”);
- Hammer.
Since the tightening torque of the main nut is serious, it is advisable to prepare a pipe as an extension for the socket wrench. A pry bar and chisel may come in handy. Well, it would be a good idea to invite a partner - to support, help and chat.
What can a malfunction lead to?
The hub bearing is one of the most important elements of the chassis system, where all parts are interconnected. For example, you may not replace the oil seal in a timely manner, and in a month or two you will have to buy a new bearing.
If you ignore problems with the bearing, then after a while you will have to spend money on replacing the entire rack.
And every time the problems become more and more serious. Therefore, make timely repairs and avoid causing problems. Only in this case can you avoid more significant breakdowns or even accidents.
Stories from our readers
“Fucking basin. "
Hi all! My name is Mikhail, now I’ll tell you a story about how I managed to exchange my two-wheeler for a 2010 Camry. It all started with the fact that I began to be wildly irritated by the breakdowns of the two-wheeler, it seemed like nothing serious was broken, but damn it, there were so many little things that really started to irritate me. This is where the idea arose that it was time to change the car to a foreign car. The choice fell on the melting Camry of the tenth years.
Yes, I had matured morally, but financially I just couldn’t handle it. I’ll say right away that I am against loans and taking a car, especially not a new one, on credit is unreasonable. My salary is 24k a month, so collecting 600-700 thousand is almost impossible for me. I started looking for different ways to make money on the Internet. You can’t imagine how many scams there are, what I haven’t tried: sports betting, network marketing, and even the volcano casino, where I successfully lost about 10 thousand ((The only direction in which it seemed to me that I could make money was currency trading on the stock exchange, they call it Forex. But when I started delving into it, I realized that it was very difficult for me. I continued to dig further and came across binary options. The essence is the same as in Forex, but it’s much easier to understand. I started reading forums, studying trading strategies. I tried it on a demo account, then opened a real account. To be honest, I didn’t manage to start earning money right away, until I understood all the mechanics of options, I lost about 3,000 rubles, but as it turned out, it was a precious experience. Now I earn 5-7 thousand rubles a day. I managed to get the car buy after half a year, but in my opinion this is a good result, and it’s not about the car, my life has changed, I naturally quit my job, I have more free time for myself and my family. You’ll laugh, but I work directly on the phone)) If If you want to change your life like me, then here’s what I advise you to do right now: 1. Register on the site 2. Practice on a Demo account (it’s free). 3. As soon as you get something on the Demo account, top up your REAL ACCOUNT and go to REAL MONEY! I also advise you to download the application to your phone, it’s much more convenient to work from your phone. Download here.
- Remove the washer by unscrewing the wheel bearing nut all the way.
- Insert bolts (about 130mm long with M12x1.25mm thread) into the two holes of the brake disc. Screw the bolts into the hub holes to a depth equal to its thickness.
- We press out the hub by sharply hitting the bolt heads with the brake disc.
- Unscrew the fastening of the ball joint to the steering knuckle and remove the CV joint from the bearing hole.