How to replace the standard microphone on Lada Largus and XRAY
On Lada Largus and XRAY cars, a microphone is installed on the ceiling to talk on the phone via bluetooth (hands free).
If hearing is poor, its sensitivity cannot be increased, because There is no such adjustment. You can solve the problem by installing a microphone with an active amplifier. The Lada XRAY and Largus have the same microphone (part number 283128032R), so the procedure is performed in the same way.
Required
: microphone with an active amplifier (for example, MKU-2P), price about 350 rubles. Glue gun.
How to remove and disassemble the standard microphone is described here. Additionally, you will need to disconnect its wires from the lampshade.
Installation and connection procedure
:
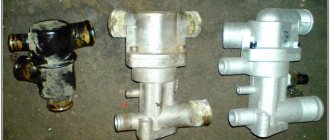
- Unsolder the wires from the standard microphone.
- Solder the wires to the microphone with an active amplifier (white - signal, black - ground). The power supply for the standard microphone is 5.9 volts, and the new one is from 8.5 to 15 volts. Therefore, we isolate the red wire from the connector, and extend the red wire from the new microphone and connect it to the lighting lamp (pin 4 is the red wire, where the recorder was also hooked).
- We install the new microphone into the housing, fixing it with hot glue.
You can also take 12 V to connect a microphone from the radio connector (red wire):
The process of replacing the standard microphone is also shown in three parts in the video:
After this modification, it became possible to adjust the microphone sensitivity. This is done using a screwdriver by rotating the regulator on the board body.
Let us remind you that Lada XRAY and Largus have a lot in common. For example, these models do not have standard backlit buttons for heated seats.
Share on social networks:
Found an error? Select it and press Ctrl+Enter..
Source
Improvement of the standard hands free microphone on Lada XRAY and Largus
On versions of Lada XRAY and Largus cars with a radio (hands free) for communication by phone (via bluetooth), an external microphone is provided in the cabin, which is installed on the ceiling next to the ceiling lamp. If you think that you are hard to hear during a conversation, try to improve your audibility with a simple modification.
The Lada XRAY and Largus have the same microphone (part number 283128032R), so the procedure is performed in the same way.
How to remove and disassemble a microphone
:
- Remove the microphone by prying it off with a flat screwdriver.
- Remove the grille by unscrewing the three clips.
- Remove the foam.
- Initially, the microphone in the housing is installed sideways. Our task is to take out the microphone along with the board and turn it so that it faces down.
- Then we install the foam rubber and the grille in the reverse order (to install the retaining ring, you may need to remove the ERA-GLONASS module).
- We check audibility.
The advantage of this modification is that it does not require money. And if you are unhappy with the result, you can return everything back in 5 minutes. Can your interlocutor hear you well during a conversation?
By the way, did you know that a standard microphone can be replaced with a microphone with an active amplifier?
Source
Eliminate quiet microphone sound in 10 minutes
Eliminate quiet microphone sound in 10 minutes
Post by web-ruslan » July 16, 2015, 08:05
Carefully remove the cover from the microphone, prying it over the edge (I used a plastic card)
Here's the lid. Please note the 3 snap fasteners
We take out the microphone. It is in an elastic band and directed into the wall through a piece of foam rubber at the top
Remove the fastening ring
We remove the label and make cuts on the back wall of this box so that the microphone board can pass through and we can turn the microphone towards the microphone grille
Tape the label in place. Above the casing we see a white fixing ring
We assemble in reverse order. We put foam rubber between the microphone and the cover. We hold the fixing ring and the microphone mount by placing our fingers under the headliner on the side of the mirror
Source
Installing the headphone and moving the microphone
For ease of installation, I recommend removing the sun visor holders. It's not easy to take them off, let me tell you. Having read on the Internet the method of removing them, I said a lot of “flattering” words to those who came up with such a design))
We dismantle the microphone, as well as its clip installed in the upholstery.
We install a spacer under the casing. The spacer is installed in the existing space in the body. To attach the spacer to the body, there are clamps on the spacer. We install the purifier itself. It is better to identify the puncture places with a needle at the beginning, so as not to spoil the casing.
To transfer the microphone from under the purifier, I used a modified stationery knife and sharpened the blade on a sharpener until
3.5 mm. This is done to cut a round hole for the microphone clip. It is advisable to have a knife as sharp as possible; if you only have an old one, sharpen it.
Marked the hole behind the lampshade; you can use a microphone stop washer as a template for marking. Before starting cutting, I first removed a piece of the foam spacer.
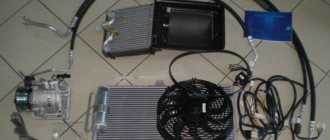
The process of installing a car radio with a hands-free function and connecting an external microphone
This work can be carried out simultaneously with replacing the speakers. If the car radio is powerful and expensive, then it will be important to replace the speakers. Let's get started:
- The car radio is connected via an adapter (in this case, insertion into the standard wiring is not at all necessary);
- The white wire, which is in the center of the chip, is responsible for power;
- Green or yellow wire – negative;
- The pink wire is a permanent plus.
Connecting speakers to the front car radio
Note. In this case, our speakers are installed in racks.
This is done as follows:
- The protection (plastic) is removed from the side front pillars;
- The caps snap off;
- You will also need to use a thin screwdriver (preferably with a wide blade) to unclip the plug labeled Airback;
- Unscrew the screw;
- Then the speaker covers snap off;
- The factory chip is disassembled;
- The contacts are put on the speaker or a homemade adapter is made.
Connecting speakers to the rear car radio
Let's get started:
- Remove the plastic from the rear side pillars;
- We snap off the caps;
- We turn off the additional brake light;
- We remove the noise and install the speakers;
- We run the wiring under the carpet.
Native radio for Lada Largus car
Lada Largus is largely copied from models of the French brand Renault. And this applies not only to components and assemblies, but also to the standard radio. For example, the Renault Duster, Sandero, Logan models have exactly the same audio system head units. There is nothing surprising in this, because the assembly of these cars is completely organized in Russia. On Largus, the standard radio can only be seen in the “luxury” or “standard” configuration.
A little about the Hands Free system
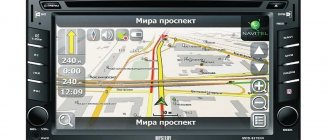
Microphone for car radio
The Hands Free system or hands-free conversation has long been wildly popular among motorists. Integrating a mobile device and this system built into the head unit couldn't be easier. The PIN code is entered and Bluetooth is activated. An automatic connection then occurs.
Note. Thanks to the Bluetooth module, you can communicate on the phone (hands-free function) without even taking your mobile phone out of your pocket or purse. In addition, most modern car radios support several mobile devices at once, which eliminates the need for frequent settings.
It turns out that car radios equipped with the Bluetooth function (see Bluetooth for car radio: do it yourself) provide a lot of advantages. But this is already clear. Everything around us is constantly progressing and improving. If earlier the driver was satisfied with the Bluetooth function with a built-in microphone, then over time he realized that for more comfortable use he needed an external microphone, which was invented. Let's, before we move on to the description of remote microphones, consider all the headsets known today. As you know, the modern automotive market is replete with many different devices, and making a choice in favor of one or another headset can be quite difficult. Let's list all the known devices below, and then compare them with an external microphone and understand that the latter is the best.
Device characteristics
It can't be called complicated. In addition, the instructions and user manual supplied with the system will help you understand the structure, functionality and characteristics of the device. Structurally, a car can be equipped with either a conventional 1 Din or 2 Din radio. The differences between them are minimal and lie in the location of the buttons and inscriptions.
To reproduce high-quality sound, the audio system provides four speakers:
One of the main features and at the same time advantages of this device is the ability to connect to a smartphone via Bluetooth wireless channel. In addition to comfort and convenience, this function provides passive safety, since the Hands free system allows you to talk on the phone while driving without using your hands. The quality of communication is decent, communication with the interlocutor is not associated with difficulties, the driver does not need to raise his voice, and passengers hear him well.
The standard radio on Largus does not have much functionality and advanced capabilities, for some this is quite enough, but for others the characteristics of the radio are not enough. In terms of appearance, the device blends harmoniously with the standard car interior. All buttons and other controls are easy to use, and the inscriptions are easy to read and intuitive. The device is tightly fixed in the seat, there is no play or other defects.
Capabilities of standard audio device
Music in the car can be played both through removable media and via the Bluetooth wireless communication channel. At the same time, the genre of music does not matter, the sound quality remains at the proper level. To listen to radio stations, a standard antenna is provided, which can pick up even a weak and unstable signal. If necessary, you can save up to 6 radio stations in the device’s memory for quick playback, in each of the available bands.
In addition to the Bluetooth channel, you can listen to music via SD, USB media or CD, MP3 discs.
The radio supports most popular formats, for example:
Via the Bluetooth channel, you can control playback, i.e. pause the song or rewind to the desired segment. For convenience, it is possible to display the artist of the song and its title on the monochrome display. The radio can also recognize Russian fonts.
There are several connectors for connecting removable devices:
The unit is also equipped with several inputs for playing sound through third-party gadgets. The panel of the standard head unit is not removable, but this is no longer considered a disadvantage, since most car owners store the removable panel directly in the car rather than carry it with them. The purpose of each button, which is quite small, usually does not cause any difficulties. It would be much more informative to consider here other hidden features that are not mentioned in the detailed user instructions.
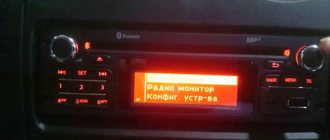
“Secret” menu of the Lada Largus radio
To go to the section with individual settings, use the SET button located on the front of the radio panel. Not every car owner knows that this button has hidden capabilities. Just press this key and hold for 6–7 seconds. The device will go to the engineering menu, where a number of special settings become available. The instructions included with the standard radio contain no information about such a tab.
The “secret” menu opens three sections (“Diagnostics”, “Configuration”, “Radio Monitor”). On the right is a rotating knob, which allows you to navigate up or down between these sections. To select the desired one, press the handle. To go to the previous level, press the “Back” key, which is located to the left of the rotary knob.
In the “Radio Monitor” section you can see the current frequency at which the received signal is located and some other data. In the “Diagnostics” section there is an additional subsection with the items “Autotest”, “Monitor” and “Errors”. The “Errors” block was created to inform the driver about existing problems in the BC (on-board computer). If there are no problems, the display will be blank. The “Autotest” item contains information about the current state of the equipment (OK on the screen means “functional equipment”).
Radio malfunctions and methods for diagnosing them
As you know, the Lada Largus is equipped with an audio system with a set of speakers already from the factory (depending on the configuration). The amplifiers are located in the front and rear door panels. To connect non-original speakers, several wiring harnesses are provided (including for increasing power using an amplifier when connecting a subwoofer). Since the connector plugs do not comply with the current standard, to connect another head unit you will need to additionally purchase adapters.
A standard car radio sometimes brings not only the pleasure of listening to music, but also some problems. The device may not work or function incorrectly for various reasons. In general, the list of faults includes only those that an ordinary driver (without special knowledge of electrical engineering) can fix with his own hands, without the need to contact a specialized center.
When it comes to repairs, it can often be cheaper to replace the device. Especially considering the availability of alternative options in different price categories and with different capabilities. At a cost of no more than 6,000 rubles, repairs can cost half this amount.
Main problems
If, when you press the power button, the head unit does not respond and does not turn on, then first of all you should pay attention to the mounting block, checking the 15A fuse in socket F28. Through it, the electrical memory circuit of the device is connected to the saved settings. The mounting block cover is located on the front panel on the left side at the end. You can understand that this fuse has blown by the absence of signs of operation of the instrument cluster panel, interior lighting and trunk lighting, since their electrical circuit is also powered by F28. If the fuse has not blown, the next check point will be the condition of the connecting contacts and the integrity of the wire that goes from the fuse to the A4 power connector on the back of the radio.
A common problem is no sound, i.e. the device itself turns on but there is no sound coming from any of the speakers when playing music.
In this case, the fault may also be the fuse, but F38. It supplies power to audio output devices. A faulty fuse is also indicated by a non-functioning cigarette lighter. If the latter works, then the fuse is intact. The lack of sound can also be caused by a violation of the integrity of the wire running from the fuse to connector A7 on the radio. And if only the rear speakers do not work, the culprit may be a broken connection in the block, which is located directly behind the driver's seat between the front and rear doors.
The cause of the malfunction may be the absence of ground - this is the black wire going to the radio (terminal A8). In all other cases, intervention in the electrical circuits of the device will be required. Without appropriate knowledge in this area, there is a high probability of complete failure of the radio. When contacting specialists, repairs can cost at least 1,000 rubles, not counting diagnostics.
Removing and installing the radio
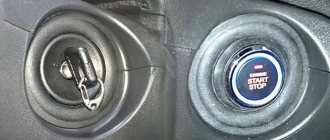
If a device fails, you will need to dismantle it to install another one. Removal will also be necessary if it is necessary to connect speakers, repair, clean terminals or reflash. Visually, there are no latches or keys for removal on the front panel.
In fact, on the front of the radio there are four holes into which you need to insert 4 rods of suitable diameter (about 2 mm). The dismantling process is as follows.
- Two rods are inserted into the holes on the left side.
- Two more - on the right.
- Now you should simultaneously press all the rods at once.
- At the same time, pry it with a suitable plate, for example, a plastic card.
- After characteristic clicks indicating that the latches are loosened, you can remove the device.
Lada Largus radio does not work
Hello everyone, today I want to talk and figure out why the radio on the Lada Largus car does not work. There are plenty of reasons for this. As you already know, Largus comes from the factory with a radio and four standard speakers. Standard speakers are located on the front and rear doors. I would like to say right away that if you do not like this radio, then to install another one you will have to purchase special adapters.
There are many reasons why the radio does not work on Largus, so we will try to look at the most basic reasons that you can eliminate with your own hands. So, let's go. If when you turn on the radio it does not show signs of life, then the first thing you need to do is check fuse F28 (15A).
In order to understand whether the fuse has blown, you don’t even need to open the mounting block, since if the fuse is blown, then your instrument cluster and the ceiling lamp will not work. All these devices are powered through fuse F28.
Sometimes it happens that the Largus radio itself turns on, but not a single sound comes out of the speakers. In this case, you will need to check fuse F38 (15A). You can check as follows: you need to check whether the car's cigarette lighter is working. If the cigarette lighter works, then the fuse is intact, then you need to check the wires going to the speakers.
Also, poor operation of the radio may be associated with poor contact that goes to the ground of the car. In this case, you need to check the contact of terminal A8 of the radio.
Well, that’s all, we have looked at the main reasons why the standard radio on a Lada Largus car does not work. Bye everyone.
Source
Firmware for audio device on Lada Largus
The standard head unit on cars of this model does not look very presentable, but at the same time the functionality is complemented by a large number of possibilities. Unfortunately, despite the decent quality of the technical part, the manufacturers did not pay enough attention to the software. It's no secret that modern audio systems have a full-fledged electronic control unit, which is a kind of computer. There is a processor, devices for reading removable media, various connectors and other functionality. In addition, the standard radio is combined with the on-board computer.
On the other hand, the more complex the audio system, the greater the likelihood of failures and malfunctions. The radio installed on the Lada Largus is no exception to the rule. The software has not been properly tested, so malfunctions are not uncommon. The most common problems are the inability to recognize the file format, reproduce high-quality sound, or identify the removable storage device. Also on Largus, incorrect display of Russian fonts on the display is often encountered. As a result, instead of the usual Cyrillic alphabet, the driver sees incomprehensible symbols. It is in these cases that updating the device firmware will help solve the problem.
Where to download and how to install
You can find out the firmware version directly on the device case, on the back side. The manufacturer regularly releases updated, i.e. improved firmware. You can find them either on the official website of the developer or on specialized thematic forums. If necessary, please contact your authorized dealer.
The firmware for the Largus radio is identical to the software from Duster or Sandero. At the factory, these cars are equipped with T2024 firmware (starting from 2014).
Preparation for the procedure
A firmware update may not be necessary if you try to reset the current settings to factory settings. The procedure is simple, but in most cases ineffective. If you update the firmware to a new version, you can expect a significant improvement in device performance. Typically, an official update is released rarely and always turns out better as testing is done and bugs are fixed.
The updated version V2030 was released in 2015. To install, you will need a flash drive or adapter with other removable media. Before you begin the procedure, you should prepare the media and find the appropriate firmware. You can download the firmware on the official AvtoVAZ website or on thematic official forums for Renault cars.
The file with the firmware is in the archive, so you need to first unpack it into a separate folder on your PC. The unpacked firmware provides a special archive that does not need to be unpacked further. The flash drive must be clean and formatted in FAT format. The unpacked CAB firmware archive is placed on it.
Update process
Now you can connect the media to the radio in your car.
- Before starting the procedure, be sure to turn on the ignition. Otherwise, the radio will automatically turn off and the firmware process will be interrupted, which may lead to device failure.
- When reading information on the media, the radio will determine that the contents on the drive are material for flashing. After analyzing the information, the device will offer to update the software. You should select "Yes" to refuse to click "No".
- Confirm the information by clicking the “OK” button.
Final operations
After confirmation, the firmware update procedure will begin. The display will show Upgrading. At this time, removing removable media or performing any manipulations with the radio is strictly prohibited. The completion of successful firmware will be accompanied by the inscription Complete on the screen. Next, you need to remove the drive, and the head unit should automatically turn off to reboot. If this is not observed, you should disconnect the terminals from the battery and wait a few minutes, then reconnect the terminals.
After rebooting, the radio will require you to enter a special service code for activation. The code can be found in the warranty card or on the back of the device. Use buttons 1 to 4 to enter the corresponding code, after which key 6 confirms the entry, and must be held down for several seconds. The system is unlocked, and you can enjoy the updated functionality and the absence of incorrect display of Cyrillic characters. When addressing this issue to specialists, you will have to pay at least 500 rubles. Inexpensive, but why pay for such a simple procedure that you can do yourself in a few minutes.
The standard radio on Largus is not rich in functionality. There is no touch screen or the ability to connect a rear view camera. On the other hand, it is a reliable device that, if handled properly, rarely causes problems for the owner. For listening to music and radio, as well as for talking on the phone, the available options are quite sufficient.
Source
Known headsets with a remote microphone today
The typefaces below were invented at different times. Each of them has its own advantages and disadvantages.
Ear headset
Let's look at it in more detail:
- Most likely, this type of headset takes precedence over its competitors due to its low cost. They can be used everywhere: not only in the car, but also at home, on the street, and so on. All this speaks in favor of such systems.
Note. The design of the ear sets is completely simple. It consists of a microphone, earphone, transmitter and control buttons. All this is combined in a miniature package.
- Many people call another advantage of such a headset the possibility of individual use. In other words, only the user himself hears the conversation of the interlocutor. But similar devices, on the contrary, do not have such an opportunity;
- The price of ear sets starts from 1 thousand rubles. If the headphones have wires, they are much cheaper. On the other hand, their use in a car is not only inconvenient, but also dangerous. Wires interfere with the driver, he is distracted from the road and all this can lead to dire consequences.
| Advantages | Flaws |
| Possibility of universal use | Tires the ears quickly with prolonged use |
| Low cost | Many people are uncomfortable with the presence of foreign objects in their ears. |
| Small sizes | Headphone wires are inconvenient and dangerous |
| Huge selection of models |
Portable Public Address Systems
They differ in the following features:
- This is practically the same system as in an ear headset. Microphone, receiving transmitter, speaker and control buttons with functionality. Only now all this is collected not in a miniature case, but in a full-size one;
- A telephone conversation with the interlocutor will be heard by others;
- The connector for powering the device is located inside the car. This is in most cases the cigarette lighter socket.
Note. There is one “but” here. If the headset microphone is located near the face, then the power is connected in a different way and the problem of noise reduction and echo elimination becomes a more pressing task.
- Among the numerous models of such devices, the best are those in which the controls and microphone are placed in a separate unit. It is this design that allows you to significantly improve the quality of communication, although you will have to use inconvenient wires again.
| Advantages | Flaws |
| Clear speech | Not very high-quality speech transmission, which is caused by poor location |
| Possibility to raise the microphone combined with controls in a separate block | Connecting to the cigarette lighter socket is considered the worst option (it is easily touched and damaged, and the contact is not ideal) |
| Easy connection |
Speakerphones or standalone public address devices
Let's take a closer look at these devices:
- It would seem that they are clearly automotive devices, but it turns out that they can be used everywhere (although they do this occasionally outside the car);
- Such devices use a built-in battery, eliminating the need to connect through the cigarette lighter or other power sources. There is a special kit for recharging the device (sooner or later the battery will run out and so that there are no surprises, a replacement is in store).
Note. Without recharging (recharging is carried out through the same cigarette lighter), the device can last about 10 hours of continuous use or about 7 days if it is in standby mode.
- The device can be installed on a sun visor, which is very convenient;
- The speaker has good power.
| Advantages | Flaws |
| The voice of the interlocutor is conveyed naturally | Wires you can't do without when recharging |
| You can talk without problems even at a speed of 90 km/h with the window open | Slight harshness and abruptness in the voice, which is explained by too strong a noise reduction system |
| Simple and uncomplicated connection | High price |
| Stylish and elegant appearance | |
| Convenient location |
Various portable devices with Bluetooth
This could be a navigator or some other device:
- The standard mounting of such devices is on the windshield using a suction cup. Due to their duty, these devices are always in sight. In some cases, such devices are equipped with a display, speakers and other components;
- The “conversation” function in such devices is “loaded”. As a result, the quality of speech is not to be envied (on the other hand, expensive models of portable devices of this type do not suffer from this).
| Advantages | Flaws |
| Convenient fastening | Poor speech quality (inexpensive models) |
| A small surcharge for Bluetooth compared to the cost of the device itself |
Car radios with Bluetooth function
Car radios with the ability to connect a microphone
Finally, the most popular devices that can use an external microphone are head units that combine a navigator, MP3/DVD player, TV/radio tuner and speakerphone function. One can only envy the functionality of such models. Let's look at their features:
- The most versatile type of speakerphone;
- A large screen and convenient controls, often touch-sensitive, are only a plus;
- There are many additional functions, ranging from a notebook to the ability to read SMS messages;
- An external microphone, included with the car radio or purchased separately, can be easily installed in a convenient place (for example, on the steering wheel or at the top of the pillar on the driver's side).
| Advantages | Flaws |
| There is no need to install foreign elements into the car | The choice of models is not as wide as we would like |
| Convenient control | It is not always possible to replace the standard system |
| Many additional features |
Today, car radios with a remote microphone are selling out with a bang. There is nothing surprising in this, because the advantages of such a microphone compared to the built-in one are obvious.
Note: So, the call quality is much better with a remote microphone than with a built-in one.