Replacing outer and inner CV joints on Lada Kalina
CV joint (constant velocity joint - approx.) or popularly just a “grenade”, is designed to transmit torque to the wheels of a car. CV joints can be internal or external, and the devices themselves are quite simple in technical terms and consist of a ball bearing that rotates transversely to its axis.
In the video, replacing CV joints on a Lada Kalina:
Failure of the CV joint on the Lada Kalina is a very common occurrence, and the main reason for its failure is torn anthers. Because, together with dust and water falling under them, the lubricant turns into thick mud, and it is no longer able to fully perform its functions.
Replacing the outer CV joint
In the process of replacing the outer CV joint
The work of replacing an outer or inner CV joint is not very difficult and can be done by any motorist who has at least once repaired a car with his own hands. And in order for the repair to be easier and faster, you need to prepare the following tools:
- Socket heads for “17” and “30”.
- Driver or ratchet.
- Extension for the wrench.
- Jack.
- Wheel chocks.
- Hammer.
- Vise.
Step-by-step disassembly procedure
After you are convinced of the malfunction of one or another CV joint, you can begin to work.
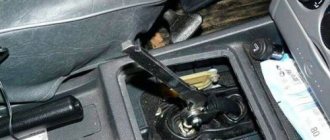
- First of all, we tear off the mounting bolts from the wheel and the hub nut, then we set the wheel chocks under the rear wheels. (To make it easier to tear off the nuts, it is better to use an extension for the wrench - approx.).
- We put the car on a jack and hang the wheel.
- We remove the wheel and, for greater reliability, place it under the car next to the jack.
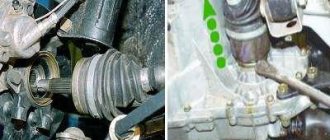
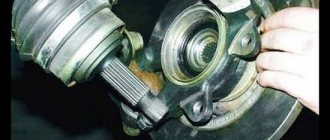
- Now that this picture appears before you, all that remains is to unscrew the 2 bolts that secure the ball joint to the steering knuckle.
Unscrew the bolts marked with a red marker on both sides.
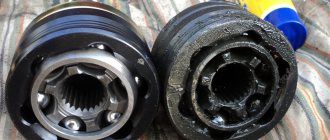
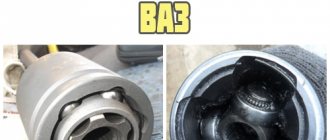
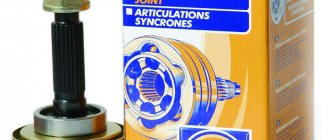
CV joint VAZ. Lada grenade. Comparison of different manufacturers
They counterfeit everything related to the AvtoVAZ assembly line. Any part purchased at a car store can be a counterfeit...
BEWARE OF FAKE! CV joint LADA Image. features
CV Joint Review
(grenades) for VAZ 2108-2115.
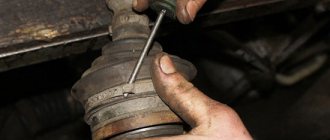
Without causing strong blows, the CV joint will move out of place
If the internal CV joint is supposed to be replaced, then work 1 to 6 should be performed as well, after which, using a pry bar, we remove it from the gearbox and take out the entire assembly.
Basic information about LADA Kalina
LADA Kalina has been produced since 2004; production of the popular second-generation car began in 2013. Kalina-1 is available in three body types: hatchback (model 1119), sedan (model 1118), station wagon (model 1117). There are cars available with petrol engines of three modifications: a 1.4-liter 16-valve engine with a power of 89 hp. s., 1.6-liter 8-valve engine producing 81 hp. s., 1.6-liter 16-valve engine producing 98 hp. With. The LADA Kalina-1 has only a manual transmission with five gears. The front axle has a classic MacPherson suspension, the rear axle has a beam with stabilizer, springs, and shock absorbers.
Typical faults of LADA Kalina-1
Significant malfunctions with Kalina rarely occur, but there are a lot of various undesirable trifles. The car’s clutch is not very reliable and has an impressive service life, regardless of the type of engine, so it can malfunction after 40-50 thousand kilometers. The main source of malfunction is a broken clutch disc.
You need to constantly monitor the oil level in the engine - sometimes it leaks through the gaskets or burns through the piston rings. On the instrument panel there is only an oil pressure warning light, but there is no dial indicator. If the indicator lights up all the time, there is a possibility that the crankshaft is knocking.
A common malfunction of VAZ gearboxes is increased noise. It is difficult to get rid of the humming of the gearbox; sometimes neither replacing the bearings nor refilling with first-class transmission oil comes to the rescue. The transmission is noisy even in new cars, because of this the Volzhsky Automobile Plant has repeatedly completed the transmission.
A problematic element since the days of the VAZ 2108 and VAZ 2109 has been the thermostat in the engine, moreover, the valve in the thermostat was capable of jamming in any position. It's annoying when the engine doesn't heat up to the required operating temperature, but if the engine overheats, it's more problematic.
Electrical problems on LADA Kalina appear mainly of three types:
- the ignition module is often damaged;
- very soon the bearings and diode bridge “die”;
- The window lift cable on the driver's door breaks.
When the ignition coil sparks, the first and fourth cylinders or the second and third cylinders stop functioning. The ESP cable breaks when it falls off the guides.
The main source of cracking noise in outer CV joints is insufficient lubrication; At the factory, in order to save money, they put it in sparingly. The consequence of this is severe wear of the hinges, and as a result, the “grenade” needs to be replaced.
A broken timing belt is a very annoying problem. And if on the 8-valve engine 21114 it is possible to change the belt drive and move on, then on engines 11194 or 21126 the valves bend from the oncoming push from the pistons, repairs will be quite expensive. In addition, a break can occur through a jammed water pump, because of this, if the pump begins to make noise, it must be replaced immediately.
Signs of CV joint failure
The first signs of a faulty grenade are crunching sounds in the area of the front wheel on turned out wheels when starting to move. When the fault is severe, noise appears at less significant loads.
The anther begins to crawl
In order to prevent such damage in advance, you should periodically inspect the anthers from the outside for cracks and integrity in general.
Diagnosis of the condition of anthers
To check the serviceability of the car's boots, an external inspection is carried out and the condition of the front suspension components is diagnosed.
If there is no damage to the upper shell, there will be no traces of lubricant leaks on the surface of the boot and the car can continue to be operated in the same mode. It is advisable to carry out diagnostics regularly, which allows timely prevention of premature failure of CV joint mechanisms. When the vehicle accelerates rapidly, extraneous noise may occur in the front wheel sector, which may indicate an internal malfunction in the suspension components and require urgent diagnosis and repair with replacement of faulty parts.
Some of the main reasons for the failure of CV joint elements are:
- poor-quality lubrication or lack thereof due to boot failure;
- the presence of defective parts in the CV joint mechanism, as a result of which the seal of the boot is compromised;
- potholes and pits that form on the roadway, which leads to damage to the protection of the mechanisms and suspension elements of the car;
- energetic driving style, which leads to increased load and premature failure of units;
- destruction or violation of the tightness of the anthers during vehicle operation.
Video about replacing a grenade boot:
On a note!
Constant velocity joints, which are sold in the store in sets, include grease, a boot and all the necessary clamps in their sets. Pay special attention to this fact so as not to overpay for additional spare parts and accessories.
I had to change more than one CV joint. Of course, I had to tinker with the first one for a couple of hours, since I didn’t really know all the subtleties, but I changed the subsequent ones almost with my eyes closed.
I bought a grenade for viburnum. The assembly includes the grenade itself, a finger guard and clamps. You can change it in an hour without rushing, it can be done faster. But why rush in such a matter?
"Lada Kalina" is a front-wheel drive car in which the engine and gearbox are located transversely relative to the body. The drive to the wheels is carried out through the main gear. Torque is transmitted through constant velocity joints (simply CV joints, or “grenade”). There are several of them - internal and external. Despite their reliability, these elements can fail. Well, let's look at how to replace a “grenade” on a Kalina, what tools are needed for this and what are the signs of a malfunction.
Gearbox lever rattling
For LADA Kalina, a typical malfunction is rattling in the area of the gearshift lever, which mainly becomes noticeable when the engine is running at speeds of about 3000. The source of the side sound is the bushing, which is made a little thicker than necessary, and because of this, a gap appears in the mount. To resolve this problem you need to do the following:
- remove the handle cover, which is attached with latches;
- using two 13mm wrenches, unscrew the nut and bolt;
- remove washers and bushings;
- to eliminate rattling, the bushing in the middle needs to be slightly sharpened in width or the mount should be lubricated with sealant;
- Having done this, mount everything back. The sealant does not help out every time, but if you sharpen the bushing by 0.3 mm, the result is guaranteed.
It’s safe to say that repairing a Lada Kalina car yourself is not so scary. Every car enthusiast has the opportunity to eliminate minor malfunctions of this car. You just need to believe in yourself, follow our advice and everything will work out!
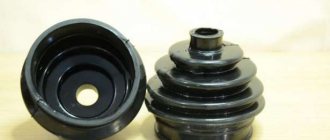
Device
In terms of their design, the inner and outer CV joints are very similar.
- Half shaft.
- Clamp and boot.
- Clip.
- Hinge housing.
- Separator.
- Ball.
- Retaining and cone ring.
- Spring washer.
Thanks to this device, the elements are capable of transmitting torque to the wheels at an angle of up to 45 degrees (not only in the horizontal, but also in the vertical plane).
How to determine a breakdown?
The grenade is a ball bearing, the cages of which have transverse grooves. Due to this, the angle between the driven and driven axle shaft changes. Thus, the CV joint not only transmits torque, but also changes the angle between the axle shafts. In view of this, over time, it develops. In places where the parts do not fit tightly, backlash and extraneous noise are formed. In fact, this is accompanied by a characteristic crunch. It occurs due to large wear on the balls that move along the grooves. The crunch can appear both during straight-line movement and when turning. In the latter case, most likely, the external grenade of the Kalina requires replacement. This sign should not be ignored, since the bearing may fall apart at high speed.
We change the CV joint. We’ll also figure out which boot is better, 2108 or 1118 for viburnum.
I bought a car with broken outer CV joints, this was one of the reasons for the cheaper price. It's time to fix it. This task is quite dreary, although I changed it more than once on my old car myself, but then I thought about it, I found out from the services that 500-750 rubles for one CV joint work, but I have two, so we multiply the amount by two, the price varies depending on who He will say that it’s cheap, but I’m always stuck with money and I couldn’t find any extra money, so I decided to “remember my youth” and change it myself again. Along the way, another problem arose. I knew that the CV joints on the Kalina were 2108, but the fact that the CV joint anthers on the Kalina were their own was news to me, and not just the anthers were different, but also the design was slightly different, such nonsense as a valve was introduced, as I understand it, this idea was made as if to allow the boot to “breathe”. Apparently they decided to show off their intelligence when they made the Kalina, a lot of other cars drive both foreign and domestic cars without any valves in the CV joint boots, but on the Kalina the engineers somehow decided to introduce all sorts of new products. In general, I began to think about what kind of boot to install, I googled the Internet, and threw fishing rods on the same drive with questions. In general, I collected the following information on the bottoms, boot 2108 fits the viburnum, boot 1118, according to some people’s comments, can allow water to pass through the valve, which is possible in principle, where there is air access there is access to water, owners of more recent viburnums say that they do not have such valves — I mean, the plant itself realized that it was screwed up and decided not to install this nonsense anymore. In the end, the advantage was more for installing anthers 2108. In general, I took both of them in the store just in case to figure out the place, the ones that I don’t install - then I’ll return them back anyway. In general, having studied both anthers, there were no great differences, and their height is approximately the same, it’s just that in the Kalinovsky one the narrow edge is made for installing a valve, and there are grooves for air, but otherwise everything is the same.
Another advantage in favor of anthers 2108 was that I bought silicone 2108, and only rubber ones from Kalinovsky were on sale, the silicone company, by the way, “Track” installed the same ones on its previous car, and they lasted for quite a long time, for several years for sure, and sometimes the rubber ones didn’t even last a year, in general I’m in favor of the silicone ones.
We unbend the locking on the hub nut - it is desirable but not necessary. We take a long pipe and a 30mm head, go up to the car and say “fix it quickly” otherwise I’ll hit you with the pipe, it’s a joke)) Someone needs to press the brake pedal, you can press it with a stick, it’s just reinsurance so as not to break anything in the gearbox . Use the pipe to turn the hub nut. Next, we climb under the car and loosen the two ball bolts (you can do this later with the wheel removed, but there may be problems; the wheel will turn, or maybe it won’t), then we loosen the wheel bolts. Jack up the car and remove the wheel. Unscrew the hub nut completely, remove it, unscrew the ball bolts completely, remove them. We pull the brake disc, the CV joint comes out of the strut, you can also turn the strut a little using the steering wheel, it will work out better. Cut off the old boot with a knife. So, how to remove the CV joint from the shaft, there are two ways, a hammer with a drift or a puller, I used to always knock it out, it’s like luck, then you quickly remove it or dig around, you also need to make sure that the second drive does not accidentally get out of the box. Now I decided to try the puller. There were two in the store, Voronezh and Kaluga. There were bad reviews on the Internet for a similar one to Voronezh, saying that the bolts break, etc., so I decided to take the more expensive one, Kaluga.
The first two times were unsuccessful, it wasn’t the CV joint that came off, but the puller itself, apparently it didn’t clamp it very well, but I was afraid to clamp it too hard so that the bolts wouldn’t break. The third time I clamped the bolts tighter and everything worked - the CV joint came off. What can I say about the puller, well, it seemed to me that this gadget is not very durable, from strong clamping there on the bolts the threads became crushed or the bolts themselves became crushed, they unscrewed at the end in general tightly, in general I conclude that for infrequent repairs it can and will do, and in service it will definitely break down quickly. But overall, I was still pleased that I didn’t have to hit with a hammer. What else I had to tinker with, the retaining ring on the shaft was quite difficult to remove, ideally it needs to be removed with something like expansion pliers, I don’t have that, but I really got into trouble with screwdrivers, but it took 4 hands and an assistant to remove it. Next, wash the shaft to remove dirt and old grease. We lubricate the hole in the boot a little so that it glides better and push the new boot onto the shaft, this is also not an easy task, the thrust ring interferes with tensioning, there are different options, one is to pull until the crap so that the boot climbs over the thrust ring and turns inside out and then turn it back out, or the second way is to carefully help the boot with a screwdriver. We put a new retaining ring on the shaft. Next, we put a little grease into the new CV joint and put it on the shaft, everything is not easy here either, it’s better to screw the old nut onto the CV joint and take a large sledgehammer, someone can do it alone, I’ve done it before, now I did it together, one holds against the CV joint, the other hits with a sledgehammer on the nut until the CV joint goes into place, this time they knocked quite a bit until it finally got into place. Then we add more grease, the more the better IMHO, we put on the boot, use a screwdriver to let air under the boot, in principle you can install clamps, the TRK silicone boots usually come with good clamps, but it is advisable to put them on with special pliers for these clamps (the seller’s tools are not expensive ), but there is one point, the viburnum has a thicker shaft than the 2108, so the small clamp may not fit, or rather, it will not be possible to snap it into place, so instead of the small one you need to put a universal one. Next, put the CV joint in the steering knuckle, coat the threads with graphite and tighten the hub nut, then put the ball in place, it’s also better to coat all threaded connections here with graphite. We put the wheel on and lower the car.
Let's get to work. Dismantling the CV joint
First of all, put the car on the handbrake (or install anti-rollbacks). Then we remove the wheel bolts and hub nut. The latter may not be supplied, so we use an extension cord. Next, place the car on a jack, lift its front part and remove the wheel. Then we find two bolts that secure the grenade to the steering knuckle.
Now we twist the steering wheel to its extreme position (so that the disc looks out of the wheel arch). Pull back the steering knuckle along with the shock absorber strut. Next, remove the outer part of the hub with the external “grenade”. If it is tight, you can use a hammer. But you need to hit through a wooden block, otherwise the part will be seriously damaged.
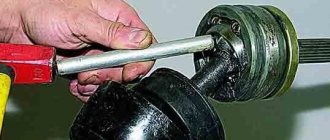
Next (if it is an external hinge) remove the old boot and clamp. Now you need to get the “grenade” itself out of the hub. To do this, you can use a puller or hit the CV joint with a hammer. In this case, you need to rotate its axle shafts.
If it is intended to replace the internal “grenade” on the Kalina, all operations are carried out in a similar way. The only thing is that the part is removed from the box using a pry bar, without hitting it with a hammer.
Repair methods
We have already found out that the main malfunction of the grenade is associated with a torn and damaged boot.
Accordingly, in order to fix the problem, you need to do something with this casing, which is shaped like a cone.
In the case of doing the repair yourself, there are 2 options:
- Emergency
. It is carried out when a breakdown catches you on the road. Literally in the field, it is necessary to partially reanimate the CV joint and its boot. In this case, the CV joint boot is not even fully replaced without removing the CV joint. But the method is still useful for emergency situations; - Garage
. Here you are already in the garage, you have a set of tools, a pit or even a lift at hand. Some are sure that there is no way to do without removing the hinge. It's a delusion.
Now we will talk about each repair method separately.
Both options can be used on various vehicles, be it:
- VAZ 2110;
- Lada Kalina;
- Renault Logan;
- VAZ 2114;
- Lada Priora;
- Chevrolet Niva (Shniva);
- VAZ 2115;
- Lada Granta, etc.
Yes, it is generally better to conduct such experiments on domestic cars, as well as on budget foreign cars. Their design is simpler, and spare parts are not so expensive if you suddenly need to correct your own mistakes.
But the price of a professional service for replacing the boot is quite impressive. This is another reason to do everything yourself.
How to extend the resource?
Typically, these bearings travel 250-300 thousand kilometers or more. They have a very durable construction. However, there are several factors that can significantly reduce their durability. This is the condition of the anther. It is because of this that water, dust, and sand get inside. As a result, the lubricant turns into a thick abrasive, which has a destructive effect on the bearing. How to prevent this? During operation, you should periodically check the condition of the boot on the CV joint. If it has cracks or tears, it needs to be replaced immediately.
Emergency repairs
Every motorist who cares about his own vehicle is simply obliged to know how wheel alignment is carried out. This largely prevents a number of problems during operation.
If they did not keep track, or the breakdown occurred unexpectedly, the driver felt the steering wheel creaking when rotating, or other characteristic signs of a violation of the integrity of the boot appeared, repairs need to be carried out.
An emergency repair method is relevant if trouble catches you on the road. But it is only suitable as a temporary measure.
The idea is to wrap the boot with film and secure it with electrical tape or a clamp. The film can be seen with a bag or rubber glove. This is no longer fundamentally important.
There are drivers who have traveled thousands of kilometers using a similar life hack.
If the boot ruptures, water, dirt, dust and sand probably managed to get inside.
Therefore, in the very near future the CV joint will begin to suffer greatly. The best solution in this situation would be to remove, wash, add lubricant, and install a new boot.