How to remove and replace the front bumper of LADA Kalina: photos and videos
Kalina rotten or installing front and rear bumpers _ of RussianTuning
Dismantling the front bumper of LADA Kalina is not an easy task and requires some knowledge. Removal is carried out for various reasons, but sooner or later everyone in a LADA car may encounter this.
The video shows the complete process of removing the bumper, although it consists of pictures, but in great detail:
Similar news
Reasons for removing the bumper
There are several reasons why you will need to remove the front bumper from Kalina. This is mainly due to physical destruction of both the part itself and the elements underneath it. Let's consider what factors are pushing LADA to begin this difficult task:
Road accident. Typically, damage to the front bumper due to a collision is the fault of the driver himself. A simple failure to maintain distance can cause disaster. Painting works. associated with paint fading will also require removal of the bumper.
Tuning. Installing a new body kit will require dismantling the front buffer.
A separate case may be dismantling the radiator. Damage to body parts. when the bumper is not damaged. Hitting an obstacle when the radiator frame is damaged from below.
All these reasons are pushing LADA to dismantle the front bumper. Many of them, not wanting to pay for removal at a car service, do this procedure with their own hands.
Radiator
The cooling system on the LADA Kalina car should be changed in cases when it has already started to leak or has been mechanically damaged.
There are no other prerequisites for its replacement. Sometimes drivers try to eliminate leaks with various additives such as cooling system sealant, most likely it will have a positive effect and the leak will stop, but it is worth noting that this additive is active with air and after using such an additive, the quality of the heater in the car usually decreases. The radiator
of the heating system begins to work worse and therefore it is better to simply change
the radiator
, and we will discuss in detail how to do this in this article.
It should be noted that removing the radiator
should be carried out in a cold car to avoid burns. If the car is warm, you should wait until it cools down.
The tool necessary to replace the radiator on LADA Kalina
:
Let's move on directly to replacing the radiator.
I would also like to give some useful advice: it is advisable to replace band clamps with worm clamps, as they are more reliable and easier to use.
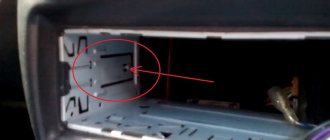
In order to replace the headlight, open the hood. First, remove the radiator grille. To do this, use head 0 to unscrew the three bolts on top of the grille. We remove the grille by removing the latches from the bumper.
Now remove the bumper. To do this, use a Phillips screwdriver to unscrew the four screws of the upper bumper mounting.
Unscrew the two screws securing the lower grille. And we take it out.
We unscrew two screws from below, where the grille stood.
In the wheel arches, on both sides, we unscrew two screws securing the fender liners.
At the bottom of the bumper, also on both sides, we unscrew one more screw. There, at the bottom, with head 0 we unscrew the three bolts securing the bumper to the body.
We move the edges of the bumper out of engagement with the wing. First with one. Then from the second side.
If you have fog lights, they will need to be removed.
connectors.
Using head 3, unscrew the four nuts that secure the bumper amplifier to the body. Two on each side. And we take it off.
Use a Phillips screwdriver to unscrew the screw. And the head is the headlight mounting bolt on top.
Lada Kalina replacement horn
Then, using the same key, unscrew the two lower mounting bolts.
We move the headlight towards ourselves. Turning counterclockwise, remove the socket with the turn signal lamp.
Now we install the new headlight. We put on the connector. Insert the base with the turn signal light. We tighten the bolt and screw of the upper fastening. And we squeeze them. Then the lower mounting bolts. Reinstall the bumper reinforcement. We screw it on. We put the connectors on the fog lights, if any.
We put the bumper in place. We attach bolts from above. We clamp them. We fix the bumper fenders. We screw in the two remaining bolts securing the bumper to the body. We fix the fender liners with screws. Install the radiator grille. We fasten it with bolts.
Then we fix the bumper from below. We install and screw the bottom grille.
To remove the radiator grille on LADA Kalina, we need two screwdrivers: a Phillips screwdriver and a regular flathead screwdriver. Below we will look at the detailed steps for removing this part from the car to replace it.
- First of all, open the hood, and use a Phillips screwdriver to unscrew the three bolts securing the grille itself and remove them. Please note that there is a washer under each bolt, remove them carefully so as not to lose them.
- After this, we move the grille a little to the side, pulling it towards us and using a flat screwdriver we bend the plastic clamps on both sides and carefully, overcoming the obstacle of these clamps, remove it.
Reasons for removing the bumper
There are several circumstances why it will be necessary to remove the front bumper from Kalina. Basically, this is due to physical destruction, both of the part itself and of the parts underneath it. Let's look at what reasons push the owner to begin this difficult task:
- Road accident. Typically, damage to the front bumper due to a collision occurs through the fault of the driver himself. Simply not keeping your distance can be a prerequisite for failure.
- Painting works. associated with paint fading will also require removal of the bumper.
All these prerequisites push the owner to dismantle the front bumper. Many of them, not wanting to pay for removal at a car service, do this function with their own hands.
Removing the front bumper: step-by-step instructions
- First you will need to unscrew the three screws holding the upper radiator trim.
- The second stage of the work is removing the radiator trim. To do this, the front bumper fastenings in the form of two latches located in the corner of the right wheel arch must be disengaged from the brackets.
- Using a Phillips screwdriver, unscrew the three self-tapping screws of the upper fender liner fastening.
- With the “tenth” wrench, remove the three bolts securing the shock absorber to the body.
- The two screws holding the grilles can be unscrewed using a Phillips screwdriver, after which the radiator grille is removed.
- the attachment to the beam is removed in the same way.
- a “10” wrench is used to unscrew the two outer bolts, and a screwdriver is used to unscrew the two middle screws of the upper shock absorber mounting.
- The ampere sidewall flange located on the body bracket is removed. The same operation is performed on the other side of the car.
- The front shock absorber is removed.
- move on to the four bolts that hold the energy-absorbing beam and remove the beam.
To remove the Kalina bumper you will need:
Installation of the mesh, method of its fastening
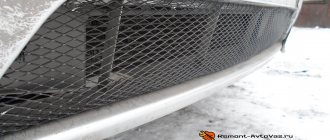
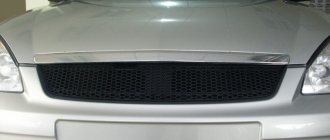
The lower radiator grille is pressed to a part called the “bumper” using self-tapping screws. They will need to be unscrewed, but the grid should remain in place - then a mesh blank is placed on it. Using ties, we press the protective mesh to the plastic structure. Lastly, you need to tighten the screws that should hold the grille and mesh together.
The result of tuning Kalina-2 - a protective mesh was installed
VAZ continues to improve the design of mass-produced cars all the time. However, it is unlikely that they will change the shape of the radiator grille - this will require making new stamps, etc. Well, it would be difficult to carry out the modifications that we discussed here in mass production conditions. Conclusion: anyone who needs it can install the protective net themselves. There are no other options available.
In fact, large mesh grilles are used on many modern cars. These include: Kia Rio hatchback, Renault Duster crossover, Volkswagen Turan minivan, etc.
Installation of bumpers on LADA Kalina
Installing the bumper on LADA Kalina, both front and rear, is performed in the reverse order.
Before starting work, it is imperative to clean the places where the bumper is attached to the body from dirt and rust. The same applies to the attachment points of the lower grille.
When reassembling the lower grille, as well as the bumper device itself, it is necessary to pay attention to the exact fit of all parts, so if it is done poorly and does not get “in place,” you can only spoil very expensive parts.
The instructions for the car will help you put the front or rear shock absorber back correctly, which you should always have with you. So, for example, if the front bumper mounts cause problems, you can always find answers to the most difficult questions in it. In especially difficult cases, you can ask for help from a more experienced car owner who has already changed this element several times.
What is needed to remove the front bumper of LADA “Kalina”
It is better to carry out work on dismantling the bumper in the inspection hole, because part of the fastenings for this part are located at the bottom of the car. If there is no hole or lift, the job will not be impossible, but you will have to unscrew some nuts by feel or lie on the ground to see the attachment points. It is better to remove and install the bumper with an assistant who can hold one side while you unscrew the fastenings of the other. If you perform the operation yourself, you may not be able to hold the part, which as a result will fall and be damaged. To remove the front bumper of LADA “Kalina” you need:
- crosshead screwdriver;
- socket or socket wrench 10;
- extension;
- wrench (preferably with a ratchet, which will make the work much easier).
Currently, two generations of Kalina have been produced, differing in the way the bumper is mounted. Accordingly, the procedure for removing this part is slightly different.
Advice: before removing the bumper from the Kalina (regardless of the modification), you should remove
ground from the battery to avoid short circuits when disconnecting electrical appliances.
Cooling system upgrade
The main disadvantage of the Lada Kalina SOD is the appearance of air locks, which can cause overheating and failure of the power plant. In order to avoid such situations, car owners upgrade the cooling system themselves. Several methods are used for improvement:
- installing a 6-hole thermostat;
- adding a coolant filter;
- installation of a shut-off valve for the antifreeze inlet pipe on the heater.
The system can also be supplemented with a button for turning on forced engine cooling with a fan, and tubes for steam removal can be added.
To prevent air locks, some car enthusiasts recommend removing the valve from the valve cover. But this can lead to overheating and jamming of the motor. The problem can be solved by making changes to the software, reducing the boiling point to 98 degrees.
The most effective way to modernize the SOD is considered to be modification of the steam outlet. A plug is installed in the branch pipe of the expansion tank connecting it to the large circuit. The fitting is released and connected to the lower hose of the stove through a tee. The thin hose from the throttle valve is plugged. The fitting is connected to the expansion tank, into the upper part of which an additional nipple is cut. You can use a tee instead. As a result, the steam removal is transferred to the small circle.
Installing a 6-hole thermostat allows you to maintain a stable temperature in the system and improve the performance of the interior heater. To prevent blockages, the SOD is equipped with a coolant filter. In the summer, installing an additional stove faucet will help. Some car enthusiasts install another pump. As a result, the fluid circulates faster, the engine warms up in a shorter period of time, and the risk of overheating of the power unit is reduced.
Features of dismantling
Before moving on to the question of how to remove the front bumper of LADA Kalina, you need to do some preparatory work. The dismantling procedure is carried out in a viewing hole or using a lift, since many of the fixing elements are located below. If this is not possible, you will need to unscrew the bolts blindly. An alternative is to position yourself on the ground to visualize the fastening points.
We recommend performing the activities with a partner. An assistant will be able to hold one part while you unscrew the fasteners from the Kalina
. Independent actions do not guarantee the quality and safety of the process.
- Extension.
- Screwdrivers - Phillips head and standard version.
- Special head for 8.
- Key for 10.
- Drive with an additional ratchet.
Today, the manufacturer supplies the market with two modifications of Kalina vehicles. They differ from each other in clamps. Therefore, there are some differences in the order of dismantling the part.
Eliminating air jams
The design of the cooling system in the VAZ-1118 has one unpleasant drawback - the tendency for the circuit to become airy. This can lead to overheating and engine damage. Here we recommend resorting to minor system upgrades. You need to act when the liquid is drained.
- First we replace the thermostat. Instead of a standard product with five holes, we install a component with six such holes.
- We add a refrigerant filter to the circuit.
- We install a shut-off valve on the pipe leading to the stove.
These actions are not capable of radically transforming the system. Experienced owners of LADA Kalina have moved further in this matter. They add steam exhaust pipes, install a forced fan activation button, etc. To install the designated outlet, the diagram looks like this: we cut a tee into the pipe leading to the expansion tank. It is connected through a separate hose to the pipe of the throttle body heating unit. We place the second tee in the return from the radiator of the heating system and connect it with an expansion tank. Now you know how to remove, as well as how to change the radiator, and fix other problems yourself.
Step-by-step removal procedure for a 1st generation car
If you are in a LADA vehicle of the first generation LADA, to dismantle the Kalina front bumper you will need to perform the following steps:
- lift the hood lid;
- unscrew the three screws that are responsible for fastening the plastic radiator grille;
- remove the radiator mesh;
- unscrew the 2 screws located on the bottom mesh and remove it;
- disconnect the fog lamp connectors;
- behind the grille there are two screws that secure the bumper, unscrew them;
- lift the car on a lift or move to a special viewing hole. In this position, you need to remove 3 central and 2 side screws, as well as 2 screws located in front of the wheel arch;
Why is the LADA “Kalina” bumper removed?
- While driving, and even in an open parking lot, parts of the car are exposed to constant physical and chemical attack. Therefore, the decorative paintwork of the bumper loses its attractive appearance and requires restoration, which is carried out by removing the bumper.
- The tough and brittle carbon fiber of the bumper can crack even during a minor accident and require repairs. This is especially true in winter, when at low temperatures carbon fiber becomes especially fragile and can burst even with relatively light contact with a snowdrift. Restoring the paintwork and soldering the bumper material requires dismantling this part from the car.
- Kalina
bumper is severely damaged, it must be replaced with a new one, which also requires dismantling the old part. - You have to remove the bumper to replace the Kalina headlight units.
- Tuning a car's front body kit usually requires dismantling the bumper in order to modify it, paint it, or replace it with a finished tuned product.
The main reasons for changing the grille
Tuning and grille removal are necessary to give the car an original appearance. Car owners should know how to replace a part if cracks appear on it. It should be noted that this design has:
- resistance to large temperature changes;
- individuality;
- low price.
Tuning Priora se involves installing an “aggressive” grille. This model will give the vehicle a sporty look by increasing radiator cooling. Some people at LADA LADA prefer to tune the factory model. For this you can use chrome strips and moldings. They stick easily to the ribs.
- hacksaw;
- scissors;
- double sided tape;
- epoxy.
The radiator grille from Priora se can be easily tuned with your own hands. To do this, you will need to cut out the VAZ badge using a hacksaw. Then you will need 2 moldings, which are pre-attached to the LADA plane, marked and cut to size. This element is attached to the grille with tape. Moldings must be wrapped with masking tape in advance. This will prevent damage to the main element.
The next step is to dilute the epoxy glue in a container. Moldings and grilles
radiator Then apply the LADA strips, press them down and hold them for a while. After the glue has dried, trim the Niva edges. A file is used for this.
Work algorithm
Thus, to dismantle the unit, you will need:
- key to 10;
- T20 star key.
You will need a T20 star key
The procedure for installing tuning on the Lada Kalina is as follows:
- Using a wrench, unscrew the 6 bolts at the top of the bumper and the 3 bolts holding it at the bottom.
- Using the T20 key, remove 6 screws, 4 of which are located in the lower part, and 2 of which secure the fender liners.
- After unscrewing all the screws, bend the top grill a little, and then the entire assembly towards you.
- The structure at the bottom of the Kalina radiator is pressed against the bumper using self-tapping screws. They must be unscrewed, but the product should remain in place - in the future, a mesh blank will be placed there.
- Using ties, press the mesh blank against the structure.
- After securing the tuning, tighten the screws that will hold the entire structure. The remaining components are assembled in reverse order.
There is another option for fixing the tuning - soldering the mesh blank to the radiator frame. Additionally, the use of rivets is provided. The third, not so durable, but more universal for every driver fastening method is carried out using a heat gun or glue. Before fastening, you need to paint the workpiece in the body color and let it dry.
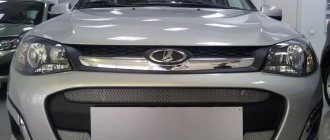
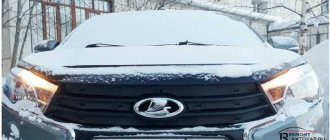
Protective grille for Kalina 2 radiator
To make working with metals easier, safety precautions must be observed. To avoid metal filings coming into contact with your skin, you need to protect your hands with plumbing gloves. To cut out the desired part of the tuning, first apply markings to the workpiece (ordinary chalk will do). It will be very convenient to cut the material with small side cutters. However, after the work is completed they will be unsuitable for further use. They cost only about a hundred rubles.
Tuning, which is easy to do with your own hands, is problematic to perform in mass production. Since you can’t count on tuning the radiator grille in the near future, you need to modify it yourself.
Radiator grille "Priora"
Replacing an element such as a grille
The “Priora” radiator often appears in the minds of the LADA car of this model. This car's grille doesn't have the most attractive appearance. To improve the appearance of the car, car owners often resort to tuning. Designers of automobile corporations never cease to amaze us with new forms and models of vehicles. Small details play an important role in the overall appearance. The radiator grille is no exception.
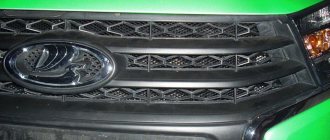
There are always large holes on the bumper. They serve to keep the engine cool and the engine compartment to be freely blown and ventilated. A mesh is placed behind the radiator grille. It is designed to protect the insides of the car from various debris, insects, and small birds that can get under the hood while driving. The mesh performs a protective function. In tandem with the radiator grille, the mesh also plays a decorative role. This is why craftsmen love to experiment with this part of the body and make the car unique.
If you install a new grille on the LADA Priora, you can significantly change its appearance. Before you begin work on improving the design, you need to know how to remove the grille
. Consultation with a specialist will not be superfluous. An experienced master will give advice, make recommendations and share the secrets of performing the work.
Replacing the Priora radiator grille is a simple process that you can do yourself. The process will depend on which grille you plan to replace the old one with. Before starting work, disconnect the wires from the battery and remove the engine splash guard.
There are two ways, with and without removing the bumper. To remove the grille on a Priora, you need to press on the washer that secures the bumper, and then remove the washers that hold the grille directly.
The LADA Priora se radiator grille is attached with nine self-tapping screws, so there is no need to remove the bumper. Just open the hood and pull it out.
Movie star effect
Fukuichi is no stranger to controversy. In late 1980, he caused a storm with the introduction of the first generation of the Toyota Previa utility vehicle, which was dubbed the "egg minivan" due to its unusual and somewhat "silly" rounded appearance.
“Even though the design is controversial, after a while you get used to it,” he said.
The designer's credo is to take risks to stand out from the competition, much like a movie star plays on what others perceive as a flaw in his or her appearance while stunning top models are quickly forgotten.
For Lexus, that "flaw" in appearance is the spindle-shaped grille, which made its quiet, tentative debut on the Lexus CT in 2010 and was subsequently incorporated into the Lexus GS redesign (see photo gallery "The Evolution of the Lexus Face").
This upset more than a few people. In mid-2012, at a shareholder meeting, one angry Toyota shareholder said that the new "face" of Lexus was giving the brand a bad name. Even some Lexus insiders associate the new look with an ugly deep-sea creature.
Lexus LF-CC concept shown at the Busan International Auto Show, South Korea, May 2014. A former Rolls Royce designer once said that the grille, which is pinched in the middle, is a "neither design" that creates an "uncomfortable" tension in the lines and shape of Lexus cars.
Photo credit: BLOOMBERG.
People outside the company also join in the criticism. A former Rolls Royce designer says the grille, which is pinched in the middle, is a "no-no design" that creates an "uncomfortable" tension in the car's lines and shape. A US design professor says the controversial-looking grille is similar to the mouth of the "predator" from the science-fiction film Alien.
However, this radical look also has its fans. Chief Designer at Nissan Motor Corp. says the company's premium brand, Infiniti, has quietly scrapped plans to adapt the spindle grille because Lexus beat them to it.
And this opinion really has a basis; Lexus dealer showrooms note that there is a positive increase in attractiveness. Since 2010, Lexus' global sales have grown 42 percent to 583,000 units sold last year.
Fukuichi is philosophical about his bold designs. “I have nothing to lose but my life,” he says. "I'm ready to leave at any time and I'm ready to resign if it doesn't work out."
Should I change the radiator grille on the Priora?
Lattice
The radiator on Priora is easy to tune. First you need to figure out how to remove the radiator grille.
Sequential steps for replacement
For the work you will need a screwdriver and an awl. Auto mechanics distinguish 2 methods for dismantling the grille.
- The bumper is removed.
- The bumper cannot be removed.
At the first stage, the ground wires are disconnected from the battery. Then the engine mudguard is removed. To do this, you will need to unscrew the 3 bolts from below that attach the bumper to the protective covers. The next step involves removing:
- screws securing the bumper to the front of the body;
- 2 screws for fixing the left and right headlight housings;
- 2 screws on the right and left side of the arches, they attach the bumper to the front fenders.
Kalina 1. Removing the bumper grille (top and bottom).
Removing the grille is completed by removing the bumper. If you remove the Priora se grille using the second method, then you will need to press the locking washer located near the bumper. Then the washers securing the grille are removed. Otherwise, the hood is raised and secured with a stop. After this, the screws securing the combination lights to the front panel are removed. The lights themselves are removed, the electrical wiring is disconnected from them. Using a screwdriver, turn the locking washers 1/4 turn. Then the old grate
The radiator is tilted forward, pulled up and removed.
Replacing and tuning the grille on Priora se are processes that require attention, since this unit provides maximum air flow to the radiator. The procedure will not take much time if you install a branded radiator grille. To secure it, you will need special parts. To do this, it is recommended to determine in advance the location on the bumper where this unit will be installed. In this case, a sealant is used.
Making a part with your own hands
The radiator grille from Priora se is easy to make yourself. To do this you will need the following materials:
- putty;
- fiberglass;
- net;
- dye.
First, the old unit is dismantled. The middle of the part is cut out with a jigsaw. To carry out tuning, holes are drilled in the mounting points. Then you will need a thin and bendable material - plastic or cardboard. It goes around the internal contour of the future unit. It is recommended to note how many centimeters the part will go inside. Based on the obtained dimensions, cardboard or plastic is cut.
Lattice
The radiator is well cleaned with sandpaper and degreased. A solvent is used for this. It is applied to the place where there is contact with the epoxy resin. Otherwise the connection will be loose. To obtain reliable contact and the desired thickness, you will need to repeat this process. As each layer dries, the cardboard or plastic comes off the product. This will allow you to find out whether the material is tightly glued. The next step is to level the Niva surface. For this, putty is used.
ODS device of Lada Kalina
Kalina 1 and Kalina 2 cars use a liquid cooling system. It consists of an engine jacket, radiator, electric fan, pump (water pump), expansion tank, thermostat and connecting hoses. The coolant moves through two circulation circuits. In a small circle, antifreeze circulates only through the engine jacket, while in a large circle, the liquid passes through the radiator.
Expansion tank
Used to pour liquid into the system. It is made of heat-resistant plastic of a translucent color to allow you to control the level of antifreeze. There is a special pipe on the top through which the tank is connected to the radiator steam outlet.
The tightness of the entire system is ensured by the valve cover, which has inlet and outlet valves. The latter is designed to maintain pressure in the SOD above atmospheric pressure. Due to this, losses in the form of steam are reduced, and the boiling point of the working fluid increases. The exhaust valve of the cover opens when the pressure rises to 1.1 bar, and the inlet valve opens when the pressure drops to 0.13 bar and the engine cools down.
water pump
This is a centrifugal pump with blades. It is belt driven from a crankshaft pulley and is included in the gas distribution system. The pump is made of aluminum. This unit cannot be repaired; if it fails, it can only be replaced. Rotation occurs due to a double-row non-separable bearing; its high-temperature lubricant is designed for the entire service life. There is a toothed pulley at the front and an impeller at the rear.
Thermostat
Designed to redistribute coolant flows, it contains a temperature-sensitive element and two valves. When the engine cools down, one of the thermostat valves is in the closed position, and fluid circulates through the motor jacket - only a small circuit is used. As the temperature reaches 85 degrees, the second valve begins to open slightly, allowing antifreeze into the radiator and closing the bypass channel. Full opening occurs at a temperature of 100 degrees. In this case, all the liquid begins to pass through the cooler.
Engine radiator
The heat exchanger can be monolithic aluminum, tubular, or plate type. Its device uses two plastic tanks that are connected by tubes. The upper one is inlet, and the lower one is outlet, through which the cooled liquid is sent back to the engine. Near the first there is a steam outlet connected to the expansion tank. The radiator on Kalina is complemented by an electric fan. There is a drain plug at the bottom of the outlet tank.
The cooling system is complemented by a heater radiator, which is integrated into the ODS and is used to heat the air in the cabin, since hot antifreeze also passes through it. The controller monitors the coolant temperature using a sensor that is installed in the cylinder head and transmits readings to the instrument panel. To transmit a signal to the controller, a sensor installed on the exhaust pipe, near the thermostat, is used.
Differences between modifications with air conditioning
Some configurations of the Lada Kalina are complemented by air conditioning, which is part of the climate control system and is used to cool the air in the cabin. The device cannot operate if the outside temperature is below 5 degrees, the engine is not running, or the heater fan is on. The air conditioning compressor is driven by the engine, and this is the main disadvantage of the installation.
Tools required for dismantling
Replacing Klin Renault bumpers is easy to do when properly selected tools are used. These include:
- wrenches 8 and 10 (wrench heads);
- Phillips screwdriver, both long and short;
- small ratchet;
- wrench and head 13, used for unscrewing the shock absorber reinforcement beam when removing the headlight.
This set of tools must be prepared in advance so as not to select it as the work progresses. In addition, using any other “suitable” tool is highly undesirable, since in this case you can damage the body of the car itself and the damper. As a result, you will have to spend extra money because of such a trifle.
Basic radiator malfunctions
Malfunctions of this Kalina unit do not occur so often and are the result of wear and tear due to natural causes of the car owner’s negligence. There are two most common types of problems:
- coolant leak;
- coking of cavities inside the radiator.
Leaks are dangerous because a decrease in coolant level leads to an increase in engine temperature. This leads to overheating and jamming of the motor. A leak of hot antifreeze can be dangerous. The fluid in the system is under pressure, a leak can form a fountain, and contact of hot antifreeze on exposed skin will cause burns.
Coking disrupts the antifreeze circulation process. As a result, the lower part of the radiator begins to cool, and then the entire heat exchanger. The liquid will not cool, causing the engine to overheat. In most cases, the cause of coking is ordinary scale. This happens when tap water is poured into the SOD. Less commonly, blockages occur due to mixing oil and antifreeze. In this case, the reason is the loss of tightness of the cylinder head gasket.
At an early stage, coking is difficult to detect. In advanced cases, mixing oil and antifreeze forms a consistency similar to jelly, which makes the heat exchanger tubes difficult to pass or completely impassable.
Installation of bumpers on LADA Kalina
Installing the bumper on LADA Kalina, both front and rear, is performed in the reverse order.
Before starting work, it is imperative to clean the places where the bumper is attached to the body from dirt and rust. The same applies to the attachment points of the lower grille.
When reassembling the lower grille, as well as the bumper device itself, it is necessary to pay attention to the exact fit of all parts, so if it is done poorly and does not get “in place,” you can only spoil very expensive parts.
The instructions for the car will help you put the front or rear shock absorber back correctly, which you should always have with you. So, for example, if the front bumper mounts cause problems, you can always find answers to the most difficult questions in it. In especially difficult cases, you can ask for help from a more experienced car owner who has already changed this element several times.
Toyota Passo
photo: youtube.com
Just a failure! Looks like Chinese consumer goods! Well, why did this need to be done?! And also to sculpt this lattice for her...
Bonus: whoever says that the Lada 2105 was not in the trend of large false radiator grilles, let him be the first to throw a stone at me:
The grille actually occupied most of the front of the car...
And also, if we talk about domestic models... Modern models have grown significantly in terms of design, so in appearance they can probably compete with foreign analogues, we suggest looking at a small patriotic selection of Russian cars with cool grilles (we did not include them in the top only for the reason that modern radiator grilles on domestic cars are structurally separated by elements of bumpers and cannot in the full sense be trend elements of the global gigantomania in the direction of large false grilles. But the fact that they were made stylish and beautiful - we have no questions here.), this is in our opinion, of course the same Lada products:
Replacing the rear bumper
Replacing the rear bumper of LADA Kalina has its own characteristics that are worth studying before removing the rear bumper from this car.
Hatchback, sedan, and Niva bodies are equipped with bumpers of different configurations, which have their own characteristic mounting features. As a result, when installing them, it is necessary to perform some additional operations that differ from the standard algorithm of actions.
As for the step-by-step instructions for performing this operation, they are as follows:
- The first step is to remove the standard mudguard. To do this, unscrew three screws in the wheel arch of the rear wheel with a Phillips screwdriver and remove the mudguard.
- From the bottom of the car, use a screwdriver to unscrew the screw of the lower fastening of the mudguard and dismantle the mudguard itself. The mudguard located on the left wheel is also removed in the same way.
- Use the “tenth” head to unscrew the lower fastening bolts.
- open the trunk lid and use the same head to remove the four upper mounting bolts.
- With the application of force with both hands, remove the top of the body bracket from the side of the bumper. We repeat this operation on the other side of the machine.
- dismantle the shock absorber, unscrew the three nuts on the “10” energy-absorbing beam of the rear damper and also dismantle it.
The bumper is the part that needs replacing most often. The fact is that it is often damaged in an accident, which requires repair and painting work. Naturally, it is not always necessary to contact specialized repair organizations to carry them out, since general skills are quite sufficient to perform such work. That is why, how to remove
The bumper on
Kalina
needs to be known to everyone in the LADA car of this brand.
In addition, replacing the front bumper of a Kalina car may be required in conditions of remoteness from populated areas and, accordingly. In this case, other than replacing the failed unit yourself, there is no way to perform this repair. Also, dismantling the shock absorber may be necessary during tuning.
Removal Guide:
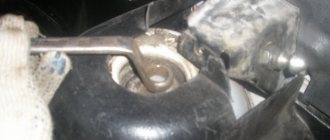
- And one more screw is located under the bottom, on the right and left sides:
- Now we take a ratchet and a 10mm socket and unscrew the three bolts securing the bumper from below, two of which are on the sides and one in the middle. The photo below shows everything in more detail:
- Next you need to remove the radiator grille, more about this is written here.
- And unscrew the 4 bolts securing the front bumper of Kalina, which are located under the grille:
- Then we take out the lower plastic decorative grille, which is located under the license plate. It is fastened with two bolts, I think there is no need to describe this, everything is clear. The only thing is that you will have to make a little effort to pull it out, because it is still secured with latches. Just pull harder.
- And in that place, actually under the very number, you will need to unscrew two more screws:
- In fact, everything is ready, all that remains is to grab each edge of the front bumper and pull it towards you, tearing it off the latches along the edges, as shown in the picture below:
After the work has been done, the bumper should be easily removed from Kalina without any difficulty, especially since it is quite light, so outside help will not be needed. If you have any questions about this repair of Kalina, ask below in the comments, we’ll sort it out! Installation or replacement with a new one occurs in the reverse order of removal. After I put everything in place, I removed the gaps by tightly filling the bumper on each side with my hand, and now everything is fine, there are no gaps or protrusions.
Removing the front bumper of a LADA Kalina is not a common task and requires some knowledge. Removal is carried out for various reasons, but at some point every car owner may encounter this.
The video shows the complete process of removing the bumper, although it consists of pictures, but very carefully:
Kalina front bumper
The body design of the LADA Kalina car has specific features that require the mandatory removal of the damper even when simply replacing the headlights. This is due to the fact that the bracket mount is attached here in such a way that it covers the entire area in the shock absorber area, thereby complicating access to other structural elements of the car.
As a result, replacing the LADA Kalina bumper is far from the only reason for its dismantling. The bumper of this model car is made of plastic, so when working with it, extreme care must be taken to avoid damaging it.
Remember that before starting work, it is imperative to disconnect the battery terminal in order to avoid electric shock.
Types of metal mesh available commercially
First of all, we note that we are talking here only about the diamond-shaped mesh, which is made from a solid metal sheet. Another mesh suitable for auto tuning can be woven, but its cells are square in shape. The horizontal pitch of the diamond-shaped mesh and its vertical pitch have a ratio of “2 to 1”, that is, when the height of the diamond is 5 mm, its width is 10 mm. Note that the largest pitch of a mesh made of aluminum can be 16 mm.
Aluminum diamond-shaped mesh is usually painted with polymer enamel. The following color options are available: black, silver, white. Aluminum coated with zinc is practically never found, but galvanized steel mesh is available in retail.
Extreme caution should be used when working with metal. Without protecting your hands with plumbing gloves, there is no point in even touching any metal mesh
Markings are applied to the surface of the workpiece, for which you can use ordinary chalk. Small side cutters are suitable as scissors, however, after cutting, all you have to do is throw them away (another minus 100-120 rubles).
Installing additional radiator protection is a labor-intensive operation, but perhaps it is also the simplest if we consider all the modernization methods available to the owner. Even changing the backlight bulbs will not be easier than performing the modifications mentioned above. So, we wish you successful tuning. And let the owner evaluate the feasibility of its implementation.
Conclusions and recommendations
Replacing a bumper on a LADA Kalina is not a very complicated operation, which is why some experienced LADA drivers claim that doing this is no more difficult than installing a new mudguard. In this case, it is necessary to be very careful and assembled so that it is dismantled and installed back so that its main parts are not damaged. If you meet this requirement, your car will be used for a long time without any major breakdowns.
Sources:
https://site-car.ru/kak-snyat-i-ustanovit-radiator-na-kaline/ https://nadouchest.ru/kak-snjat-nizhnjuju-reshetku-radiatora-kalina/ https://avto- idea.ru/sovety/kak-snyat-peredniy-bamper-lada-kalina/ https://maxmot.ru/kak-snyat-reshetku-radiatora-na-priore/ https://infokuzov.ru/kuzov/zamena- bampera-lada-kalina